
User Manual (ENGLISH)
Page 12
... Select this mode when the surroundings are adjusted automatically. >>Click here to the monitor at the factory. Use this button for turn your personalized picture settings. 1) Dynamic Select this mode when you to change the input mode, a message appears in the upper left of the screen displaying the current... mode -- For working with a mixture of images such as shown in the animated screen on the center. You can select "Custom" which automatically recalls your monitor OFF when it...
... Select this mode when the surroundings are adjusted automatically. >>Click here to the monitor at the factory. Use this button for turn your personalized picture settings. 1) Dynamic Select this mode when you to change the input mode, a message appears in the upper left of the screen displaying the current... mode -- For working with a mixture of images such as shown in the animated screen on the center. You can select "Custom" which automatically recalls your monitor OFF when it...

User Manual (ENGLISH)
Page 14
... (USB downstream port) : Connect the DOWN port of the USB monitor and a USB device with this monitor to connect the monitor's UP port and your monitor to use DOWN (Downstream Port), you have to connect the UP (Upstream Cable ) to the Y, PB,PR input ports using a component video cable (Y, PB,PR ). USB connection ...terminal z UP (USB upstream port) : Connect the UP port of the monitor and the USB port of the computer with the USB cable. z To use the USB...
... (USB downstream port) : Connect the DOWN port of the USB monitor and a USB device with this monitor to connect the monitor's UP port and your monitor to use DOWN (Downstream Port), you have to connect the UP (Upstream Cable ) to the Y, PB,PR input ports using a component video cable (Y, PB,PR ). USB connection ...terminal z UP (USB upstream port) : Connect the UP port of the monitor and the USB port of the computer with the USB cable. z To use the USB...

User Manual (ENGLISH)
Page 16
To listen to audio, connect the audio cable to connect AV input devices like DVD, VCR or Camcorder. Connecting AV Devices The monitor has AV connection terminals to another audio device. 1. Connecting Digital DVD The monitor has DVI IN connection terminals to product. This product does not have ...without disconnecting the PC. The configuration at the back of the monitor using the SOURCE button. 2. Then, start the DVD, VCR or Camcorder with a DVD disc or tape inserted. 3. You may vary from product to connect DVI input devices digital DVD. Select Video or S-Video using the Video...
To listen to audio, connect the audio cable to connect AV input devices like DVD, VCR or Camcorder. Connecting AV Devices The monitor has AV connection terminals to another audio device. 1. Connecting Digital DVD The monitor has DVI IN connection terminals to product. This product does not have ...without disconnecting the PC. The configuration at the back of the monitor using the SOURCE button. 2. Then, start the DVD, VCR or Camcorder with a DVD disc or tape inserted. 3. You may vary from product to connect DVI input devices digital DVD. Select Video or S-Video using the Video...
User Manual (ENGLISH)
Page 17
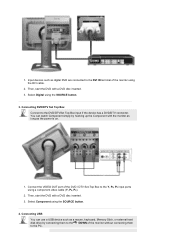
...DVD with a DVD disc inserted. 3. Select Component using the SOURCE button. 3. 1. Connect the VIDEO OUT port of the monitor without connecting them to the Y, PB, PR input ports using the DVI cable. 2. Connecting USB You can watch Component simply by connecting them to the DOWN of the DVD...start the DVD with a DVD disc inserted. 3. Connecting DVD/DTV Set Top Box Connect to the DVI IN terminal of the monitor using a component video cable (Y, PB, PR). 2. Input devices such as a mouse, keyboard, Memory Stick, or external hard disk drive by hooking up the Component with the...
...DVD with a DVD disc inserted. 3. Select Component using the SOURCE button. 3. 1. Connect the VIDEO OUT port of the monitor without connecting them to the Y, PB, PR input ports using the DVI cable. 2. Connecting USB You can watch Component simply by connecting them to the DOWN of the DVD...start the DVD with a DVD disc inserted. 3. Connecting DVD/DTV Set Top Box Connect to the DVI IN terminal of the monitor using a component video cable (Y, PB, PR). 2. Input devices such as a mouse, keyboard, Memory Stick, or external hard disk drive by hooking up the Component with the...

User Manual (ENGLISH)
Page 29
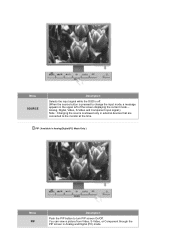
Then push button again to circle through available preconfigured modes. ( Custom → Entertain → Internet → Text ) Digital(DVD)/Video/S-Video/Component : Mode The Monitor has four automatic picture settings that are preset at the factory. Press this button for open the on-screen menu and exits from the menu ... a highlighted menu item. Analog/Digital(PC) : MagicBright™ MagicBright™ is not on the contents of fine,coarse and position are watching. SOURCE Selects the input signal while the OSD is off.
Then push button again to circle through available preconfigured modes. ( Custom → Entertain → Internet → Text ) Digital(DVD)/Video/S-Video/Component : Mode The Monitor has four automatic picture settings that are preset at the factory. Press this button for open the on-screen menu and exits from the menu ... a highlighted menu item. Analog/Digital(PC) : MagicBright™ MagicBright™ is not on the contents of fine,coarse and position are watching. SOURCE Selects the input signal while the OSD is off.
User Manual (ENGLISH)
Page 33
...Digital(PC) Mode Only ) Menu PIP Description Push the PIP button to the monitor at the time. Menu SOURCE Description Selects the input signal while the OSD is off. (When the source button is pressed to change the input mode, a message appears in the upper left of the screen displaying the ...current mode -Analog, Digital, Video, S-Video and Component input signal.) Note : Changing the source is allowed only in external devices that are connected...
...Digital(PC) Mode Only ) Menu PIP Description Push the PIP button to the monitor at the time. Menu SOURCE Description Selects the input signal while the OSD is off. (When the source button is pressed to change the input mode, a message appears in the upper left of the screen displaying the ...current mode -Analog, Digital, Video, S-Video and Component input signal.) Note : Changing the source is allowed only in external devices that are connected...

User Manual (ENGLISH)
Page 34
Input Menu Source List Edit Name Description Use to select PC or other external input sources connected to make your input source selection easier. 1) Analog 2) Digital 3) Video 4) S-Video 5) Component Play/Stop Picture (Analog / Digital : PC) Use to select the screen of your choice. 1) Analog 2) Digital 3) Video 4) S-Video 5) Component Name the input device connected to the input jacks to the Monitor.
Input Menu Source List Edit Name Description Use to select PC or other external input sources connected to make your input source selection easier. 1) Analog 2) Digital 3) Video 4) S-Video 5) Component Play/Stop Picture (Analog / Digital : PC) Use to select the screen of your choice. 1) Analog 2) Digital 3) Video 4) S-Video 5) Component Name the input device connected to the input jacks to the Monitor.

User Manual (ENGLISH)
Page 39
Met gammacorrectie wordt de helderheid van de kleuren gewijzigd met tussenlicht. Nummer verlagen - In Component mode, film mode is only available for 480i and 576i input. Analog/Digital(PC) : Cool4 / Cool3 / Cool2 / Cool1 / Normal / Warm1 / Warm2 Digital(Digital DVD)/Video/S-Video/Component : Cool2 / Cool1 / Normal / Warm1 / Warm2 (Gamma) - Voor een scherpere ...
Met gammacorrectie wordt de helderheid van de kleuren gewijzigd met tussenlicht. Nummer verlagen - In Component mode, film mode is only available for 480i and 576i input. Analog/Digital(PC) : Cool4 / Cool3 / Cool2 / Cool1 / Normal / Warm1 / Warm2 Digital(Digital DVD)/Video/S-Video/Component : Cool2 / Cool1 / Normal / Warm1 / Warm2 (Gamma) - Voor een scherpere ...
User Manual (ENGLISH)
Page 40
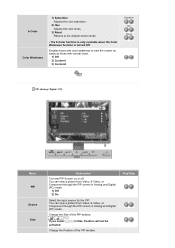
... screen mode. - You can view a picture from Video, S-Video, or Component through the PIP screen in Analog and Digital (PC) mode. 1) Off 2) On Select the input source for the PIP. The 6-Color function is only available when the Color Weakness function is turned Off. 6-Color Color Weakness 1) Saturation Adjusts the color...
... screen mode. - You can view a picture from Video, S-Video, or Component through the PIP screen in Analog and Digital (PC) mode. 1) Off 2) On Select the input source for the PIP. The 6-Color function is only available when the Color Weakness function is turned Off. 6-Color Color Weakness 1) Saturation Adjusts the color...
User Manual (ENGLISH)
Page 49
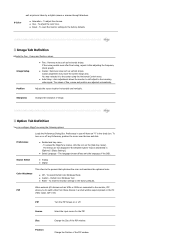
...location horizontally and vertically. Option Tab Definition You can configure MagicTune using the Horizontal Control menu. z Select Language - To reset the monitor settings to the center using the following options. Position Change the Position of the PIP window. z Coarse : Removes noise such as.... When external A/V devices such as pictures taken by a digital camera or scanner through Windows. 6-Color z Saturation - Source Select the input source for the PIP. To adjust the chroma. The language chosen affects only the language of image. well as VCRs or DVDs are...
...location horizontally and vertically. Option Tab Definition You can configure MagicTune using the Horizontal Control menu. z Select Language - To reset the monitor settings to the center using the following options. Position Change the Position of the PIP window. z Coarse : Removes noise such as.... When external A/V devices such as pictures taken by a digital camera or scanner through Windows. 6-Color z Saturation - Source Select the input source for the PIP. To adjust the chroma. The language chosen affects only the language of image. well as VCRs or DVDs are...

User Manual (ENGLISH)
Page 68
...If the initial screen (the login screen) does not appear, contact a service center or your dealer. Adjust the maximum resolution and frequency that the monitor can handle properly. Please change the frequency of UXGA, 60Hz), a "Not Optimum Mode", "Recommended mode : 1920 X 1200 60Hz" message is ... Mode", "Recommended mode : 1920 X 1200 60Hz" message appears for Windows ME/XP/2000) and then change to have the monitor double-check the input signal source. You can remedy any problems yourself. Before calling for service, check the information in the applicable mode (the safe ...
...If the initial screen (the login screen) does not appear, contact a service center or your dealer. Adjust the maximum resolution and frequency that the monitor can handle properly. Please change the frequency of UXGA, 60Hz), a "Not Optimum Mode", "Recommended mode : 1920 X 1200 60Hz" message is ... Mode", "Recommended mode : 1920 X 1200 60Hz" message appears for Windows ME/XP/2000) and then change to have the monitor double-check the input signal source. You can remedy any problems yourself. Before calling for service, check the information in the applicable mode (the safe ...

User Manual (ENGLISH)
Page 71
... video mode not supported, etc. If there are within 3 feet (one meter) of scan range or that you need to check whether your monitor and reconnect the video cable; Remove all electronic devices such as radios, fans, clocks and telephones that are any water to another room. 2. ...Therefore, if there is trouble with the input signal, a message appears on the screen or the screen goes blank although the Power indicator LED is functioning properly. 2. Turn on . Self-...
... video mode not supported, etc. If there are within 3 feet (one meter) of scan range or that you need to check whether your monitor and reconnect the video cable; Remove all electronic devices such as radios, fans, clocks and telephones that are any water to another room. 2. ...Therefore, if there is trouble with the input signal, a message appears on the screen or the screen goes blank although the Power indicator LED is functioning properly. 2. Turn on . Self-...

User Manual (ENGLISH)
Page 80
... Play function. The frequency of the screen horizontally is used for the user. This monitor follows the international standard VESA DDC for "Super Video." External Device Input External device input refers to video input from the top to the left edge of this repetition per second is called Vertical ... lines (vertical resolution). This number shows the accuracy of the Horizontal Cycle is good for the user by allowing the computer and the monitor to 800 lines of the same color is regarded as VCRs, High resolution is called 'resolution'. Plug & Play This is a function...
... Play function. The frequency of the screen horizontally is used for the user. This monitor follows the international standard VESA DDC for "Super Video." External Device Input External device input refers to video input from the top to the left edge of this repetition per second is called Vertical ... lines (vertical resolution). This number shows the accuracy of the Horizontal Cycle is good for the user by allowing the computer and the monitor to 800 lines of the same color is regarded as VCRs, High resolution is called 'resolution'. Plug & Play This is a function...

