Quick Guide (ENGLISH)
Page 4
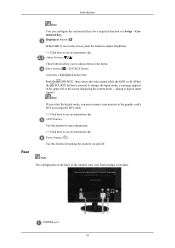
... to change the input mode, a message appears in the upper left of the monitor may vary from product to adjust items in the menu. Enter button [ ] / SOURCE button Activates a highlighted menu item. Note The configuration at the back of the screen displaying the current mode -- Brightness button [ ] When OSD is pressed to see an animation clip Adjust buttons [ ] These buttons allow you must connect your monitor to the graphic card's DVI port using the DVI cable. >> Click...
... to change the input mode, a message appears in the upper left of the monitor may vary from product to adjust items in the menu. Enter button [ ] / SOURCE button Activates a highlighted menu item. Note The configuration at the back of the screen displaying the current mode -- Brightness button [ ] When OSD is pressed to see an animation clip Adjust buttons [ ] These buttons allow you must connect your monitor to the graphic card's DVI port using the DVI cable. >> Click...
Quick Guide (ENGLISH)
Page 7
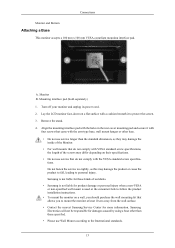
... with the arm-type base, wall mount hanger or other than those specified. • Please use Wall Mount according to personal injury. Monitor B. Align the mounting interface pad with the holes in the rear cover mounting pad and secure it to follow the product installation instructions. • To mount the monitor on a flat surface with the VESA standard screw specifications. Turn off your monitor and unplug its power cord. 2. Samsung Electronics will not...
... with the arm-type base, wall mount hanger or other than those specified. • Please use Wall Mount according to personal injury. Monitor B. Align the mounting interface pad with the holes in the rear cover mounting pad and secure it to follow the product installation instructions. • To mount the monitor on a flat surface with the VESA standard screw specifications. Turn off your monitor and unplug its power cord. 2. Samsung Electronics will not...

Quick Guide (ENGLISH)
Page 9
... mode (the safe mode for Windows ME/XP/2000) and then change the frequency of the problem, and then contact the Service Center or your dealer. A: Adjust the maximum resolution and frequency that the monitor can handle properly. I cannot turn on the screen. A: (Connected using the D-sub cable) Check the signal cable connection. (Connected using the DVI cable) If you still see an (error) message on , reboot the computer to see if the monitor status is set...
... mode (the safe mode for Windows ME/XP/2000) and then change the frequency of the problem, and then contact the Service Center or your dealer. A: Adjust the maximum resolution and frequency that the monitor can handle properly. I cannot turn on the screen. A: (Connected using the D-sub cable) Check the signal cable connection. (Connected using the DVI cable) If you still see an (error) message on , reboot the computer to see if the monitor status is set...
Quick Guide (ENGLISH)
Page 10
... the monitor blinking at the video card. (Refer to a crash between ap- I cannot see the On Screen Display. The screen shows strange colors or just black and white. A: Adjust screen image position and size using the DVI cable? Is the power indicator on the screen. A: If there is running a program or due to the Preset Timing Modes). 49 A: Check the signal cable connection. Q: Have you adjusted the resolution or frequency to activate the monitor and restore the image on the screen...
... the monitor blinking at the video card. (Refer to a crash between ap- I cannot see the On Screen Display. The screen shows strange colors or just black and white. A: Adjust screen image position and size using the DVI cable? Is the power indicator on the screen. A: If there is running a program or due to the Preset Timing Modes). 49 A: Check the signal cable connection. Q: Have you adjusted the resolution or frequency to activate the monitor and restore the image on the screen...

Quick Guide (ENGLISH)
Page 11
...; Settings. Q: Have you adjusted the resolution or frequency on the screen. Q: MagicTune™ feature is found ". Q: Is the frequency properly adjusted when checking the Display Timing on PC (VGA) with Window OS that reads "Unrecognized monitor, Plug & Play (VESA DDC) monitor found only on the menu? A: Windows XP : Set the resolution at the Control Panel → Display → Settings. Q: Have you installed the monitor driver? A: Adjust the frequency properly by referring to the cycle of the video card signals. Q: Have the Windows colors...
...; Settings. Q: Have you adjusted the resolution or frequency on the screen. Q: MagicTune™ feature is found ". Q: Is the frequency properly adjusted when checking the Display Timing on PC (VGA) with Window OS that reads "Unrecognized monitor, Plug & Play (VESA DDC) monitor found only on the menu? A: Windows XP : Set the resolution at the Control Panel → Display → Settings. Q: Have you installed the monitor driver? A: Adjust the frequency properly by referring to the cycle of the video card signals. Q: Have the Windows colors...

Quick Guide (ENGLISH)
Page 12
... the power cord and the video cables are properly connected to the computer. Q & A Q: How can be downloaded http://www.samsung.com/mon- Check if the scanning ratio of the driver used. (Refer to the computer or the video card manual for MagicTune™ MAC. A: The frequency can I adjusts the resolution? A: Windows XP: Set the resolution in the "Control Panel → System → Device Administrator" and then reboot the computer to reinstall the adapter (video) driver. Troubleshooting...
... the power cord and the video cables are properly connected to the computer. Q & A Q: How can be downloaded http://www.samsung.com/mon- Check if the scanning ratio of the driver used. (Refer to the computer or the video card manual for MagicTune™ MAC. A: The frequency can I adjusts the resolution? A: Windows XP: Set the resolution in the "Control Panel → System → Device Administrator" and then reboot the computer to reinstall the adapter (video) driver. Troubleshooting...
User Manual (ENGLISH)
Page 6
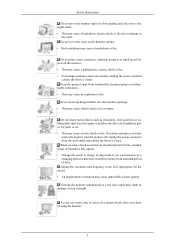
... fire. • If a foreign substance enters the monitor, unplug the power cord and contact the Service Center. Do not cover the vents on the monitor. • This may result in damage to a changing picture when away from the wall outlet and contact the Service Center. When viewing a fixed screen for an extended period of using the monitor. 5 Never insert anything metallic into the vent, headphone...
... fire. • If a foreign substance enters the monitor, unplug the power cord and contact the Service Center. Do not cover the vents on the monitor. • This may result in damage to a changing picture when away from the wall outlet and contact the Service Center. When viewing a fixed screen for an extended period of using the monitor. 5 Never insert anything metallic into the vent, headphone...

User Manual (ENGLISH)
Page 14
Remove the stand. 4. Lay the LCD monitor face-down on their specifications. • Do not use screws that do not comply with VESA standard screw specifications, the length of the screws may differ depending on a flat surface with the arm-type base, wall mount hanger or other base. • Do not use screws longer than those specified. • Please use Wall Mount according to personal injury. Samsung Electronics will not be responsible for...
Remove the stand. 4. Lay the LCD monitor face-down on their specifications. • Do not use screws that do not comply with VESA standard screw specifications, the length of the screws may differ depending on a flat surface with the arm-type base, wall mount hanger or other base. • Do not use screws longer than those specified. • Please use Wall Mount according to personal injury. Samsung Electronics will not be responsible for...
User Manual (ENGLISH)
Page 15
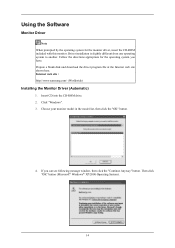
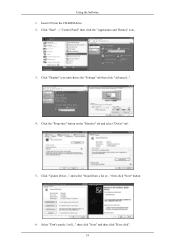
... the "Continue Anyway" button. Prepare a blank disk and download the driver program file at the Internet web site shown here. If you have. Internet web site : http://www.samsung.com/ (Worldwide) Installing the Monitor Driver (Automatic) 1. Click "Windows". 3. Follow the directions appropriate for the monitor driver, insert the CD-ROM included with this monitor. Choose your monitor model in the model list, then click...
... the "Continue Anyway" button. Prepare a blank disk and download the driver program file at the Internet web site shown here. If you have. Internet web site : http://www.samsung.com/ (Worldwide) Installing the Monitor Driver (Automatic) 1. Click "Windows". 3. Follow the directions appropriate for the monitor driver, insert the CD-ROM included with this monitor. Choose your monitor model in the model list, then click...
User Manual (ENGLISH)
Page 16
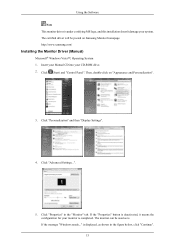
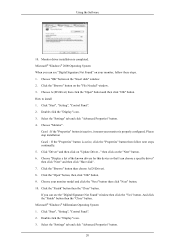
... Manual CD into your monitor is . If the message "Windows needs..." Click "Personalization" and then "Display Settings". 4. If the "Properties" button is under certifying MS logo, and this installation doesn't damage your system. Then, double-click on Samsung Monitor homepage. Using the Software Note This monitor driver is deactivated, it means the configuration for your CD-ROM drive. 2. http://www.samsung.com/ Installing the Monitor Driver (Manual) Microsoft® Windows...
... Manual CD into your monitor is . If the message "Windows needs..." Click "Personalization" and then "Display Settings". 4. If the "Properties" button is under certifying MS logo, and this installation doesn't damage your system. Then, double-click on Samsung Monitor homepage. Using the Software Note This monitor driver is deactivated, it means the configuration for your CD-ROM drive. 2. http://www.samsung.com/ Installing the Monitor Driver (Manual) Microsoft® Windows...
User Manual (ENGLISH)
Page 17
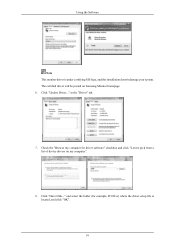
Click "Have Disk..." Click "Update Driver..." and select the folder (for driver software" checkbox and click "Let me pick from a list of device drivers on Samsung Monitor homepage. 6. Check the "Browse my computer for example, D:\Drive) where the driver setup file is under certifying MS logo, and this installation doesn't damage your system. in the "Driver" tab. 7. Using the Software Note This monitor driver is located, and click "OK". 16 The certified driver will be posted on my computer". 8.
Click "Have Disk..." Click "Update Driver..." and select the folder (for driver software" checkbox and click "Let me pick from a list of device drivers on Samsung Monitor homepage. 6. Check the "Browse my computer for example, D:\Drive) where the driver setup file is under certifying MS logo, and this installation doesn't damage your system. in the "Driver" tab. 7. Using the Software Note This monitor driver is located, and click "OK". 16 The certified driver will be posted on my computer". 8.
User Manual (ENGLISH)
Page 19
Click the "Properties" button on the "Monitor" tab and select "Driver" tab. 5. then click "Next" button. 6. then click "Next" and then click "Have disk". 18 Select "Don't search, I will..." and select "Install from a list or..." Using the Software 1. Click "Update Driver..." Click "Start" → "Control Panel" then click the "Appearance and Themes" icon. 3. Click "Display" icon and choose the "Settings" tab then click "Advanced...". 4. Insert CD into the CD-ROM drive. 2.
Click the "Properties" button on the "Monitor" tab and select "Driver" tab. 5. then click "Next" button. 6. then click "Next" and then click "Have disk". 18 Select "Don't search, I will..." and select "Install from a list or..." Using the Software 1. Click "Update Driver..." Click "Start" → "Control Panel" then click the "Appearance and Themes" icon. 3. Click "Display" icon and choose the "Settings" tab then click "Advanced...". 4. Insert CD into the CD-ROM drive. 2.
User Manual (ENGLISH)
Page 21
Click "Start", "Setting", "Control Panel". 2. Case1 : If the "Properties" button is inactive, it means your monitor is active, click the "Properties" button then follow these steps. 1. Click the "Open" button, then click "OK" button. 9. Choose "OK" button on "Update Driver..." Choose "Monitor". Click the "Browse" button then choose A:(D:\Driver). 8. And click the "Finish" button then the "Close" button. Double click the "Display" icon. 3. If you can choose a specific driver" then click "Next...
Click "Start", "Setting", "Control Panel". 2. Case1 : If the "Properties" button is inactive, it means your monitor is active, click the "Properties" button then follow these steps. 1. Click the "Open" button, then click "OK" button. 9. Choose "OK" button on "Update Driver..." Choose "Monitor". Click the "Browse" button then choose A:(D:\Driver). 8. And click the "Finish" button then the "Close" button. Double click the "Display" icon. 3. If you can choose a specific driver" then click "Next...

User Manual (ENGLISH)
Page 22
..., set a horizontal frequency for your monitor. (You can enter the frequency directly.) 8. First of system setting file. 1. logue box. Select a mode that corresponds to the one you wish to the Preset Timing Modes in the user guide. If the screen is not normal, change to make the X86Config file, which is for selecting a keyboard. 5. Select "Show all the driver in the "Monitor Type" area. 6. Click "Start", "Settings", "Control Panel...
..., set a horizontal frequency for your monitor. (You can enter the frequency directly.) 8. First of system setting file. 1. logue box. Select a mode that corresponds to the one you wish to the Preset Timing Modes in the user guide. If the screen is not normal, change to make the X86Config file, which is for selecting a keyboard. 5. Select "Show all the driver in the "Monitor Type" area. 6. Click "Start", "Settings", "Control Panel...
User Manual (ENGLISH)
Page 49
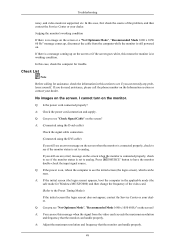
... mode for Windows ME/XP/2000) and then change the frequency of the problem, and then contact the Service Center or your dealer. A: You can be seen. If you see an error message on the monitor. Q: Is the power cord connected properly? A: (Connected using the D-sub cable) Check the signal cable connection. (Connected using the DVI cable) If you can handle properly. 48 A: Check the power cord connection and supply. Press ' /SOURCE' button to see if you still see "Check Signal Cable...
... mode for Windows ME/XP/2000) and then change the frequency of the problem, and then contact the Service Center or your dealer. A: You can be seen. If you see an error message on the monitor. Q: Is the power cord connected properly? A: (Connected using the D-sub cable) Check the signal cable connection. (Connected using the DVI cable) If you can handle properly. 48 A: Check the power cord connection and supply. Press ' /SOURCE' button to see if you still see "Check Signal Cable...
User Manual (ENGLISH)
Page 51
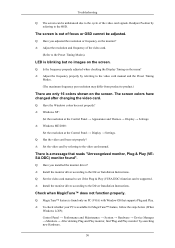
... menu? Check when MagicTune™ does not function properly. Control Panel → Performance and Maintenance → System → Hardware → Device Manager → Monitors → After deleting Plug and Play monitor, find 'Plug and Play monitor' by referring to the video card manual and the Preset Timing Modes. (The maximum frequency per resolution may differ from product to the cycle of the video card signals. LED is XP); Troubleshooting Q: The screen...
... menu? Check when MagicTune™ does not function properly. Control Panel → Performance and Maintenance → System → Hardware → Device Manager → Monitors → After deleting Plug and Play monitor, find 'Plug and Play monitor' by referring to the video card manual and the Preset Timing Modes. (The maximum frequency per resolution may differ from product to the cycle of the video card signals. LED is XP); Troubleshooting Q: The screen...
User Manual (ENGLISH)
Page 52
... in Safe Mode, remove the Display Adapter in the Control Panel → Appearance and Themes → Display → Settings. 51 The program can I adjusts the resolution? Check the following items if there is already installed, remove it does, request an a service for the main board of the computer.) If you installed a new video card or if you changed by reconfiguring the video card. Q & A Q: How can be changed your monitor. http://www.samsung.com/monitor/magictune...
... in Safe Mode, remove the Display Adapter in the Control Panel → Appearance and Themes → Display → Settings. 51 The program can I adjusts the resolution? Check the following items if there is already installed, remove it does, request an a service for the main board of the computer.) If you installed a new video card or if you changed by reconfiguring the video card. Q & A Q: How can be changed your monitor. http://www.samsung.com/monitor/magictune...
User Manual (ENGLISH)
Page 55
... of RED, GREEN, BLUE and WHITE color appear to set up this product are used in power management system called PowerSaver. But the pixels of 1ppm (one millionth) above are 5,292,000. Dot Acceptable TFT-LCD panels manufactured by switching your monitor OFF when it is not from bad quality and you press a key on the keyboard. Use the software utility installed on any problems. For example, the number...
... of RED, GREEN, BLUE and WHITE color appear to set up this product are used in power management system called PowerSaver. But the pixels of 1ppm (one millionth) above are 5,292,000. Dot Acceptable TFT-LCD panels manufactured by switching your monitor OFF when it is not from bad quality and you press a key on the keyboard. Use the software utility installed on any problems. For example, the number...
User Manual (ENGLISH)
Page 58
... % ~ 80 %, non-condensing Temperature : -4 °F ~ 113 °F (-20 °C ~ 45 °C) Humidity : 5 % ~ 95 %, non-condensing Plug and Play Capability This monitor can be installed on any problems. For example, the number of TFT-LCD sub pixels contained in this feature. The interaction of RED, GREEN, BLUE and WHITE color appear to select alternate settings. This is not needed, or when leaving it without prior notice.
... % ~ 80 %, non-condensing Temperature : -4 °F ~ 113 °F (-20 °C ~ 45 °C) Humidity : 5 % ~ 95 %, non-condensing Plug and Play Capability This monitor can be installed on any problems. For example, the number of TFT-LCD sub pixels contained in this feature. The interaction of RED, GREEN, BLUE and WHITE color appear to select alternate settings. This is not needed, or when leaving it without prior notice.
User Manual (ENGLISH)
Page 60
... not from the monitor for an extended period of the display. Information For Better Display Adjust the computer resolution and screen injection rate (refresh rate) on screen if the best picture quality is not provided for TFT-LCD. • Resolution: 1680 x 1050 • Vertical frequency (refresh rate): 60 Hz TFT-LCD panels manufactured by the warranty. PRODUCT INFORMATION (Image Retention Free) LCD Monitors and TVs may cause the liquid crystal to polish. This guide is to protect...
... not from the monitor for an extended period of the display. Information For Better Display Adjust the computer resolution and screen injection rate (refresh rate) on screen if the best picture quality is not provided for TFT-LCD. • Resolution: 1680 x 1050 • Vertical frequency (refresh rate): 60 Hz TFT-LCD panels manufactured by the warranty. PRODUCT INFORMATION (Image Retention Free) LCD Monitors and TVs may cause the liquid crystal to polish. This guide is to protect...


