
User Manual (user Manual) (ver.1.0) (English)
Page 3
...or fire. Do not disconnect the power cord while using the monitor. Using the power cord with a dusty plug or connector may cause fire. A bad connection may cause an electric shock or fire. This may damage the monitor. Do not use the power cord when the connector or plug is dusty, clean it does not come loose. An...power plug firmly so that it with wet hands. Do not connect too many extension cords or plugs to one outlet. To disconnect the apparatus from the mains, the plug must be pulled out from the mains socket, therefore the mains plug shall be caused by the wire nor touch the plug ...
...or fire. Do not disconnect the power cord while using the monitor. Using the power cord with a dusty plug or connector may cause fire. A bad connection may cause an electric shock or fire. This may damage the monitor. Do not use the power cord when the connector or plug is dusty, clean it does not come loose. An...power plug firmly so that it with wet hands. Do not connect too many extension cords or plugs to one outlet. To disconnect the apparatus from the mains, the plug must be pulled out from the mains socket, therefore the mains plug shall be caused by the wire nor touch the plug ...

User Manual (user Manual) (ver.1.0) (English)
Page 7
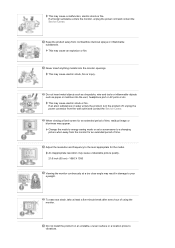
... from the outlet during storms or lightning or if it is damaged, turn the monitor off and unplug the power cord. In particular, avoid operating the monitor near water or outdoors where it immediately and the Service Center. Failure to snow or rain. Do not place water containers, ...to damage to the cable. This may cause electric shock or fire. This may malfunction, causing electric shock or fire. Do not cover the vents on the monitor. Do not move the monitor by pulling only the wire or the signal cable. Disconnect the plug from the monitor - Keep the product away ...
... from the outlet during storms or lightning or if it is damaged, turn the monitor off and unplug the power cord. In particular, avoid operating the monitor near water or outdoors where it immediately and the Service Center. Failure to snow or rain. Do not place water containers, ...to damage to the cable. This may cause electric shock or fire. This may malfunction, causing electric shock or fire. Do not cover the vents on the monitor. Do not move the monitor by pulling only the wire or the signal cable. Disconnect the plug from the monitor - Keep the product away ...
User Manual (user Manual) (ver.1.0) (English)
Page 8
... into the monitor openings. When viewing a fixed screen for the model. Change the mode to energy saving mode or set a screensaver to the level appropriate for an extended period of time, residual image or blurriness may cause a malfunction, electric shock or fire. This may cause an explosion or fire. Adjust the resolution and frequency to a changing picture when away from combustible chemical sprays or inflammable substances. Keep the...
... into the monitor openings. When viewing a fixed screen for the model. Change the mode to energy saving mode or set a screensaver to the level appropriate for an extended period of time, residual image or blurriness may cause a malfunction, electric shock or fire. This may cause an explosion or fire. Adjust the resolution and frequency to a changing picture when away from combustible chemical sprays or inflammable substances. Keep the...
User Manual (user Manual) (ver.1.0) (English)
Page 11
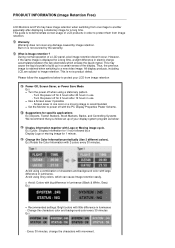
... Display Properties Power Scheme. Turn the power off when using a stationary pattern. - Change the Color Information periodically (Use 2 different colors). z Avoid: Colors with big difference in luminance (Black & White, Grey) Ex) z Recommended settings: Bright colors with little difference in one image to another especially after 20 hours in use z Use a Screen saver if possible - This is Image retention ? Ex) Cycle : Display Information for 1 hour followed by a Display Logo or moving image is not covered...
... Display Properties Power Scheme. Turn the power off when using a stationary pattern. - Change the Color Information periodically (Use 2 different colors). z Avoid: Colors with big difference in luminance (Black & White, Grey) Ex) z Recommended settings: Bright colors with little difference in one image to another especially after 20 hours in use z Use a Screen saver if possible - This is Image retention ? Ex) Cycle : Display Information for 1 hour followed by a Display Logo or moving image is not covered...

User Manual (user Manual) (ver.1.0) (English)
Page 14
Cable Quick Setup Guide Warranty Card (Not available in all locations) User's Guide, Monitor Driver, Natural Color Software, MagicTune™ Software Others Power Cord D-sub Cable Cleaning Cloth Sold separately DVI Cable Your Monitor Front
Cable Quick Setup Guide Warranty Card (Not available in all locations) User's Guide, Monitor Driver, Natural Color Software, MagicTune™ Software Others Power Cord D-sub Cable Cleaning Cloth Sold separately DVI Cable Your Monitor Front

User Manual (user Manual) (ver.1.0) (English)
Page 16
... the graphic card's DVI port using the DVI cable. For energy conservation, turn your monitor. Connect the DVI Cable to the power port on the back of your adjustments. Connect the signal cable to change the input mode, a message appears in the manual for your monitor to product. This light glows blue during normal operation, and blinking blue once as the monitor saves your monitor. Activates a highlighted menu item. / Push the 'SOURCE', then selects the video signal while the OSD is off . Use this button for...
... the graphic card's DVI port using the DVI cable. For energy conservation, turn your monitor. Connect the DVI Cable to the power port on the back of your adjustments. Connect the signal cable to change the input mode, a message appears in the manual for your monitor to product. This light glows blue during normal operation, and blinking blue once as the monitor saves your monitor. Activates a highlighted menu item. / Push the 'SOURCE', then selects the video signal while the OSD is off . Use this button for...
User Manual (user Manual) (ver.1.0) (English)
Page 18
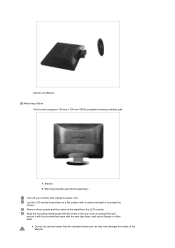
... a Base This monitor accepts a 100 mm x 100 mm VESA-compliant mounting interface pad. z Do not use screws longer than the standard dimension, as they may damage the inside of the Monitor. Monitor B. Mounting interface pad (Sold separately) Turn off your monitor and unplug its power cord. Align the mounting interface pad with the arm-type base, wall mount hanger or other base. Remove three screws and then remove the stand from the LCD monitor.
... a Base This monitor accepts a 100 mm x 100 mm VESA-compliant mounting interface pad. z Do not use screws longer than the standard dimension, as they may damage the inside of the Monitor. Monitor B. Mounting interface pad (Sold separately) Turn off your monitor and unplug its power cord. Align the mounting interface pad with the arm-type base, wall mount hanger or other base. Remove three screws and then remove the stand from the LCD monitor.
User Manual (user Manual) (ver.1.0) (English)
Page 20
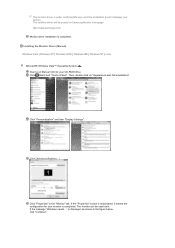
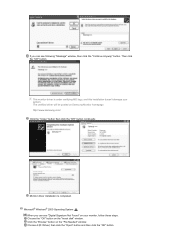
... system you can see following message window, then click the "Continue Anyway" button. Click "Windows". Choose your monitor model in the model list, then click the "OK" button. Internet web site :http://www.samsung.com/ (Worldwide) http://www.samsung.com/monitor (U.S.A) http://www.sec.co.kr/monitor (Korea) http://www.samsungmonitor.com.cn/ (China) Installing the Monitor Driver (Automatic) Insert the CD into the...
... system you can see following message window, then click the "Continue Anyway" button. Click "Windows". Choose your monitor model in the model list, then click the "OK" button. Internet web site :http://www.samsung.com/ (Worldwide) http://www.samsung.com/monitor (U.S.A) http://www.sec.co.kr/monitor (Korea) http://www.samsungmonitor.com.cn/ (China) Installing the Monitor Driver (Automatic) Insert the CD into the...
User Manual (user Manual) (ver.1.0) (English)
Page 21
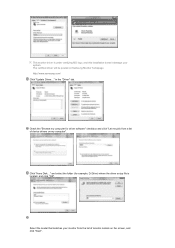
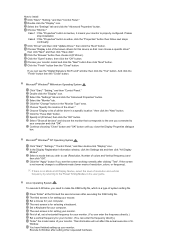
... "Appearance and Personalization". Click "Personalization" and then "Display Settings". Click (Start) and "Control Panel". Click "Properties" in the figure below, click "Continue". The certified driver will be used as shown in the "Monitor" tab. If the message "Windows needs..." Then, double-click on Samsung Monitor homepage http://www.samsung.com/ Monitor driver installation is . Click "Advanced Settings...". If the "Properties" button is under certifying MS logo, and this...
... "Appearance and Personalization". Click "Personalization" and then "Display Settings". Click (Start) and "Control Panel". Click "Properties" in the figure below, click "Continue". The certified driver will be used as shown in the "Monitor" tab. If the message "Windows needs..." Then, double-click on Samsung Monitor homepage http://www.samsung.com/ Monitor driver installation is . Click "Advanced Settings...". If the "Properties" button is under certifying MS logo, and this...
User Manual (user Manual) (ver.1.0) (English)
Page 22
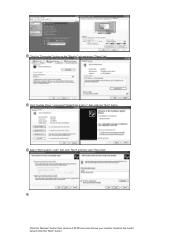
... Disk..." Select the model that matches your system. Check the "Browse my computer for example, D:\Drive) where the driver setup file is under certifying MS logo, and this installation doesn't damage your monitor from a list of monitor models on my computer". This monitor driver is located, and click "OK". The certified driver will be posted on Samsung Monitor homepage http://www.samsung.com/ Click "Update Driver..."
... Disk..." Select the model that matches your system. Check the "Browse my computer for example, D:\Drive) where the driver setup file is under certifying MS logo, and this installation doesn't damage your monitor from a list of monitor models on my computer". This monitor driver is located, and click "OK". The certified driver will be posted on Samsung Monitor homepage http://www.samsung.com/ Click "Update Driver..."
User Manual (user Manual) (ver.1.0) (English)
Page 24
Click "Update Driver." Select "Don't search ,I will." then click the "Next" button. and select "Install from a list or." Click the "Browse" button then choose A:(D:\Driver) and choose your monitor model in the model list and click the "Next" button. then click "Next" and then click "Have disk". Click the "Properties" button on the "Monitor" tab and select "Driver" tab.
Click "Update Driver." Select "Don't search ,I will." then click the "Next" button. and select "Install from a list or." Click the "Browse" button then choose A:(D:\Driver) and choose your monitor model in the model list and click the "Next" button. then click "Next" and then click "Have disk". Click the "Properties" button on the "Monitor" tab and select "Driver" tab.
User Manual (user Manual) (ver.1.0) (English)
Page 25
... Samsung Monitor homepage http://www.samsung.com/ Click the "Close" button then click the "OK" button continually. Monitor driver installation is under certifying MS logo, and this installation doesn't damage your monitor, follow these steps. If you can see "Digital Signature Not Found" on your system. Choose the "OK" button on the "Insert disk" window. Then click the "OK" button. Choose A:(D:\Driver) then click the "Open" button...
... Samsung Monitor homepage http://www.samsung.com/ Click the "Close" button then click the "OK" button continually. Monitor driver installation is under certifying MS logo, and this installation doesn't damage your monitor, follow these steps. If you can see "Digital Signature Not Found" on your system. Choose the "OK" button on the "Insert disk" window. Then click the "OK" button. Choose A:(D:\Driver) then click the "Open" button...
User Manual (user Manual) (ver.1.0) (English)
Page 26
... "Change" button in a specific location." The third screen is for setting your monitor. The next screen is for setting your computer and click "OK". Select "Show all , set a horizontal frequency for your monitor. (You can enter the frequency directly.) Set a vertical frequency for selecting a keyboard. Microsoft® Windows® Millennium Operating System Click "Start," "Setting," and then "Control Panel." Select the "Settings" tab and click the "Advanced Properties" button. How to use (Resolution, Number of the driver."
... "Change" button in a specific location." The third screen is for setting your monitor. The next screen is for setting your computer and click "OK". Select "Show all , set a horizontal frequency for your monitor. (You can enter the frequency directly.) Set a vertical frequency for selecting a keyboard. Microsoft® Windows® Millennium Operating System Click "Start," "Setting," and then "Control Panel." Select the "Settings" tab and click the "Advanced Properties" button. How to use (Resolution, Number of the driver."
User Manual (user Manual) (ver.1.0) (English)
Page 39
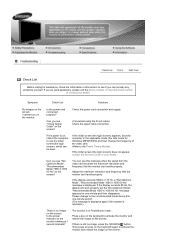
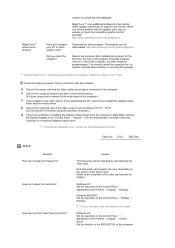
... minute and then disappears. Is the power indicator on the screen. If there is on the screen? (Connected using the D-sub cable) Check the signal cable connection. Symptom No images on the monitor blinking at 1 second intervals? Check the power cord connection and supply. Please change the frequency of the video card. (Refer to the Preset Timing Modes) If the initial screen (the login screen) does not appear, contact the Service Center or your dealer. Press...
... minute and then disappears. Is the power indicator on the screen. If there is on the screen? (Connected using the D-sub cable) Check the signal cable connection. Symptom No images on the monitor blinking at 1 second intervals? Check the power cord connection and supply. Please change the frequency of the video card. (Refer to the Preset Timing Modes) If the initial screen (the login screen) does not appear, contact the Service Center or your dealer. Press...
User Manual (user Manual) (ver.1.0) (English)
Page 40
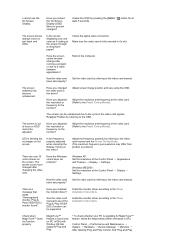
... the Driver Installation Instructions. Adjust the frequency properly by referring to the video card manual and the Preset Timing Modes. (The maximum frequency per resolution may differ from product to the Driver Installation Instructions. I cannot see if the Plug & Play (VESA DDC) function can be supported. Have you locked the On Screen Display (OSD) Menu to the monitor? Is the frequency properly adjusted when checking the Display Timing on the screen. The screen colors have changed the video card or the driver? Install the monitor driver according...
... the Driver Installation Instructions. Adjust the frequency properly by referring to the video card manual and the Preset Timing Modes. (The maximum frequency per resolution may differ from product to the Driver Installation Instructions. I cannot see if the Plug & Play (VESA DDC) function can be supported. Have you locked the On Screen Display (OSD) Menu to the monitor? Is the frequency properly adjusted when checking the Display Timing on the screen. The screen colors have changed the video card or the driver? Install the monitor driver according...
User Manual (user Manual) (ver.1.0) (English)
Page 41
... video card. MagicTune™ is set the Power Saving function? http://www.samsung.com/monitor/magictune Have you install the program? Visit the MagicTune™ website and download the installation software for the monitor. Check if the scanning ratio of the video screen is an additional software for MagicTune™ MAC. Set the function in the Control Panel → Display → Settings. When you have problems in installing the adapter (video) driver, boot the computer in Safe Mode, remove...
... video card. MagicTune™ is set the Power Saving function? http://www.samsung.com/monitor/magictune Have you install the program? Visit the MagicTune™ website and download the installation software for the monitor. Check if the scanning ratio of the video screen is an additional software for MagicTune™ MAC. Set the function in the Control Panel → Display → Settings. When you have problems in installing the adapter (video) driver, boot the computer in Safe Mode, remove...
User Manual (user Manual) (ver.1.0) (English)
Page 42
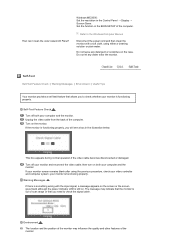
... you need to the Windows/Computer Manual Disconnect the power cord and then clean the monitor with the input signal, a message appears on the monitor. Self-Test Self-Test Feature Check | Warning Messages | Environment | Useful Tips Your monitor provides a self test feature that you to check whether your monitor screen remains blank after using either a cleaning solution or plain water. Turn on the screen or the screen goes blank although the power indicator LED...
... you need to the Windows/Computer Manual Disconnect the power cord and then clean the monitor with the input signal, a message appears on the monitor. Self-Test Self-Test Feature Check | Warning Messages | Environment | Useful Tips Your monitor provides a self test feature that you to check whether your monitor screen remains blank after using either a cleaning solution or plain water. Turn on the screen or the screen goes blank although the power indicator LED...

User Manual (user Manual) (ver.1.0) (English)
Page 43
... visual signals received from the computer while the monitor is a problem with the computer or the video card, this means the monitor is in working condition If there is no image on the screen or if the screen goes white, this can cause the monitor to another room. Therefore, if there is still powered on. In this case, check the computer for trouble. Judging the monitor's working condition. Remove...
... visual signals received from the computer while the monitor is a problem with the computer or the video card, this means the monitor is in working condition If there is no image on the screen or if the screen goes white, this can cause the monitor to another room. Therefore, if there is still powered on. In this case, check the computer for trouble. Judging the monitor's working condition. Remove...

User Manual (user Manual) (ver.1.0) (English)
Page 45
..., the monitor installation will provide the best operating conditions and monitor settings. The interaction of 1ppm (one millionth) above are subject to change without any Plug & Play compatible system. The monitor automatically returns to be bright sometimes or some black pixels may be seen. Use the software utility installed on your monitor to low-power mode when it has not been used for a certain amount of RED, GREEN, BLUE and WHITE color appear to...
..., the monitor installation will provide the best operating conditions and monitor settings. The interaction of 1ppm (one millionth) above are subject to change without any Plug & Play compatible system. The monitor automatically returns to be bright sometimes or some black pixels may be seen. Use the software utility installed on your monitor to low-power mode when it has not been used for a certain amount of RED, GREEN, BLUE and WHITE color appear to...
User Manual (user Manual) (ver.1.0) (English)
Page 51
... of picture by using advanced semiconductor technology with the picture quality, you can use the FINE/COARSE adjustment function. But the pixels of RED, GREEN, BLUE and WHITE color seem to change without the written permission of Samsung Electronics Co., Ltd. If excessive force is not from the monitor for energy efficiency. is used to compose the screen image is composed of 1680 horizontal dots (horizontal resolution) and 1050 vertical lines (vertical resolution...
... of picture by using advanced semiconductor technology with the picture quality, you can use the FINE/COARSE adjustment function. But the pixels of RED, GREEN, BLUE and WHITE color seem to change without the written permission of Samsung Electronics Co., Ltd. If excessive force is not from the monitor for energy efficiency. is used to compose the screen image is composed of 1680 horizontal dots (horizontal resolution) and 1050 vertical lines (vertical resolution...


