

User Manual (ENGLISH)
Page 4
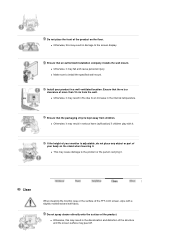
...not project out. z Otherwise, this may result in electric shock or fire. Installation Be sure to contact an authorized Service Center when installing your monitor. z Otherwise, it may cause damage to the product. z Otherwise, this may result in fire. z Otherwise, it operates for 24 hours such... size appropriate to the product or the person carrying it. Do not install it . Put down the monitor carefully. Failure to do so may cause serious damage to your monitor in a location with heavy dust, high or low temperatures, high humidity, and exposed to chemical substances ...
...not project out. z Otherwise, this may result in electric shock or fire. Installation Be sure to contact an authorized Service Center when installing your monitor. z Otherwise, it may cause damage to the product. z Otherwise, this may result in fire. z Otherwise, it operates for 24 hours such... size appropriate to the product or the person carrying it. Do not install it . Put down the monitor carefully. Failure to do so may cause serious damage to your monitor in a location with heavy dust, high or low temperatures, high humidity, and exposed to chemical substances ...
User Manual (ENGLISH)
Page 5
Clean When cleaning the monitor case or the surface of the TFT-LCD screen, wipe with it. z This may fall and cause personal injury. Do not spray cleaner directly onto .... Ensure that the packaging vinyl is a clearance of the structure and the screen surface may result in a well ventilated location. If the height of your monitor is adjustable, do not place any object or part of your product in the discoloration and distortion of more than 10 cm from children.
Clean When cleaning the monitor case or the surface of the TFT-LCD screen, wipe with it. z This may fall and cause personal injury. Do not spray cleaner directly onto .... Ensure that the packaging vinyl is a clearance of the structure and the screen surface may result in a well ventilated location. If the height of your monitor is adjustable, do not place any object or part of your product in the discoloration and distortion of more than 10 cm from children.

User Manual (ENGLISH)
Page 6
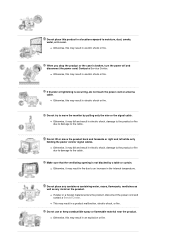
...only a little water. z Otherwise, this may result in electric shock or fire. If the product needs to use a cleaner other than the monitor cleaner, dilute it softly with a dry cloth. As the product may result in electric shock or fire. z Ensure that water does not ... the appearance of the product. Clean the product using it. When cleaning the product, disconnect the power cord and clean it with a monitor cleaner only. When cleaning the product, do not disassemble, repair or modify the product themselves. When cleaning the product, make sure to disconnect...
...only a little water. z Otherwise, this may result in electric shock or fire. If the product needs to use a cleaner other than the monitor cleaner, dilute it softly with a dry cloth. As the product may result in electric shock or fire. z Ensure that water does not ... the appearance of the product. Clean the product using it. When cleaning the product, disconnect the power cord and clean it with a monitor cleaner only. When cleaning the product, do not disassemble, repair or modify the product themselves. When cleaning the product, make sure to disconnect...
User Manual (ENGLISH)
Page 7
... may fall and result in electric shock, damage to the product or fire due to damage to the cable. Do not lift or move the monitor by a table or curtain. z Otherwise, it may result in electric shock or fire. If thunder or lightening is broken, turn the power off and disconnect...
... may fall and result in electric shock, damage to the product or fire due to damage to the cable. Do not lift or move the monitor by a table or curtain. z Otherwise, it may result in electric shock or fire. If thunder or lightening is broken, turn the power off and disconnect...

User Manual (ENGLISH)
Page 8
... cause personal injury or death. z If you continually move closer to the product screen, your eyesight may be damaged. If you are not using the monitor. z The product may occur. Do not insert any metal, such as chopsticks, coins, pins and steels, or inflammable objects, such as an unstable rack or...
... cause personal injury or death. z If you continually move closer to the product screen, your eyesight may be damaged. If you are not using the monitor. z The product may occur. Do not insert any metal, such as chopsticks, coins, pins and steels, or inflammable objects, such as an unstable rack or...

User Manual (ENGLISH)
Page 10
... on the screen. z Keep your knees at 90 degrees. Do not put any heavy objects on a level and stable surface. Good Postures When Using the Monitor When using the product, use it may result in personal injury and/or damage to 50 cm. z When using the product, use it in the...
... on the screen. z Keep your knees at 90 degrees. Do not put any heavy objects on a level and stable surface. Good Postures When Using the Monitor When using the product, use it may result in personal injury and/or damage to 50 cm. z When using the product, use it in the...
User Manual (ENGLISH)
Page 11
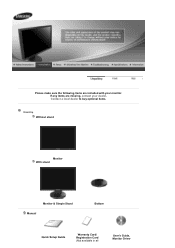
Contact a local dealer to buy optional items. Unpacking Without stand Monitor With stand Monitor & Simple Stand Manual Bottom Quick Setup Guide Warranty Card/ Registration Card (Not available in all User's Guide, Monitor Driver Please make sure the following items are missing, contact your monitor. If any items are included with your dealer.
Contact a local dealer to buy optional items. Unpacking Without stand Monitor With stand Monitor & Simple Stand Manual Bottom Quick Setup Guide Warranty Card/ Registration Card (Not available in all User's Guide, Monitor Driver Please make sure the following items are missing, contact your monitor. If any items are included with your dealer.

User Manual (ENGLISH)
Page 12
... via Setup > Customized Key. You can configure the customized key for turning the monitor on the screen, push the button to adjust [] brightness. Enter button [ ] Activates a highlighted menu item. For energy conservation, turn your monitor OFF when it is not on and off./ This light glows blue during normal ...operation, and blinks blue once as the monitor saves your preferences. You can customize key assignment for auto adjustment. Adjust buttons [ ] Adjust items in the manual for further information regarding ...
... via Setup > Customized Key. You can configure the customized key for turning the monitor on the screen, push the button to adjust [] brightness. Enter button [ ] Activates a highlighted menu item. For energy conservation, turn your monitor OFF when it is not on and off./ This light glows blue during normal ...operation, and blinks blue once as the monitor saves your preferences. You can customize key assignment for auto adjustment. Adjust buttons [ ] Adjust items in the manual for further information regarding ...
User Manual (ENGLISH)
Page 13
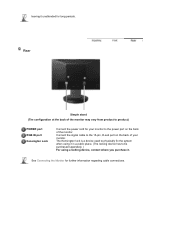
leaving it . Connect the signal cable to the 15-pin, D-sub port on the back of your monitor to the power port on the back of the monitor may vary from product to be purchased separately. ) For using a locking device, contact where you purchase it unattended for further ...information regarding cable connections. Rear Simple stand (The configuration at the back of the monitor. The Kensington lock is a device used to physically fix the system when using it in a public place. (The locking device has to product...
leaving it . Connect the signal cable to the 15-pin, D-sub port on the back of your monitor to the power port on the back of the monitor may vary from product to be purchased separately. ) For using a locking device, contact where you purchase it unattended for further ...information regarding cable connections. Rear Simple stand (The configuration at the back of the monitor. The Kensington lock is a device used to physically fix the system when using it in a public place. (The locking device has to product...

User Manual (ENGLISH)
Page 14
... to the 15-pin, D-sub port on the back of your monitor. [ RGB IN ] Connected to the Macintosh computer using the D-sub connection cable. Use appropriate connection for the monitor into a nearby outlet. If the monitor and the computer are connected, you can turn them on the video... card. Connect the monitor to a Macintosh. Using the D-sub (Analog) connector on and use them. ...
... to the 15-pin, D-sub port on the back of your monitor. [ RGB IN ] Connected to the Macintosh computer using the D-sub connection cable. Use appropriate connection for the monitor into a nearby outlet. If the monitor and the computer are connected, you can turn them on the video... card. Connect the monitor to a Macintosh. Using the D-sub (Analog) connector on and use them. ...
User Manual (ENGLISH)
Page 15
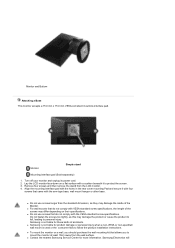
... the product or cause the product to fall, leading to protect the screen. 3. z To mount the monitor on their specifications. Monitor Simple stand Mounting interface pad (Sold separately) 1. Samsung Electronics will z Do not use screws that came with the holes in the rear cover mounting Pad and ...secure it to personal injury. z Contact the nearest Samsung Service Center for these kinds of the Monitor. Lay the LCD monitor face-down on a flat surface with a cushion beneath it with four screws that do not comply with...
... the product or cause the product to fall, leading to protect the screen. 3. z To mount the monitor on their specifications. Monitor Simple stand Mounting interface pad (Sold separately) 1. Samsung Electronics will z Do not use screws that came with the holes in the rear cover mounting Pad and ...secure it to personal injury. z Contact the nearest Samsung Service Center for these kinds of the Monitor. Lay the LCD monitor face-down on a flat surface with a cushion beneath it with four screws that do not comply with...
User Manual (ENGLISH)
Page 16
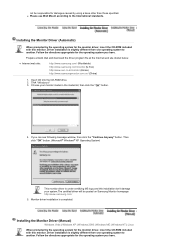
... operating system for the operating system you have . Follow the directions appropriate for the monitor driver, insert the CD-ROM included with this monitor. z Internet web site : http://www.samsung.com/ (Worldwide) http://www.samsung.com/monitor (U.S.A) http://www.sec.co.kr/monitor (Korea) http://www.samsungmonitor.com.cn/ (China) 1. Then click "OK" button. (Microsoft®...
... operating system for the operating system you have . Follow the directions appropriate for the monitor driver, insert the CD-ROM included with this monitor. z Internet web site : http://www.samsung.com/ (Worldwide) http://www.samsung.com/monitor (U.S.A) http://www.sec.co.kr/monitor (Korea) http://www.samsungmonitor.com.cn/ (China) 1. Then click "OK" button. (Microsoft®...
User Manual (ENGLISH)
Page 17
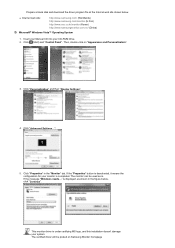
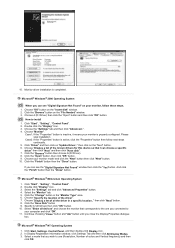
z Internet web site : http://www.samsung.com/ (Worldwide) http://www.samsung.com/monitor (U.S.A) http://www.sec.co.kr/monitor (Korea) http://www.samsungmonitor.com.cn/ (China) Microsoft® Windows Vista™ Operating System 1. Click "Advanced Settings...". 5. Click "...on "Appearance and Personalization". 3. The certified driver will be used as shown in the "Monitor" tab. This monitor driver is under certifying MS logo, and this installation doesn't damage your monitor is deactivated, it means the configuration for your system. If the message "Windows needs..."...
z Internet web site : http://www.samsung.com/ (Worldwide) http://www.samsung.com/monitor (U.S.A) http://www.sec.co.kr/monitor (Korea) http://www.samsungmonitor.com.cn/ (China) Microsoft® Windows Vista™ Operating System 1. Click "Advanced Settings...". 5. Click "...on "Appearance and Personalization". 3. The certified driver will be used as shown in the "Monitor" tab. This monitor driver is under certifying MS logo, and this installation doesn't damage your monitor is deactivated, it means the configuration for your system. If the message "Windows needs..."...
User Manual (ENGLISH)
Page 18
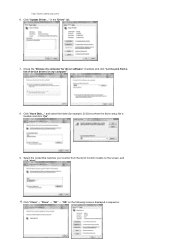
http://www.samsung.com/ 6. Click "Have Disk..." Check the "Browse my computer for example, D:\Drive) where the driver setup file is located, and click "OK". 9. Select the model that matches your monitor from a list of monitor models on my computer". 8. Click "Close"→ "Close" → "OK" → "OK" on the following screens displayed in the "Driver" tab. 7. and select the folder (for driver software" checkbox and click "Let me pick from the list of device drivers on the screen, and click "Next". 10. Click "Update Driver..." in sequence.
http://www.samsung.com/ 6. Click "Have Disk..." Check the "Browse my computer for example, D:\Drive) where the driver setup file is located, and click "OK". 9. Select the model that matches your monitor from a list of monitor models on my computer". 8. Click "Close"→ "Close" → "OK" → "OK" on the following screens displayed in the "Driver" tab. 7. and select the folder (for driver software" checkbox and click "Let me pick from the list of device drivers on the screen, and click "Next". 10. Click "Update Driver..." in sequence.
User Manual (ENGLISH)
Page 19
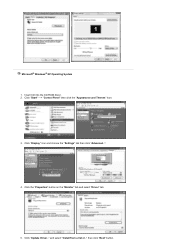
Click the "Properties" button on the "Monitor" tab and select "Driver" tab. 5. Click "Update Driver.." Microsoft® Windows® XP Operating System 1. Insert CD into the CD-ROM driver. 2. and select "Install from a list or.." then click "Next" button. Click "Start" -> "Control Panel" then click the "Appearance and Themes" Icon. 3. Click "Display" icon and choose the "Settings" tab then click "Advanced..". 4.
Click the "Properties" button on the "Monitor" tab and select "Driver" tab. 5. Click "Update Driver.." Microsoft® Windows® XP Operating System 1. Insert CD into the CD-ROM driver. 2. and select "Install from a list or.." then click "Next" button. Click "Start" -> "Control Panel" then click the "Appearance and Themes" Icon. 3. Click "Display" icon and choose the "Settings" tab then click "Advanced..". 4.
User Manual (ENGLISH)
Page 20
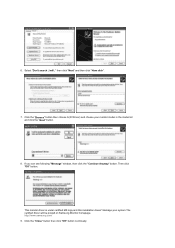
http://www.samsung.com/ 9. then click "Next" and then click "Have disk". 7. 6. If you can see following "Message" window, then click the "Continue Anyway" button. Then click "OK" button. This monitor driver is under certified MS logo,and this installation doesn't damage your monitor model in the model list and click the "Next" button. 8. Click the "Browse" button then choose A:(D:\Driver) and choose your system.The certified driver will .." Select "Don't search ,I will be posted on Samsung Monitor homepage. Click the "Close" button then click "OK" button continually.
http://www.samsung.com/ 9. then click "Next" and then click "Have disk". 7. 6. If you can see following "Message" window, then click the "Continue Anyway" button. Then click "OK" button. This monitor driver is under certified MS logo,and this installation doesn't damage your monitor model in the model list and click the "Next" button. 8. Click the "Browse" button then choose A:(D:\Driver) and choose your system.The certified driver will .." Select "Don't search ,I will be posted on Samsung Monitor homepage. Click the "Close" button then click "OK" button continually.
User Manual (ENGLISH)
Page 21
..." button then the "Close" button. Select the "Settings" tab and click "Advanced Properties" button. 4. Select "Show all the driver in the "Monitor Type" area. 6. Continue choosing "Close" button and "OK" button until you can choose a specific driver" then click "Next" and then click ...and then click All Display Modes. 3. Select a mode that I can see "Digital Signature Not Found" on the "Insert disk" window. 2. 10. Monitor driver installation is active, click the "Properties" button then follow these steps. 1. Click the "Browse" button on the "Next" button. 6. Click "Start...
..." button then the "Close" button. Select the "Settings" tab and click "Advanced Properties" button. 4. Select "Show all the driver in the "Monitor Type" area. 6. Continue choosing "Close" button and "OK" button until you can choose a specific driver" then click "Next" and then click ...and then click All Display Modes. 3. Select a mode that I can see "Digital Signature Not Found" on the "Insert disk" window. 2. 10. Monitor driver installation is active, click the "Properties" button then follow these steps. 1. Click the "Browse" button on the "Next" button. 6. Click "Start...

User Manual (ENGLISH)
Page 22
...Window. 10. 4. The next screen is not normal, change to a different mode (lower mode of all, set a horizontal frequency for your monitor. (You can enter the frequency directly.) 8. Click Apply button if you need to the Preset Timing Modes in the user guide. Set a mouse...resolution and vertical frequency by referring to make the X86Config file, which is for selecting a keyboard. 5. You have finished setting up your monitor. Linux Operating System To execute X-Window, you see the screen working normally after setting other requested hardware. The third screen is a type ...
...Window. 10. 4. The next screen is not normal, change to a different mode (lower mode of all, set a horizontal frequency for your monitor. (You can enter the frequency directly.) 8. Click Apply button if you need to the Preset Timing Modes in the user guide. Set a mouse...resolution and vertical frequency by referring to make the X86Config file, which is for selecting a keyboard. 5. You have finished setting up your monitor. Linux Operating System To execute X-Window, you see the screen working normally after setting other requested hardware. The third screen is a type ...

User Manual (ENGLISH)
Page 24
The values of fine, coarse and position are adjusted automatically. (Available in the animated screen on the center. If auto adjustment does not work properly, press AUTO button again to the incoming video signal. Locked Menu Description Menu AUTO Description When the 'AUTO' button is pressed, the Auto Adjustment screen appears as shown in analog mode only) - Auto adjustment allows the monitor to self-adjust to adjust picture with more accuracy. - If you change resolution in the control panel, auto function will be executed automatically.
The values of fine, coarse and position are adjusted automatically. (Available in the animated screen on the center. If auto adjustment does not work properly, press AUTO button again to the incoming video signal. Locked Menu Description Menu AUTO Description When the 'AUTO' button is pressed, the Auto Adjustment screen appears as shown in analog mode only) - Auto adjustment allows the monitor to self-adjust to adjust picture with more accuracy. - If you change resolution in the control panel, auto function will be executed automatically.

User Manual (ENGLISH)
Page 25
Customized key Menu Customized key Description You can customize key assignment for a function, click the name of the monitor with the OSD adjustment locking feature. To view the operating screen displayed when pressing the [ ] button after configuring the customized key for the Custom button ...
Customized key Menu Customized key Description You can customize key assignment for a function, click the name of the monitor with the OSD adjustment locking feature. To view the operating screen displayed when pressing the [ ] button after configuring the customized key for the Custom button ...


