User Manual (ENGLISH)
Page 11
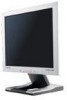
If any items are included with your dealer. Unpacking D-Sub Cable Quick Setup Guide Power Cord Monitor DC-Adapter VESA Mounting Bracket For Multimedia model (Option) Warranty Card (Not available in all locations) User's Guide and Driver Installation CD Multimedia Speaker Stand Sound Cable Introduction (SyncMaster 192B) User's Manual Unpacking Please make sure the following items are missing, contact your monitor.
If any items are included with your dealer. Unpacking D-Sub Cable Quick Setup Guide Power Cord Monitor DC-Adapter VESA Mounting Bracket For Multimedia model (Option) Warranty Card (Not available in all locations) User's Guide and Driver Installation CD Multimedia Speaker Stand Sound Cable Introduction (SyncMaster 192B) User's Manual Unpacking Please make sure the following items are missing, contact your monitor.
User Manual (ENGLISH)
Page 12
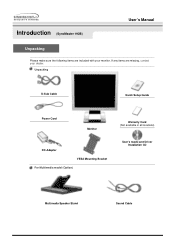
Unpacking D-Sub Cable Quick Setup Guide DVI Cable (Option) Power Cord DC-Adapter For Multimedia model (Option) Monitor Warranty Card (Not available in all locations) User's Guide and Driver Installation CD VESA Mounting Bracket Multimedia Speaker Stand Sound Cable If any items are included with your dealer. Introduction (SyncMaster 192T) User's Manual Unpacking Please make sure the following items are missing, contact your monitor.
Unpacking D-Sub Cable Quick Setup Guide DVI Cable (Option) Power Cord DC-Adapter For Multimedia model (Option) Monitor Warranty Card (Not available in all locations) User's Guide and Driver Installation CD VESA Mounting Bracket Multimedia Speaker Stand Sound Cable If any items are included with your dealer. Introduction (SyncMaster 192T) User's Manual Unpacking Please make sure the following items are missing, contact your monitor.
User Manual (ENGLISH)
Page 13
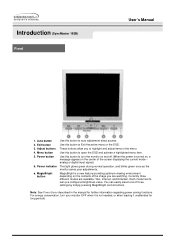
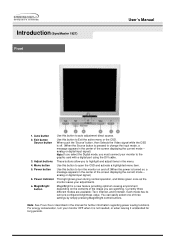
... as the monitor saves your monitor OFF when it is turned on the contents of three settings by simply pressing MagicBright control buttons. Introduction (SyncMaster 192B) Front User's Manual 1. These buttons allow you to turn your adjustments. Currently three different modes are watching. MagicBright is a new feature providing optimum viewing environment depending...
... as the monitor saves your monitor OFF when it is turned on the contents of three settings by simply pressing MagicBright control buttons. Introduction (SyncMaster 192B) Front User's Manual 1. These buttons allow you to turn your adjustments. Currently three different modes are watching. MagicBright is a new feature providing optimum viewing environment depending...
User Manual (ENGLISH)
Page 14
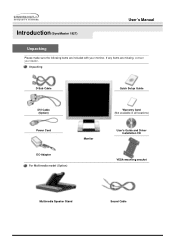
... while the OSD is off .(When the power is a new feature providing optimum viewing environment depending on , a message appears in the manual for long periods. Exit button Source button 3. Power indicator a. Menu button 5. MagicBright is turned on the contents of the screen displaying the... or digital input signal.) Note:If you select the Digital mode, you to auto adjustment direct access. Introduction (SyncMaster 192T) Front User's Manual 1. Note: See PowerSaver described in the center of three settings by simply pressing MagicBright control buttons. Adjust buttons 4.
... while the OSD is off .(When the power is a new feature providing optimum viewing environment depending on , a message appears in the manual for long periods. Exit button Source button 3. Power indicator a. Menu button 5. MagicBright is turned on the contents of the screen displaying the... or digital input signal.) Note:If you select the Digital mode, you to auto adjustment direct access. Introduction (SyncMaster 192T) Front User's Manual 1. Note: See PowerSaver described in the center of three settings by simply pressing MagicBright control buttons. Adjust buttons 4.
User Manual (ENGLISH)
Page 15
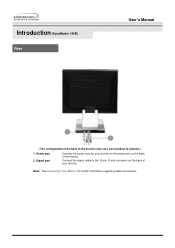
Signal port Connect the power cord for further information regarding cable connections. Note: See Connecting Your Monitor for your monitor to product.) 1. Connect the signal cable to the 15-pin, D-sub connector on the back of the monitor may vary from product to the power port on the back of your monitor. Power port 2. Introduction (SyncMaster 192B) Rear User's Manual (The configuration at the back of the monitor.
Signal port Connect the power cord for further information regarding cable connections. Note: See Connecting Your Monitor for your monitor to product.) 1. Connect the signal cable to the 15-pin, D-sub connector on the back of the monitor may vary from product to the power port on the back of your monitor. Power port 2. Introduction (SyncMaster 192B) Rear User's Manual (The configuration at the back of the monitor.
User Manual (ENGLISH)
Page 16
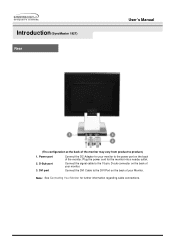
D-Sub port 3. DVI port Connect the DC Adapter for your monitor to the power port on the back of the monitor. Connect the DVI Cable to product.) 1. Note: See Connecting Your Monitor for the monitor into a nearby outlet. Power port 2. Connect the signal cable to the 15-pin, D-sub connector on the back of the monitor may vary from product to the DVI Port on the back of your monitor. Plug the power cord for further information regarding cable connections. Introduction (SyncMaster 192T) Rear User's Manual (The configuration at the back of your Monitor.
D-Sub port 3. DVI port Connect the DC Adapter for your monitor to the power port on the back of the monitor. Connect the DVI Cable to product.) 1. Note: See Connecting Your Monitor for the monitor into a nearby outlet. Power port 2. Connect the signal cable to the 15-pin, D-sub connector on the back of the monitor may vary from product to the DVI Port on the back of your monitor. Plug the power cord for further information regarding cable connections. Introduction (SyncMaster 192T) Rear User's Manual (The configuration at the back of your Monitor.
User Manual (ENGLISH)
Page 17
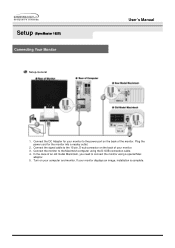
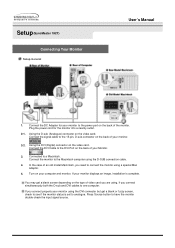
... Macintosh, you need to the power port on your monitor displays an image, installation is complete. If your computer and monitor. Setup (SyncMaster 192BT)) Connecting Your Monitor Setup-General User's Manual 1. Connect the signal cable to the Macintosh computer using a special Mac adaptor. 5. Connect the DC Adapter for the monitor into a nearby...
... Macintosh, you need to the power port on your monitor displays an image, installation is complete. If your computer and monitor. Setup (SyncMaster 192BT)) Connecting Your Monitor Setup-General User's Manual 1. Connect the signal cable to the Macintosh computer using a special Mac adaptor. 5. Connect the DC Adapter for the monitor into a nearby...
User Manual (ENGLISH)
Page 19
.... 2-1. Using the D-sub (Analogue) connector on the video card. Press Source button to the 15-pin, D-sub connector on your monitor. 2-2. Setup (SyncMaster 192T) Connecting Your Monitor Setup-General User's Manual 1. Plug the power cord for your monitor displays an image, installation is set to see if the monitor status is complete. Connect...
.... 2-1. Using the D-sub (Analogue) connector on the video card. Press Source button to the 15-pin, D-sub connector on your monitor. 2-2. Setup (SyncMaster 192T) Connecting Your Monitor Setup-General User's Manual 1. Plug the power cord for your monitor displays an image, installation is set to see if the monitor status is complete. Connect...
User Manual (ENGLISH)
Page 20
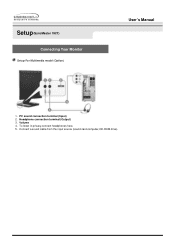
Connect a sound cable from the input source (sound card,computer,CD-ROM drive). Volume 4. Headphone connection terminal (Output) 3. To listen in privacy,connect headphones here. 5. PC sound connection terminal (Input) 2. Setup (SyncMaster 192T) Connecting Your Monitor Setup-For Multimedia model (Option) User's Manual 1.
Connect a sound cable from the input source (sound card,computer,CD-ROM drive). Volume 4. Headphone connection terminal (Output) 3. To listen in privacy,connect headphones here. 5. PC sound connection terminal (Input) 2. Setup (SyncMaster 192T) Connecting Your Monitor Setup-For Multimedia model (Option) User's Manual 1.

User Manual (ENGLISH)
Page 38
Specifications General (SyncMaster 192B) General Model Name SyncMaster 192B LCD Panel Size Display area Pixel Pitch 19" Diagonal 376.32 (H) x 301.056 (V) 0.297mm (H) x 0.297mm (V) Type a-si TFT active matrix Viewing Angle 170/170(L,R/T,B) ... the stand) Weight 5.5 kg (With Basic Stand) 5.6 kg (Multimedia Stand) VESA Mounting Interface 75 mm x 75 mm (for use with Specialty(Arm) Mounting hardware.) User's Manual
Specifications General (SyncMaster 192B) General Model Name SyncMaster 192B LCD Panel Size Display area Pixel Pitch 19" Diagonal 376.32 (H) x 301.056 (V) 0.297mm (H) x 0.297mm (V) Type a-si TFT active matrix Viewing Angle 170/170(L,R/T,B) ... the stand) Weight 5.5 kg (With Basic Stand) 5.6 kg (Multimedia Stand) VESA Mounting Interface 75 mm x 75 mm (for use with Specialty(Arm) Mounting hardware.) User's Manual
User Manual (ENGLISH)
Page 39
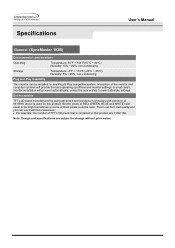
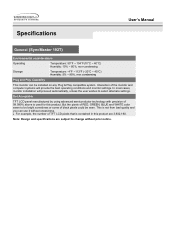
... not from bad quality and you can be seen. In most cases, monitor installation will provide the best operating conditions and monitor settings. Specifications User's Manual General (SyncMaster 192B) Environmental considerations Operating Temperature: 50°F ~ 104°F(10°C ~ 40°C) Humidity: 10% ~ 80%, non-condensing Storage Temperature: -4°F ~ 113°F (-20...
... not from bad quality and you can be seen. In most cases, monitor installation will provide the best operating conditions and monitor settings. Specifications User's Manual General (SyncMaster 192B) Environmental considerations Operating Temperature: 50°F ~ 104°F(10°C ~ 40°C) Humidity: 10% ~ 80%, non-condensing Storage Temperature: -4°F ~ 113°F (-20...
User Manual (ENGLISH)
Page 40
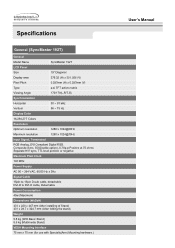
... Stand) VESA Mounting Interface 75 mm x 75 mm (for use with Specialty(Arm) Mounting hardware.) User's Manual Specifications General (SyncMaster 192T) General Model Name LCD Panel Size Display area Pixel Pitch Type Viewing Angle Synchronization Horizontal Vertical SyncMaster 192T 19" Diagonal 376.32 (H) x 301.056 (V) 0.297mm (H) x 0.297mm (V) a-si TFT active matrix 170/170(L,R/T,B) 30 ~ 81...
... Stand) VESA Mounting Interface 75 mm x 75 mm (for use with Specialty(Arm) Mounting hardware.) User's Manual Specifications General (SyncMaster 192T) General Model Name LCD Panel Size Display area Pixel Pitch Type Viewing Angle Synchronization Horizontal Vertical SyncMaster 192T 19" Diagonal 376.32 (H) x 301.056 (V) 0.297mm (H) x 0.297mm (V) a-si TFT active matrix 170/170(L,R/T,B) 30 ~ 81...
User Manual (ENGLISH)
Page 41
... contained in this product. z For example, the number of 99.999% above is used for this product are subject to change without uneasiness. Specifications User's Manual General (SyncMaster 192T) Environmental considerations Operating Temperature: 50°F ~ 104°F(10°C ~ 40°C) Humidity: 10% ~ 80%, non-condensing Storage Temperature: -4°F ~113°F (-20°...
... contained in this product. z For example, the number of 99.999% above is used for this product are subject to change without uneasiness. Specifications User's Manual General (SyncMaster 192T) Environmental considerations Operating Temperature: 50°F ~ 104°F(10°C ~ 40°C) Humidity: 10% ~ 80%, non-condensing Storage Temperature: -4°F ~113°F (-20°...
User Manual (ENGLISH)
Page 54
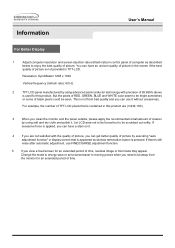
...semiconductor technology with the quality of picture, you view a fixed screen for an extended period of time, residual image or blurriness may appear. Resolution: SyncMaster 1208 x 1024 Vertical frequency (refresh rate): 60 Hz 2 TFT LCD panel manufactured by using soft and dry cloth and polish it . 4 ... on it . But the pixels of RED, GREEN, BLUE and WHITE color seem to enjoy the best quality of picture. Information User's Manual For Better Display 1 Adjust computer resolution and screen injection rate (refresh rate) in control panel of computer as window termination button is not ...
...semiconductor technology with the quality of picture, you view a fixed screen for an extended period of time, residual image or blurriness may appear. Resolution: SyncMaster 1208 x 1024 Vertical frequency (refresh rate): 60 Hz 2 TFT LCD panel manufactured by using soft and dry cloth and polish it . 4 ... on it . But the pixels of RED, GREEN, BLUE and WHITE color seem to enjoy the best quality of picture. Information User's Manual For Better Display 1 Adjust computer resolution and screen injection rate (refresh rate) in control panel of computer as window termination button is not ...

