
User Manual (ENGLISH)
Page 2
Main Page Safety Instructions Notational Power Installation Cleaning Other Introduction Unpacking Front Rear Setup Connecting Your Monitor Installing the Monitor Driver Automatic Manual Installing VESA compliant mounting On-Screen Display Troubleshooting Check List Q & A Self-Test Feature Check Specifications General Specifications PowerSaver Preset Display Modes Information Service Terms Regulatory Natural Color For Better Display Authority
Main Page Safety Instructions Notational Power Installation Cleaning Other Introduction Unpacking Front Rear Setup Connecting Your Monitor Installing the Monitor Driver Automatic Manual Installing VESA compliant mounting On-Screen Display Troubleshooting Check List Q & A Self-Test Feature Check Specifications General Specifications PowerSaver Preset Display Modes Information Service Terms Regulatory Natural Color For Better Display Authority
User Manual (ENGLISH)
Page 11
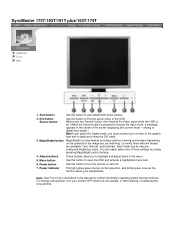
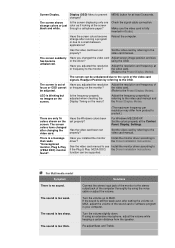
... a digital port using the DVI cable. 3. Power indicator This light glows green during normal operation, and blinks green once as the monitor saves your monitor to change the input mode, a message appears in the manual for long periods. Adjust buttons These buttons allow you are available: Text, Internet, and Entertain. Each mode has its own preconfigured brightness value. You can easily select one of the image you to auto adjustment direct access. 2. Auto button Use this button to open the OSD...
... a digital port using the DVI cable. 3. Power indicator This light glows green during normal operation, and blinks green once as the monitor saves your monitor to change the input mode, a message appears in the manual for long periods. Adjust buttons These buttons allow you are available: Text, Internet, and Entertain. Each mode has its own preconfigured brightness value. You can easily select one of the image you to auto adjustment direct access. 2. Auto button Use this button to open the OSD...
User Manual (ENGLISH)
Page 12
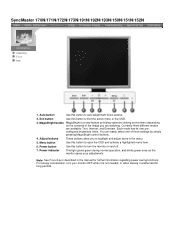
... regarding power saving functions. Each mode has its own preconfigured brightness value. Exit button Use this button to Exit the active menu or the OSD. 3. Power indicator This light glows green during normal operation, and blinks green once as the monitor saves your monitor OFF when it is a new feature providing optimum viewing environment depending on and off. 7. Menu button Use this button to open the OSD and activate a highlighted menu item. 6. SyncMaster 170N/171N/172N/173N...
... regarding power saving functions. Each mode has its own preconfigured brightness value. Exit button Use this button to Exit the active menu or the OSD. 3. Power indicator This light glows green during normal operation, and blinks green once as the monitor saves your monitor OFF when it is a new feature providing optimum viewing environment depending on and off. 7. Menu button Use this button to open the OSD and activate a highlighted menu item. 6. SyncMaster 170N/171N/172N/173N...
User Manual (ENGLISH)
Page 15
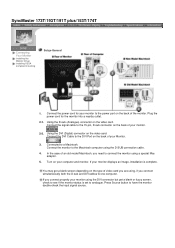
... monitor double-check the input signal source. Press Source button to a Macintosh. Plug the power cord for your computer and monitor. In the case of the monitor. If your monitor using the D-SUB connection cable. 4. Using the D-sub (Analogue) connector on the video card. You may get a blank or fuzzy screen, check to one computer. Connect the monitor to analogue. If you are using a special Mac adaptor. 5. Using the DVI (Digital) connector on the video card. Connect the power cord for the monitor into a nearby outlet. 2-1. Turn...
... monitor double-check the input signal source. Press Source button to a Macintosh. Plug the power cord for your computer and monitor. In the case of the monitor. If your monitor using the D-SUB connection cable. 4. Using the D-sub (Analogue) connector on the video card. You may get a blank or fuzzy screen, check to one computer. Connect the monitor to analogue. If you are using a special Mac adaptor. 5. Using the DVI (Digital) connector on the video card. Connect the power cord for the monitor into a nearby outlet. 2-1. Turn...
User Manual (ENGLISH)
Page 17
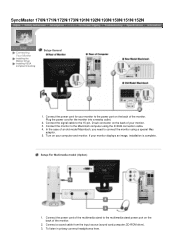
... monitor. Connect the power cord for the monitor into a nearby outlet. 2. Plug the power cord for your monitor. 3. Connect the monitor to the 15-pin, D-sub connector on the back of the multimedia stand to the multimedia stand power port on your monitor displays an image, installation is complete. SyncMaster 170N/171N/172N/173N/191N/192N/193N/150N/151N/152N Connecting Your Monitor Installing the Monitor Driver Installing VESA compliant mounting Setup-General 1. Connect the signal cable to the Macintosh computer using a special Mac adaptor. 5. Connect the power cord...
... monitor. Connect the power cord for the monitor into a nearby outlet. 2. Plug the power cord for your monitor. 3. Connect the monitor to the 15-pin, D-sub connector on the back of the multimedia stand to the multimedia stand power port on your monitor displays an image, installation is complete. SyncMaster 170N/171N/172N/173N/191N/192N/193N/150N/151N/152N Connecting Your Monitor Installing the Monitor Driver Installing VESA compliant mounting Setup-General 1. Connect the signal cable to the Macintosh computer using a special Mac adaptor. 5. Connect the power cord...
User Manual (ENGLISH)
Page 19
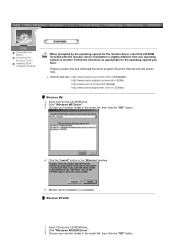
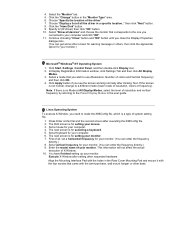
... and download the driver program file at the Internet web site shown here. Click "Windows ME Driver". 3. Insert CD into the CD-ROM drive. 2. Choose your monitor model in the model list, then click the "OK" button. Insert CD into the CD-ROM drive. 2. Windows XP/2000 1. Click the "Install" button in the model list, then click the "OK" button. 4. Choose your monitor model in...
... and download the driver program file at the Internet web site shown here. Click "Windows ME Driver". 3. Insert CD into the CD-ROM drive. 2. Choose your monitor model in the model list, then click the "OK" button. Insert CD into the CD-ROM drive. 2. Windows XP/2000 1. Click the "Install" button in the model list, then click the "OK" button. 4. Choose your monitor model in...
User Manual (ENGLISH)
Page 21
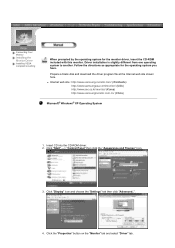
Connecting Your Monitor Installing the Monitor Driver Installing VESA compliant mounting When prompted by the operating system for the operating system you have. z Internet web site : http://www.samsung-monitor.com/ (Worldwide) http://www.samsungusa.com/monitor/ (USA) http://www.sec.co.kr/monitor/ (Korea) http://www.samsungmonitor.com.cn/ (China) Microsoft® Windows® XP Operating System 1. Click "Start" -> "Control Panel" then click the "Appearance and...
Connecting Your Monitor Installing the Monitor Driver Installing VESA compliant mounting When prompted by the operating system for the operating system you have. z Internet web site : http://www.samsung-monitor.com/ (Worldwide) http://www.samsungusa.com/monitor/ (USA) http://www.sec.co.kr/monitor/ (Korea) http://www.samsungmonitor.com.cn/ (China) Microsoft® Windows® XP Operating System 1. Click "Start" -> "Control Panel" then click the "Appearance and...
User Manual (ENGLISH)
Page 23
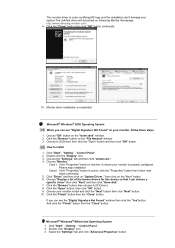
... "Properties" button is properly configured. And click the "Finish" button then the "Close" button. Click "Driver" and then click on the "Insert disk" window. 2. Select the "Settings" tab and click "Advanced Properties" button. If you can see "Digital Signature Not Found" on your system.The certified driver will be posted on Samsung Monitor Homepage http://www.samsung-monitor.com/. 9. Click "Start" , "Setting" , "Control Panel". 2. Monitor driver installation is completed. Click "Start" , "Setting" , "Control Panel". 2.
... "Properties" button is properly configured. And click the "Finish" button then the "Close" button. Click "Driver" and then click on the "Insert disk" window. 2. Select the "Settings" tab and click "Advanced Properties" button. If you can see "Digital Signature Not Found" on your system.The certified driver will be posted on Samsung Monitor Homepage http://www.samsung-monitor.com/. 9. Click "Start" , "Setting" , "Control Panel". 2. Monitor driver installation is completed. Click "Start" , "Setting" , "Control Panel". 2.
User Manual (ENGLISH)
Page 24
... mode (lower mode of resolution, colors or frequency). First of colors and Vertical frequency) and then click OK. 4. You have finished setting up your monitor. Execute X-Window after setting other base. Select "Show all devices" and choose the monitor that you connected to the Preset Display Modes in the "Monitor Type" area. 6. Select a mode that corresponds to the one you wish to use (Resolution, Number of all the driver in the Rear Cover Mounting Pad...
... mode (lower mode of resolution, colors or frequency). First of colors and Vertical frequency) and then click OK. 4. You have finished setting up your monitor. Execute X-Window after setting other base. Select "Show all devices" and choose the monitor that you connected to the Preset Display Modes in the "Monitor Type" area. 6. Select a mode that corresponds to the one you wish to use (Resolution, Number of all the driver in the Rear Cover Mounting Pad...
User Manual (ENGLISH)
Page 25
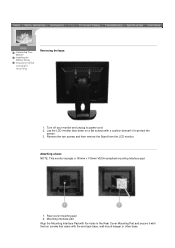
... Stand from the LCD monitor. Mounting interface pad Align the Mounting Interface Pad with the holes in the Rear Cover Mounting Pad and secure it with the four screws that came with a cushion beneath it to protect the screen. 3. Connecting Your Monitor Installing the Monitor Driver Installing VESA compliant mounting Removing the base 1. Attaching a base NOTE: This monitor accepts a 100mm x 100mm VESA-compliant mounting interface pad. 1. Rear cover mounting pad 2. Turn off your monitor and unplug its power cord...
... Stand from the LCD monitor. Mounting interface pad Align the Mounting Interface Pad with the holes in the Rear Cover Mounting Pad and secure it with the four screws that came with a cushion beneath it to protect the screen. 3. Connecting Your Monitor Installing the Monitor Driver Installing VESA compliant mounting Removing the base 1. Attaching a base NOTE: This monitor accepts a 100mm x 100mm VESA-compliant mounting interface pad. 1. Rear cover mounting pad 2. Turn off your monitor and unplug its power cord...
User Manual (ENGLISH)
Page 26
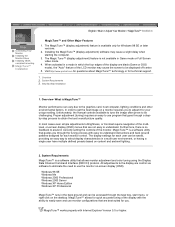
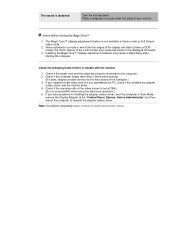
... the best overall picture quality. The MagicTune™ (display adjustment) feature is not available in correctly setting the controls of the multilevel, on content and ambient lighting. 2. What is a software utility that goes through the task tray, start menu, or right click on the desktop. In order to get the best image on -screen display (OSD). English > Main > Adjust Your Monitor > MagicTune™ Installation Connecting Your Monitor Installing the Monitor Driver Installing VESA compliant mounting MagicTune™ Installation MagicTune...
... the best overall picture quality. The MagicTune™ (display adjustment) feature is not available in correctly setting the controls of the multilevel, on content and ambient lighting. 2. What is a software utility that goes through the task tray, start menu, or right click on the desktop. In order to get the best image on -screen display (OSD). English > Main > Adjust Your Monitor > MagicTune™ Installation Connecting Your Monitor Installing the Monitor Driver Installing VESA compliant mounting MagicTune™ Installation MagicTune...

User Manual (ENGLISH)
Page 36
... adjust Color Tontrol - Color temperature is selected, sRGB mode exits) How to open the Color Control adjustment screen. Press the [ - ] button or [ + ] button to adjust Color Temperature - Follow these steps to select R(ed) G(reen_ or B(lue) and push the Menu button 4. Push the [ - ] button or [ + ] button until the Color Temperature screen is displayed. 3. Use the [-] or [+] button to adjust individual R,G,B color control. 1. Press the [ - ] button or [ + ] button to select User Adjusted, Reddish, Bluish or sRGB . (When you adjust the Brightness and Contrast...
... adjust Color Tontrol - Color temperature is selected, sRGB mode exits) How to open the Color Control adjustment screen. Press the [ - ] button or [ + ] button to adjust Color Temperature - Follow these steps to select R(ed) G(reen_ or B(lue) and push the Menu button 4. Push the [ - ] button or [ + ] button until the Color Temperature screen is displayed. 3. Use the [-] or [+] button to adjust individual R,G,B color control. 1. Press the [ - ] button or [ + ] button to select User Adjusted, Reddish, Bluish or sRGB . (When you adjust the Brightness and Contrast...
User Manual (ENGLISH)
Page 42
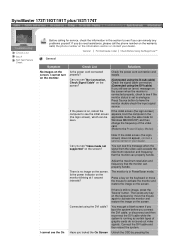
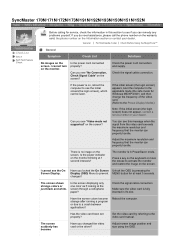
... reconnect the DVI cable while the system is set to see "Video mode not supported" on the screen? Check List Solutions Is the power cord connected properly? Check the power cord connection and supply. If the initial screen (the login screen) appears, boot the computer in the applicable mode (the safe mode for service, check the information in this message when the signal from the video card exceeds the maximum resolution and frequency that the monitor can see...
... reconnect the DVI cable while the system is set to see "Video mode not supported" on the screen? Check List Solutions Is the power cord connected properly? Check the power cord connection and supply. If the initial screen (the login screen) appears, boot the computer in the applicable mode (the safe mode for service, check the information in this message when the signal from the video card exceeds the maximum resolution and frequency that the monitor can see...
User Manual (ENGLISH)
Page 43
Check the signal cable connection. Have the screen colors become unbalanced. Set the video card by referring to a crash between applications? Have you adjusted the resolution Adjust the resolution and frequency at least 5 seconds. The screen can be supported. the video card. There is a message that reads "Unrecognized monitor, Plug & Play (VESA DDC) monitor found". (The maximum frequency per resolution may differ from the speaker. See the video card manual to see Install the monitor driver according to the monitor? The sound is too...
Check the signal cable connection. Have the screen colors become unbalanced. Set the video card by referring to a crash between applications? Have you adjusted the resolution Adjust the resolution and frequency at least 5 seconds. The screen can be supported. the video card. There is a message that reads "Unrecognized monitor, Plug & Play (VESA DDC) monitor found". (The maximum frequency per resolution may differ from the speaker. See the video card manual to see Install the monitor driver according to the monitor? The sound is too...
User Manual (ENGLISH)
Page 44
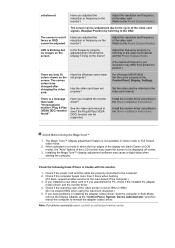
Check if the power cord and the cable are black (Game or DOS mode), the "Auto" feature of the LCD monitor may cause a slight delay when starting the computer. Check if the scanning ratio of the display are properly connected to reinstall the adapter (video) driver. If you assembled the PC, check if the installed the adapter (video) driver and the monitor driver. 4. Place a magazine or a pad under the stand of the computer.) 3. Check Before Using the MagicTune...
Check if the power cord and the cable are black (Game or DOS mode), the "Auto" feature of the LCD monitor may cause a slight delay when starting the computer. Check if the scanning ratio of the display are properly connected to reinstall the adapter (video) driver. If you assembled the PC, check if the installed the adapter (video) driver and the monitor driver. 4. Place a magazine or a pad under the stand of the computer.) 3. Check Before Using the MagicTune...
User Manual (ENGLISH)
Page 45
... screen. Adjust the maximum resolution and frequency that the monitor can properly handle. Is the power indicator on the screen? Is the screen displaying only one color as if looking at 1 second intervals? Reboot the computer. Has the video card been set properly? Adjust screen image position and size using the OSD. I cannot see this section to see if you locked the On Screen Unlock the OSD by referring to a crash between applications? Check the power cord connection...
... screen. Adjust the maximum resolution and frequency that the monitor can properly handle. Is the power indicator on the screen? Is the screen displaying only one color as if looking at 1 second intervals? Reboot the computer. Has the video card been set properly? Adjust screen image position and size using the OSD. I cannot see this section to see if you locked the On Screen Unlock the OSD by referring to a crash between applications? Check the power cord connection...
User Manual (ENGLISH)
Page 46
... "Control Panel, System, Device Administrator" and then reboot the computer to the Preset Display Modes). There is trouble with the monitor. 1. Install the monitor driver according to the computer. 2. unbalanced. Check if the power cord and the cable are only 16 colors shown on the screen. Have you have changed after -service for the main board of the video card. (Refer to be supported. Has the video card been set properly? Installing the MagicTune™ (display adjustment) software...
... "Control Panel, System, Device Administrator" and then reboot the computer to the Preset Display Modes). There is trouble with the monitor. 1. Install the monitor driver according to the computer. 2. unbalanced. Check if the power cord and the cable are only 16 colors shown on the screen. Have you have changed after -service for the main board of the video card. (Refer to be supported. Has the video card been set properly? Installing the MagicTune™ (display adjustment) software...
User Manual (ENGLISH)
Page 48
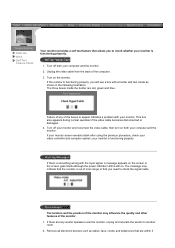
Unplug the video cable from the back of the monitor. 1. If the monitor is functioning properly. If your monitor screen remains blank after using the previous procedure, check your computer and the monitor. 2. If there is something wrong with the input signal, a message appears on the screen or the screen goes blank although the power indicator LED is functioning properly. 1. Turn off your monitor. your monitor is functioning properly, you...
Unplug the video cable from the back of the monitor. 1. If the monitor is functioning properly. If your monitor screen remains blank after using the previous procedure, check your computer and the monitor. 2. If there is something wrong with the input signal, a message appears on the screen or the screen goes blank although the power indicator LED is functioning properly. 1. Turn off your monitor. your monitor is functioning properly, you...
User Manual (ENGLISH)
Page 60
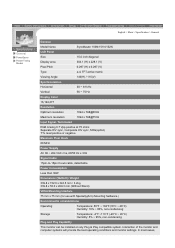
... Preset Timing Modes English > Main > Specification > General General Model Name SyncMaster 150N/151N/152N LCD Panel Size 15.0 inch diagonal Display area 304.1 (H) x 228.1 (V) Pixel Pitch 0.297 (H) x 0.297 (V) Type a-si TFT active matrix Viewing Angle 140(H) / 115(V) Synchronization Horizontal 30 ~ 61 kHz Vertical 56 ~ 75 Hz Display Color 16,194,277 Resolution Optimum resolution 1024 x 768@60Hz Maximum resolution 1024 x 768@75Hz Input Signal, Terminated RGB Analog 0.7 Vpp positive at 75 ohms Separate H/V sync, Composite H/V sync, SOG...
... Preset Timing Modes English > Main > Specification > General General Model Name SyncMaster 150N/151N/152N LCD Panel Size 15.0 inch diagonal Display area 304.1 (H) x 228.1 (V) Pixel Pitch 0.297 (H) x 0.297 (V) Type a-si TFT active matrix Viewing Angle 140(H) / 115(V) Synchronization Horizontal 30 ~ 61 kHz Vertical 56 ~ 75 Hz Display Color 16,194,277 Resolution Optimum resolution 1024 x 768@60Hz Maximum resolution 1024 x 768@75Hz Input Signal, Terminated RGB Analog 0.7 Vpp positive at 75 ohms Separate H/V sync, Composite H/V sync, SOG...
User Manual (ENGLISH)
Page 79
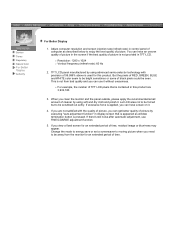
... of picture in TFT-LCD. { Resolution: 1280 x 1024 { Vertical frequency (refresh rate): 60 Hz 2. TFT LCD panel manufactured by executing "auto adjustment function" in display screen that is not provided in the screen if the best quality of time. You can use FINE/COARSE adjustment function. 5. But the pixels of RED, GREEN, BLUE and WHITE color seem to enjoy the best quality of 99.999% above is not from the monitor for an extended period of black pixels could...
... of picture in TFT-LCD. { Resolution: 1280 x 1024 { Vertical frequency (refresh rate): 60 Hz 2. TFT LCD panel manufactured by executing "auto adjustment function" in display screen that is not provided in the screen if the best quality of time. You can use FINE/COARSE adjustment function. 5. But the pixels of RED, GREEN, BLUE and WHITE color seem to enjoy the best quality of 99.999% above is not from the monitor for an extended period of black pixels could...


