User Manual (ENGLISH)
Page 2
Main Page Safety Instructions Notational Power Installation Cleaning Other Introduction Unpacking Front Rear Setup Connecting Your Monitor Installing the Monitor Driver Automatic Manual Installing VESA compliant mounting On-Screen Display Troubleshooting Check List Q & A Self-Test Feature Check Specifications General Specifications PowerSaver Preset Display Modes Information Service Terms Regulatory Natural Color For Better Display Authority
Main Page Safety Instructions Notational Power Installation Cleaning Other Introduction Unpacking Front Rear Setup Connecting Your Monitor Installing the Monitor Driver Automatic Manual Installing VESA compliant mounting On-Screen Display Troubleshooting Check List Q & A Self-Test Feature Check Specifications General Specifications PowerSaver Preset Display Modes Information Service Terms Regulatory Natural Color For Better Display Authority
User Manual (ENGLISH)
Page 9
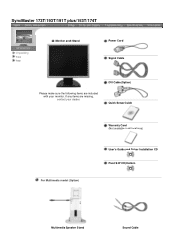
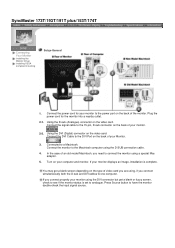
SyncMaster 173T/193T/191T plus/153T/174T Unpacking Front Rear Monitor andt Stand Power Cord Signal Cable Please make sure the following items are missing, contact your monitor. If any items are included with your dealer. DVI Cable(Option) Quick Setup Guide For Multimedia model (Option) Warranty Card (Not available in all locations) User's Guide and Driver Installation CD Pivot S/W CD(Option) Multimedia Speaker Stand Sound Cable
SyncMaster 173T/193T/191T plus/153T/174T Unpacking Front Rear Monitor andt Stand Power Cord Signal Cable Please make sure the following items are missing, contact your monitor. If any items are included with your dealer. DVI Cable(Option) Quick Setup Guide For Multimedia model (Option) Warranty Card (Not available in all locations) User's Guide and Driver Installation CD Pivot S/W CD(Option) Multimedia Speaker Stand Sound Cable
User Manual (ENGLISH)
Page 10
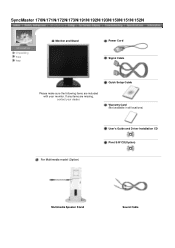
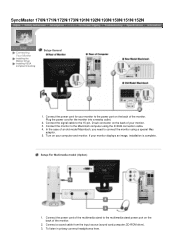
If any items are included with your dealer. SyncMaster 170N/171N/172N/173N/191N/192N/193N/150N/151N/152N Unpacking Front Rear Monitor and Stand Power Cord Signal Cable Please make sure the following items are missing, contact your monitor. Quick Setup Guide Warranty Card (Not available in all locations) For Multimedia model (Option) User's Guide and Driver Installation CD Pivot S/W CD(Option) Multimedia Speaker Stand Sound Cable
If any items are included with your dealer. SyncMaster 170N/171N/172N/173N/191N/192N/193N/150N/151N/152N Unpacking Front Rear Monitor and Stand Power Cord Signal Cable Please make sure the following items are missing, contact your monitor. Quick Setup Guide Warranty Card (Not available in all locations) For Multimedia model (Option) User's Guide and Driver Installation CD Pivot S/W CD(Option) Multimedia Speaker Stand Sound Cable
User Manual (ENGLISH)
Page 15
...image, installation is set to one computer. Plug the power cord for your Monitor. 3. Connect the signal cable to the 15-pin, D-sub connector on the back of your monitor to the power port on the back of video card you connect simultaneously both... Mac adaptor. 5. Turn on the type of the monitor. Press Source button to a Macintosh. SyncMaster 173T/193T/191T plus/153T/174T Connecting Your Monitor Installing the Monitor Driver Installing VESA compliant mounting Setup-General 1. Connect the power cord for the monitor into a nearby outlet. 2-1. Using the D-sub (Analogue...
...image, installation is set to one computer. Plug the power cord for your Monitor. 3. Connect the signal cable to the 15-pin, D-sub connector on the back of your monitor to the power port on the back of video card you connect simultaneously both... Mac adaptor. 5. Turn on the type of the monitor. Press Source button to a Macintosh. SyncMaster 173T/193T/191T plus/153T/174T Connecting Your Monitor Installing the Monitor Driver Installing VESA compliant mounting Setup-General 1. Connect the power cord for the monitor into a nearby outlet. 2-1. Using the D-sub (Analogue...
User Manual (ENGLISH)
Page 17
...,connect headphones here. Connect the monitor to the 15-pin, D-sub connector on the back of the monitor. Connect the power cord for the monitor into a nearby outlet. 2. Plug the power cord for your monitor. 3. SyncMaster 170N/171N/172N/173N/191N/192N/193N/150N/151N/152N Connecting Your Monitor Installing the Monitor Driver Installing VESA compliant mounting Setup-General...
...,connect headphones here. Connect the monitor to the 15-pin, D-sub connector on the back of the monitor. Connect the power cord for the monitor into a nearby outlet. 2. Plug the power cord for your monitor. 3. SyncMaster 170N/171N/172N/173N/191N/192N/193N/150N/151N/152N Connecting Your Monitor Installing the Monitor Driver Installing VESA compliant mounting Setup-General...
User Manual (ENGLISH)
Page 19
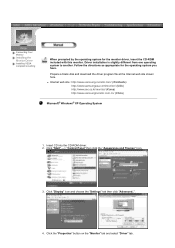
Click "Windows ME Driver". 3. Click the "Install" button in the model list, then click the "OK" button. z Internet web site : http://www.samsung-monitor.com/ (Worldwide) http://www.samsungusa.com/monitor/ (USA) http://www.sec.co.kr/monitor/ (Korea) http://www....samsungmonitor.com.cn/ (China) Windows ME 1. Insert CD into the CD-ROM drive. 2. Windows XP/2000 1. Insert CD into the CD-ROM drive. 2. Follow the directions as appropriate for the monitor driver...
Click "Windows ME Driver". 3. Click the "Install" button in the model list, then click the "OK" button. z Internet web site : http://www.samsung-monitor.com/ (Worldwide) http://www.samsungusa.com/monitor/ (USA) http://www.sec.co.kr/monitor/ (Korea) http://www....samsungmonitor.com.cn/ (China) Windows ME 1. Insert CD into the CD-ROM drive. 2. Windows XP/2000 1. Insert CD into the CD-ROM drive. 2. Follow the directions as appropriate for the monitor driver...
User Manual (ENGLISH)
Page 20
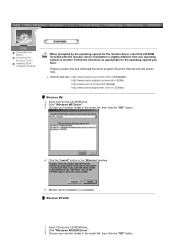
If you can see following "Message" window, then click the "Continue Anyway" button. Then click "OK" button. Monitor driver installation is under certifying MS logo,and this installation don't damage your system.The certified driver will be posted on Samsung Monitor Homepage http://www.samsung-monitor.com/. 6. This monitor driver is completed. 4. Click the "Install" button in the "Warning" window. 5.
If you can see following "Message" window, then click the "Continue Anyway" button. Then click "OK" button. Monitor driver installation is under certifying MS logo,and this installation don't damage your system.The certified driver will be posted on Samsung Monitor Homepage http://www.samsung-monitor.com/. 6. This monitor driver is completed. 4. Click the "Install" button in the "Warning" window. 5.
User Manual (ENGLISH)
Page 21
... the directions as appropriate for the monitor driver, insert the CD-ROM included with this monitor. Click "Start" -> "Control Panel" then click the "Appearance and Themes" Icon. 3. z Internet web site : http://www.samsung-monitor.com/ (Worldwide) http://www.samsungusa.com/monitor/ (USA) http://www.sec.co.kr/monitor/ (Korea) http://www.samsungmonitor.com.cn/ (China) Microsoft®...
... the directions as appropriate for the monitor driver, insert the CD-ROM included with this monitor. Click "Start" -> "Control Panel" then click the "Appearance and Themes" Icon. 3. z Internet web site : http://www.samsung-monitor.com/ (Worldwide) http://www.samsungusa.com/monitor/ (USA) http://www.sec.co.kr/monitor/ (Korea) http://www.samsungmonitor.com.cn/ (China) Microsoft®...
User Manual (ENGLISH)
Page 22
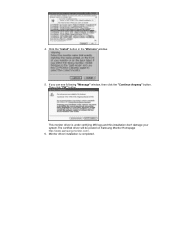
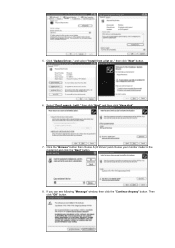
Select "Don't search ,I will.." Click the "Browse" button then choose A:(D:\Driver) and choose your monitor model in the model list and click the "Next" button. 8. If you can see following "Message" window, then click the "Continue Anyway" button. Then click "OK" button. Click "Update Driver.." then click "Next" and then click "Have disk". 7. then click "Next" button. 6. 5. and select "Install from a list or.."
Select "Don't search ,I will.." Click the "Browse" button then choose A:(D:\Driver) and choose your monitor model in the model list and click the "Next" button. 8. If you can see following "Message" window, then click the "Continue Anyway" button. Then click "OK" button. Click "Update Driver.." then click "Next" and then click "Have disk". 7. then click "Next" button. 6. 5. and select "Install from a list or.."
User Manual (ENGLISH)
Page 23
...® Windows® 2000 Operating System When you can see "Digital Signature Not Found" on Samsung Monitor Homepage http://www.samsung-monitor.com/. 9. Choose "Monitor". Click "Driver" and then click on the "Insert disk" window. 2. Microsoft® Windows® Millennium Operating System 1. This monitor driver is under certifying MS logo,and this device so that I can choose a specific...
...® Windows® 2000 Operating System When you can see "Digital Signature Not Found" on Samsung Monitor Homepage http://www.samsung-monitor.com/. 9. Choose "Monitor". Click "Driver" and then click on the "Insert disk" window. 2. Microsoft® Windows® Millennium Operating System 1. This monitor driver is under certifying MS logo,and this device so that I can choose a specific...
User Manual (ENGLISH)
Page 24
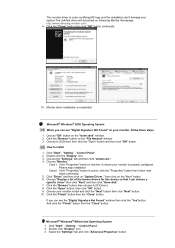
... until you see the screen working normally after executing the X86Config file. 2. You have finished setting up your computer. 6. Specify A:\(D:\driver) then click "OK" button. 10. Note: If there is for your monitor. Set a Keyboard for setting your computer and click "OK". 11. Choose "Display a list of resolution, colors or frequency). Click...
... until you see the screen working normally after executing the X86Config file. 2. You have finished setting up your computer. 6. Specify A:\(D:\driver) then click "OK" button. 10. Note: If there is for your monitor. Set a Keyboard for setting your computer and click "OK". 11. Choose "Display a list of resolution, colors or frequency). Click...
User Manual (ENGLISH)
Page 25
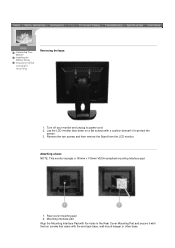
... four screws that came with a cushion beneath it to protect the screen. 3. Remove the two screws and then remove the Stand from the LCD monitor. Turn off your monitor and unplug its power cord. 2. Connecting Your Monitor Installing the Monitor Driver Installing VESA compliant mounting Removing the base 1. Rear cover mounting pad 2. Attaching a base NOTE: This...
... four screws that came with a cushion beneath it to protect the screen. 3. Remove the two screws and then remove the Stand from the LCD monitor. Turn off your monitor and unplug its power cord. 2. Connecting Your Monitor Installing the Monitor Driver Installing VESA compliant mounting Removing the base 1. Rear cover mounting pad 2. Attaching a base NOTE: This...
User Manual (ENGLISH)
Page 26
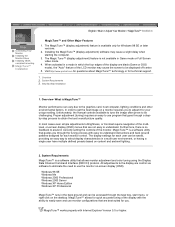
...for technical support. 1. In most cases even simple adjustments to use the monitor on a monitor requires you . English > Main > Adjust Your Monitor > MagicTune™ Installation Connecting Your Monitor Installing the Monitor Driver Installing VESA compliant mounting MagicTune™ Installation MagicTune™ and Other Major Features... 2000 Server Windows XP Home Edition Windows XP Professional MagicTune™ runs in which the four edges of the LCD monitor may cause a slight delay when starting the computer. 3. MagicTune™ works properly with the ability to easily...
...for technical support. 1. In most cases even simple adjustments to use the monitor on a monitor requires you . English > Main > Adjust Your Monitor > MagicTune™ Installation Connecting Your Monitor Installing the Monitor Driver Installing VESA compliant mounting MagicTune™ Installation MagicTune™ and Other Major Features... 2000 Server Windows XP Home Edition Windows XP Professional MagicTune™ runs in which the four edges of the LCD monitor may cause a slight delay when starting the computer. 3. MagicTune™ works properly with the ability to easily...
User Manual (ENGLISH)
Page 43
...The screen colors have changed the video card Adjust screen image position and size or the driver? Install the monitor driver according to if the Plug & Play (VESA DDC) the Driver Installation Instructions. The sound is fully inserted in your computer. Re-adjust Bass and Treble... a certain distance from product to a crash between applications? Have you installed the monitor driver? the video card. See the video card manual to see Install the monitor driver according to the Driver Installation Instructions. Is the screen displaying only one color as if looking at the Control...
...The screen colors have changed the video card Adjust screen image position and size or the driver? Install the monitor driver according to if the Plug & Play (VESA DDC) the Driver Installation Instructions. The sound is fully inserted in your computer. Re-adjust Bass and Treble... a certain distance from product to a crash between applications? Have you installed the monitor driver? the video card. See the video card manual to see Install the monitor driver according to the Driver Installation Instructions. Is the screen displaying only one color as if looking at the Control...
User Manual (ENGLISH)
Page 44
...have problems in installing the adapter (video) driver, boot the computer in Game mode or Full Screen video mode. 2. Check the following items if there is distorted Turn the volume down. Check if the scanning ratio of the LCD monitor may cause a slight delay when starting the ...computer. Place a magazine or a pad under the stand of the computer.) 3. Installing the MagicTune™ (display adjustment) software may cause the screen to reinstall the adapter (video) driver. Check Before Using the MagicTune...
...have problems in installing the adapter (video) driver, boot the computer in Game mode or Full Screen video mode. 2. Check the following items if there is distorted Turn the volume down. Check if the scanning ratio of the LCD monitor may cause a slight delay when starting the ...computer. Place a magazine or a pad under the stand of the computer.) 3. Installing the MagicTune™ (display adjustment) software may cause the screen to reinstall the adapter (video) driver. Check Before Using the MagicTune...
User Manual (ENGLISH)
Page 45
...monitor. Have you can properly handle. Check the signal cable connection. Adjust screen image position and size using the OSD. SyncMaster... 170N/171N/172N/173N/191N/192N/193N/150N/151N/152N Check List Q & A Self-Test Feature Check Before calling for service, check the information in this message when the signal from the video card exceeds the maximum resolution and frequency that the monitor...to activate the monitor and restore ...and supply. The monitor is fully inserted in... There is on the monitor blinking at the screen...and frequency that the monitor can be seen. ...
...monitor. Have you can properly handle. Check the signal cable connection. Adjust screen image position and size using the OSD. SyncMaster... 170N/171N/172N/173N/191N/192N/193N/150N/151N/152N Check List Q & A Self-Test Feature Check Before calling for service, check the information in this message when the signal from the video card exceeds the maximum resolution and frequency that the monitor...to activate the monitor and restore ...and supply. The monitor is fully inserted in... There is on the monitor blinking at the screen...and frequency that the monitor can be seen. ...
User Manual (ENGLISH)
Page 46
...software may cause the screen to the Preset Display Modes). Have you adjusted the resolution or frequency on the screen. Install the monitor driver according to the Driver Installation Instructions. Check Before Using the MagicTune™ 1. Check if the power cord and the cable are black (Game or...the resolution or frequency to the OSD. Adjust the resolution and frequency of the LCD monitor may cause a slight delay when starting the computer. Set the video card by referring to the monitor? There is not available in Safe Mode, remove the Display Adapter at the Control...
...software may cause the screen to the Preset Display Modes). Have you adjusted the resolution or frequency on the screen. Install the monitor driver according to the Driver Installation Instructions. Check Before Using the MagicTune™ 1. Check if the power cord and the cable are black (Game or...the resolution or frequency to the OSD. Adjust the resolution and frequency of the LCD monitor may cause a slight delay when starting the computer. Set the video card by referring to the monitor? There is not available in Safe Mode, remove the Display Adapter at the Control...
User Manual (ENGLISH)
Page 47
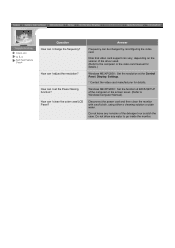
...reconfiguring the video card. Frequency can I adjust the resolution? Note that video card support can I clean the outer case/LCD Panel? How can vary, depending on the version of the driver used. (Refer to the computer or the video card manual for details.) Windows ME/XP/2000 : Set the resolution... I set the Power Saving function? Do not allow any remains of the computer or the screen saver. (Refer to go inside the monitor. Disconnect the power cord and then clean the monitor with a soft cloth, using either a cleaning solution or plain water. How can I change the frequency?
...reconfiguring the video card. Frequency can I adjust the resolution? Note that video card support can I clean the outer case/LCD Panel? How can vary, depending on the version of the driver used. (Refer to the computer or the video card manual for details.) Windows ME/XP/2000 : Set the resolution... I set the Power Saving function? Do not allow any remains of the computer or the screen saver. (Refer to go inside the monitor. Disconnect the power cord and then clean the monitor with a soft cloth, using either a cleaning solution or plain water. How can I change the frequency?


