Operating Instructions
Page 3
......30 About Operation Tools...33 Initial Setup...34 Initial Setup...34 Changing Operation Modes...35 Multi-access...35 1 TABLE OF CONTENTS How to Read This Manual...9 Introduction...9 Legal Prohibition...9 Disclaimer...9 Differences in the State of California...16 ENERGY STAR Program...17 Saving Energy...17 1.
......30 About Operation Tools...33 Initial Setup...34 Initial Setup...34 Changing Operation Modes...35 Multi-access...35 1 TABLE OF CONTENTS How to Read This Manual...9 Introduction...9 Legal Prohibition...9 Disclaimer...9 Differences in the State of California...16 ENERGY STAR Program...17 Saving Energy...17 1.
Operating Instructions
Page 5
... with 2-Sided and Combined Printing 109 Specifying Combined and 2-sided Copies 112 Copying 2-Sided Originals with 2-Sided and Combined Printing (Manual 2-Sided Copying 113 Manually Performing 2-Sided Copying Using the ADF 114 Manually Performing 2-Sided Copying Using the Exposure Glass 114 Copying Both Sides of an ID Card onto One Side of Paper...
... with 2-Sided and Combined Printing 109 Specifying Combined and 2-sided Copies 112 Copying 2-Sided Originals with 2-Sided and Combined Printing (Manual 2-Sided Copying 113 Manually Performing 2-Sided Copying Using the ADF 114 Manually Performing 2-Sided Copying Using the Exposure Glass 114 Copying Both Sides of an ID Card onto One Side of Paper...
Operating Instructions
Page 11
...for any questions concerning the legality of parts other than genuine parts from the manufacturer with it. How to Read This Manual Introduction This manual contains detailed instructions and notes on the operation and use genuine toner from the manufacturer. In no event will the ... handling or operating the machine. This machine is not inclusive. The preceding list is meant as a result of this manual carefully before using this manual in no responsibility for which reproduction is generally prohibited by law. For your legal advisor. Keep this machine or any ...
...for any questions concerning the legality of parts other than genuine parts from the manufacturer with it. How to Read This Manual Introduction This manual contains detailed instructions and notes on the operation and use genuine toner from the manufacturer. In no event will the ... handling or operating the machine. This machine is not inclusive. The preceding list is meant as a result of this manual carefully before using this manual in no responsibility for which reproduction is generally prohibited by law. For your legal advisor. Keep this machine or any ...
Operating Instructions
Page 13
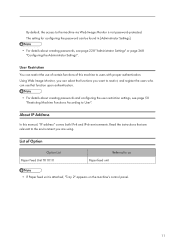
... Option Option List Paper Feed Unit TK1010 Referred to as Paper feed unit • If Paper feed unit is not password-protected. List of this manual, "IP address" covers both IPv4 and IPv6 environments. About IP Address In this machine to User". The setting for configuring the password can restrict the...
... Option Option List Paper Feed Unit TK1010 Referred to as Paper feed unit • If Paper feed unit is not password-protected. List of this manual, "IP address" covers both IPv4 and IPv6 environments. About IP Address In this machine to User". The setting for configuring the password can restrict the...
Operating Instructions
Page 14
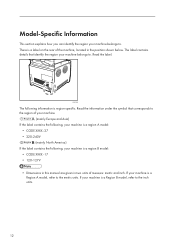
... your machine belongs to the metric units. Read the label. There is a region B model: • CODE XXXX -17 • 120-127V • Dimensions in this manual are given in the position shown below. Read the information under the symbol that identify the region your machine is a Region A model, refer to . DAC029...
... your machine belongs to the metric units. Read the label. There is a region B model: • CODE XXXX -17 • 120-127V • Dimensions in this manual are given in the position shown below. Read the information under the symbol that identify the region your machine is a Region A model, refer to . DAC029...
Operating Instructions
Page 15
... of separately via the appropriate return and collection systems available. Recycled paper The machine can print 13 Recycling of products helps to either the User's Manual for this information or the packaging of the consumable. The symbol indicates that this product is produced in accordance with the symbol below. By following...
... of separately via the appropriate return and collection systems available. Recycled paper The machine can print 13 Recycling of products helps to either the User's Manual for this information or the packaging of the consumable. The symbol indicates that this product is produced in accordance with the symbol below. By following...
Operating Instructions
Page 44
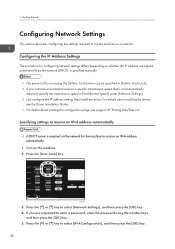
Tools Lock]. • If your network environment requires a specific transmission speed that is specified manually. • The password for the machine to use the machine on the machine. 2. Getting Started Configuring Network Settings This section describes configuring the settings required ...
Tools Lock]. • If your network environment requires a specific transmission speed that is specified manually. • The password for the machine to use the machine on the machine. 2. Getting Started Configuring Network Settings This section describes configuring the settings required ...

Operating Instructions
Page 45
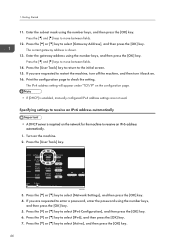
.... Print the configuration page to select [Subnet Mask], and then press the [OK] key. The current subnet mask is shown. 9. Assigning the machine's IPv4 address manually • The IPv4 address assigned to select [IPv4 Configuration], and then press the [OK] key. 6. DAC509 3. Press the [ ] or [ ] key to the machine must not...
.... Print the configuration page to select [Subnet Mask], and then press the [OK] key. The current subnet mask is shown. 9. Assigning the machine's IPv4 address manually • The IPv4 address assigned to select [IPv4 Configuration], and then press the [OK] key. 6. DAC509 3. Press the [ ] or [ ] key to the machine must not...
Operating Instructions
Page 46
1. Enter the gateway address using the number keys, and then press the [OK] key. DAC509 3. Getting Started 11. The current gateway address is enabled, manually configured IPv4 address settings are not used. Press the [User Tools] key to return to check the setting. Print the configuration page to the initial ...
1. Enter the gateway address using the number keys, and then press the [OK] key. DAC509 3. Getting Started 11. The current gateway address is enabled, manually configured IPv4 address settings are not used. Press the [User Tools] key to return to check the setting. Print the configuration page to the initial ...
Operating Instructions
Page 47
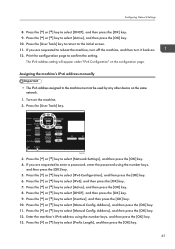
... to enter a password, enter the password using the number keys, and then press the [OK] key. 13. Press the [ ] or [ ] key to select [Manual Config. Press the [ ] or [ ] key to select [Inactive], and then press the [OK] key. 10. Enter the machine's IPv6 address using the number keys..., and then press the [OK] key. 5. Assigning the machine's IPv6 address manually • The IPv6 address assigned to select [IPv6 Configuration], and then press the [OK] key. 6. If you are requested to reboot the machine, turn...
... to enter a password, enter the password using the number keys, and then press the [OK] key. 13. Press the [ ] or [ ] key to select [Manual Config. Press the [ ] or [ ] key to select [Inactive], and then press the [OK] key. 10. Enter the machine's IPv6 address using the number keys..., and then press the [OK] key. 5. Assigning the machine's IPv6 address manually • The IPv6 address assigned to select [IPv6 Configuration], and then press the [OK] key. 6. If you are requested to reboot the machine, turn...
Operating Instructions
Page 49
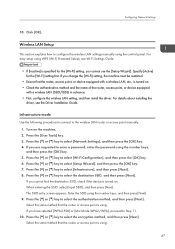
Wireless LAN Setup This section explains how to configure the wireless LAN settings manually using . Turn on . Press the [ ] or [ ] key to select the encryption method, and then press [Next]. Select the same method that the router or access ... to connect to select [Wi-Fi Configuration], and then press the [OK] key. 6. Press the [ ] or [ ] key to the wireless LAN router or access point manually. 1. If you cannot find the destination SSID, check if the device is turned on. • Check the authentication method and the name of the router...
Wireless LAN Setup This section explains how to configure the wireless LAN settings manually using . Turn on . Press the [ ] or [ ] key to select the encryption method, and then press [Next]. Select the same method that the router or access ... to connect to select [Wi-Fi Configuration], and then press the [OK] key. 6. Press the [ ] or [ ] key to the wireless LAN router or access point manually. 1. If you cannot find the destination SSID, check if the device is turned on. • Check the authentication method and the name of the router...

Operating Instructions
Page 50
... [ ] key to select a communication channel, and then press [Next]. Select a channel that corresponds to -peer network. • In Ad Hoc network, every device must be manually assigned an IP address for identifying the encryption key. Enter the encryption key using the number keys, and then press [Next]. 10. If you are...
... [ ] key to select a communication channel, and then press [Next]. Select a channel that corresponds to -peer network. • In Ad Hoc network, every device must be manually assigned an IP address for identifying the encryption key. Enter the encryption key using the number keys, and then press [Next]. 10. If you are...
Operating Instructions
Page 97
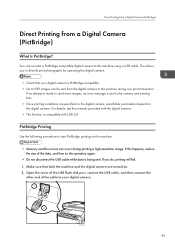
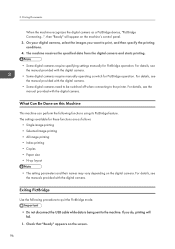
For details, see the manuals provided with USB 2.0. Make sure that your digital camera. 1 2 DAC030 95 If you to start PictBridge printing on . 2. Open the cover of the USB flash ...
For details, see the manuals provided with USB 2.0. Make sure that your digital camera. 1 2 DAC030 95 If you to start PictBridge printing on . 2. Open the cover of the USB flash ...
Operating Instructions
Page 98
... not disconnect the USB cable while data is being sent to print, and then specify the printing conditions. 4. For details, see the manual provided with the digital camera. • Some digital cameras need to be switched off when connecting to the printer. For details, see the... manual provided with the digital camera. The settings available for these functions are as a PictBridge device, "PictBridge Connecting...", then "Ready" will fail. 1....
... not disconnect the USB cable while data is being sent to print, and then specify the printing conditions. 4. For details, see the manual provided with the digital camera. • Some digital cameras need to be switched off when connecting to the printer. For details, see the... manual provided with the digital camera. The settings available for these functions are as a PictBridge device, "PictBridge Connecting...", then "Ready" will fail. 1....
Operating Instructions
Page 109
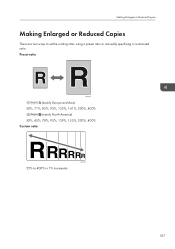
Preset ratio DAC578 (mainly Europe and Asia) 50%, 71%, 82%, 93%, 122%, 141%, 200%, 400% (mainly North America) 50%, 65%, 78%, 93%, 129%, 155%, 200%, 400% Custom ratio CES106 25% to set the scaling ratio: using a preset ratio or manually specifying a customized ratio. Making Enlarged or Reduced Copies Making Enlarged or Reduced Copies There are two ways to 400% in 1% increments. 107
Preset ratio DAC578 (mainly Europe and Asia) 50%, 71%, 82%, 93%, 122%, 141%, 200%, 400% (mainly North America) 50%, 65%, 78%, 93%, 129%, 155%, 200%, 400% Custom ratio CES106 25% to set the scaling ratio: using a preset ratio or manually specifying a customized ratio. Making Enlarged or Reduced Copies Making Enlarged or Reduced Copies There are two ways to 400% in 1% increments. 107
Operating Instructions
Page 115
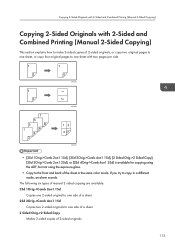
...originals, or copy two original pages to one sheet, or copy four original pages to one sheet with 2-Sided and Combined Printing (Manual 2-Sided Copying) This section explains how to make 2-sided copies of 2-sided originals. 113 Copying 2-Sided Originals with 2-Sided and Combined Printing... (Manual 2-Sided Copying) Copying 2-Sided Originals with two pages per side. DAC602 DAC603 DAC603 • [2Sd 1Orig->Comb 2on1 1Sd], [2Sd 2Orig->Comb ...
...originals, or copy two original pages to one sheet, or copy four original pages to one sheet with 2-Sided and Combined Printing (Manual 2-Sided Copying) This section explains how to make 2-sided copies of 2-sided originals. 113 Copying 2-Sided Originals with 2-Sided and Combined Printing... (Manual 2-Sided Copying) Copying 2-Sided Originals with two pages per side. DAC602 DAC603 DAC603 • [2Sd 1Orig->Comb 2on1 1Sd], [2Sd 2Orig->Comb ...
Operating Instructions
Page 116
... 6. After all 2-sided originals into the ADF again with four pages per side. After all sheets. Press the [ ] or [ ] key to make 2-sided copies using [Manual 2 Sided Scan Mode], you cannot print the last page. Press [Dup/Comb]. 2. Place all originals are being scanned, the job is canceled.... Manually Performing 2-Sided Copying Using the Exposure Glass • If you place the originals, press the [B&W Start] key or [Color Start] key within the time ...
... 6. After all 2-sided originals into the ADF again with four pages per side. After all sheets. Press the [ ] or [ ] key to make 2-sided copies using [Manual 2 Sided Scan Mode], you cannot print the last page. Press [Dup/Comb]. 2. Place all originals are being scanned, the job is canceled.... Manually Performing 2-Sided Copying Using the Exposure Glass • If you place the originals, press the [B&W Start] key or [Color Start] key within the time ...
Operating Instructions
Page 117
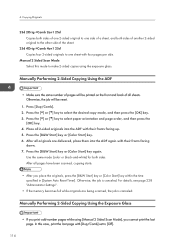
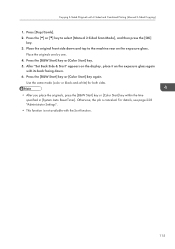
... one by one. 4. Press the [ ] or [ ] key to the machine rear on the exposure glass again with its back facing down and top to select [Manual 2 Sided Scan Mode], and then press the [OK] key. 3. Press the [B&W Start] key or [Color Start] key. 5. Press the [B&W Start] key or [Color Start] key... the time specified in [System Auto Reset Timer]. Place the original front side down . 6. Otherwise, the job is not available with 2-Sided and Combined Printing (Manual 2-Sided Copying) 1.
... one by one. 4. Press the [ ] or [ ] key to the machine rear on the exposure glass again with its back facing down and top to select [Manual 2 Sided Scan Mode], and then press the [OK] key. 3. Press the [B&W Start] key or [Color Start] key. 5. Press the [B&W Start] key or [Color Start] key... the time specified in [System Auto Reset Timer]. Place the original front side down . 6. Otherwise, the job is not available with 2-Sided and Combined Printing (Manual 2-Sided Copying) 1.

Operating Instructions
Page 158
Place the original on the machine's settings, you manually entered the fax number. In this case, proceed to Step 3. 6. DAC506 2. In this case, re-enter the number within 60 seconds, if the fax numbers ...
Place the original on the machine's settings, you manually entered the fax number. In this case, proceed to Step 3. 6. DAC506 2. In this case, re-enter the number within 60 seconds, if the fax numbers ...
Operating Instructions
Page 159
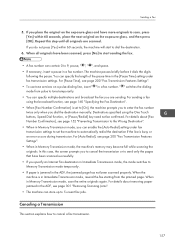
... about [Fax Number Confirmation], see page 152 "Preventing Transmission to send only the pages that have been scanned successfully. • If you dial the destination manually. If you are scanned. You can contain 0 to 5 unsent fax jobs. For sending a fax using the One Touch buttons, Speed Dial function, or [Pause/Redial...
... about [Fax Number Confirmation], see page 152 "Preventing Transmission to send only the pages that have been scanned successfully. • If you dial the destination manually. If you are scanned. You can contain 0 to 5 unsent fax jobs. For sending a fax using the One Touch buttons, Speed Dial function, or [Pause/Redial...


