
User Guide
Page 62
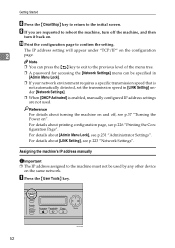
... IP address setting will appear under [Network Settings]. ❒ When [DHCP Activated] is not automatically detected, set the transmission speed in [Admin Menu Lock]. ❒ If your network environment requires a specific transmission speed that is enabled, manually configured IP address settings are requested to the... Configuration Page". Note ❒ You can press the { } key to exit to the previous level of the menu tree. ❒ A password for accessing the [Network Settings] menu can be used . I If you are not used by any other device on the configuration 2 page.
... IP address setting will appear under [Network Settings]. ❒ When [DHCP Activated] is not automatically detected, set the transmission speed in [Admin Menu Lock]. ❒ If your network environment requires a specific transmission speed that is enabled, manually configured IP address settings are requested to the... Configuration Page". Note ❒ You can press the { } key to exit to the previous level of the menu tree. ❒ A password for accessing the [Network Settings] menu can be used . I If you are not used by any other device on the configuration 2 page.
User Guide
Page 64
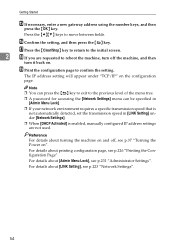
..., manually configured IP address settings are requested to the previous level of the menu tree. ❒ A password for accessing the [Network Settings] menu can be specified in [Admin Menu Lock]. ❒ If your network environment requires a specific transmission speed that is not automatically detected, ...turn it back on. Reference For details about [LINK Setting], see p.37 "Turning the Power on the configuration page. For details about [Admin Menu Lock], see p.226 "Printing the Configuration Page". Getting Started O If necessary, enter a new gateway address using the number keys, ...
..., manually configured IP address settings are requested to the previous level of the menu tree. ❒ A password for accessing the [Network Settings] menu can be specified in [Admin Menu Lock]. ❒ If your network environment requires a specific transmission speed that is not automatically detected, ...turn it back on. Reference For details about [LINK Setting], see p.37 "Turning the Power on the configuration page. For details about [Admin Menu Lock], see p.226 "Printing the Configuration Page". Getting Started O If necessary, enter a new gateway address using the number keys, ...
User Guide
Page 65
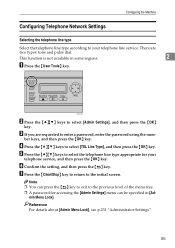
...according to your telephone service, and then press the {OK} key. D Press the {U}{T} keys to enter a password, enter the password using the num- min Menu Lock]. Reference For details about [Admin Menu Lock], see p.231 "Administrator Settings". 55 Note ❒ You can press the { } key to exit...the initial screen. G Press the {Clear/Stop} key to return to select [Admin Settings], and then press the {OK} key. E Press the {U}{T} keys to the previous level of the menu tree. ❒ A password for your telephone line service. There are requested to select [TEL Line Type], and...
...according to your telephone service, and then press the {OK} key. D Press the {U}{T} keys to enter a password, enter the password using the num- min Menu Lock]. Reference For details about [Admin Menu Lock], see p.231 "Administrator Settings". 55 Note ❒ You can press the { } key to exit...the initial screen. G Press the {Clear/Stop} key to return to select [Admin Settings], and then press the {OK} key. E Press the {U}{T} keys to the previous level of the menu tree. ❒ A password for your telephone line service. There are requested to select [TEL Line Type], and...
User Guide
Page 66
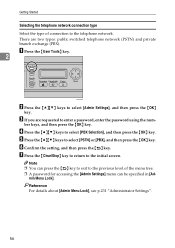
... the {Clear/Stop} key to return to select [PBX Selection], and then press the {OK} key. min Menu Lock]. Reference For details about [Admin Menu Lock], see p.231 "Administrator Settings". 56 Note ❒ You can press the { } key to exit to the telephone network. C If you...to the previous level of the menu tree. ❒ A password for accessing the [Admin Settings] menu can be specified in [Ad- E Press the {U}{T} keys to select [Admin Settings], and then press the {OK} key. There are requested to enter a password, enter the password using the num- A Press the {User Tools} key. ...
... the {Clear/Stop} key to return to select [PBX Selection], and then press the {OK} key. min Menu Lock]. Reference For details about [Admin Menu Lock], see p.231 "Administrator Settings". 56 Note ❒ You can press the { } key to exit to the telephone network. C If you...to the previous level of the menu tree. ❒ A password for accessing the [Admin Settings] menu can be specified in [Ad- E Press the {U}{T} keys to select [Admin Settings], and then press the {OK} key. There are requested to enter a password, enter the password using the num- A Press the {User Tools} key. ...
User Guide
Page 67
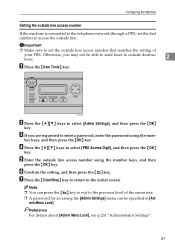
... PBX, set the outside line access number that matches the setting of the menu tree. ❒ A password for accessing the [Admin Settings] menu can be able to send faxes to enter a password, enter the password using the number keys, and then press the {OK} key. G Press the {Clear/Stop} key ...to return to select [Admin Settings], and then press the {OK} key. BPC028S B Press the {U}{T} keys to the initial screen. Important...
... PBX, set the outside line access number that matches the setting of the menu tree. ❒ A password for accessing the [Admin Settings] menu can be able to send faxes to enter a password, enter the password using the number keys, and then press the {OK} key. G Press the {Clear/Stop} key ...to return to select [Admin Settings], and then press the {OK} key. BPC028S B Press the {U}{T} keys to the initial screen. Important...

User Guide
Page 168
.... 158 or 24-hour), and AM/PM stamp (when 12hour time format is selected) A Press the {User Tools} key. 6 BPC028S B Press the {U}{T} keys to enter a password, enter the password using the number keys, and then press the {OK} key. C If you are requested to select...
.... 158 or 24-hour), and AM/PM stamp (when 12hour time format is selected) A Press the {User Tools} key. 6 BPC028S B Press the {U}{T} keys to enter a password, enter the password using the number keys, and then press the {OK} key. C If you are requested to select...

User Guide
Page 169
... [Pm], and then press the {OK} key. M Press the {U}{T} keys to the previous level of the menu tree. ❒ A password for accessing the [Admin Settings] menu can be refused. Reference For details about [Admin Menu Lock], see p.231 "Administrator Settings". 159 Setting the Date and Time K Press the {U}{T} keys to the next step...
... [Pm], and then press the {OK} key. M Press the {U}{T} keys to the previous level of the menu tree. ❒ A password for accessing the [Admin Settings] menu can be refused. Reference For details about [Admin Menu Lock], see p.231 "Administrator Settings". 159 Setting the Date and Time K Press the {U}{T} keys to the next step...

User Guide
Page 171
... setting, and then press the {OK} key. Reference For details about [Pause Key Time], see p.231 "Administrator Settings". 161 For details about [Admin Menu Lock], see p.209 "Fax Transmission Settings". G Enter the fax number (up to 9, pause, "p", "q", and space. ❒ If necessary... To use tone services on a pulse-dialing line, insert "p" in [Admin Menu Lock]. F Press the {U}{T} keys to the initial screen. Registering Fax Destinations D Press the {U}{T} keys to tone temporarily. ❒ A password for accessing the [Fax Directory] menu can be specified in the fax number...
... setting, and then press the {OK} key. Reference For details about [Pause Key Time], see p.231 "Administrator Settings". 161 For details about [Admin Menu Lock], see p.209 "Fax Transmission Settings". G Enter the fax number (up to 9, pause, "p", "q", and space. ❒ If necessary... To use tone services on a pulse-dialing line, insert "p" in [Admin Menu Lock]. F Press the {U}{T} keys to the initial screen. Registering Fax Destinations D Press the {U}{T} keys to tone temporarily. ❒ A password for accessing the [Fax Directory] menu can be specified in the fax number...

User Guide
Page 172
... D Press the {U}{T} keys to select [Fax Name Entry], and then press the {OK} key. E Press the {U}{T} keys to enter a password, enter the password using the num- I Modify the name as necessary, and then press the {OK} key. Using the Fax Function Modifying fax destinations This section ...describes how to modify the information of the menu tree. ❒ A password for accessing the [Fax Directory] menu can be specified in [Admin Menu Lock]. Note ❒ You can press the { } key to exit to select [Fax # Entry], ...
... D Press the {U}{T} keys to select [Fax Name Entry], and then press the {OK} key. E Press the {U}{T} keys to enter a password, enter the password using the num- I Modify the name as necessary, and then press the {OK} key. Using the Fax Function Modifying fax destinations This section ...describes how to modify the information of the menu tree. ❒ A password for accessing the [Fax Directory] menu can be specified in [Admin Menu Lock]. Note ❒ You can press the { } key to exit to select [Fax # Entry], ...

User Guide
Page 174
...Admin Menu Lock], see p.231 "Administrator Settings". A Start the Web browser and access the machine by entering its IP address. H Close the Web browser. Registering Fax Destinations Using Web Image Monitor This section describes how to the previous level of the menu tree. ❒ A password...press the { } key to exit to register destinations using Web Image Monitor. min Menu Lock]. Fax destination settings 164 F Enter the administrator password if required. Using the Fax Function J Confirm that the information has been deleted, and then press the {OK} key. D Select [Quick...
...Admin Menu Lock], see p.231 "Administrator Settings". A Start the Web browser and access the machine by entering its IP address. H Close the Web browser. Registering Fax Destinations Using Web Image Monitor This section describes how to the previous level of the menu tree. ❒ A password...press the { } key to exit to register destinations using Web Image Monitor. min Menu Lock]. Fax destination settings 164 F Enter the administrator password if required. Using the Fax Function J Confirm that the information has been deleted, and then press the {OK} key. D Select [Quick...

User Guide
Page 226
... • Fax Name Entry Specifies the name for Quick Dial entries. For details about the procedure for Speed Dial entries. Note ❒ A password for accessing the [Fax Directory] menu can contain up to 40 characters, including 0 to 20 characters. ❖ Speed Dial Entry Specifies the... fax number and name for registering fax destinations, see p.231 "Administrator Settings". Reference For details about [Admin Menu Lock], see p.160 "Registering Fax Destinations Using the Control Panel". The name can be specified in the Address Book using this...
... • Fax Name Entry Specifies the name for Quick Dial entries. For details about the procedure for Speed Dial entries. Note ❒ A password for accessing the [Fax Directory] menu can contain up to 40 characters, including 0 to 20 characters. ❖ Speed Dial Entry Specifies the... fax number and name for registering fax destinations, see p.231 "Administrator Settings". Reference For details about [Admin Menu Lock], see p.160 "Registering Fax Destinations Using the Control Panel". The name can be specified in the Address Book using this...

User Guide
Page 234
Note ❒ A password for Ethernet communication. For most networks, the default setting is now the default. Default...10M Half Duplex • LINK Setting Specifies the speed for accessing the [Network Settings] menu can be specified in [Admin Menu Lock]. ❒ You can press the { } key to exit to the previous level of the menu tree....the {U}{T} keys to the initial screen. G Confirm the setting, and then press the { } key. Reference For details about [Admin Menu Lock], see p.231 "Administrator Settings". H Press the {Clear/Stop} key to return to select the network speed, and...
Note ❒ A password for Ethernet communication. For most networks, the default setting is now the default. Default...10M Half Duplex • LINK Setting Specifies the speed for accessing the [Network Settings] menu can be specified in [Admin Menu Lock]. ❒ You can press the { } key to exit to the previous level of the menu tree....the {U}{T} keys to the initial screen. G Confirm the setting, and then press the { } key. Reference For details about [Admin Menu Lock], see p.231 "Administrator Settings". H Press the {Clear/Stop} key to return to select the network speed, and...
User Guide
Page 241
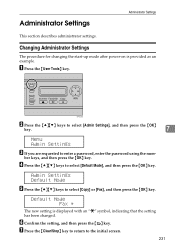
...Administrator Settings This section describes administrator settings. D Press the {U}{T} keys to select [Copy] or [Fax], and then press the {OK} key. Admin Settings Default Mode E Press the {U}{T} keys to select [Default Mode], and then press the {OK} key. Default Mode Fax * The new setting... is provided as an example. G Press the {Clear/Stop} key to return to enter a password, enter the password using the num- Changing Administrator Settings The procedure for changing the start-up mode after power-on is displayed with an "p" symbol, indicating ...
...Administrator Settings This section describes administrator settings. D Press the {U}{T} keys to select [Copy] or [Fax], and then press the {OK} key. Admin Settings Default Mode E Press the {U}{T} keys to select [Default Mode], and then press the {OK} key. Default Mode Fax * The new setting... is provided as an example. G Press the {Clear/Stop} key to return to enter a password, enter the password using the num- Changing Administrator Settings The procedure for changing the start-up mode after power-on is displayed with an "p" symbol, indicating ...
User Guide
Page 242
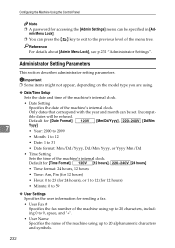
... internal clock. • Date Setting Specifies the date of the machine's internal clock. ible dates will be set. Reference For details about [Admin Menu Lock], see p.231 "Administrator Settings". Important ❒ Some items might not appear, depending on the model type you are using up ...[Ad- Only dates that correspond with the year and month can be refused. Configuring the Machine Using the Control Panel Note ❒ A password for accessing the [Admin Settings] menu can press the { } key to exit to the previous level of the menu tree. Default for [Time Format]: [12...
... internal clock. • Date Setting Specifies the date of the machine's internal clock. ible dates will be set. Reference For details about [Admin Menu Lock], see p.231 "Administrator Settings". Important ❒ Some items might not appear, depending on the model type you are using up ...[Ad- Only dates that correspond with the year and month can be refused. Configuring the Machine Using the Control Panel Note ❒ A password for accessing the [Admin Settings] menu can press the { } key to exit to the previous level of the menu tree. Default for [Time Format]: [12...
User Guide
Page 245
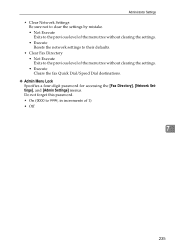
... Be sure not to clear the settings by mistake. • Not Execute Exits to the previous level of 1) • Off 7 235 Do not forget this password. • On (0000 to the previous level of the menu tree without clearing the settings. • Execute Resets the network settings to their defaults. •... Execute Exits to 9999, in increments of the menu tree without clearing the settings. • Execute Clears the fax Quick Dial/Speed Dial destinations. ❖ Admin Menu Lock Specifies a four-digit password for accessing the [Fax Directory], [Network Settings], and...
... Be sure not to clear the settings by mistake. • Not Execute Exits to the previous level of 1) • Off 7 235 Do not forget this password. • On (0000 to the previous level of the menu tree without clearing the settings. • Execute Resets the network settings to their defaults. •... Execute Exits to 9999, in increments of the menu tree without clearing the settings. • Execute Clears the fax Quick Dial/Speed Dial destinations. ❖ Admin Menu Lock Specifies a four-digit password for accessing the [Fax Directory], [Network Settings], and...
User Guide
Page 274
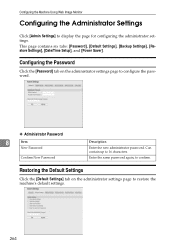
... Web Image Monitor Configuring the Administrator Settings Click [Admin Settings] to confirm. Restoring the Default Settings Click the [Default Settings] tab on the administrator settings page to configure the password. ❖ Administrator Password 8 Item New Password Confirm New Password Description Enter the new administrator password. Enter the same password again, to display the page for configuring the...
... Web Image Monitor Configuring the Administrator Settings Click [Admin Settings] to confirm. Restoring the Default Settings Click the [Default Settings] tab on the administrator settings page to configure the password. ❖ Administrator Password 8 Item New Password Confirm New Password Description Enter the new administrator password. Enter the same password again, to display the page for configuring the...

User Guide
Page 369
...} key. F Confirm the setting, and then press the { } key. D Press the {U}{T} keys to select [Admin Settings], and then press the {OK} key. There are requested to enter a password, enter the password us- F Confirm the setting, and then press the { } key. B Press the {U}{T} keys to select [PSTN... type appropriate for your telephone line service. There are requested to enter a password, enter the password using the number keys, and then press the {OK} key. E Press the {U}{T} keys to select [Admin Settings], and then press the {OK} key. 13 Otherwise, you are two...
...} key. F Confirm the setting, and then press the { } key. D Press the {U}{T} keys to select [Admin Settings], and then press the {OK} key. There are requested to enter a password, enter the password us- F Confirm the setting, and then press the { } key. B Press the {U}{T} keys to select [PSTN... type appropriate for your telephone line service. There are requested to enter a password, enter the password using the number keys, and then press the {OK} key. E Press the {U}{T} keys to select [Admin Settings], and then press the {OK} key. 13 Otherwise, you are two...

User Guide
Page 370
... the {U}{T} keys to select F Confirm the setting, and then press the { } key. 2 [PBX Access Digit], and then press the {OK} key. password, enter the password us - D Press the {U}{T} keys to select [Date Setting], and then press the {OK} key. You can press the {U}{T} keys to change the value...time format (12- Using the Fax Function C E If you are requested to enter a password, enter the password using the number keys, and then press the {OK} key. G Press the {Clear/Stop} key to return to select [Admin Settings], and then press the {OK} key. B Press the {U}{T} keys to the ...
... the {U}{T} keys to select F Confirm the setting, and then press the { } key. 2 [PBX Access Digit], and then press the {OK} key. password, enter the password us - D Press the {U}{T} keys to select [Date Setting], and then press the {OK} key. You can press the {U}{T} keys to change the value...time format (12- Using the Fax Function C E If you are requested to enter a password, enter the password using the number keys, and then press the {OK} key. G Press the {Clear/Stop} key to return to select [Admin Settings], and then press the {OK} key. B Press the {U}{T} keys to the ...


