Quick Start Guide
Page 3
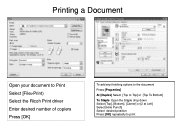
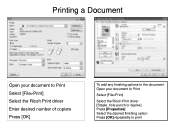
Printing a Document Open your document to Print Select [File>Print) Select the Ricoh Print driver Enter desired number of copiers Press [OK] To add any finishing options to the document Press [Properties] At [Duplex] Select [Top to Top] or [Top To Bottom] To Staple: Open the Staple drop down Select [Top], [Bottom], [Center] or [2 at Left] Select [Hole Punch] Select desired position Press [OK] repeatedly to print
Printing a Document Open your document to Print Select [File>Print) Select the Ricoh Print driver Enter desired number of copiers Press [OK] To add any finishing options to the document Press [Properties] At [Duplex] Select [Top to Top] or [Top To Bottom] To Staple: Open the Staple drop down Select [Top], [Bottom], [Center] or [2 at Left] Select [Hole Punch] Select desired position Press [OK] repeatedly to print
Quick Start Guide
Page 6
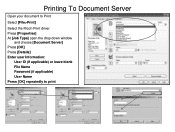
Printing To Document Server Open your document to Print Select [File>Print] Select the Ricoh Print driver Press [Properties] At [Job Type] open the drop down window and choose [Document Server] Press [OK] Press [Details] Enter user Information: User ID (if applicable) or leave blank File Name Password (if applicable) User Name Press [OK] repeatedly to print
Printing To Document Server Open your document to Print Select [File>Print] Select the Ricoh Print driver Press [Properties] At [Job Type] open the drop down window and choose [Document Server] Press [OK] Press [Details] Enter user Information: User ID (if applicable) or leave blank File Name Password (if applicable) User Name Press [OK] repeatedly to print
Quick Start Guide
Page 9
Press OK, Ok, Ok, to print the document. Booklet Printing - Large & Small Open the document Press File >print Select the Ricoh Print Driver (PCL5e/PCL6) Press Properties At Page Set up Tab Select Duplex>booklet Select Staple>2 at center Across from Duplex option select non reduction ...1/2x11 paper in one of the internal trays (copier cannot staple a booklet document in portrait mode) Open the document Press File >print Select the Ricoh Print Driver (PCL5e/PCL6) Press Properties At Page Set up Tab Select Duplex>booklet Select Staple>2 at center At Paper Setup Tab Select the tray that has...
Press OK, Ok, Ok, to print the document. Booklet Printing - Large & Small Open the document Press File >print Select the Ricoh Print Driver (PCL5e/PCL6) Press Properties At Page Set up Tab Select Duplex>booklet Select Staple>2 at center Across from Duplex option select non reduction ...1/2x11 paper in one of the internal trays (copier cannot staple a booklet document in portrait mode) Open the document Press File >print Select the Ricoh Print Driver (PCL5e/PCL6) Press Properties At Page Set up Tab Select Duplex>booklet Select Staple>2 at center At Paper Setup Tab Select the tray that has...

Quick Start Guide
Page 18
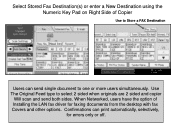
Confirmations can send single document to select 2 sided when originals are 2 sided and copier Will scan and send both sides. Use The Original Feed type to one or more users simultaneously. When Networked, users have the option of Copier Use to Store a FAX Destination Users can print automatically, selectively, for faxing documents from the desktop with fax Covers and other options. Select Stored Fax Destination(s) or enter a New Destination using the Numeric Key Pad on Right Side of Installing the LAN fax driver for errors only or off.
Confirmations can send single document to select 2 sided when originals are 2 sided and copier Will scan and send both sides. Use The Original Feed type to one or more users simultaneously. When Networked, users have the option of Copier Use to Store a FAX Destination Users can print automatically, selectively, for faxing documents from the desktop with fax Covers and other options. Select Stored Fax Destination(s) or enter a New Destination using the Numeric Key Pad on Right Side of Installing the LAN fax driver for errors only or off.

Quick Start Guide
Page 19
... is already pre-programmed in address book. 6. Press [Attach Cover] to add a fax cover to fax 2. In the [Name] list, click the LAN-Fax M8 driver 4.
... is already pre-programmed in address book. 6. Press [Attach Cover] to add a fax cover to fax 2. In the [Name] list, click the LAN-Fax M8 driver 4.
User Guide
Page 46
Printing a Document Open your document to Print Select [File>Print] Select the Ricoh Print driver Enter desired number of copiers Press [OK] To add any finishing options to the document Open your document to Print Select [File>Print) Select the Ricoh Print driver [Staple, hole punch or duplex] Press [Properties] Select the desired finishing option Press [OK] repeatedly to print
Printing a Document Open your document to Print Select [File>Print] Select the Ricoh Print driver Enter desired number of copiers Press [OK] To add any finishing options to the document Open your document to Print Select [File>Print) Select the Ricoh Print driver [Staple, hole punch or duplex] Press [Properties] Select the desired finishing option Press [OK] repeatedly to print

User Guide
Page 47
Printing To Document Server Open your document to Print Select [File>Print] Select the Ricoh Print driver Press [Properties] At [Job Type] open the drop down window and choose [Document Server] Press [OK] Press [Details] Enter user Information: User ID (if applicable) or leave blank File Name Password (if applicable) User Name Press [OK] repeatedly to print
Printing To Document Server Open your document to Print Select [File>Print] Select the Ricoh Print driver Press [Properties] At [Job Type] open the drop down window and choose [Document Server] Press [OK] Press [Details] Enter user Information: User ID (if applicable) or leave blank File Name Password (if applicable) User Name Press [OK] repeatedly to print
User Guide
Page 59
When Networked, users have the option of Copier Use to Store a FAX Destination Users can print automatically, selectively, for faxing documents from the desktop with fax Covers and other options. Select Stored Fax Destination(s) or enter a New Destination using the Numeric Key Pad on Right Side of Installing the LAN fax driver for errors only or off. Confirmations can send single document to select 2 sided when originals are 2 sided and copier Will scan and send both sides. Use The Original Feed type to one or more users simultaneously.
When Networked, users have the option of Copier Use to Store a FAX Destination Users can print automatically, selectively, for faxing documents from the desktop with fax Covers and other options. Select Stored Fax Destination(s) or enter a New Destination using the Numeric Key Pad on Right Side of Installing the LAN fax driver for errors only or off. Confirmations can send single document to select 2 sided when originals are 2 sided and copier Will scan and send both sides. Use The Original Feed type to one or more users simultaneously.
User Guide
Page 60
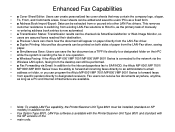
.../Export: Data can be extracted from the LAN-Fax driver. • ■ Duplex Printing: Inbound fax documents can be checked via Email: In addition to the inbound paperless fax to SAF/HDD, the Aficio MP 6001/MP 7001/ • MP 8001/MP 9001 Series' have the ability to forward all incoming... faxes directly to an administrator's email • address or folder, or you can program the Aficio MP 6001/MP 7001/MP 8001/MP 9001 Series to forward faxes • from specific senders directly to Ricoh's, as the primary task of manually • re-entering address book entries is sending the fax...
.../Export: Data can be extracted from the LAN-Fax driver. • ■ Duplex Printing: Inbound fax documents can be checked via Email: In addition to the inbound paperless fax to SAF/HDD, the Aficio MP 6001/MP 7001/ • MP 8001/MP 9001 Series' have the ability to forward all incoming... faxes directly to an administrator's email • address or folder, or you can program the Aficio MP 6001/MP 7001/MP 8001/MP 9001 Series to forward faxes • from specific senders directly to Ricoh's, as the primary task of manually • re-entering address book entries is sending the fax...

Reference Guide
Page 2
Table of Contents Table of Contents ...2 Changing Modes ...3 Basic Copy Features ...4 Paper Selection...6 Duplex...6 Making Two‐sided Copies from One‐Sided Originals (1 - 2 sided 6 Making Two‐sided Copies from Two‐sided Originals (2 - 2 sided 6 Finishing...7 Print Features...7 Accessing the Print Driver...7 Finishing Options...8 Two - Sided Printing...8 Basic Scan to Email or Folder Features...9 Calling for Service...10 Ordering Supplies...10 2
Table of Contents Table of Contents ...2 Changing Modes ...3 Basic Copy Features ...4 Paper Selection...6 Duplex...6 Making Two‐sided Copies from One‐Sided Originals (1 - 2 sided 6 Making Two‐sided Copies from Two‐sided Originals (2 - 2 sided 6 Finishing...7 Print Features...7 Accessing the Print Driver...7 Finishing Options...8 Two - Sided Printing...8 Basic Scan to Email or Folder Features...9 Calling for Service...10 Ordering Supplies...10 2
Reference Guide
Page 7
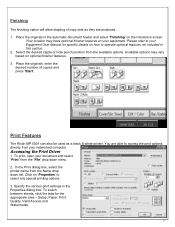
Place the originals in the Properties dialog box. Print Features The Ricoh MP 5001 can also be used as they are able to select any special printing options. 3. You are produced. 1. Click on 'Properties' to access the print options ... your Equipment User Manual for the appropriate area - Select the desired staple or hole punch position from the 'File' drop down list. Accessing the Print Driver 1. Specify the various print settings in the automatic document feeder and select 'Finishing' on how to operate optional features not included in this section. 2. Finishing...
Place the originals in the Properties dialog box. Print Features The Ricoh MP 5001 can also be used as they are able to select any special printing options. 3. You are produced. 1. Click on 'Properties' to access the print options ... your Equipment User Manual for the appropriate area - Select the desired staple or hole punch position from the 'File' drop down list. Accessing the Print Driver 1. Specify the various print settings in the automatic document feeder and select 'Finishing' on how to operate optional features not included in this section. 2. Finishing...


