Operating Instructions
Page 2
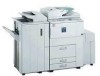
... machine. Caution: Use of controls or adjustments or performance of your office products. For details, please contact your local dealer. With this manual. (For details, see "Power Connection" in the General Settings Guide. Introduction This manual describes detailed instructions on the operation and notes about power source, see P.3 "Machine Types".) • Type 1: 4051/DSm651/LD151/Aficio 2051 • Type 2: 4060/DSm660/LD160/Aficio 2060 • Type 3: 4075/DSm675/LD175/Aficio 2075 Certain types...
... machine. Caution: Use of controls or adjustments or performance of your office products. For details, please contact your local dealer. With this manual. (For details, see "Power Connection" in the General Settings Guide. Introduction This manual describes detailed instructions on the operation and notes about power source, see P.3 "Machine Types".) • Type 1: 4051/DSm651/LD151/Aficio 2051 • Type 2: 4060/DSm660/LD160/Aficio 2060 • Type 3: 4075/DSm675/LD175/Aficio 2075 Certain types...
Operating Instructions
Page 3
...all models, and therefore contains functions and settings that the administrators can use . i CD-ROM1) Provides information about configuring and operating the printer in a network environment or using software. Images, illustrations, functions, and supported operating systems may not be available for your model. ❖ Copy Reference Describes operations, functions, and troubleshooting for the machine's copier function. ❖ Printer Reference Describes operations, functions, system settings and troubleshooting for the machine's printer function. ❖ Scanner Reference (PDF file...
...all models, and therefore contains functions and settings that the administrators can use . i CD-ROM1) Provides information about configuring and operating the printer in a network environment or using software. Images, illustrations, functions, and supported operating systems may not be available for your model. ❖ Copy Reference Describes operations, functions, and troubleshooting for the machine's copier function. ❖ Printer Reference Describes operations, functions, system settings and troubleshooting for the machine's printer function. ❖ Scanner Reference (PDF file...
Operating Instructions
Page 4
... is installed. ii CD-ROM2) Describes operations of DeskTopBinder Lite and provides an overview of Auto Document Link installed with DeskTopBinder Lite. CD-ROM2) Describes operations and functions of its functions. ❖ Manuals for DeskTopBinder Lite in detail. This guide can be displayed from the [Setup] display when DeskTopBinder Lite is a utility included on the CD-ROM labeled "Scanner Driver & Document Management Utilities". • DeskTopBinder Lite Setup Guide (PDF file -
... is installed. ii CD-ROM2) Describes operations of DeskTopBinder Lite and provides an overview of Auto Document Link installed with DeskTopBinder Lite. CD-ROM2) Describes operations and functions of its functions. ❖ Manuals for DeskTopBinder Lite in detail. This guide can be displayed from the [Setup] display when DeskTopBinder Lite is a utility included on the CD-ROM labeled "Scanner Driver & Document Management Utilities". • DeskTopBinder Lite Setup Guide (PDF file -

Operating Instructions
Page 9
... 2 Sided→1 Sided ...52 Copying Book Originals 53 Image Repeat...55 Double Copies...56 Centering...57 Scanning Position ...57 Erase...58 3 Edges Full Bleed 63 Margin Adjustment 64 Positive/Negative ...64 Background Numbering 65 Preset Stamp ...65 User Stamp ...66 Date Stamp ...69 Page Numbering ...70 Covers...74 Designate ...75 Chapter ...76 Blank Slip Sheets ...76 Slip Sheets ...77 Storing Data in Use 95 System Settings on Main and Sub-machines 97 Copier/Document Server Features...
... 2 Sided→1 Sided ...52 Copying Book Originals 53 Image Repeat...55 Double Copies...56 Centering...57 Scanning Position ...57 Erase...58 3 Edges Full Bleed 63 Margin Adjustment 64 Positive/Negative ...64 Background Numbering 65 Preset Stamp ...65 User Stamp ...66 Date Stamp ...69 Page Numbering ...70 Covers...74 Designate ...75 Chapter ...76 Blank Slip Sheets ...76 Slip Sheets ...77 Storing Data in Use 95 System Settings on Main and Sub-machines 97 Copier/Document Server Features...

Operating Instructions
Page 10
... Supplementary Specifications 139 INDEX...156 viii User Tools (Copier/Document Server Features) User Tools Menu (Copier/Document Server Features 115 Accessing User Tools (Copier/Document Server Features 122 Changing Default Settings 122 Exiting User Tools 122 Settings You Can Change with User Tools 123 General Features P.1/5 123 General Features P.2/5 125 General Features P.3/5 125 General Features P.4/5 126 General Features P.5/5 126 Reproduction Ratio P.1/2 126 Reproduction Ratio P.2/2 127 Edit P.1/2 ...128 Edit P.2/2 ...129 Stamp ...131 Input/Output...
... Supplementary Specifications 139 INDEX...156 viii User Tools (Copier/Document Server Features) User Tools Menu (Copier/Document Server Features 115 Accessing User Tools (Copier/Document Server Features 122 Changing Default Settings 122 Exiting User Tools 122 Settings You Can Change with User Tools 123 General Features P.1/5 123 General Features P.2/5 125 General Features P.3/5 125 General Features P.4/5 126 General Features P.5/5 126 Reproduction Ratio P.1/2 126 Reproduction Ratio P.2/2 127 Edit P.1/2 ...128 Edit P.2/2 ...129 Stamp ...131 Input/Output...
Operating Instructions
Page 15
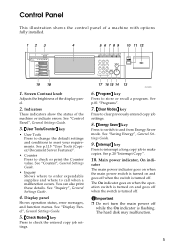
... "Saving Energy", General Settings Guide. 9. {Interrupt} key Press to interrupt a long copy job to check the entered copy job settings. Main power indicator, On indi- cator The main power indicator goes on when the main power switch is turned on and goes off when the switch is turned off when the switch is flashing. See "Display Panel", General Settings Guide. 5. {Check Modes} key Press to make copies. Display panel Shows operation status, error messages, and function menus. The On indicator goes on when the operation switch is turned...
... "Saving Energy", General Settings Guide. 9. {Interrupt} key Press to interrupt a long copy job to check the entered copy job settings. Main power indicator, On indi- cator The main power indicator goes on when the main power switch is turned on and goes off when the switch is turned off when the switch is flashing. See "Display Panel", General Settings Guide. 5. {Check Modes} key Press to make copies. Display panel Shows operation status, error messages, and function menus. The On indicator goes on when the operation switch is turned...
Operating Instructions
Page 26
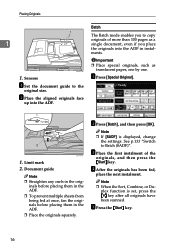
... has been fed, place the next instalment. B Place the aligned originals face up into the ADF in instal- plex function is displayed, change the settings. inals before placing them in the ADF. ❒ To prevent multiple sheets from being fed at once, fan the originals before placing them in the orig- Sensors A Set the document guide to Batch (SADF)". Document guide Note ❒ Straighten any curls...
... has been fed, place the next instalment. B Place the aligned originals face up into the ADF in instal- plex function is displayed, change the settings. inals before placing them in the ADF. ❒ To prevent multiple sheets from being fed at once, fan the originals before placing them in the orig- Sensors A Set the document guide to Batch (SADF)". Document guide Note ❒ Straighten any curls...
Operating Instructions
Page 83
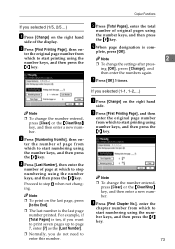
... print seven pages up to start printing using A Press [Change] on the right hand side. Note ❒ To change the number entered, press [Clear] or the {Clear/Stop} key, and then enter a new number. B Press [First Printing Page], then en- Proceed to the End]. ❒ The last number is com- the number keys, and then press the {#} key. G Press [OK] 3 times. C Press [Numbering from which to enter this number. D Press [Last Number], then enter the number of page at which to page 7, enter...
... print seven pages up to start printing using A Press [Change] on the right hand side. Note ❒ To change the number entered, press [Clear] or the {Clear/Stop} key, and then enter a new number. B Press [First Printing Page], then en- Proceed to the End]. ❒ The last number is com- the number keys, and then press the {#} key. G Press [OK] 3 times. C Press [Numbering from which to enter this number. D Press [Last Number], then enter the number of page at which to page 7, enter...

Operating Instructions
Page 98
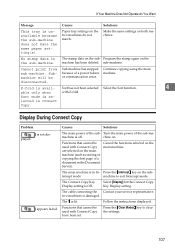
... the {Clear/Stop} key and enter again. See p.125 "Connect Copy Key Display". Note ❒ You can select Connect Copy from either machine by pressing [Connect]. Connect Copy Using Connect Copy You can specify with the User Tools whether [Connect]is displayed or not. Reference See p.19 "Copying". However, if optional finishers are not installed on both main and sub machines, the Stack, Staple, Punch and Z-fold functions are connected. ❖ Main machine 88 ❖ Sub-machine C Set the...
... the {Clear/Stop} key and enter again. See p.125 "Connect Copy Key Display". Note ❒ You can select Connect Copy from either machine by pressing [Connect]. Connect Copy Using Connect Copy You can specify with the User Tools whether [Connect]is displayed or not. Reference See p.19 "Copying". However, if optional finishers are not installed on both main and sub machines, the Stack, Staple, Punch and Z-fold functions are connected. ❖ Main machine 88 ❖ Sub-machine C Set the...
Operating Instructions
Page 101
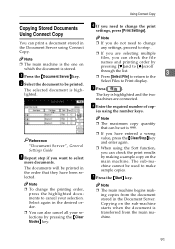
... two machines are selecting multiple Note ❒ The main machine is the one on the sub-machine starts when the document is stored. Using Connect Copy Copying Stored Documents Using Connect Copy D If you need to change the Document Server using Connect any settings, proceed to step . Note You can check the file names and printing order by pressing the {Clear Modes} key. A Press the {Document Server} key. files, you can print a document stored in the Document Server. Select Files to Print display. E Press [ ]. F Enter the required number of...
... two machines are selecting multiple Note ❒ The main machine is the one on the sub-machine starts when the document is stored. Using Connect Copy Copying Stored Documents Using Connect Copy D If you need to change the Document Server using Connect any settings, proceed to step . Note You can check the file names and printing order by pressing the {Clear Modes} key. A Press the {Document Server} key. files, you can print a document stored in the Document Server. Select Files to Print display. E Press [ ]. F Enter the required number of...

Operating Instructions
Page 107
... Copy Count Display - Print Priority - - Function Reset Timer - - After that, the machine switches back to the settings. $: Depends on the main machine applies to both machines. -: Not related to the mode selected in Function Priority upon reaching the System Reset time. 97 When the Auto Reset time of the main machine has lapsed, Connect Copy will be cancelled. Output Tray Setting ❍ ❍ Output: Copier ❍ ❍ Output: Document ❍ ❍ Server Output: Printer ❍ ❍ Remarks The copy counter is 3 disabled. Sub...
... Copy Count Display - Print Priority - - Function Reset Timer - - After that, the machine switches back to the settings. $: Depends on the main machine applies to both machines. -: Not related to the mode selected in Function Priority upon reaching the System Reset time. 97 When the Auto Reset time of the main machine has lapsed, Connect Copy will be cancelled. Output Tray Setting ❍ ❍ Output: Copier ❍ ❍ Output: Document ❍ ❍ Server Output: Printer ❍ ❍ Remarks The copy counter is 3 disabled. Sub...

Operating Instructions
Page 108
...be used in Connect Copy mode. Remarks Both the main and sub-machines should have the same paper tray settings. Connect Copy Main machine ADF Original Table ❍ Elevation Job List Display Time ❍ Z-fold Position ❍ Sub-machine - - ❍ ❖ Tray Paper Settings 3 Main machine Paper Tray Priority: ❍ Copier Paper Tray Priority: ❍ Printer Tray Paper Size: Tray 2 ❍ Tray Paper Size: Tray 3 ❍ Sub-machine ❍ ❍ ❍ ❍ Paper Type: Bypass $ $ tray Paper Type: Tray 1 ❍ ❍ Paper Type...
...be used in Connect Copy mode. Remarks Both the main and sub-machines should have the same paper tray settings. Connect Copy Main machine ADF Original Table ❍ Elevation Job List Display Time ❍ Z-fold Position ❍ Sub-machine - - ❍ ❖ Tray Paper Settings 3 Main machine Paper Tray Priority: ❍ Copier Paper Tray Priority: ❍ Printer Tray Paper Size: Tray 2 ❍ Tray Paper Size: Tray 3 ❍ Sub-machine ❍ ❍ ❍ ❍ Paper Type: Bypass $ $ tray Paper Type: Tray 1 ❍ ❍ Paper Type...

Operating Instructions
Page 110
... Address Book: Select - Delete LDAP Server Use LDAP Server - Auto Erase Memory - - Change Order Print Address Book: - Delete All Files - The power will be turned off automatically. Title Auto Delete File - Program/ Change/ - Remarks During Connect Copy, neither machine is turned off only when you exit from Connect Copy mode. 100 Address Book: - Firmware Version - - lete Group 3 Address Book: Edit Title - Display/Clear/Print - Counter per User Address Book Man- - Sub-machine - - - - agement Address Book: Pro- - Setting...
... Address Book: Select - Delete LDAP Server Use LDAP Server - Auto Erase Memory - - Change Order Print Address Book: - Delete All Files - The power will be turned off automatically. Title Auto Delete File - Program/ Change/ - Remarks During Connect Copy, neither machine is turned off only when you exit from Connect Copy mode. 100 Address Book: - Firmware Version - - lete Group 3 Address Book: Edit Title - Display/Clear/Print - Counter per User Address Book Man- - Sub-machine - - - - agement Address Book: Pro- - Setting...
Operating Instructions
Page 117
... stopped Continue copying using the main because of a document in the sub-machine. machine to clear the settings. 107 Follow the instructions displayed. If Your Machine Does Not Operate As You Want Message Causes Solutions This tray is unavailable because the sub-machine does not have been set. Make the same settings on the two machines do not match. No stamp data in the Document Server). Program the stamp again on . Turn the main power...
... stopped Continue copying using the main because of a document in the sub-machine. machine to clear the settings. 107 Follow the instructions displayed. If Your Machine Does Not Operate As You Want Message Causes Solutions This tray is unavailable because the sub-machine does not have been set. Make the same settings on the two machines do not match. No stamp data in the Document Server). Program the stamp again on . Turn the main power...

Operating Instructions
Page 119
... a cover is in progress. Removed the jammed paper. To cancel Connect Copy, Press the {Clear/Stop} key on the main machine, and then press [Yes]. 109 A paper misfeed has occurred on either machine, or toner or other supplies need to be replenished. A paper misfeed has occurred during stapling. Follow the instructions displayed. Reference "Removing Jammed Staples", General Settings Guide To cancel Connect Copy, Press the {Clear/Stop} key on the main machine, and then press [Yes]. Copying is open, follow...
... a cover is in progress. Removed the jammed paper. To cancel Connect Copy, Press the {Clear/Stop} key on the main machine, and then press [Yes]. 109 A paper misfeed has occurred on either machine, or toner or other supplies need to be replenished. A paper misfeed has occurred during stapling. Follow the instructions displayed. Reference "Removing Jammed Staples", General Settings Guide To cancel Connect Copy, Press the {Clear/Stop} key on the main machine, and then press [Yes]. Copying is open, follow...
Operating Instructions
Page 122
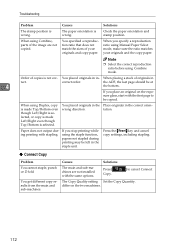
... order. If you stop printing while using Combine, parts of copies is wrong. sure glass, start with the first page to cancel Connect The Copy Quality setting Set the Copy Quantity. You placed originals in rect. Press the {Reset} key and cancel copy settings, including stapling. ❖ Connect Copy Problem You cannot staple, punch or Z-fold. You get different copy results from the main and sub-machines. Paper does not output during printing may be left...
... order. If you stop printing while using Combine, parts of copies is wrong. sure glass, start with the first page to cancel Connect The Copy Quality setting Set the Copy Quantity. You placed originals in rect. Press the {Reset} key and cancel copy settings, including stapling. ❖ Connect Copy Problem You cannot staple, punch or Z-fold. You get different copy results from the main and sub-machines. Paper does not output during printing may be left...

Operating Instructions
Page 135
...; Original Orientation in User Tools (System Settings) is [Off], the beeper does not sound, whatever the Tone: Original remains setting. Note ❒ Default: On ❒ If Panel Tone in Duplex Mode You can assign frequently used functions to function keys F1 to T 125 Settings You Can Change with User Tools ❖ Connect Copy Key Display You can select the type of the Duplex function effective when the power is turned on , or modes are cleared.
...; Original Orientation in User Tools (System Settings) is [Off], the beeper does not sound, whatever the Tone: Original remains setting. Note ❒ Default: On ❒ If Panel Tone in Duplex Mode You can assign frequently used functions to function keys F1 to T 125 Settings You Can Change with User Tools ❖ Connect Copy Key Display You can select the type of the Duplex function effective when the power is turned on , or modes are cleared.

Operating Instructions
Page 164
... not to use Connect Copy. • Select the copy paper using the main machine. • When [ ] is pressed, only the paper trays common to both ma- Front 2. Back ❖ Front Cover, Front/Back Cover • If Blank mode is selected, the cover will not be copied on the settings made in Display Time in Cover Sheet Tray of User Tools (System Settings). 6 • If Display Time is selected to malfunctioning of are two-sided copied depending on...
... not to use Connect Copy. • Select the copy paper using the main machine. • When [ ] is pressed, only the paper trays common to both ma- Front 2. Back ❖ Front Cover, Front/Back Cover • If Blank mode is selected, the cover will not be copied on the settings made in Display Time in Cover Sheet Tray of User Tools (System Settings). 6 • If Display Time is selected to malfunctioning of are two-sided copied depending on...

Operating Instructions
Page 165
...-machine for Connect Copy. See "Tray Paper Settings", General Settings Guide. • If the {Clear Modes} key is pressed on the main machine while you are making settings, Connect Copy will be selected according to make copies. • When an Interrupt job on the sub-machine has finished, press the {Interrupt} key. • Connect Copy jobs are displayed on the Job List of the sub-machine. Supplementary Specifications • When two or more trays hold the desired paper size, the paper tray will be cancelled...
...-machine for Connect Copy. See "Tray Paper Settings", General Settings Guide. • If the {Clear Modes} key is pressed on the main machine while you are making settings, Connect Copy will be selected according to make copies. • When an Interrupt job on the sub-machine has finished, press the {Interrupt} key. • Connect Copy jobs are displayed on the Job List of the sub-machine. Supplementary Specifications • When two or more trays hold the desired paper size, the paper tray will be cancelled...

Operating Instructions
Page 167
... paper display, 123 tone − original remains, 125 Generation copy, 27 I Indicators, 5 Input/Output, 120, 121, 133, 135 auto sort, 134 letterhead setting, 135 memory full auto scan restart, 134 rotate sort − auto paper continue, 134 SADF auto reset, 134 select punch type, 135 select stack function, 135 select stapling position, 134, 135 switch to batch (SADF), 133 Interrupt key, 5 K Key check modes, 5 clear modes, 5 clear/stop, 6 energy saver, 5 interrupt, 5 program, 5 sample copy, 6 # (sharp), 6 start, 6 user tools/counter...
... paper display, 123 tone − original remains, 125 Generation copy, 27 I Indicators, 5 Input/Output, 120, 121, 133, 135 auto sort, 134 letterhead setting, 135 memory full auto scan restart, 134 rotate sort − auto paper continue, 134 SADF auto reset, 134 select punch type, 135 select stack function, 135 select stapling position, 134, 135 switch to batch (SADF), 133 Interrupt key, 5 K Key check modes, 5 clear modes, 5 clear/stop, 6 energy saver, 5 interrupt, 5 program, 5 sample copy, 6 # (sharp), 6 start, 6 user tools/counter...


