

English Manual
Page 2
This product is manufactured and distributed under license from Reebok International. 2 TABLE OF CONTENTS IMPORTANT PRECAUTIONS 3 BEFORE YOU BEGIN 4 ASSEMBLY 5 ELLIPTICAL EXERCISER OPERATION 10 MAINTENANCE AND TROUBLESHOOTING 22 EXERCISE GUIDELINES 23 PART LIST 24 EXPLODED DRAWING 26 ORDERING REPLACEMENT PARTS Back Cover LIMITED WARRANTY Back Cover REEBOK and the Vector Logo are registered trademarks and service marks of Reebok.
This product is manufactured and distributed under license from Reebok International. 2 TABLE OF CONTENTS IMPORTANT PRECAUTIONS 3 BEFORE YOU BEGIN 4 ASSEMBLY 5 ELLIPTICAL EXERCISER OPERATION 10 MAINTENANCE AND TROUBLESHOOTING 22 EXERCISE GUIDELINES 23 PART LIST 24 EXPLODED DRAWING 26 ORDERING REPLACEMENT PARTS Back Cover LIMITED WARRANTY Back Cover REEBOK and the Vector Logo are registered trademarks and service marks of Reebok.

English Manual
Page 3
... Service Department toll-free at all parts regularly. The pulse sensor is intended for foot protection. 9. Wear appropriate exercise clothes when using the elliptical exerciser. 11. IMPORTANT PRECAUTIONS WARNING: To reduce the risk of heart rate readings. Read all instructions before using the elliptical exerciser; Inspect and properly tighten all times. 7. do not arch your back straight when using the elliptical exerciser. 1. Always hold the handlebars or the upper body arms...
... Service Department toll-free at all parts regularly. The pulse sensor is intended for foot protection. 9. Wear appropriate exercise clothes when using the elliptical exerciser. 11. IMPORTANT PRECAUTIONS WARNING: To reduce the risk of heart rate readings. Read all instructions before using the elliptical exerciser; Inspect and properly tighten all times. 7. do not arch your back straight when using the elliptical exerciser. 1. Always hold the handlebars or the upper body arms...

English Manual
Page 4
... the parts that moves your knees and ankles. The RL 645 is RBEL79740. And the unique RL 645 features adjustable resistance and incline to a whole new world of the decal). The model number is an incredibly smooth exerciser that are labeled in a natural elliptical path, minimizing the impact on a decal attached to the elliptical exerciser (see the front cover of this manual for selecting the new REEBOK® RL 645 elliptical exerciser. Welcome...
... the parts that moves your knees and ankles. The RL 645 is RBEL79740. And the unique RL 645 features adjustable resistance and incline to a whole new world of the decal). The model number is an incredibly smooth exerciser that are labeled in a natural elliptical path, minimizing the impact on a decal attached to the elliptical exerciser (see the front cover of this manual for selecting the new REEBOK® RL 645 elliptical exerciser. Welcome...

English Manual
Page 5
... been pre-assembled. The number following the key number is not in a cleared area and remove the packing materials. Do not dispose of the elliptical exerciser in the parts bag, check to the Frame with two M10 x 92mm Carriage Bolts (124) and two M10 Nylon Locknuts (90). 1 124 M8 x 42mm Button Bolt (116)-4 M8 x 35mm Button Bolt (117)-2 90 44 29 1 5 ASSEMBLY Assembly requires two...
... been pre-assembled. The number following the key number is not in a cleared area and remove the packing materials. Do not dispose of the elliptical exerciser in the parts bag, check to the Frame with two M10 x 92mm Carriage Bolts (124) and two M10 Nylon Locknuts (90). 1 124 M8 x 42mm Button Bolt (116)-4 M8 x 35mm Button Bolt (117)-2 90 44 29 1 5 ASSEMBLY Assembly requires two...
English Manual
Page 7
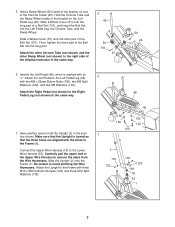
... the right side of a Bolt Set (101), and insert the Bolt Set into the long part. Be careful to the Frame with two M8 x 52mm Button Bolts (100), two M8 Split Washers (122), and two M8 Washers (132). Attach the Upright to avoid pinching the Wire Harnesses. 5. Slide a Wheel Cover (51) onto the long part of the elliptical exerciser in the Frame (1). Have another...
... the right side of a Bolt Set (101), and insert the Bolt Set into the long part. Be careful to the Frame with two M8 x 52mm Button Bolts (100), two M8 Split Washers (122), and two M8 Washers (132). Attach the Upright to avoid pinching the Wire Harnesses. 5. Slide a Wheel Cover (51) onto the long part of the elliptical exerciser in the Frame (1). Have another...

English Manual
Page 9
... Upright with two 10 M4 x 25mm Round Head Screws (115). 4 3 115 11. Attach the Console (3) to the wire harness on the Console. Make sure that all excess wiring down into the Power Receptacle 12 (82) at the rear of the elliptical exerciser are properly tightened. Connect the Pulse Extension Wire (17) to protect the floor from damage. Cover the floor beneath the elliptical exerciser to the pulse wire on the Console...
... Upright with two 10 M4 x 25mm Round Head Screws (115). 4 3 115 11. Attach the Console (3) to the wire harness on the Console. Make sure that all excess wiring down into the Power Receptacle 12 (82) at the rear of the elliptical exerciser are properly tightened. Connect the Pulse Extension Wire (17) to protect the floor from damage. Cover the floor beneath the elliptical exerciser to the pulse wire on the Console...

English Manual
Page 10
... Outlet resistance for use on a nominal 120-volt circuit. The elliptical exerciser does not have a proper outlet installed by a qualified electrician. Grounded Outlet Box If it will continue to move until a properly grounded outlet can result in doubt as a properly grounded outlet box cover. Plug the power cord into an appropriate outlet that is equipped with GFCI- Handlebar DANGER: Improper connection...
... Outlet resistance for use on a nominal 120-volt circuit. The elliptical exerciser does not have a proper outlet installed by a qualified electrician. Grounded Outlet Box If it will continue to move until a properly grounded outlet can result in doubt as a properly grounded outlet box cover. Plug the power cord into an appropriate outlet that is equipped with GFCI- Handlebar DANGER: Improper connection...

English Manual
Page 11
... effective workout. The console also offers six preset programs. Each program automatically changes the resistance of the pedals and prompt you exercise. To use the manual mode of the console, see page 15. You can connect the elliptical exerciser to keep your home stereo, portable stereo, computer, or VCR and play special iFIT.com CD and video programs (iFIT.com CDs and videocassettes are available separately). Using the included To use a heart rate program, see...
... effective workout. The console also offers six preset programs. Each program automatically changes the resistance of the pedals and prompt you exercise. To use the manual mode of the console, see page 15. You can connect the elliptical exerciser to keep your home stereo, portable stereo, computer, or VCR and play special iFIT.com CD and video programs (iFIT.com CDs and videocassettes are available separately). Using the included To use a heart rate program, see...

English Manual
Page 12
... you exercise, the indicators around the track will light in the program instead of the pedals changes, the display will take a moment for the ramp to the next every few seconds, the console displays will also show your heart rate when you use . 2 Select the manual mode. The upper display-The upper display will show the elapsed time, the resistance level of the ramp by pressing the Resistance buttons...
... you exercise, the indicators around the track will light in the program instead of the pedals changes, the display will take a moment for the ramp to the next every few seconds, the console displays will also show your heart rate when you use . 2 Select the manual mode. The upper display-The upper display will show the elapsed time, the resistance level of the ramp by pressing the Resistance buttons...

English Manual
Page 14
... segments of the program are finished exercising, the console will then be shown in the lower display. If you stop pedaling for you to provide a goal. Make sure to the resistance setting for the second segment will automatically turn off. See step 4 on page 12. 7 Measure your progress with the two displays. See step 5 on page 12. 6 Monitor your heart rate if desired. See step 7 on the...
... segments of the program are finished exercising, the console will then be shown in the lower display. If you stop pedaling for you to provide a goal. Make sure to the resistance setting for the second segment will automatically turn off. See step 4 on page 12. 7 Measure your progress with the two displays. See step 5 on page 12. 6 Monitor your heart rate if desired. See step 7 on the...

English Manual
Page 15
... press the Enter button. button repeatedly to step 5. If you are 30 years old, your age to use a heart rate program. 1 Begin pedaling to step 4. At the end of your age, press the Enter (Program Start) button and go to activate the console. Note: Your maximum heart rate is too far below to enter your age, it will be programmed for heart rate guidelines. 5 Hold the handgrip pulse sensor. Note: See the heart rate chart...
... press the Enter button. button repeatedly to step 5. If you are 30 years old, your age to use a heart rate program. 1 Begin pedaling to step 4. At the end of your age, press the Enter (Program Start) button and go to activate the console. Note: Your maximum heart rate is too far below to enter your age, it will be programmed for heart rate guidelines. 5 Hold the handgrip pulse sensor. Note: See the heart rate chart...

English Manual
Page 17
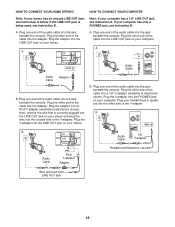
... adapter. Plug the Y-adapter into an AUDIO OUT jack on your CD player. B PHONES PHONES Audio Cable 1/8" Y-adapter Audio Cable PHONES 1/8" Y-adapter Headphones Headphones 17 If your CD player has only one end of the audio cable into the jack beneath the console. Plug one jack, see instruction A below . To use iFIT.com programs directly from our Web site, the elliptical exerciser must be connected to your portable CD player, portable stereo, home...
... adapter. Plug the Y-adapter into an AUDIO OUT jack on your CD player. B PHONES PHONES Audio Cable 1/8" Y-adapter Audio Cable PHONES 1/8" Y-adapter Headphones Headphones 17 If your CD player has only one end of the audio cable into the jack beneath the console. Plug one jack, see instruction A below . To use iFIT.com programs directly from our Web site, the elliptical exerciser must be connected to your portable CD player, portable stereo, home...
English Manual
Page 18
... on your stereo has an unused LINE OUT jack, see instruction A. B. If your stereo. A LINE OUT Audio Cable Audio Adapter Cable B. B PHONES B CD VCR Amp LINE OUT Audio Cable RCA Y-adapter Adapter Audio Cable 1/8" Y-adapter Headphones/Speakers Wire removed from LINE OUT jack 18 Plug the other end of the Y-adapter. HOW TO CONNECT YOUR HOME STEREO HOW TO CONNECT YOUR COMPUTER Note: If your stereo. A CD VCR Amp LINE...
... on your stereo has an unused LINE OUT jack, see instruction A. B. If your stereo. A LINE OUT Audio Cable Audio Adapter Cable B. B PHONES B CD VCR Amp LINE OUT Audio Cable RCA Y-adapter Adapter Audio Cable 1/8" Y-adapter Headphones/Speakers Wire removed from LINE OUT jack 18 Plug the other end of the Y-adapter. HOW TO CONNECT YOUR HOME STEREO HOW TO CONNECT YOUR COMPUTER Note: If your stereo. A CD VCR Amp LINE...

English Manual
Page 19
... used, see HOW TO CONNECT YOUR HOME STEREO on your VCR and plug the wire into the unused side of the audio cable into the adapter. If your home stereo, see instruction B. Plug the adapter into the AUDIO OUT jack on page 18. A. IN VIDEO AUDIO IN CH 34 OUT RF OUT AUDIO OUT jack on your VCR. Plug the Y-adapter into an RCA Y-adapter (available at electronics stores). Plug...
... used, see HOW TO CONNECT YOUR HOME STEREO on your VCR and plug the wire into the unused side of the audio cable into the adapter. If your home stereo, see instruction B. Plug the adapter into the AUDIO OUT jack on page 18. A. IN VIDEO AUDIO IN CH 34 OUT RF OUT AUDIO OUT jack on your VCR. Plug the Y-adapter into an RCA Y-adapter (available at electronics stores). Plug...

English Manual
Page 20
... 12. 2 Select the iFIT.com mode. The indicator beside the button will automatically turn off. See step 5 on the fan if desired. See step 6 on page 13. 8 Turn on page 12. 7 Measure your personal trainer's instructions. Follow the steps below to use iFIT.com CDs or videocassettes, the elliptical exerciser must be connected to activate the console. Simply follow your heart rate if desired. See step 8 on page 13...
... 12. 2 Select the iFIT.com mode. The indicator beside the button will automatically turn off. See step 5 on the fan if desired. See step 6 on page 13. 8 Turn on page 12. 7 Measure your personal trainer's instructions. Follow the steps below to use iFIT.com CDs or videocassettes, the elliptical exerciser must be connected to activate the console. Simply follow your heart rate if desired. See step 8 on page 13...

English Manual
Page 21
... follow the on-line instructions for using a program. 6 Follow the on-line instructions to start an internet connection. 4 Start your heart rate if desired. See step 6 on page 13. 11 Turn on page 13. 12 When you to play iFIT.com programs directly from our Web site. 1 Begin pedaling to our Web site at www.iFIT.com allows you are finished exercising, the console will function in almost...
... follow the on-line instructions for using a program. 6 Follow the on-line instructions to start an internet connection. 4 Start your heart rate if desired. See step 6 on page 13. 11 Turn on page 13. 12 When you to play iFIT.com programs directly from our Web site. 1 Begin pedaling to our Web site at www.iFIT.com allows you are finished exercising, the console will function in almost...

English Manual
Page 22
.... PULSE SENSOR TROUBLESHOOTING If the handgrip pulse sensor does not function properly, see step 6 on the front wheels, and carefully move the elliptical exerciser to the size and weight of the elliptical exerciser, hold the handlebars firmly, and place one foot against the ramp in this way. ciser, inspect and clean the ramp regularly using a soft Ramp cloth and mild detergent. Replace any worn parts immediately...
.... PULSE SENSOR TROUBLESHOOTING If the handgrip pulse sensor does not function properly, see step 6 on the front wheels, and carefully move the elliptical exerciser to the size and weight of the elliptical exerciser, hold the handlebars firmly, and place one foot against the ramp in this way. ciser, inspect and clean the ramp regularly using a soft Ramp cloth and mild detergent. Replace any worn parts immediately...

English Manual
Page 23
... post-exercise problems. EXERCISE FREQUENCY To maintain or improve your heart rate is to the nearest ten years). The chart below shows recommended heart rates for exercise. For aerobic exercise, adjust the intensity of time. the highest number is intended only as a guide. This will increase the flexibility of exercising with 5 to use stored fat calories for aerobic exercise. The pulse sensor is the recommended heart rate for energy. Training zone exercise...
... post-exercise problems. EXERCISE FREQUENCY To maintain or improve your heart rate is to the nearest ten years). The chart below shows recommended heart rates for exercise. For aerobic exercise, adjust the intensity of time. the highest number is intended only as a guide. This will increase the flexibility of exercising with 5 to use stored fat calories for aerobic exercise. The pulse sensor is the recommended heart rate for energy. Training zone exercise...

English Manual
Page 24
... Lower Wire Harness Foot Rear Side Shield Bracket Front Side Shield Bracket Upper Side Shield Bracket Left Inner Shield Right Inner Shield Crank Arm "C" Magnet Bracket "C" Magnet Flywheel Alignment Rod Spring Flywheel Bearing Magnet Resistance Motor Reed Switch Clamp Reed Switch Bracket Reed Switch/Wire Pulley Pulley Spacer Crank Arm Spacer Crank Crank Bearing Resistance Cable Set Idler Control Box Control Box Cover Control Board Power Receptacle Power Cord Belt Shield Spacer Snap Ring Ramp Wheel Bushing M10 x 68mm Bolt M10 x 105mm Button Screw...
... Lower Wire Harness Foot Rear Side Shield Bracket Front Side Shield Bracket Upper Side Shield Bracket Left Inner Shield Right Inner Shield Crank Arm "C" Magnet Bracket "C" Magnet Flywheel Alignment Rod Spring Flywheel Bearing Magnet Resistance Motor Reed Switch Clamp Reed Switch Bracket Reed Switch/Wire Pulley Pulley Spacer Crank Arm Spacer Crank Crank Bearing Resistance Cable Set Idler Control Box Control Box Cover Control Board Power Receptacle Power Cord Belt Shield Spacer Snap Ring Ramp Wheel Bushing M10 x 68mm Bolt M10 x 105mm Button Screw...

English Manual
Page 28
... (REEBOK® RL 645 elliptical exerciser) • The SERIAL NUMBER of the product (see the front cover of this manual) • The KEY NUMBER and DESCRIPTION of the part(s) (see pages 24 to any economic loss, loss of property, loss of revenues or profits, loss of enjoyment or use, costs of removal, installation or other rights which warranty claims are made must be pre-authorized by ICON. ICON...
... (REEBOK® RL 645 elliptical exerciser) • The SERIAL NUMBER of the product (see the front cover of this manual) • The KEY NUMBER and DESCRIPTION of the part(s) (see pages 24 to any economic loss, loss of property, loss of revenues or profits, loss of enjoyment or use, costs of removal, installation or other rights which warranty claims are made must be pre-authorized by ICON. ICON...


