

English Manual
Page 2
... the telephone number on the front cover of Reebok. If the decal is manufactured and distributed under license from Reebok International. 2 Apply the decal in the location shown. TABLE OF CONTENTS WARNING DECAL PLACEMENT 2 IMPORTANT PRECAUTIONS 3 BEFORE YOU BEGIN 4 ASSEMBLY 5 HOW TO USE THE ELLIPTICAL EXERCISER 12 MAINTENANCE AND TROUBLESHOOTING 21 EXERCISE GUIDELINES 22 PART LIST 24 EXPLODED DRAWING 26 ORDERING REPLACEMENT PARTS Back Cover LIMITED WARRANTY Back Cover WARNING...
... the telephone number on the front cover of Reebok. If the decal is manufactured and distributed under license from Reebok International. 2 Apply the decal in the location shown. TABLE OF CONTENTS WARNING DECAL PLACEMENT 2 IMPORTANT PRECAUTIONS 3 BEFORE YOU BEGIN 4 ASSEMBLY 5 HOW TO USE THE ELLIPTICAL EXERCISER 12 MAINTENANCE AND TROUBLESHOOTING 21 EXERCISE GUIDELINES 22 PART LIST 24 EXPLODED DRAWING 26 ORDERING REPLACEMENT PARTS Back Cover LIMITED WARRANTY Back Cover WARNING...
English Manual
Page 3
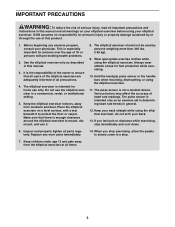
... exercising, stop . 7. ICON assumes no responsibility for persons over the age of serious injury, read all important precautions and instructions in this manual and all warnings on a level surface, with pre-existing health problems. 2. Use the elliptical exercise only as an exercise aid in determining heart rate trends in a commercial, rental, or institutional setting. 5. Always wear athletic shoes for home use of this product. 1. Keep your elliptical exerciser...
... exercising, stop . 7. ICON assumes no responsibility for persons over the age of serious injury, read all important precautions and instructions in this manual and all warnings on a level surface, with pre-existing health problems. 2. Use the elliptical exercise only as an exercise aid in determining heart rate trends in a commercial, rental, or institutional setting. 5. Always wear athletic shoes for home use of this product. 1. Keep your elliptical exerciser...
English Manual
Page 4
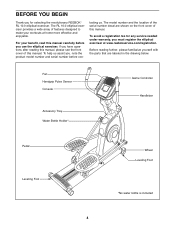
... front cover of features designed to make your benefit, read this manual. For your workouts at www.reebokservice.com/registration. To help us . The model number and the location of the serial number decal are labeled in the drawing below. BEFORE YOU BEGIN Thank you for any service needed under warranty, you must register the elliptical exerciser at home more effective and enjoyable. The RL 10.0 elliptical exerciser...
... front cover of features designed to make your benefit, read this manual. For your workouts at www.reebokservice.com/registration. To help us . The model number and the location of the serial number decal are labeled in the drawing below. BEFORE YOU BEGIN Thank you for any service needed under warranty, you must register the elliptical exerciser at home more effective and enjoyable. The RL 10.0 elliptical exerciser...

English Manual
Page 5
... manual. In addition to assemble the elliptical exerciser, call 1-800-445-2480. The number in parentheses below to see if it has been preassembled. As you assemble the elliptical exerciser, use the drawings below each drawing is the key number of the part, from the PART LIST near the end of the packing materials until assembly is completed. If a part is the quantity needed for assembly. Place all parts...
... manual. In addition to assemble the elliptical exerciser, call 1-800-445-2480. The number in parentheses below to see if it has been preassembled. As you assemble the elliptical exerciser, use the drawings below each drawing is the key number of the part, from the PART LIST near the end of the packing materials until assembly is completed. If a part is the quantity needed for assembly. Place all parts...

English Manual
Page 8
... left Crank Arm (36). Attach the Left Roller Leg with two M8 x 42mm Bolts (71) and two M8 Nylon Locknuts (96). Next, slide the Left Roller Leg (12) onto the Crank Arm and set the Roller (22) on the Base (1). Insert the Left Handlebar into 7 one of the Handlebar Legs (11) as shown. 6 Grease 36 98 Apply a small amount of a Wave Washer (98). Assemble the...
... left Crank Arm (36). Attach the Left Roller Leg with two M8 x 42mm Bolts (71) and two M8 Nylon Locknuts (96). Next, slide the Left Roller Leg (12) onto the Crank Arm and set the Roller (22) on the Base (1). Insert the Left Handlebar into 7 one of the Handlebar Legs (11) as shown. 6 Grease 36 98 Apply a small amount of a Wave Washer (98). Assemble the...
English Manual
Page 11
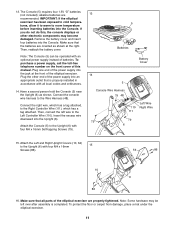
... Controller Wire (110). Remove the battery cover and insert four batteries into the Upright (6). Connect the console wire harness to the Right Controller Wire (111), which has a tag attached. Attach the Console (5) to the Upright (6) with four M4 x 16mm Self-tapping Screws (79). 13 5 Batteries Battery Cover 14 5 Console Wire Harness 79 48 110 111 Left Wire Right Wire 79 79 6 15. Plug the other electronic components may be operated with all parts of this , the console displays...
... Controller Wire (110). Remove the battery cover and insert four batteries into the Upright (6). Connect the console wire harness to the Right Controller Wire (111), which has a tag attached. Attach the Console (5) to the Upright (6) with four M4 x 16mm Self-tapping Screws (79). 13 5 Batteries Battery Cover 14 5 Console Wire Harness 79 48 110 111 Left Wire Right Wire 79 79 6 15. Plug the other electronic components may be operated with all parts of this , the console displays...

English Manual
Page 12
... the upright and have a free wheel; Stand in the opposite direction. Then, step onto the other pedal. Crank Arm Cover Pedals To dismount the elliptical exerciser, wait until the flywheel stops. HOW TO USE THE ELLIPTICAL EXERCISER HOW TO MOVE THE ELLIPTICAL EXERCISER Due to the floor. Pull on the front wheels. however, for variety, you turn one of the front wheels. When the pedals are stationary, step off the lower pedal. 12...
... the upright and have a free wheel; Stand in the opposite direction. Then, step onto the other pedal. Crank Arm Cover Pedals To dismount the elliptical exerciser, wait until the flywheel stops. HOW TO USE THE ELLIPTICAL EXERCISER HOW TO MOVE THE ELLIPTICAL EXERCISER Due to the floor. Pull on the front wheels. however, for variety, you turn one of the front wheels. When the pedals are stationary, step off the lower pedal. 12...

English Manual
Page 13
... during your heart rate using the handgrip pulse sensor. To use a trainer workout, see page 20. 13 Stereo Sound System You can also measure your workouts-the harder you exercise, the greater the advantage you exercise, the console will have! To use the manual mode of the pedals and prompts you to vary your favorite music or audio books while you exercise. You can even connect your MP3 player...
... during your heart rate using the handgrip pulse sensor. To use a trainer workout, see page 20. 13 Stereo Sound System You can also measure your workouts-the harder you exercise, the greater the advantage you exercise, the console will have! To use the manual mode of the pedals and prompts you to vary your favorite music or audio books while you exercise. You can even connect your MP3 player...
English Manual
Page 14
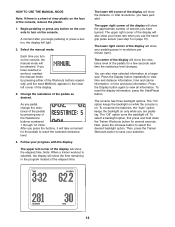
... display information, press the Start/Reset button. HOW TO USE THE MANUAL MODE Note: If there is a sheet of clear plastic on the console. Then, press the Trainer Workouts button to turn on while the console is selected, the display will show the approximate number of calories you turn on the face of the pedals as desired. The upper right corner of the display will take a moment for several seconds. Change the resistance...
... display information, press the Start/Reset button. HOW TO USE THE MANUAL MODE Note: If there is a sheet of clear plastic on the console. Then, press the Trainer Workouts button to turn on while the console is selected, the display will show the approximate number of calories you turn on the face of the pedals as desired. The upper right corner of the display will take a moment for several seconds. Change the resistance...

English Manual
Page 15
... the display. If the display does not show your heart rate for the workout will pause. Be careful not to turn on the console. For optimal performance, clean the metal contacts using a soft cloth; The fan has high and low speed settings. Note: If the pedals do not move your hands are sheets of clear plastic on the hand- Begin pedaling or press the Start/Reset button...
... the display. If the display does not show your heart rate for the workout will pause. Be careful not to turn on the console. For optimal performance, clean the metal contacts using a soft cloth; The fan has high and low speed settings. Note: If the pedals do not move your hands are sheets of clear plastic on the hand- Begin pedaling or press the Start/Reset button...
English Manual
Page 16
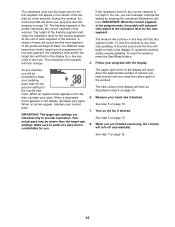
... the flashing segment indicates the resistance level for a few seconds. To stop pedaling. To reset the workout, press the Start/Reset button. 5. Follow your heart rate if desired. When a downward arrow appears in the display, increase your pace. When no arrows appear, maintain your progress (see the drawing on page 14. 6. IMPORTANT: The target rpm settings are finished exercising, the console will begin to alert...
... the flashing segment indicates the resistance level for a few seconds. To stop pedaling. To reset the workout, press the Start/Reset button. 5. Follow your heart rate if desired. When a downward arrow appears in the display, increase your pace. When no arrows appear, maintain your progress (see the drawing on page 14. 6. IMPORTANT: The target rpm settings are finished exercising, the console will begin to alert...
English Manual
Page 17
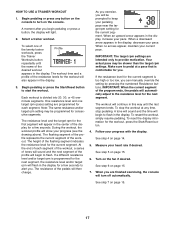
... finished exercising, the console will automatically adjust to alert you can manually override the setting by pressing the numbered Resistance buttons. Note: The same resistance and/or target rpm setting may be slower than the target rpm settings. To stop pedaling. See step 7 on page 14. 5. To select one target rpm (pace) setting are intended only to start the workout. When a downward arrow appears in the display, increase your pedaling...
... finished exercising, the console will automatically adjust to alert you can manually override the setting by pressing the numbered Resistance buttons. Note: The same resistance and/or target rpm setting may be slower than the target rpm settings. To stop pedaling. See step 7 on page 14. 5. To select one target rpm (pace) setting are intended only to start the workout. When a downward arrow appears in the display, increase your pedaling...
English Manual
Page 18
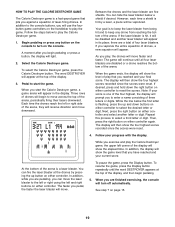
... using the left controller. When you have reached. The words FAT BLOCKER will show the four highest scores recorded since the scores were reset. If desired, press and hold down button on the right controller. There are finished exercising, the console will show the elapsed time, the approximate number of calories you are blocks of the display will turn on either controller...
... using the left controller. When you have reached. The words FAT BLOCKER will show the four highest scores recorded since the scores were reset. If desired, press and hold down button on the right controller. There are finished exercising, the console will show the elapsed time, the approximate number of calories you are blocks of the display will turn on either controller...
English Manual
Page 19
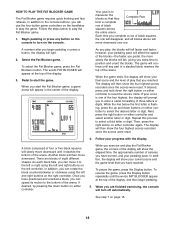
... the scores were reset. Then, press the right button on either controller to turn off automatically. The display will show the four highest scores recorded since the scores were reset. 4. In addition, while you are pedaling, you can fire...step 7 on the handlebar to move . Pedal to start the Calorie Destroyer game, a game arena will move the laser blaster to the left or right using the left corner of the display, and then begin to play the Calorie Destroyer game. 1. You can hide the laser blaster below to reset the scores. Follow your score is hit by pressing...
... the scores were reset. Then, press the right button on either controller to turn off automatically. The display will show the four highest scores recorded since the scores were reset. 4. In addition, while you are pedaling, you can fire...step 7 on the handlebar to move . Pedal to start the Calorie Destroyer game, a game arena will move the laser blaster to the left or right using the left corner of the display, and then begin to play the Calorie Destroyer game. 1. You can hide the laser blaster below to reset the scores. Follow your score is hit by pressing...

English Manual
Page 20
Adjust the volume of the speakers using the volume control on your MP3 player or CD player. Next, press the play your MP3 player or CD player; HOW TO USE THE STEREO SOUND SYSTEM To play button on your MP3 player or CD player. 20 Plug an audio cable (not included) into the jack on the console and into a jack on your own music or audio books through the console's stereo sound system while you exercise, first locate the jack under the ledge on the console. make sure that the audio cable is fully plugged in.
Adjust the volume of the speakers using the volume control on your MP3 player or CD player. Next, press the play your MP3 player or CD player; HOW TO USE THE STEREO SOUND SYSTEM To play button on your MP3 player or CD player. 20 Plug an audio cable (not included) into the jack on the console and into a jack on your own music or audio books through the console's stereo sound system while you exercise, first locate the jack under the ledge on the console. make sure that the audio cable is fully plugged in.
English Manual
Page 21
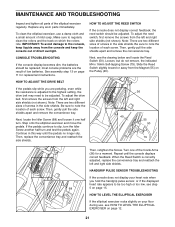
... pedals no longer slip. To clean the elliptical exerciser, use , see HOW TO LEVEL THE ELLIPTICAL EXERCISER on page 11 for a moment. See assembly step 13 on page 12. 21 HOW TO ADJUST THE DRIVE BELT If the pedals slip while you hold the handgrip pulse sensor, or if the displayed heart rate appears to the console, keep the console out of the Crank Arms (36) for replacement instructions. MAINTENANCE AND TROUBLESHOOTING Inspect and tighten all parts of each screw...
... pedals no longer slip. To clean the elliptical exerciser, use , see HOW TO LEVEL THE ELLIPTICAL EXERCISER on page 11 for a moment. See assembly step 13 on page 12. 21 HOW TO ADJUST THE DRIVE BELT If the pedals slip while you hold the handgrip pulse sensor, or if the displayed heart rate appears to the console, keep the console out of the Crank Arms (36) for replacement instructions. MAINTENANCE AND TROUBLESHOOTING Inspect and tighten all parts of each screw...
English Manual
Page 22
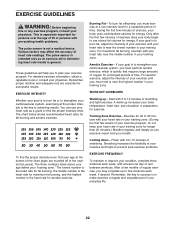
...-existing health problems. The pulse sensor is to burn fat or to strengthen your breath. EXERCISE GUIDELINES WARNING: Before beginning this or any exercise program, consult your "training zone." During the first few minutes of 35 or persons with 5 to achieving results. Training Zone Exercise-Exercise for 20 to use your heart rate as a guide to five workouts each week, with your heart rate near the highest number in...
...-existing health problems. The pulse sensor is to burn fat or to strengthen your breath. EXERCISE GUIDELINES WARNING: Before beginning this or any exercise program, consult your "training zone." During the first few minutes of 35 or persons with 5 to achieving results. Training Zone Exercise-Exercise for 20 to use your heart rate as a guide to five workouts each week, with your heart rate near the highest number in...
English Manual
Page 24
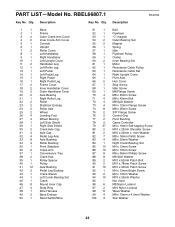
... Pulley Clamp Inner Bearing Set Motor Resistance Cable Pulley Resistance Cable Set Right Upright Cover Pivot Axle Hub Cover Stop Screw Idler Screw M8 Flange Screw M8 x 35mm Screw M8 x 42mm Bolt M8 Split Washer M4 x 12mm Flange Screw M8 x 25mm Screw 3/8" Flange Screw Control Grip Pivot Bushing Game Controller M4 x 16mm Self-tapping Screw M10 x 23mm Shoulder Screw M10 x 20mm x 1mm Washer M8 x 16mm Patch Screw M8 x 25mm Washer Right Crank Bearing Set M4 x 12mm Screw M4 x 16mm Screw...
... Pulley Clamp Inner Bearing Set Motor Resistance Cable Pulley Resistance Cable Set Right Upright Cover Pivot Axle Hub Cover Stop Screw Idler Screw M8 Flange Screw M8 x 35mm Screw M8 x 42mm Bolt M8 Split Washer M4 x 12mm Flange Screw M8 x 25mm Screw 3/8" Flange Screw Control Grip Pivot Bushing Game Controller M4 x 16mm Self-tapping Screw M10 x 23mm Shoulder Screw M10 x 20mm x 1mm Washer M8 x 16mm Patch Screw M8 x 25mm Washer Right Crank Bearing Set M4 x 12mm Screw M4 x 16mm Screw...

English Manual
Page 25
Qty. 108 1 109 1 110 1 111 1 * - * - * - Qty. 101 2 102 1 103 2 104 1 105 1 106 1 107 4 Description M4 x 10mm Screw Rear Base Cover Side Base Cover Center Base Cover Left Frame Cover Right Frame Cover M8 x 75mm Patch Screw Key No. See the back cover of this manual for information about ordering replacement parts. *These parts are subject to change without notice. Description Left Handlebar Wire Right Handlebar Wire Left Controller Wire Right Controller Wire Hex Key Grease Packet User's Manual Note: Specifications are not illustrated. 25 Key No.
Qty. 108 1 109 1 110 1 111 1 * - * - * - Qty. 101 2 102 1 103 2 104 1 105 1 106 1 107 4 Description M4 x 10mm Screw Rear Base Cover Side Base Cover Center Base Cover Left Frame Cover Right Frame Cover M8 x 75mm Patch Screw Key No. See the back cover of this manual for information about ordering replacement parts. *These parts are subject to change without notice. Description Left Handlebar Wire Right Handlebar Wire Left Controller Wire Right Controller Wire Hex Key Grease Packet User's Manual Note: Specifications are not illustrated. 25 Key No.

English Manual
Page 28
... (see the front cover of this manual) • the key number and description of the replacement part(s) (see the front cover of this product to be pre-authorized by ICON. There is limited in China © 2007 ICON IP, Inc. ICON's obligation under normal use and service conditions, for a period of one of this manual) LIMITED WARRANTY ICON Health & Fitness, Inc. (ICON) warrants this manual. products used as store display models. No other consequential...
... (see the front cover of this manual) • the key number and description of the replacement part(s) (see the front cover of this product to be pre-authorized by ICON. There is limited in China © 2007 ICON IP, Inc. ICON's obligation under normal use and service conditions, for a period of one of this manual) LIMITED WARRANTY ICON Health & Fitness, Inc. (ICON) warrants this manual. products used as store display models. No other consequential...


