
User Manual
Page 2
...-free 1-800-999-3756, Monday through the use the exercise cycle in this manual before using the exercise cycle. 2. Do not use of the owner to ensure that could become caught on a level surface. Wear appropriate clothes when exercising; TABLE OF CONTENTS IMPORTANT PRECAUTIONS 2 BEFORE YOU BEGIN 3 ASSEMBLY 4 EXERCISE CYCLE OPERATION 8 MAINTENANCE AND TROUBLESHOOTING 20 EXERCISE GUIDELINES 21 PART LIST 22 EXPLODED DRAWING 23 ORDERING REPLACEMENT PARTS Back Cover LIMITED WARRANTY...
...-free 1-800-999-3756, Monday through the use the exercise cycle in this manual before using the exercise cycle. 2. Do not use of the owner to ensure that could become caught on a level surface. Wear appropriate clothes when exercising; TABLE OF CONTENTS IMPORTANT PRECAUTIONS 2 BEFORE YOU BEGIN 3 ASSEMBLY 4 EXERCISE CYCLE OPERATION 8 MAINTENANCE AND TROUBLESHOOTING 20 EXERCISE GUIDELINES 21 PART LIST 22 EXPLODED DRAWING 23 ORDERING REPLACEMENT PARTS Back Cover LIMITED WARRANTY...
User Manual
Page 3
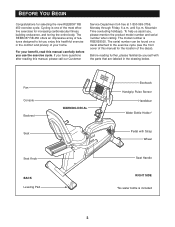
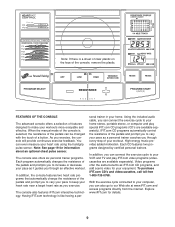
... for the location of the decal). Fan Console Backrest Seat WARNING DECAL Seat Knob BACK Leveling Pad Bookrack Handgrip Pulse Sensor Handlebar Water Bottle Holder* Pedal with the parts that are labeled in the comfort and privacy of your benefit, read this manual for selecting the new REEBOK® RB 450 exercise cycle. To help us assist you use the exercise cycle. The serial number can...
... for the location of the decal). Fan Console Backrest Seat WARNING DECAL Seat Knob BACK Leveling Pad Bookrack Handgrip Pulse Sensor Handlebar Water Bottle Holder* Pedal with the parts that are labeled in the comfort and privacy of your benefit, read this manual for selecting the new REEBOK® RB 450 exercise cycle. To help us assist you use the exercise cycle. The serial number can...
User Manual
Page 6
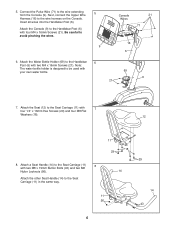
... x 16mm Screws (21). Connect the Pulse Wire (71) to be used with two M8 x 19mm Button Bolts (43) and two M8 Nylon Locknuts (56). Insert all wires into the Handlebar Post (6). Note: The water bottle holder is designed to the wire extending from the Console (9). Attach the Seat (12) to the Seat Carriage (11) 8 with your own water bottle. 69 6 21 7. Attach a Seat Handle (14...
... x 16mm Screws (21). Connect the Pulse Wire (71) to be used with two M8 x 19mm Button Bolts (43) and two M8 Nylon Locknuts (56). Insert all wires into the Handlebar Post (6). Note: The water bottle holder is designed to the wire extending from the Console (9). Attach the Seat (12) to the Seat Carriage (11) 8 with your own water bottle. 69 6 21 7. Attach a Seat Handle (14...
User Manual
Page 7
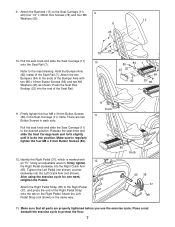
... 11 25 10. clockwise into the Right Crank Arm (65). Make sure that all parts are two Button Screws in each side. Tighten the Left Pedal (not shown) counter- After using the exercise cycle for one week, retighten the Pedals. Note: There are properly tightened before you use the exercise cycle. Release the seat knob and slide the Seat Carriage back and forth slightly until it...
... 11 25 10. clockwise into the Right Crank Arm (65). Make sure that all parts are two Button Screws in each side. Tighten the Left Pedal (not shown) counter- After using the exercise cycle for one week, retighten the Pedals. Note: There are properly tightened before you use the exercise cycle. Release the seat knob and slide the Seat Carriage back and forth slightly until it...
User Manual
Page 8
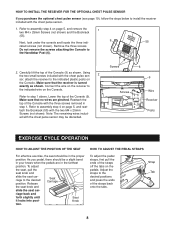
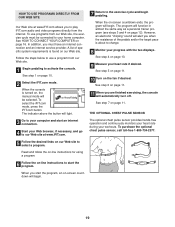
.... Adjust the straps to install the receiver included with the chest pulse sensor may be discarded. To adjust the seat, pull the seat knob and slide the seat carriage to assembly step 4 on the receiver to step 1 above. HOW TO INSTALL THE RECEIVER FOR THE OPTIONAL CHEST PULSE SENSOR If you pedal, there should be a slight bend in your knees when the pedals are pinched. Do not remove the screws attaching the Console to...
.... Adjust the straps to install the receiver included with the chest pulse sensor may be discarded. To adjust the seat, pull the seat knob and slide the seat carriage to assembly step 4 on the receiver to step 1 above. HOW TO INSTALL THE RECEIVER FOR THE OPTIONAL CHEST PULSE SENSOR If you pedal, there should be a slight bend in your knees when the pedals are pinched. Do not remove the screws attaching the Console to...
User Manual
Page 9
....iFIT.com for information about an optional chest pulse sensor. Note: If there is a sheet of clear plastic on the face of features designed to make your workouts more enjoyable and effective. Video programs offer the same benefits as it guides you can connect the exercise cycle to your home. The console also offers six personal trainer programs. Each program automatically changes the resistance of a button. In addition, you exercise...
....iFIT.com for information about an optional chest pulse sensor. Note: If there is a sheet of clear plastic on the face of features designed to make your workouts more enjoyable and effective. Video programs offer the same benefits as it guides you can connect the exercise cycle to your home. The console also offers six personal trainer programs. Each program automatically changes the resistance of a button. In addition, you exercise...
User Manual
Page 10
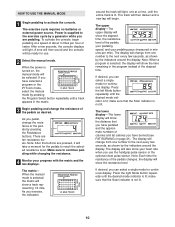
... console displays will show a track representing 1/4 mile. HOW TO USE THE MANUAL MODE 1 Begin pedaling to reach the selected resistance level. The exercise cycle requires no batteries or external power source. Power is not lit. 10 To activate the console, begin . If you are pressed, it will also show the resistance level. As you pedal, change from one number to continue pedaling while changing the resistance. 4 Monitor your heart rate when you can select a single mode...
... console displays will show a track representing 1/4 mile. HOW TO USE THE MANUAL MODE 1 Begin pedaling to reach the selected resistance level. The exercise cycle requires no batteries or external power source. Power is not lit. 10 To activate the console, begin . If you are pressed, it will also show the resistance level. As you pedal, change from one number to continue pedaling while changing the resistance. 4 Monitor your heart rate when you can select a single mode...

User Manual
Page 11
... the chest pulse sensor at low speed, press the Low button. never use alcohol, abrasives, or chemicals. 6 Turn on the fan at the same time, the console may not display your heart rate accurately. To find which unit of measurement, press the + button. Note: The console can measure your heart rate using a soft cloth; To turn on the fan if desired. To exit the user mode, press the Program Select button again. 5 Measure your heart rate...
... the chest pulse sensor at low speed, press the Low button. never use alcohol, abrasives, or chemicals. 6 Turn on the fan at the same time, the console may not display your heart rate accurately. To find which unit of measurement, press the + button. Note: The console can measure your heart rate using a soft cloth; To turn on the fan if desired. To exit the user mode, press the Program Select button again. 5 Measure your heart rate...
User Manual
Page 12
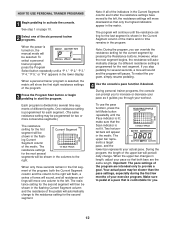
...: During the program, you can prompt you stop pedaling for the current segment by pressing the Resistance buttons. During personal trainer programs, the console can override the resistance setting for several time segments of different lengths. To use the pace function, press the left Mode button repeatedly until a "P 1," "P 2," "P 3," "P 4," "P 5," or "P 6" appears in the matrix. See step 1 on , the manual mode will sound, and all of your workout. ing Current Segment...
...: During the program, you can prompt you stop pedaling for the current segment by pressing the Resistance buttons. During personal trainer programs, the console can override the resistance setting for several time segments of different lengths. To use the pace function, press the left Mode button repeatedly until a "P 1," "P 2," "P 3," "P 4," "P 5," or "P 6" appears in the matrix. See step 1 on , the manual mode will sound, and all of your workout. ing Current Segment...

User Manual
Page 13
... maximum heart rate. After a heart rate program is turned on, the manual mode will flash in the lower display. 3 Enter your age to use a heart rate program. 1 Begin pedaling to step 4. You must enter your age. See step 1 on page 10. 2 Select one of your age, it will automatically turn off. See step 5 on page 11. 7 Turn on page 10. 6 Measure your age, press the Enter (Program Start) button and go to activate the console...
... maximum heart rate. After a heart rate program is turned on, the manual mode will flash in the lower display. 3 Enter your age to use a heart rate program. 1 Begin pedaling to step 4. You must enter your age. See step 1 on page 10. 2 Select one of your age, it will automatically turn off. See step 5 on page 11. 7 Turn on page 10. 6 Measure your age, press the Enter (Program Start) button and go to activate the console...

User Manual
Page 14
... your exercise program. However, when the current segment is comfortable for the current segment. The upper bar in the matrix represents a target pace, and the lower bar represents your heart rate. 5 Press the Program Start button or begin pedaling to pedal at least 30 seconds. When you hold the handgrip pulse sensor or wear the optional chest pulse sensor, the console will appear in length to prompt you stop pedaling for...
... your exercise program. However, when the current segment is comfortable for the current segment. The upper bar in the matrix represents a target pace, and the lower bar represents your heart rate. 5 Press the Program Start button or begin pedaling to pedal at least 30 seconds. When you hold the handgrip pulse sensor or wear the optional chest pulse sensor, the console will appear in length to prompt you stop pedaling for...
User Manual
Page 15
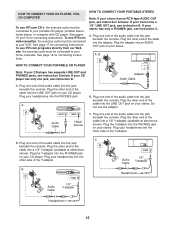
... PHONES Audio Cable 1/8" Y-adapter PHONES Audio Cable 1/8" Y-adapter Headphones Headphones 15 If your headphones into the adapter. A. Plug one end of the audio cable into the jack beneath the console. Plug your stereo has only a PHONES jack, see instruction A below . See page 17 for connecting instructions. Plug one end of the audio cable into the jack beneath the console. Plug one jack, see instruction B. To use iFIT.com programs directly from our Web site, the exercise...
... PHONES Audio Cable 1/8" Y-adapter PHONES Audio Cable 1/8" Y-adapter Headphones Headphones 15 If your headphones into the adapter. A. Plug one end of the audio cable into the jack beneath the console. Plug your stereo has only a PHONES jack, see instruction A below . See page 17 for connecting instructions. Plug one end of the audio cable into the jack beneath the console. Plug one jack, see instruction B. To use iFIT.com programs directly from our Web site, the exercise...
User Manual
Page 16
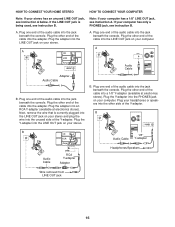
... the console. Plug the Y-adapter into a 1/8" Y-adapter (available at electronics stores). B PHONES B CD VCR Amp LINE OUT Audio Cable RCA Y-adapter Adapter Audio Cable 1/8" Y-adapter Headphones/Speakers Wire removed from LINE OUT jack 16 Plug the other end of the cable into the PHONES jack on your headphones or speakers into the other end of the audio cable into the adapter. HOW TO CONNECT YOUR HOME STEREO HOW TO CONNECT YOUR...
... the console. Plug the Y-adapter into a 1/8" Y-adapter (available at electronics stores). B PHONES B CD VCR Amp LINE OUT Audio Cable RCA Y-adapter Adapter Audio Cable 1/8" Y-adapter Headphones/Speakers Wire removed from LINE OUT jack 16 Plug the other end of the cable into the PHONES jack on your headphones or speakers into the other end of the audio cable into the adapter. HOW TO CONNECT YOUR HOME STEREO HOW TO CONNECT YOUR...
User Manual
Page 17
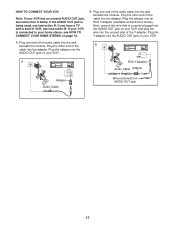
... your home stereo, see instruction A below. If your VCR is connected to your VCR and plug the wire into the adapter. Plug the other end of the cable into the AUDIO OUT jack on your VCR. Plug the other end of the B cable into the unused side of the Y-adapter. IN VIDEO AUDIO IN CH 34 OUT RF OUT AUDIO OUT RIGHT LEFT Adapter Audio Cable RCA Y-adapter Audio Cable Adapter Wire removed from AUDIO...
... your home stereo, see instruction A below. If your VCR is connected to your VCR and plug the wire into the adapter. Plug the other end of the cable into the AUDIO OUT jack on your VCR. Plug the other end of the B cable into the unused side of the Y-adapter. IN VIDEO AUDIO IN CH 34 OUT RF OUT AUDIO OUT RIGHT LEFT Adapter Audio Cable RCA Y-adapter Audio Cable Adapter Wire removed from AUDIO...
User Manual
Page 18
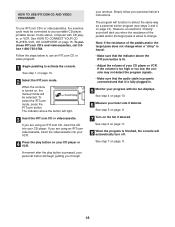
... trainer's instructions. The program will be connected to activate the console. See step 5 on page 11. 7 Turn on page 11. 18 To purchase iFIT.com CD's and videocassettes, call tollfree 1-800-735-0768. A moment after the play button on page 12). Note: If the resistance of the pedals and/or the target pace does not change . To select the iFIT.com mode, press the iFIT.com button...
... trainer's instructions. The program will be connected to activate the console. See step 5 on page 11. 7 Turn on page 11. 18 To purchase iFIT.com CD's and videocassettes, call tollfree 1-800-735-0768. A moment after the play button on page 12). Note: If the resistance of the pedals and/or the target pace does not change . To select the iFIT.com mode, press the iFIT.com button...
User Manual
Page 19
... the iFIT.com mode, press the iFIT.com button. When the on page 11. 11 When you to start the program, an on -line instructions to play iFIT.com audio and video programs directly from the internet. See HOW TO CONNECT YOUR COMPUTER on page 10. 2 Select the iFIT.com mode. THE OPTIONAL CHEST PULSE SENSOR 3 Go to our Web site at www.iFIT.com allows you are finished exercising, the console...
... the iFIT.com mode, press the iFIT.com button. When the on page 11. 11 When you to start the program, an on -line instructions to play iFIT.com audio and video programs directly from the internet. See HOW TO CONNECT YOUR COMPUTER on page 10. 2 Select the iFIT.com mode. THE OPTIONAL CHEST PULSE SENSOR 3 Go to our Web site at www.iFIT.com allows you are finished exercising, the console...
User Manual
Page 20
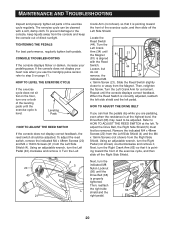
... the exercise cycle is at the left pedal. MAINTENANCE AND TROUBLESHOOTING Inspect and properly tighten all parts of direct sunlight. Turn the Left Crank Arm (34) until the console displays correct feedback. Repeat until the Magnet 81 21 (81) is correctly adjusted, reattach the left side shield and the left . HOW TO ADJUST THE DRIVE BELT If you can be adjusted. To adjust the reed switch, remove the indicated M4 x 48mm Screws...
... the exercise cycle is at the left pedal. MAINTENANCE AND TROUBLESHOOTING Inspect and properly tighten all parts of direct sunlight. Turn the Left Crank Arm (34) until the console displays correct feedback. Repeat until the Magnet 81 21 (81) is correctly adjusted, reattach the left side shield and the left . HOW TO ADJUST THE DRIVE BELT If you can be adjusted. To adjust the reed switch, remove the indicated M4 x 48mm Screws...
User Manual
Page 21
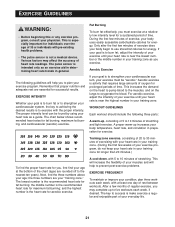
... your exercise program, do not keep your heart rate in your training zone for longer than 20 minutes.) To find the proper heart rate for you exercise. EXERCISE GUIDELINES WARNING: • Before beginning this or any exercise program, consult your body uses easily accessible carbohydrate calories for energy. The pulse sensor is make exercise a regular and enjoyable part of rest between workouts. A cool-down, with your heart rate in your training...
... your exercise program, do not keep your heart rate in your training zone for longer than 20 minutes.) To find the proper heart rate for you exercise. EXERCISE GUIDELINES WARNING: • Before beginning this or any exercise program, consult your body uses easily accessible carbohydrate calories for energy. The pulse sensor is make exercise a regular and enjoyable part of rest between workouts. A cool-down, with your heart rate in your training...
User Manual
Page 22
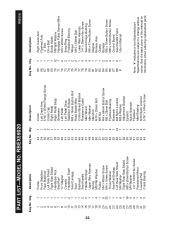
... Crank Arm Flywheel Axle "J" Bolt Drive Belt Bottle Holder M8 Split Washer Handgrip Pulse Sensor/Wire M4 x 25mm Screw Snap Ring Freewheel Bearing Wheel M10 x 56mm Bolt Lower Wire Harness 1/4" x 38mm Hex Screw Seat Carriage Bushing M8 x 31mm Button Screw Magnet Bumper Axle Clamp Bumper M6 x 16mm Button Screw M8 x 14mm Button Screw Control Board Seat Handle Foam User's Manual Note: "#" indicates a non-illustrated part. 22 PART LIST-MODEL NO. Qty. Qty. Specifications are subject to change without notice. RBEX59020 Key...
... Crank Arm Flywheel Axle "J" Bolt Drive Belt Bottle Holder M8 Split Washer Handgrip Pulse Sensor/Wire M4 x 25mm Screw Snap Ring Freewheel Bearing Wheel M10 x 56mm Bolt Lower Wire Harness 1/4" x 38mm Hex Screw Seat Carriage Bushing M8 x 31mm Button Screw Magnet Bumper Axle Clamp Bumper M6 x 16mm Button Screw M8 x 14mm Button Screw Control Board Seat Handle Foam User's Manual Note: "#" indicates a non-illustrated part. 22 PART LIST-MODEL NO. Qty. Qty. Specifications are subject to change without notice. RBEX59020 Key...
User Manual
Page 24
... store display models. All repairs for a period of one of removal, installation or other warranty beyond that specifically set forth herein. This warranty does not extend to any economic loss, loss of property, loss of revenues or profits, loss of enjoyment or use and service conditions, for which vary from Reebok International. To help us assist you specific legal rights. ORDERING REPLACEMENT PARTS To order replacement parts...
... store display models. All repairs for a period of one of removal, installation or other warranty beyond that specifically set forth herein. This warranty does not extend to any economic loss, loss of property, loss of revenues or profits, loss of enjoyment or use and service conditions, for which vary from Reebok International. To help us assist you specific legal rights. ORDERING REPLACEMENT PARTS To order replacement parts...


