
English Manual
Page 1
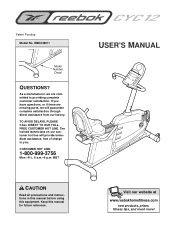
... Read all precautions and instructions in this manual before using this manual for future reference. RBEX39011 Model Number Decal QUESTIONS? The trained technicians on our customer hot line will guarantee complete satisfaction through direct assistance from our factory. Keep this equipment. TO AVOID DELAYS, PLEASE CALL DIRECT TO OUR TOLLFREE CUSTOMER HOT LINE. Patent Pending Model No. CUSTOMER HOT LINE...
... Read all precautions and instructions in this manual before using this manual for future reference. RBEX39011 Model Number Decal QUESTIONS? The trained technicians on our customer hot line will guarantee complete satisfaction through direct assistance from our factory. Keep this equipment. TO AVOID DELAYS, PLEASE CALL DIRECT TO OUR TOLLFREE CUSTOMER HOT LINE. Patent Pending Model No. CUSTOMER HOT LINE...
English Manual
Page 2
... OPERATE THE EXERCISE CYCLE 8 MAINTENANCE AND TROUBLESHOOTING 11 EXERCISE GUIDELINES 12 PART LIST 14 EXPLODED DRAWING 15 HOW TO ORDER REPLACEMENT PARTS Back Cover LIMITED WARRANTY Back Cover IMPORTANT PRECAUTIONS WARNING: To reduce the risk of heart rate readings. cautions before using the REEBOK® CYC12 exercise cycle. 1. This is not a medical device. Place a mat under the age of 35 or persons with pre-existing health problems. Read all instructions before using .
... OPERATE THE EXERCISE CYCLE 8 MAINTENANCE AND TROUBLESHOOTING 11 EXERCISE GUIDELINES 12 PART LIST 14 EXPLODED DRAWING 15 HOW TO ORDER REPLACEMENT PARTS Back Cover LIMITED WARRANTY Back Cover IMPORTANT PRECAUTIONS WARNING: To reduce the risk of heart rate readings. cautions before using the REEBOK® CYC12 exercise cycle. 1. This is not a medical device. Place a mat under the age of 35 or persons with pre-existing health problems. Read all instructions before using .
English Manual
Page 3
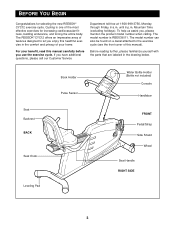
... the product model number when calling. Before reading further, please familiarize yourself with the parts that are labeled in the comfort and privacy of your benefit, read this healthful exercise in the drawing below. If you use the exercise cycle. Book Holder Pulse Sensor Water Bottle Holder (Bottle not included) Console Handlebar Seat Backrest BACK Seat Knob FRONT Pedal/Strap Side Shield Wheel Seat Handle RIGHT...
... the product model number when calling. Before reading further, please familiarize yourself with the parts that are labeled in the comfort and privacy of your benefit, read this healthful exercise in the drawing below. If you use the exercise cycle. Book Holder Pulse Sensor Water Bottle Holder (Bottle not included) Console Handlebar Seat Backrest BACK Seat Knob FRONT Pedal/Strap Side Shield Wheel Seat Handle RIGHT...
English Manual
Page 4
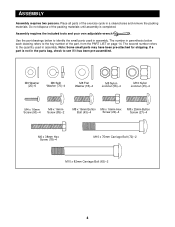
Use the part drawings below each drawing refers to the key number of the exercise cycle in assembly. Place all parts of the part, from the PART LIST on page 14. The number in parenthesis below to see if it has been pre-assembled. If a part is completed. M6 Washer (25)-6 M8 Split Washer (70)-4 M8 Flat Washer (18)-4 M8 Nylon Locknut (56)-4 M10...
Use the part drawings below each drawing refers to the key number of the exercise cycle in assembly. Place all parts of the part, from the PART LIST on page 14. The number in parenthesis below to see if it has been pre-assembled. If a part is completed. M6 Washer (25)-6 M8 Split Washer (70)-4 M8 Flat Washer (18)-4 M8 Nylon Locknut (56)-4 M10...
English Manual
Page 5
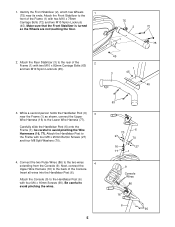
... from the Console (9). Attach the Rear Stabilizer (3) to the Frame with four M4 x 16mm Screws (90). Attach the Handlebar Post to the rear of the Frame (1) with two M10 x 82mm Carriage Bolts (63) and two M10 Nylon Locknuts (45). 75 2 1 45 1 3 45 72 75 45 3. Carefully slide the Handlebar Post (6) onto the Frame (1); Connect the two Pulse Wires (86) to...
... from the Console (9). Attach the Rear Stabilizer (3) to the Frame with four M4 x 16mm Screws (90). Attach the Handlebar Post to the rear of the Frame (1) with two M10 x 82mm Carriage Bolts (63) and two M10 Nylon Locknuts (45). 75 2 1 45 1 3 45 72 75 45 3. Carefully slide the Handlebar Post (6) onto the Frame (1); Connect the two Pulse Wires (86) to...
English Manual
Page 6
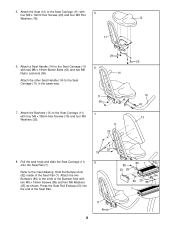
... 13 25 78 8. Attach a Seat Handle (14) to the Seat Carriage (11) with two M8 x 19mm Button Bolts (43) and two M8 Nylon Locknuts (56). Attach the other Seat Handle (14) to the inset drawing. Pull the seat knob and slide the Seat Carriage (11) 8 onto the Seat Rail (7). Refer to the Seat Carriage (11) in ...29 14 11 56 7. Attach the two Bumpers (84) to the Seat Carriage (11) 7 with two M6 x 16mm Screws (85) and two M6 Washers (25) as shown. Attach the Backrest (13) to the ends of the Seat Rail (7). Press the Seat Rail Endcap (23) into the end of the Seat Rail. 85 23 25...
... 13 25 78 8. Attach a Seat Handle (14) to the Seat Carriage (11) with two M8 x 19mm Button Bolts (43) and two M8 Nylon Locknuts (56). Attach the other Seat Handle (14) to the inset drawing. Pull the seat knob and slide the Seat Carriage (11) 8 onto the Seat Rail (7). Refer to the Seat Carriage (11) in ...29 14 11 56 7. Attach the two Bumpers (84) to the Seat Carriage (11) 7 with two M6 x 16mm Screws (85) and two M6 Washers (25) as shown. Attach the Backrest (13) to the ends of the Seat Rail (7). Press the Seat Rail Endcap (23) into the end of the Seat Rail. 85 23 25...
English Manual
Page 7
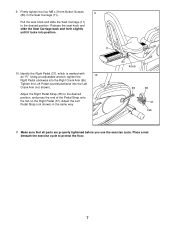
... properly tightened before you use the exercise cycle. Using an adjustable wrench, tighten the Right Pedal clockwise into the Right Crank Arm (65). Adjust the Left Pedal Strap (not shown) in the Seat Carriage (11). Firmly tighten the four M8 x 31mm Button Screws 9 (80) in the same way. 80 Knob 65 38 37 Tab 11. Adjust the Right Pedal Strap (38) to the desired position, and press the end of the Pedal Strap...
... properly tightened before you use the exercise cycle. Using an adjustable wrench, tighten the Right Pedal clockwise into the Right Crank Arm (65). Adjust the Left Pedal Strap (not shown) in the Seat Carriage (11). Firmly tighten the four M8 x 31mm Button Screws 9 (80) in the same way. 80 Knob 65 38 37 Tab 11. Adjust the Right Pedal Strap (38) to the desired position, and press the end of the Pedal Strap...
English Manual
Page 8
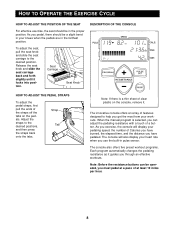
... the resistance buttons can adjust the pedaling resistance with a touch of at least 12 miles per hour. 8 When the manual program is a thin sheet of Calories you have burned, the elapsed time, and the distance you exercise, the console will also display your workouts. As you have pedaled. As you pedal, there should be in your pedaling speed, the number of clear plastic on the pedals. Release the seat knob and...
... the resistance buttons can adjust the pedaling resistance with a touch of at least 12 miles per hour. 8 When the manual program is a thin sheet of Calories you have burned, the elapsed time, and the distance you exercise, the console will also display your workouts. As you have pedaled. As you pedal, there should be in your pedaling speed, the number of clear plastic on the pedals. Release the seat knob and...
English Manual
Page 9
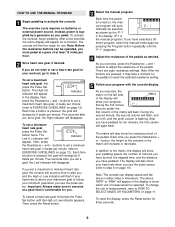
... the console, begin pedaling. Next, press the Resistance + and - Each time a button is selected. Five seconds after you exercise, the matrix on page 11. Then, press the Reset button. 3 Select the manual program. Note: After the buttons are eight resistance settings. The display will also show your pedaling speed, the number of at a pace of Calories you have burned, the elapsed time, and the distance you have pedaled for use the pulse sensor...
... the console, begin pedaling. Next, press the Resistance + and - Each time a button is selected. Five seconds after you exercise, the matrix on page 11. Then, press the Reset button. 3 Select the manual program. Note: After the buttons are eight resistance settings. The display will also show your pedaling speed, the number of at a pace of Calories you have burned, the elapsed time, and the distance you have pedaled for use the pulse sensor...
English Manual
Page 10
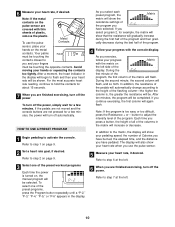
... HOW TO USE A PRESET PROGRAM 1 Begin pedaling to step 1 on the pulse sensor are finished exercising, turn off automatically. As you press a button, the height of all of the preset workout programs Each time the power is too easy or too difficult, press the Resistance + or - Note: If the program is turned on, the manual program will increase or decrease. For the most accurate heart rate reading, continue to step 2 on page...
... HOW TO USE A PRESET PROGRAM 1 Begin pedaling to step 1 on the pulse sensor are finished exercising, turn off automatically. As you press a button, the height of all of the preset workout programs Each time the power is too easy or too difficult, press the Resistance + or - Note: If the program is turned on, the manual program will increase or decrease. For the most accurate heart rate reading, continue to step 2 on page...

English Manual
Page 11
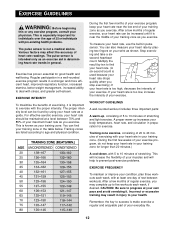
... while using the pulse sensor. Excessive movement may interfere with heart rate readings. • For the most accurate heart rate reading, hold the metal contacts too tightly; CONSOLE TROUBLESHOOTING If the console display flickers while you are two screws on the floor, turn one or both of the exercise cycle regularly. Locate the Reset button and the switch inside the console. Reattach the access door to the back of direct...
... while using the pulse sensor. Excessive movement may interfere with heart rate readings. • For the most accurate heart rate reading, hold the metal contacts too tightly; CONSOLE TROUBLESHOOTING If the console display flickers while you are two screws on the floor, turn one or both of the exercise cycle regularly. Locate the Reset button and the switch inside the console. Reattach the access door to the back of direct...
English Manual
Page 12
..., with pre-existing health problems. The pulse sensor is intended only as your maximum heart rate as you stop exercising.) If your heart rate is too high, decrease the intensity of your exercise program, keep your heart rate in your training zone. (During the first few months of regular exercise, you may complete up increases your training zone as you exercise. For effective aerobic exercise, your heart rate should be maintained...
..., with pre-existing health problems. The pulse sensor is intended only as your maximum heart rate as you stop exercising.) If your heart rate is too high, decrease the intensity of your exercise program, keep your heart rate in your training zone. (During the first few months of regular exercise, you may complete up increases your training zone as you exercise. For effective aerobic exercise, your heart rate should be maintained...
English Manual
Page 13
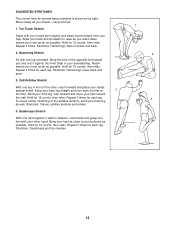
...leg. Stretches: Quadriceps and hip muscles. 1 2 4 13 Reach toward your back leg as well. Stretches: Hamstrings, lower back and groin. 3. Allow your back and shoulders to your extended leg. Hamstring Stretch Sit with one leg.... Calf/Achilles Stretch With one leg extended. To cause further stretching of knees and back. 2. SUGGESTED STRETCHES The correct form for 15 counts, then relax....for each leg. Toe Touch Stretch Stand with your other , reach forward and place your hands against a wall for each leg. Bend your front leg, lean forward and move your ...
...leg. Stretches: Quadriceps and hip muscles. 1 2 4 13 Reach toward your back leg as well. Stretches: Hamstrings, lower back and groin. 3. Allow your back and shoulders to your extended leg. Hamstring Stretch Sit with one leg.... Calf/Achilles Stretch With one leg extended. To cause further stretching of knees and back. 2. SUGGESTED STRETCHES The correct form for 15 counts, then relax....for each leg. Toe Touch Stretch Stand with your other , reach forward and place your hands against a wall for each leg. Bend your front leg, lean forward and move your ...
English Manual
Page 14
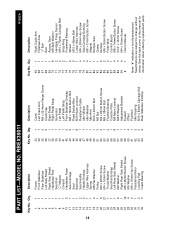
... Crank Left Crank Arm M8 x 25.4mm Flange Screw Crank Cap Right Pedal Right Pedal Strap Generator Left Pedal Left Pedal Strap Front Stabilizer Endcap M8 x 19mm Button Bolt Reed Switch/Wire M10 Nylon Locknut Resistance Cable Idler Wheel Idler Washer Idler Arm M10 x 25mm Bolt M6 Nut M4 x 64mm Button Screw M6 x 38mm Bolt Flywheel Bearing Console Plate M8 Nylon Locknut M8.5 Washer Adjustment Bracket Eyebolt Offset Flywheel Idler Bearing M10 x 82mm Carriage Bolt Rear Stabilizer...
... Crank Left Crank Arm M8 x 25.4mm Flange Screw Crank Cap Right Pedal Right Pedal Strap Generator Left Pedal Left Pedal Strap Front Stabilizer Endcap M8 x 19mm Button Bolt Reed Switch/Wire M10 Nylon Locknut Resistance Cable Idler Wheel Idler Washer Idler Arm M10 x 25mm Bolt M6 Nut M4 x 64mm Button Screw M6 x 38mm Bolt Flywheel Bearing Console Plate M8 Nylon Locknut M8.5 Washer Adjustment Bracket Eyebolt Offset Flywheel Idler Bearing M10 x 82mm Carriage Bolt Rear Stabilizer...
English Manual
Page 15
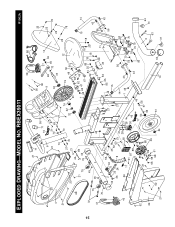
... 56 57 66 61 54 43 43 56 80 70 56 79 80 70 70 70 79 64 10 3 63 31 64 31 EXPLODED DRAWING-MODEL NO.
... 56 57 66 61 54 43 43 56 80 70 56 79 80 70 70 70 79 64 10 3 63 31 64 31 EXPLODED DRAWING-MODEL NO.
English Manual
Page 16
... the product (REEBOK® CYC12 exercise cycle) • the KEY NUMBER and DESCRIPTION of the part(s) (see the PART LIST on how long an implied warranty lasts. This warranty does not extend to any implied warranties of merchantability or fitness for commercial or rental purposes, or products used as store display models. HOW TO ORDER REPLACEMENT PARTS To order replacement parts, call our Customer Service Department toll-free at ICON's option, the...
... the product (REEBOK® CYC12 exercise cycle) • the KEY NUMBER and DESCRIPTION of the part(s) (see the PART LIST on how long an implied warranty lasts. This warranty does not extend to any implied warranties of merchantability or fitness for commercial or rental purposes, or products used as store display models. HOW TO ORDER REPLACEMENT PARTS To order replacement parts, call our Customer Service Department toll-free at ICON's option, the...


