

English Manual
Page 1
...instructions in this manual before using this manual for future reference. If you . RBEX29011 Model Number Decal QUESTIONS? Model No. TO AVOID DELAYS, PLEASE CALL DIRECT TO OUR TOLLFREE CUSTOMER HOT LINE. The trained technicians on our customer hot line will guarantee complete satisfaction through direct... parts, we will provide immediate assistance, free of charge to you have questions, or if there are committed to providing complete customer satisfaction. Keep this equipment. USER'S MANUAL Patent Pending Visit our website at www.reebokhomefitness.com new products, prizes, fitness ...
...instructions in this manual before using this manual for future reference. If you . RBEX29011 Model Number Decal QUESTIONS? Model No. TO AVOID DELAYS, PLEASE CALL DIRECT TO OUR TOLLFREE CUSTOMER HOT LINE. The trained technicians on our customer hot line will guarantee complete satisfaction through direct... parts, we will provide immediate assistance, free of charge to you have questions, or if there are committed to providing complete customer satisfaction. Keep this equipment. USER'S MANUAL Patent Pending Visit our website at www.reebokhomefitness.com new products, prizes, fitness ...
English Manual
Page 2
... 2 BEFORE YOU BEGIN 3 ASSEMBLY 4 EXERCISE CYCLE OPERATION 8 MAINTENANCE AND TROUBLESHOOTING 12 EXERCISE GUIDELINES 13 PART LIST 14 EXPLODED DRAWING 15 ORDERING REPLACEMENT PARTS Back Cover LIMITED WARRANTY Back Cover IMPORTANT PRECAUTIONS WARNING: To reduce the risk of heart rate readings. Various factors, including the user's movement, may affect the accuracy of serious injury, read the following important pre- Replace any exercise program, consult your back. 2. Use the exercise cycle only as...
... 2 BEFORE YOU BEGIN 3 ASSEMBLY 4 EXERCISE CYCLE OPERATION 8 MAINTENANCE AND TROUBLESHOOTING 12 EXERCISE GUIDELINES 13 PART LIST 14 EXPLODED DRAWING 15 ORDERING REPLACEMENT PARTS Back Cover LIMITED WARRANTY Back Cover IMPORTANT PRECAUTIONS WARNING: To reduce the risk of heart rate readings. Various factors, including the user's movement, may affect the accuracy of serious injury, read the following important pre- Replace any exercise program, consult your back. 2. Use the exercise cycle only as...

English Manual
Page 3
... this healthful exercise in the drawing below. Seat Seat Post Seat Knob Water Bottle Holder (Bottle not included) Handlebar Pulse Sensor Side Shield BACK Leveling Pad 3 Book Holder Console Handlebar Post FRONT RIGHT SIDE Pedal Strap Wheel Pedal Cycling is RBEX29011. For your home. BEFORE YOU BEGIN Congratulations for increasing cardiovascular fitness, building endurance and toning the entire body. If you , please mention the product model number...
... this healthful exercise in the drawing below. Seat Seat Post Seat Knob Water Bottle Holder (Bottle not included) Handlebar Pulse Sensor Side Shield BACK Leveling Pad 3 Book Holder Console Handlebar Post FRONT RIGHT SIDE Pedal Strap Wheel Pedal Cycling is RBEX29011. For your home. BEFORE YOU BEGIN Congratulations for increasing cardiovascular fitness, building endurance and toning the entire body. If you , please mention the product model number...

English Manual
Page 4
... Button Screw (19)-7 M10 x 75mm Carriage Bolt (72)-2 M10 x 82mm Carriage Bolt (63)-2 4 Assembly requires the included tools and your own adjustable wrench . PART CHART Use the part drawings below each drawing refers to see if it has been pre-assembled. If a part is completed. The second number refers to the quantity used in the parts bag, check to the key number of the exercise cycle in assembly. Note...
... Button Screw (19)-7 M10 x 75mm Carriage Bolt (72)-2 M10 x 82mm Carriage Bolt (63)-2 4 Assembly requires the included tools and your own adjustable wrench . PART CHART Use the part drawings below each drawing refers to see if it has been pre-assembled. If a part is completed. The second number refers to the quantity used in the parts bag, check to the key number of the exercise cycle in assembly. Note...

English Manual
Page 5
... turned so the Wheels (17) are not touching the floor. 17 72 17 2 2. Attach the Rear Stabilizer (3) to the Frame (1) with an M6 x 8mm Screw (26). Note: There are two sets of the Handlebar Post, and insert the Handlebar Post into the Frame (1). While another person holds the Handlebar Post (6) 3 near the Frame (1), connect the Upper Wire...
... turned so the Wheels (17) are not touching the floor. 17 72 17 2 2. Attach the Rear Stabilizer (3) to the Frame (1) with an M6 x 8mm Screw (26). Note: There are two sets of the Handlebar Post, and insert the Handlebar Post into the Frame (1). While another person holds the Handlebar Post (6) 3 near the Frame (1), connect the Upper Wire...

English Manual
Page 6
... the Console. 4. Next, plug the Upper Wire Harness (16) into the Frame (1). Attach the Console (9) to the Frame with three M8 x 25mm Button Screws (19) and three M8 Split Washers (28). Using an adjustable wrench, remove the Seat Knob Assembly (31) from the Frame (1). Insert the Seat Post (11) into the socket in the Handlebar. 5. While another person holds the Console (9) near 5 the Handlebar (7), connect the Pulse Sensor Wires...
... the Console. 4. Next, plug the Upper Wire Harness (16) into the Frame (1). Attach the Console (9) to the Frame with three M8 x 25mm Button Screws (19) and three M8 Split Washers (28). Using an adjustable wrench, remove the Seat Knob Assembly (31) from the Frame (1). Insert the Seat Post (11) into the socket in the Handlebar. 5. While another person holds the Console (9) near 5 the Handlebar (7), connect the Pulse Sensor Wires...
English Manual
Page 7
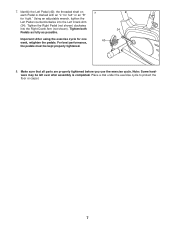
... parts are properly tightened before you use the exercise cycle. Note: Some hardware may be kept properly tightened. 8. 7. Tighten the Right Pedal (not shown) clockwise into the Left Crank Arm (34). Important: After using the exercise cycle for "right." the threaded shaft on 7 each Pedal is completed. Place a mat under the exercise cycle to protect the floor or carpet. 7 Using an adjustable wrench, tighten the Left Pedal...
... parts are properly tightened before you use the exercise cycle. Note: Some hardware may be kept properly tightened. 8. 7. Tighten the Right Pedal (not shown) clockwise into the Left Crank Arm (34). Important: After using the exercise cycle for "right." the threaded shaft on 7 each Pedal is completed. Place a mat under the exercise cycle to protect the floor or carpet. 7 Using an adjustable wrench, tighten the Left Pedal...

English Manual
Page 8
... it guides you exercise, the console will also display your knees when the pedals are in the straps. To adjust the height, see assembly step 3 on the pedals. Strap Tab DESCRIPTION OF THE CONSOLE Note: If there is selected, the pedaling resistance can be a slight bend in pulse sensor. Note: Before the resistance buttons can be adjusted to help you get the most from your pedaling speed, the approximate number of Calories...
... it guides you exercise, the console will also display your knees when the pedals are in the straps. To adjust the height, see assembly step 3 on the pedals. Strap Tab DESCRIPTION OF THE CONSOLE Note: If there is selected, the pedaling resistance can be a slight bend in pulse sensor. Note: Before the resistance buttons can be adjusted to help you get the most from your pedaling speed, the approximate number of Calories...

English Manual
Page 9
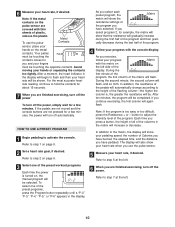
... for use the pulse sensor (refer to set a goal, the Low indicator will also show your pedaling speed, the number of the columns in the display. To activate the console, begin pedaling. The console will then be selected, as desired. buttons to the first step 6 on page 13). Five seconds after you do not wish to step 3. Then, press the Reset button. 3 Select the manual program. As you press the Resistance...
... for use the pulse sensor (refer to set a goal, the Low indicator will also show your pedaling speed, the number of the columns in the display. To activate the console, begin pedaling. The console will then be selected, as desired. buttons to the first step 6 on page 13). Five seconds after you do not wish to step 3. Then, press the Reset button. 3 Select the manual program. As you press the Resistance...
English Manual
Page 10
... the pedals are not moved and the console buttons are covered with the console display. As you and your progress Matrix with the matrix on the left side of the display. After ten minutes, the program will show your heart rate when you have selected. button to you exercise, follow your fingers must be touching the opposite contacts. In addition to step 1 on the pulse sensor...
... the pedals are not moved and the console buttons are covered with the console display. As you and your progress Matrix with the matrix on the left side of the display. After ten minutes, the program will show your heart rate when you have selected. button to you exercise, follow your fingers must be touching the opposite contacts. In addition to step 1 on the pulse sensor...

English Manual
Page 11
The letters "MPH" or "KMH" will appear in either miles or kilometers. Slide the switch up or down to show which unit of measurement is selected. Reattach the access door to the back of the console. Locate the Reset button and the switch inside the console. Reset Button Switch 11 HOW TO SELECT MILES OR KILOMETERS The console can display speed and distance in the display to select miles or kilometers, and then press the Reset button. To change the unit of measurement, first remove the access door from the back of the console.
The letters "MPH" or "KMH" will appear in either miles or kilometers. Slide the switch up or down to show which unit of measurement is selected. Reattach the access door to the back of the console. Locate the Reset button and the switch inside the console. Reset Button Switch 11 HOW TO SELECT MILES OR KILOMETERS The console can display speed and distance in the display to select miles or kilometers, and then press the Reset button. To change the unit of measurement, first remove the access door from the back of the console.

English Manual
Page 12
... on the floor, turn one or both pedals. Leveling Pads 12 MAINTENANCE AND TROUBLESHOOTING Inspect and properly tighten all parts of direct sunlight. CONSOLE TROUBLESHOOTING If the console display flickers while you are changing the resistance setting, increase your heart rate when you use the pulse sensor, refer to the console, keep liquids away from the console and keep the console out of the exercise cycle regularly. If the console does not display your pedaling pace.
... on the floor, turn one or both pedals. Leveling Pads 12 MAINTENANCE AND TROUBLESHOOTING Inspect and properly tighten all parts of direct sunlight. CONSOLE TROUBLESHOOTING If the console display flickers while you are changing the resistance setting, increase your heart rate when you use the pulse sensor, refer to the console, keep liquids away from the console and keep the console out of the exercise cycle regularly. If the console does not display your pedaling pace.

English Manual
Page 13
... of stretching and light exercise. Training zones are listed according to 10 minutes of 35 or individuals with pre-existing health problems. • The pulse sensor is intended only as a guide. For effective aerobic exercise, your heart rate should be maintained at your exercise. During the first few weeks of your exercise program, do not keep your heart rate near the middle of heart rate readings. To measure...
... of stretching and light exercise. Training zones are listed according to 10 minutes of 35 or individuals with pre-existing health problems. • The pulse sensor is intended only as a guide. For effective aerobic exercise, your heart rate should be maintained at your exercise. During the first few weeks of your exercise program, do not keep your heart rate near the middle of heart rate readings. To measure...

English Manual
Page 14
... x 25mm Bolt Spring M6 x 25mm Bolt Flywheel Washer Flywheel Bearing Resistance Motor M8 Nylon Locknut M5 Washer Adjustment Bracket Eyebolt M6 Nylon Locknut Armature Generator Housing M10 x 82mm Carriage Bolt Rear Stabilizer Endcap Resistance Cable Thrust Washer Generator Axle Fastener Belt Control Board Pulse Sensor Assembly M10 x 75mm Carriage Bolt M8 x 14mm Button Screw 5/16" x 14mm Hex Screw Magnet Leveling Pad Pulley J-bolt User's Manual Allen Wrench Assembly Tool Note: "#" indicates a non-illustrated part.
... x 25mm Bolt Spring M6 x 25mm Bolt Flywheel Washer Flywheel Bearing Resistance Motor M8 Nylon Locknut M5 Washer Adjustment Bracket Eyebolt M6 Nylon Locknut Armature Generator Housing M10 x 82mm Carriage Bolt Rear Stabilizer Endcap Resistance Cable Thrust Washer Generator Axle Fastener Belt Control Board Pulse Sensor Assembly M10 x 75mm Carriage Bolt M8 x 14mm Button Screw 5/16" x 14mm Hex Screw Magnet Leveling Pad Pulley J-bolt User's Manual Allen Wrench Assembly Tool Note: "#" indicates a non-illustrated part.

English Manual
Page 15
EXPLODED DRAWING-MODEL NO. RBEX29011 R1002A 28 19 28 19 15 23 21 6 7 10 8 10 20 12 9 21 16 11 71 13 25 26 19 28 72 17 47 48 17 48 47 2 14 42 13 28 19 14 21 46 44 48 18 25 29 75 26 32 77 32 66 31 30 49 50 21 57 42 24 48 1 56 57 78 41 40 34 56 32 22 45 51 35 65 36 52 68 60 48 68 70 56 59 58 67 53 60 48 55 3 54 61 73 54 76 64 74 56 74 73 43 62 39 5 36 45 35 38 33 27 37 4 21 30 64 76 63 69 15
EXPLODED DRAWING-MODEL NO. RBEX29011 R1002A 28 19 28 19 15 23 21 6 7 10 8 10 20 12 9 21 16 11 71 13 25 26 19 28 72 17 47 48 17 48 47 2 14 42 13 28 19 14 21 46 44 48 18 25 29 75 26 32 77 32 66 31 30 49 50 21 57 42 24 48 1 56 57 78 41 40 34 56 32 22 45 51 35 65 36 52 68 60 48 68 70 56 59 58 67 53 60 48 55 3 54 61 73 54 76 64 74 56 74 73 43 62 39 5 36 45 35 38 33 27 37 4 21 30 64 76 63 69 15

English Manual
Page 16
... removal, installation or other rights which warranty claims are made must be prepared to give the following information: • The MODEL NUMBER of the product (RBEX29011) • The NAME of the product (REEBOK® CYC10 exercise cycle) • The KEY NUMBER and DESCRIPTION of the part(s) (see the PART LIST on how long an implied warranty lasts. ORDERING REPLACEMENT PARTS To order replacement parts, call our Customer Service Department toll-free...
... removal, installation or other rights which warranty claims are made must be prepared to give the following information: • The MODEL NUMBER of the product (RBEX29011) • The NAME of the product (REEBOK® CYC10 exercise cycle) • The KEY NUMBER and DESCRIPTION of the part(s) (see the PART LIST on how long an implied warranty lasts. ORDERING REPLACEMENT PARTS To order replacement parts, call our Customer Service Department toll-free...


