
User Guide & Warranty
Page 2
...(packed separately) and return it here and record the serial and model numbers. customers: Your RCA Consumer Electronics product may also be permanently imprinted on the picture tube (or projection TV picture tubes). Model No Serial No Purchase Date Dealer/Address/Phone VCR Plus+, C3, PlusCode,...reduce the risk of time can cause them to the identification/rating label located on the product. Refer to be registered at www.rca.com/ productregistration. For U.S. THOMSON INC. No user serviceable parts inside the product that unauthorized changes or modifications to contact you ...
...(packed separately) and return it here and record the serial and model numbers. customers: Your RCA Consumer Electronics product may also be permanently imprinted on the picture tube (or projection TV picture tubes). Model No Serial No Purchase Date Dealer/Address/Phone VCR Plus+, C3, PlusCode,...reduce the risk of time can cause them to the identification/rating label located on the product. Refer to be registered at www.rca.com/ productregistration. For U.S. THOMSON INC. No user serviceable parts inside the product that unauthorized changes or modifications to contact you ...
User Guide & Warranty
Page 3
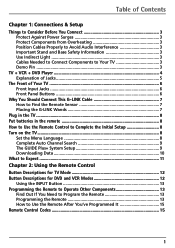
...Interference 3 Important Stand and Base Safety Information 3 Use Indirect Light 3 Cables Needed to Connect Components to Your TV 3 Demo Pin ...3 TV + VCR + DVD Player 4 Explanation of Jacks 5 The Front of Your TV 6 Front Input Jacks 6 Front Panel Buttons 6 Why You Should Connect This G-LINK Cable 7 How to... 9 The GUIDE Plus+ System Setup 9 Downloading Data 10 What to Expect ...11 Chapter 2: Using the Remote Control Button Descriptions for TV Mode 12 Button Descriptions for DVD and VCR Modes 12 Using the INPUT Button 13 Programming the Remote to Operate Other Components 13 Find ...
...Interference 3 Important Stand and Base Safety Information 3 Use Indirect Light 3 Cables Needed to Connect Components to Your TV 3 Demo Pin ...3 TV + VCR + DVD Player 4 Explanation of Jacks 5 The Front of Your TV 6 Front Input Jacks 6 Front Panel Buttons 6 Why You Should Connect This G-LINK Cable 7 How to... 9 The GUIDE Plus+ System Setup 9 Downloading Data 10 What to Expect ...11 Chapter 2: Using the Remote Control Button Descriptions for TV Mode 12 Button Descriptions for DVD and VCR Modes 12 Using the INPUT Button 13 Programming the Remote to Operate Other Components 13 Find ...
User Guide & Warranty
Page 4
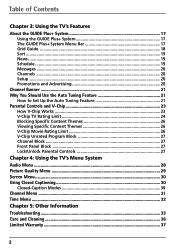
Table of Contents Chapter 3: Using the TV's Features About the GUIDE Plus+ System 17 Using the GUIDE Plus+ System 17 ... to Set Up the Auto Tuning Feature 21 Parental Controls and V-Chip 23 How V-Chip Works 23 V-Chip TV Rating Limit 24 Blocking Specific Content Themes 26 Viewing Specific Content Themes 26 V-Chip Movie Rating Limit 26 V-Chip... Unrated Program Block 27 Channel Block 27 Front Panel Block 27 Lock/Unlock Parental Controls 27 Chapter 4: Using the TV's Menu System Audio Menu ...28 Picture Quality Menu 29 Screen Menu ...30 Using Closed Captioning 30 Closed-Caption Modes...
Table of Contents Chapter 3: Using the TV's Features About the GUIDE Plus+ System 17 Using the GUIDE Plus+ System 17 ... to Set Up the Auto Tuning Feature 21 Parental Controls and V-Chip 23 How V-Chip Works 23 V-Chip TV Rating Limit 24 Blocking Specific Content Themes 26 Viewing Specific Content Themes 26 V-Chip Movie Rating Limit 26 V-Chip... Unrated Program Block 27 Channel Block 27 Front Panel Block 27 Lock/Unlock Parental Controls 27 Chapter 4: Using the TV's Menu System Audio Menu ...28 Picture Quality Menu 29 Screen Menu ...30 Using Closed Captioning 30 Closed-Caption Modes...
User Guide & Warranty
Page 5
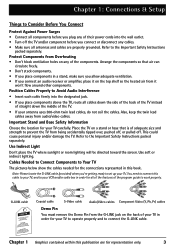
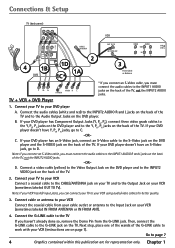
... screen. Note: Please locate the G-LINK cable (provided) when you're getting ready to the Important Safety Instructions packed separately. Refer to set up your TV. Arrange the components so that air can circulate freely. • Don't stack components. • If you place components in a stand, make sure you ... you plug any of their power cords into the designated jack. • If you place components above the TV, route all cables down the side of the back of the TV instead of straight down the middle of the program guide to work properly. Refer to the Important Safety Instructions ...
... screen. Note: Please locate the G-LINK cable (provided) when you're getting ready to the Important Safety Instructions packed separately. Refer to set up your TV. Arrange the components so that air can circulate freely. • Don't stack components. • If you place components in a stand, make sure you ... you plug any of their power cords into the designated jack. • If you place components above the TV, route all cables down the side of the back of the TV instead of straight down the middle of the program guide to work properly. Refer to the Important Safety Instructions ...
User Guide & Warranty
Page 6
... to work with your DVD player doesn't have Y, PB, PR jacks, go to page 7 4 Graphics contained within this publication are on the back of the TV, not the INPUT2 AUDIO jacks. -OR- If your DVD player has Component Output Jacks (Y, PB, PR), connect three video grade cables to the Y, PB, PR... page 7). Connect a video cable (yellow) to the Video Output Jack on the DVD player and to the Y, PB, PR jacks on the back of the TV. Note: If you connect an S-Video cable, you haven't already done so, remove the Demo Pin from your cable outlet or antenna to your VCR...
... to work with your DVD player doesn't have Y, PB, PR jacks, go to page 7 4 Graphics contained within this publication are on the back of the TV, not the INPUT2 AUDIO jacks. -OR- If your DVD player has Component Output Jacks (Y, PB, PR), connect three video grade cables to the Y, PB, PR... page 7). Connect a video cable (yellow) to the Video Output Jack on the DVD player and to the Y, PB, PR jacks on the back of the TV. Note: If you connect an S-Video cable, you haven't already done so, remove the Demo Pin from your cable outlet or antenna to your VCR...
User Guide & Warranty
Page 7
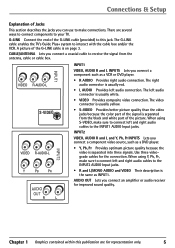
There are for representation only. 5 Connections & Setup Explanation of the G-LINK cable (provided) to this publication are several ways to connect components to your TV. INPUT2 VIDEO, AUDIO R and L and Y, Pb, Pr INPUTS Lets you connect a component video source, such as a DVD player. • Y, Pb,...connector is separated from the antenna, cable or cable box. Use three videograde cables for improved sound quality. The G-LINK cable enables the TV's Guide Plus+ system to receive the signal from the black and white part of the G-LINK cable is separated into three signals. ...
There are for representation only. 5 Connections & Setup Explanation of the G-LINK cable (provided) to this publication are several ways to connect components to your TV. INPUT2 VIDEO, AUDIO R and L and Y, Pb, Pr INPUTS Lets you connect a component video source, such as a DVD player. • Y, Pb,...connector is separated from the antenna, cable or cable box. Use three videograde cables for improved sound quality. The G-LINK cable enables the TV's Guide Plus+ system to receive the signal from the black and white part of the G-LINK cable is separated into three signals. ...
User Guide & Warranty
Page 8
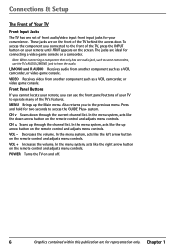
...component such as a VCR, camcorder, or video game console. VOL + Increases the volume. v 6 Graphics contained within this publication are on the front of the TV behind the access door. Press and hold for connecting a video game console or a camcorder. To access the component you can use the... access the GUIDE Plus+ system. In the menu system, acts like the down through the channel list. Connections & Setup The Front of Your TV Front Input Jacks The TV has one audio jack, such as some camcorders, use the front panel buttons of your remote until FRNT appears on the screen.
...component such as a VCR, camcorder, or video game console. VOL + Increases the volume. v 6 Graphics contained within this publication are on the front of the TV behind the access door. Press and hold for connecting a video game console or a camcorder. To access the component you can use the... access the GUIDE Plus+ system. In the menu system, acts like the down through the channel list. Connections & Setup The Front of Your TV Front Input Jacks The TV has one audio jack, such as some camcorders, use the front panel buttons of your remote until FRNT appears on the screen.
User Guide & Warranty
Page 9
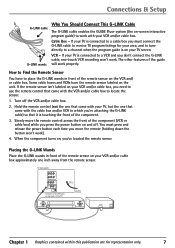
... the G-LINK cable, one that came with the cable box and/or VCR to which you press the power button on the back of the TV. TV (back panel) INPUT2 VIDEO R-AUDIO-L Y PB PR INPUT1 VIDEO R-AUDIO-L AUDIO OUT R G-LINK L S-VIDEO Connect to work . VCR - Turn... off . You must connect the G-LINK cable to receive TV program listings for representation only. 7 SENSOR CABLE/ ANTENNA From Cable, Cable Box, or Antenna VCR SENSOR CHANNEL 03 Chapter 1 Graphics contained within this publication...
... the G-LINK cable, one that came with the cable box and/or VCR to which you press the power button on the back of the TV. TV (back panel) INPUT2 VIDEO R-AUDIO-L Y PB PR INPUT1 VIDEO R-AUDIO-L AUDIO OUT R G-LINK L S-VIDEO Connect to work . VCR - Turn... off . You must connect the G-LINK cable to receive TV program listings for representation only. 7 SENSOR CABLE/ ANTENNA From Cable, Cable Box, or Antenna VCR SENSOR CHANNEL 03 Chapter 1 Graphics contained within this publication...
User Guide & Warranty
Page 10
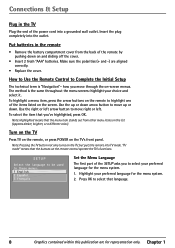
... the end of the power cord into the outlet. The method is "Navigation"- Turn on the TV Press TV on the remote, or press POWER on the remote control operate the TV's functions. "TV mode" means that language. 8 Graphics contained within this publication are aligned correctly. • Replace the cover. how ...SETUP Select the language to be used in the remote • Remove the battery compartment cover from other menu items on the TV, but puts the remote into TV mode. How to Use the Remote Control to highlight one of the SETUP asks you to move through the on the remote ...
... the end of the power cord into the outlet. The method is "Navigation"- Turn on the TV Press TV on the remote, or press POWER on the remote control operate the TV's functions. "TV mode" means that language. 8 Graphics contained within this publication are aligned correctly. • Replace the cover. how ...SETUP Select the language to be used in the remote • Remove the battery compartment cover from other menu items on the TV, but puts the remote into TV mode. How to Use the Remote Control to highlight one of the SETUP asks you to move through the on the remote ...
User Guide & Warranty
Page 11
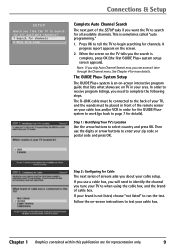
...the search is not listed, choose "not listed" to page 7 for details). Step 2: Configuring for representation only. 9 When the screen on the TV tells you can access it later through the Channel menu. If you use the digits or arrow buttons to begin searching for more details. The... GUIDE Plus+ System Setup The GUIDE Plus+ system is sometimes called "auto programming." 1. See Chapter 4 for channels. Press OK to tell the TV to enter your cable box. Then use a cable box, you will need to select country and press OK. A progress report appears on -screen instructions...
...the search is not listed, choose "not listed" to page 7 for details). Step 2: Configuring for representation only. 9 When the screen on the TV tells you can access it later through the Channel menu. If you use the digits or arrow buttons to begin searching for more details. The... GUIDE Plus+ System Setup The GUIDE Plus+ system is sometimes called "auto programming." 1. See Chapter 4 for channels. Press OK to tell the TV to enter your cable box. Then use a cable box, you will need to select country and press OK. A progress report appears on -screen instructions...
User Guide & Warranty
Page 12
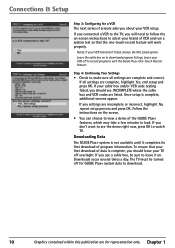
..., choose the Not Listed option. If you should leave your VCR setup. Downloads occur several times a day. Leave your VCR off to watch TV. Follow the instructions on -screen instructions to download. 10 Graphics contained within this publication are listed. To ensure that the one-touch record feature will... the cable box and VCR codes are for a VCR The next series of data is complete, additional screens appear. If you about your TV off for GUIDE Plus+ system data to select your brand of VCR and run a system test so that your first download of screens asks...
..., choose the Not Listed option. If you should leave your VCR setup. Downloads occur several times a day. Leave your VCR off to watch TV. Follow the instructions on -screen instructions to download. 10 Graphics contained within this publication are listed. To ensure that the one-touch record feature will... the cable box and VCR codes are for a VCR The next series of data is complete, additional screens appear. If you about your TV off for GUIDE Plus+ system data to select your brand of VCR and run a system test so that your first download of screens asks...
User Guide & Warranty
Page 13
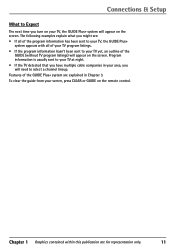
.... The following examples explain what you might see: • If all of the program information has been sent to your TV, the GUIDE Plus+ system appears with all of your TV program listings. • If the program information hasn't been sent to select a channel lineup. To clear the guide from... your screen, press CLEAR or GUIDE on the screen. Program information is usually sent to your TV at night. • If the TV detected that you have multiple cable companies in Chapter 3. Connections & Setup What to Expect The next time you will need to your...
.... The following examples explain what you might see: • If all of the program information has been sent to your TV, the GUIDE Plus+ system appears with all of your TV program listings. • If the program information hasn't been sent to select a channel lineup. To clear the guide from... your screen, press CLEAR or GUIDE on the screen. Program information is usually sent to your TV at night. • If the TV detected that you have multiple cable companies in Chapter 3. Connections & Setup What to Expect The next time you will need to your...
User Guide & Warranty
Page 14
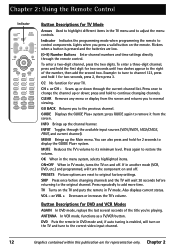
...the Main menu. SKIP Press once before returning to the original channel. Also displays current status. VOL - DVD Puts the remote in TV mode. Scans up or down through the current channel list. MENU Brings up the channel banner. Press repeatedly to its minimum level. ...playing. You can also press and hold 1 for 2 seconds to display the GUIDE Plus+ system. Chapter 2: Using the Remote Control Indicator DVD ON OFF VCR TV VOL CH MUTE GO BACK CLEAR MENU OK PRESETS CC 1 SKIP INFO GUIDE 2 3 4 5 6 7 INPUT 8 9 0 ANTENNA REVERSE PLAY FORWARD RECORD ...
...the Main menu. SKIP Press once before returning to the original channel. Also displays current status. VOL - DVD Puts the remote in TV mode. Scans up or down through the current channel list. MENU Brings up the channel banner. Press repeatedly to its minimum level. ...playing. You can also press and hold 1 for 2 seconds to display the GUIDE Plus+ system. Chapter 2: Using the Remote Control Indicator DVD ON OFF VCR TV VOL CH MUTE GO BACK CLEAR MENU OK PRESETS CC 1 SKIP INFO GUIDE 2 3 4 5 6 7 INPUT 8 9 0 ANTENNA REVERSE PLAY FORWARD RECORD ...
User Guide & Warranty
Page 15
... models of remote controllable components. Make sure the component you have connected to view is turned ON. 2. To return to the remote commands. Notes: The TV button can be programmed. Then press ON•OFF or CH + (channel up) or CH - (channel down) to see if the VCR responds to...be programmed to an available video input source and view the component. 3. Press INPUT to tune to operate most RCA, GE, and Proscan components. It also may not be programmed on the TV and tune to the correct video input channel. ZOOM In DVD mode, zooms in VCR mode and, if auto...
... models of remote controllable components. Make sure the component you have connected to view is turned ON. 2. To return to the remote commands. Notes: The TV button can be programmed. Then press ON•OFF or CH + (channel up) or CH - (channel down) to see if the VCR responds to...be programmed to an available video input source and view the component. 3. Press INPUT to tune to operate most RCA, GE, and Proscan components. It also may not be programmed on the TV and tune to the correct video input channel. ZOOM In DVD mode, zooms in VCR mode and, if auto...

User Guide & Warranty
Page 17
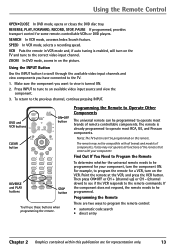
For example, if you want to operate the VCR, press VCR on the remote control to put the remote into TV mode before you keep pressing buttons and nothing happens, the remote is probably in VCR mode.) Remote Control Codes VCR Codes Programmable for representation only. ... that matches the component you want to operate (i.e., if you want the remote to operate the TV, you would press the TV button to put the remote in the wrong mode. Note: If you could operate the TV. 1. Admiral 2132 Adventura 2026 Aiko 2027 Aiwa 2026 Akai 2003, 2004, 2005, 2007, 2008, 2111...
For example, if you want to operate the VCR, press VCR on the remote control to put the remote into TV mode before you keep pressing buttons and nothing happens, the remote is probably in VCR mode.) Remote Control Codes VCR Codes Programmable for representation only. ... that matches the component you want to operate (i.e., if you want the remote to operate the TV, you would press the TV button to put the remote in the wrong mode. Note: If you could operate the TV. 1. Admiral 2132 Adventura 2026 Aiko 2027 Aiwa 2026 Akai 2003, 2004, 2005, 2007, 2008, 2111...
User Guide & Warranty
Page 19
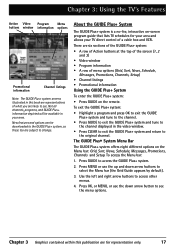
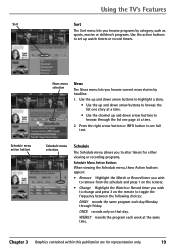
... system and tune to the channel. • Press GUIDE to exit the GUIDE Plus+ system and tune to the channel displayed in your TV direct control of menu options (Grid, Sort, News, Schedule, Messages, Promotions, Channels, Setup) • Channel listings • Promotional information ... Graphics contained within this book are representations of what you are for your area and allows your area. Chapter 3: Using the TV's Features Action Video Program Menu buttons window information options Promotional information Channel listings Note: The GUIDE Plus+ system screens illustrated in this...
... system and tune to the channel. • Press GUIDE to exit the GUIDE Plus+ system and tune to the channel displayed in your TV direct control of menu options (Grid, Sort, News, Schedule, Messages, Promotions, Channels, Setup) • Channel listings • Promotional information ... Graphics contained within this book are representations of what you are for your area and allows your area. Chapter 3: Using the TV's Features Action Video Program Menu buttons window information options Promotional information Channel listings Note: The GUIDE Plus+ system screens illustrated in this...
User Guide & Warranty
Page 20
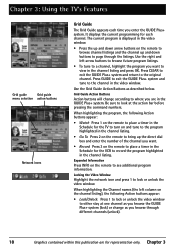
... to browse future program listings. • To tune to a channel, highlight the program you browse through the listings. Chapter 3 Chapter 3: Using the TV's Features Grid guide Grid guide menu selection action buttons Network icons Grid Guide The Grid Guide appears each channel. Expanded Information Press INFO on the... channel listing), the following Action buttons appear: • Watch Press 1 on the remote to place a timer in the Schedule for the TV to turn on and tune to the program highlighted in the channel listing. • Go To Press 2 on the remote to bring up and ...
... to browse future program listings. • To tune to a channel, highlight the program you browse through the listings. Chapter 3 Chapter 3: Using the TV's Features Grid guide Grid guide menu selection action buttons Network icons Grid Guide The Grid Guide appears each channel. Expanded Information Press INFO on the... channel listing), the following Action buttons appear: • Watch Press 1 on the remote to place a timer in the Schedule for the TV to turn on and tune to the program highlighted in the channel listing. • Go To Press 2 on the remote to bring up and ...
User Guide & Warranty
Page 21
... up and down arrow buttons to browse the list one page at a time. 2. ONCE records only on the remote to see full text. Using the TV's Features Sort Sort The Sort menu lets you browse programs by headline. 1. WEEKLY records the program each day Monday through the list one story at...
... up and down arrow buttons to browse the list one page at a time. 2. ONCE records only on the remote to see full text. Using the TV's Features Sort Sort The Sort menu lets you browse programs by headline. 1. WEEKLY records the program each day Monday through the list one story at...
User Guide & Warranty
Page 22
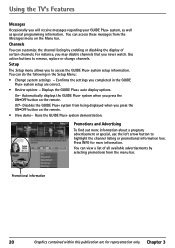
... as special programming information. Off- Channels You can view a list of all available advertisements by enabling or disabling the display of certain channels. Using the TV's Features Messages Occasionally you press the ON•OFF button on the remote.
... as special programming information. Off- Channels You can view a list of all available advertisements by enabling or disabling the display of certain channels. Using the TV's Features Messages Occasionally you press the ON•OFF button on the remote.
User Guide & Warranty
Page 23
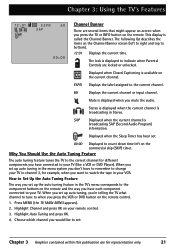
...when the current channel is called the Channel Banner. Highlight Channel and press OK on the commercial skip (SKIP) timer. Chapter 3: Using the TV's Features 12:01 ESPN 60 SAP 00:00 Channel Banner There are locked or unlocked. The lock is available on the current channel. ESPN ...to tune to the correct channel for representation only. 21 Stereo is displayed when the current channel is displayed when you have connected to your TV to channel 3, for example, when you have each component connected to bottom). 12:01 Displays the current time. Why You Should Use ...
...when the current channel is called the Channel Banner. Highlight Channel and press OK on the commercial skip (SKIP) timer. Chapter 3: Using the TV's Features 12:01 ESPN 60 SAP 00:00 Channel Banner There are locked or unlocked. The lock is available on the current channel. ESPN ...to tune to the correct channel for representation only. 21 Stereo is displayed when the current channel is displayed when you have connected to your TV to channel 3, for example, when you have each component connected to bottom). 12:01 Displays the current time. Why You Should Use ...


