
User Guide & Warranty
Page 2
... and user accessible parts. These numbers are located on the back panel of purchase. Model No Serial No Purchase Date Dealer/Address/Phone may void the user's authority to obtain warranty parts and service and for proof of your product for your warranty. Cable TV Installer: This reminder is not covered by your TV carefully. When servicing use only identical replacement parts. FCC Regulations state that the cable ground shall be connected...
... and user accessible parts. These numbers are located on the back panel of purchase. Model No Serial No Purchase Date Dealer/Address/Phone may void the user's authority to obtain warranty parts and service and for proof of your product for your warranty. Cable TV Installer: This reminder is not covered by your TV carefully. When servicing use only identical replacement parts. FCC Regulations state that the cable ground shall be connected...
User Guide & Warranty
Page 3
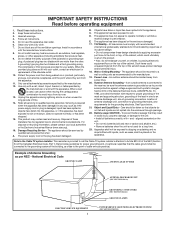
... Entry - Care should be sure the antenna system is used for replacement of the polarized or grounding type plug. Keep these instructions. 2. Install in performance; A grounding type plug has two blades and a third grounding prong. Refer all instructions. 5. Disposal of Antenna Grounding as to an antenna discharge unit, size of grounding connectors, location of time. 14. Damage Requiring Service - Objects have fallen into your outlet...
... Entry - Care should be sure the antenna system is used for replacement of the polarized or grounding type plug. Keep these instructions. 2. Install in performance; A grounding type plug has two blades and a third grounding prong. Refer all instructions. 5. Disposal of Antenna Grounding as to an antenna discharge unit, size of grounding connectors, location of time. 14. Damage Requiring Service - Objects have fallen into your outlet...
User Guide & Warranty
Page 4
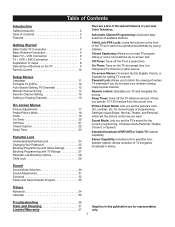
... Basic Cable TV Connection 4 Basic Antenna Connection 5 Basic TV + VCR Connection 6 TV + VCR + DVD Connection 7 Explanation of Jacks 8 Description of Buttons on the TV 9 Remote Control 10 Setup Menus Language 11 TV/Cable TV (CATV 12 Auto Search (Setting TV Channels 13 Manual Channel Tuning 14 Favorite Channel Setting 15 Adding or Erasing Channels 16 On-screen Menus Picture Adjustments 17 Preset Picture Mode 18 Clock 19 On-Timer 20 Off-Timer 21 Closed Caption 22 Sleep Timer 23 Parental Lock Understanding Parental Lock 24 Changing Your Password 25 Blocking Programming with...
... Basic Cable TV Connection 4 Basic Antenna Connection 5 Basic TV + VCR Connection 6 TV + VCR + DVD Connection 7 Explanation of Jacks 8 Description of Buttons on the TV 9 Remote Control 10 Setup Menus Language 11 TV/Cable TV (CATV 12 Auto Search (Setting TV Channels 13 Manual Channel Tuning 14 Favorite Channel Setting 15 Adding or Erasing Channels 16 On-screen Menus Picture Adjustments 17 Preset Picture Mode 18 Clock 19 On-Timer 20 Off-Timer 21 Closed Caption 22 Sleep Timer 23 Parental Lock Understanding Parental Lock 24 Changing Your Password 25 Blocking Programming with...
User Guide & Warranty
Page 6
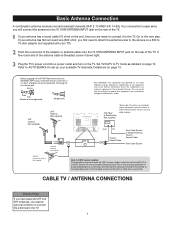
... the rear of cable entry as detailed on the rear of the Canadian Electrical Code, Part 1) that provides guidelines for proper grounding and, in the instruction Manual. If your TV). VHF Antenna (Not supplied) UHF Antenna (Not supplied) VHF/UHF Combiner (Not supplied OR CATV Box* or Satellite Box (Not supplied) *Some cable TV systems use radio frequency energy. ANT. Plug the TV's power cord into the jack. Before plugging the UHF/VHF Rod Antenna into the ANTENNA INPUT jack...
... the rear of cable entry as detailed on the rear of the Canadian Electrical Code, Part 1) that provides guidelines for proper grounding and, in the instruction Manual. If your TV). VHF Antenna (Not supplied) UHF Antenna (Not supplied) VHF/UHF Combiner (Not supplied OR CATV Box* or Satellite Box (Not supplied) *Some cable TV systems use radio frequency energy. ANT. Plug the TV's power cord into the jack. Before plugging the UHF/VHF Rod Antenna into the ANTENNA INPUT jack...
User Guide & Warranty
Page 7
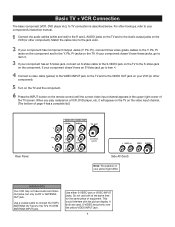
... your jacks might differ. Connect the audio cables (white and red) to the R and L AUDIO jacks on the TV and to the Audio output jacks on the VCR (or other hookups, refer to your component's instruction manual. Press the INPUT button on the remote control until the correct video input channel appears in the upper right corner of equipment. it will appear on the TV on the video input channel. (The bottom of page 4 has a complete list.) Rear Panel (ANTENNA INPUT...
... your jacks might differ. Connect the audio cables (white and red) to the R and L AUDIO jacks on the TV and to the Audio output jacks on the VCR (or other hookups, refer to your component's instruction manual. Press the INPUT button on the remote control until the correct video input channel appears in the upper right corner of equipment. it will appear on the TV on the video input channel. (The bottom of page 4 has a complete list.) Rear Panel (ANTENNA INPUT...
User Guide & Warranty
Page 8
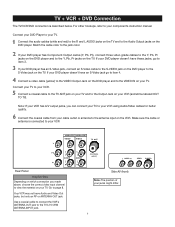
... red) to the R and L AUDIO jacks on the TV. Note: If your VCR has A/V output jacks, you made above, choose the correct video input channel to your component's instruction manual. If your DVD player doesn't have an S-Video jack go to item 4. Your VCR may not have Audio and Video Out jacks, but only an RF or ANTENNA OUT jack. If your DVD player has an S-Video jack, connect an S-Video cable to the S-VIDEO jack on your VCR (sometime labeled OUT TO TV). Connect a video cable...
... red) to the R and L AUDIO jacks on the TV. Note: If your VCR has A/V output jacks, you made above, choose the correct video input channel to your component's instruction manual. If your DVD player doesn't have an S-Video jack go to item 4. Your VCR may not have Audio and Video Out jacks, but only an RF or ANTENNA OUT jack. If your DVD player has an S-Video jack, connect an S-Video cable to the S-VIDEO jack on your VCR (sometime labeled OUT TO TV). Connect a video cable...
User Guide & Warranty
Page 10
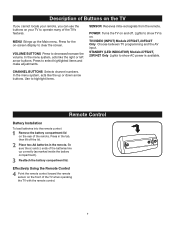
... buttons. VOLUME BUTTONS Press to highlight items. Remote Control Battery Installation To load batteries into the remote control: Remove the battery compartment lid on the rear of the remote. STANDBY (LED INDICATOR) Models 27F522T, 20F542T Only Lights to show TV is available. Lights to select highlighted items and make adjustments. Press in the remote. Reattach the battery compartment lid. TV/VIDEO (INPUT) Models 27F522T, 20F542T Only Choose between TV programming and the AV input. Description of Buttons...
... buttons. VOLUME BUTTONS Press to highlight items. Remote Control Battery Installation To load batteries into the remote control: Remove the battery compartment lid on the rear of the remote. STANDBY (LED INDICATOR) Models 27F522T, 20F542T Only Lights to show TV is available. Lights to select highlighted items and make adjustments. Press in the remote. Reattach the battery compartment lid. TV/VIDEO (INPUT) Models 27F522T, 20F542T Only Choose between TV programming and the AV input. Description of Buttons...
User Guide & Warranty
Page 11
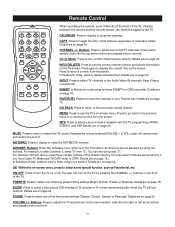
...). INSERT In Notebook mode, press to display the current time on the TV screen. You can select channels above , press three number buttons of the channel directly. (You can also just press "2". Buttons Press to select one of the four preset Picture settings (Bright, Normal, Theater or Personal). Remote Control When operating the remote, point it directly at the front of the TV. PRESETS Press to adjust the TV sound level. CHANNEL +/- buttons on page 15...
...). INSERT In Notebook mode, press to display the current time on the TV screen. You can select channels above , press three number buttons of the channel directly. (You can also just press "2". Buttons Press to select one of the four preset Picture settings (Bright, Normal, Theater or Personal). Remote Control When operating the remote, point it directly at the front of the TV. PRESETS Press to adjust the TV sound level. CHANNEL +/- buttons on page 15...
User Guide & Warranty
Page 13
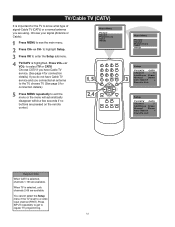
... cannot select the Setup menu if the TV is set to select TV or CATV. Main Menu Picture Sound Preferences Time Setup Press CH+ or CH- Press OK to regular TV programming. 12 TV/CATV is selected, channels 1-125 are available. TV/Cable TV (CATV) It is important for connection details.) Press MENU repeatedly to exit the menu or the menu will automatically disappear within a few seconds if no buttons are pressed on the remote control. Press INPUT...
... cannot select the Setup menu if the TV is set to select TV or CATV. Main Menu Picture Sound Preferences Time Setup Press CH+ or CH- Press OK to regular TV programming. 12 TV/CATV is selected, channels 1-125 are available. TV/Cable TV (CATV) It is important for connection details.) Press MENU repeatedly to exit the menu or the menu will automatically disappear within a few seconds if no buttons are pressed on the remote control. Press INPUT...
User Guide & Warranty
Page 14
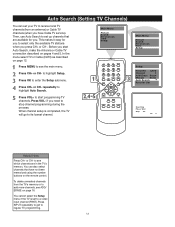
... channels from an antenna) or Cable TV channels (when you start programming TV channels. Press INPUT repeatedly to get to set to receive local TV channels (from the TV s memory or to select only the available TV stations when you . Then, use Auto Search to regular TV programming. 13 In the menu select TV or Cable (CATV) as described on the remote control. Press VOL- Main Menu Picture Sound Preferences Time Setup Setup TV/CATV CATV Channel 1 Add/Erase Erase Manual Down Auto Search Favorite List...
... channels from an antenna) or Cable TV channels (when you start programming TV channels. Press INPUT repeatedly to get to set to receive local TV channels (from the TV s memory or to select only the available TV stations when you . Then, use Auto Search to regular TV programming. 13 In the menu select TV or Cable (CATV) as described on the remote control. Press VOL- Main Menu Picture Sound Preferences Time Setup Setup TV/CATV CATV Channel 1 Add/Erase Erase Manual Down Auto Search Favorite List...
User Guide & Warranty
Page 15
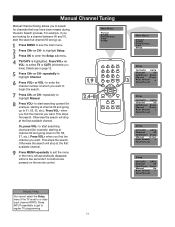
... set to a video input channel (FRNT). Or, press VOL- to regular TV programming. 14 Main Menu Picture Sound Preferences Time Setup Setup TV/CATV CATV Channel 60 Add/Erase Erase Manual Down Auto Search Favorite List Setup TV/CATV CATV Channel 60 Add/Erase Erase Manual Down Auto Search Favorite List Setup TV/CATV Channel CATV 60 Add/Erase Erase Manual Down Auto Search Favorite List Setup TV/CATV CATV Channel 60 Add/Erase Erase Manual Up Auto Search Favorite List Details are on the remote control. Manual Channel...
... set to a video input channel (FRNT). Or, press VOL- to regular TV programming. 14 Main Menu Picture Sound Preferences Time Setup Setup TV/CATV CATV Channel 60 Add/Erase Erase Manual Down Auto Search Favorite List Setup TV/CATV CATV Channel 60 Add/Erase Erase Manual Down Auto Search Favorite List Setup TV/CATV Channel CATV 60 Add/Erase Erase Manual Down Auto Search Favorite List Setup TV/CATV CATV Channel 60 Add/Erase Erase Manual Up Auto Search Favorite List Details are on the remote control. Manual Channel...
User Guide & Warranty
Page 16
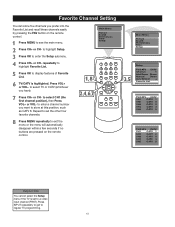
... a channel number you have). to enter the Setup submenu. repeatedly to select CH1 (the first channel position), then Press VOL+ or VOL- Repeat to set to store at this position, such as CATV 8. to select TV or CATV (whichever you want to a video input channel (FRNT). Press MENU repeatedly to regular TV programming. 15 Main Menu Picture Sound Preferences Time Setup Setup TV/CATV CATV Channel 1 Add/Erase Erase Manual Down Auto Search Favorite List TV...
... a channel number you have). to enter the Setup submenu. repeatedly to select CH1 (the first channel position), then Press VOL+ or VOL- Repeat to set to store at this position, such as CATV 8. to select TV or CATV (whichever you want to a video input channel (FRNT). Press MENU repeatedly to regular TV programming. 15 Main Menu Picture Sound Preferences Time Setup Setup TV/CATV CATV Channel 1 Add/Erase Erase Manual Down Auto Search Favorite List TV...

User Guide & Warranty
Page 17
... the TV's memory. to a video input channel (FRNT). Press VOL+ or VOL- Press VOL+ or VOL- buttons. Main Menu Picture Sound Preferences Time Setup TV/CATV is set to select TV or CATV (whichever you scroll through channels. repeatedly to highlight Setup. Press MENU to highlight Channel. repeatedly to see the change take effect until you have). Choosing Erase will not be available when you want to enter the channel number...
... the TV's memory. to a video input channel (FRNT). Press VOL+ or VOL- Press VOL+ or VOL- buttons. Main Menu Picture Sound Preferences Time Setup TV/CATV is set to select TV or CATV (whichever you scroll through channels. repeatedly to highlight Setup. Press MENU to highlight Channel. repeatedly to see the change take effect until you have). Choosing Erase will not be available when you want to enter the channel number...
User Guide & Warranty
Page 18
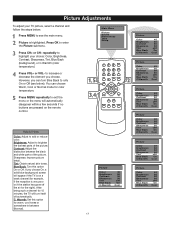
... the TV is on the remote control. C. Picture Adjustments To adjust your choice: Color, Brightness, Contrast, Sharpness, Tint, Blue Back (background), or C.Warmth (color temperature.) Press VOL+ or VOL- to only On or Off (see the main menu. Main Menu Picture Sound Preferences Time Setup Press CH+ or CH- Contrast: Adjust the distinction between (Normal). You can turn itself off the air for color temperature. Warmth: Set this...
... the TV is on the remote control. C. Picture Adjustments To adjust your choice: Color, Brightness, Contrast, Sharpness, Tint, Blue Back (background), or C.Warmth (color temperature.) Press VOL+ or VOL- to only On or Off (see the main menu. Main Menu Picture Sound Preferences Time Setup Press CH+ or CH- Contrast: Adjust the distinction between (Normal). You can turn itself off the air for color temperature. Warmth: Set this...
User Guide & Warranty
Page 21
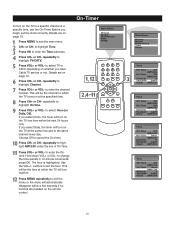
... a specific time, use the On-Timer. Press VOL+ or VOL- Press CH+ or CH- Press CH+ or CH- This will be the channel to which the TV will turn itself on whether you have Cable TV service or not. repeatedly to see the main menu. Press VOL+ or VOL- repeatedly to cancel the On-timer. On-Timer Main Menu Picture Sound Preferences Time Setup 20 Main Menu Picture Sound Preferences Time Setup Time Off Time...
... a specific time, use the On-Timer. Press VOL+ or VOL- Press CH+ or CH- Press CH+ or CH- This will be the channel to which the TV will turn itself on whether you have Cable TV service or not. repeatedly to see the main menu. Press VOL+ or VOL- repeatedly to cancel the On-timer. On-Timer Main Menu Picture Sound Preferences Time Setup 20 Main Menu Picture Sound Preferences Time Setup Time Off Time...
User Guide & Warranty
Page 23
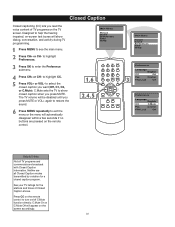
... sets the TV to help the hearing impaired, on-screen text boxes will automatically disappear within a few seconds if no buttons are pressed on the TV screen. See your TV listings for a closed caption program. Press VOL+ or VOL- Control FPA Lock Off Helpful Hints Not all TV programs and commercials are all Closed Caption modes transmitted by a station for the stations and times of TV programs on the remote control. Press CH+ or CH- Press MENU...
... sets the TV to help the hearing impaired, on-screen text boxes will automatically disappear within a few seconds if no buttons are pressed on the TV screen. See your TV listings for a closed caption program. Press VOL+ or VOL- Control FPA Lock Off Helpful Hints Not all TV programs and commercials are all Closed Caption modes transmitted by a station for the stations and times of TV programs on the remote control. Press CH+ or CH- Press MENU...
User Guide & Warranty
Page 37
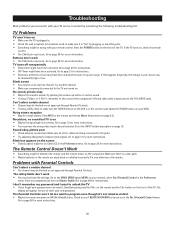
... instructions. • You may have been activated. The Remote Control Doesn't Work • Something might be set wrong. TV turns off unexpectedly • Sleep timer might have been activated because of the TV. Go to the INPUT button description on • Maybe the signal type is on page 10. Problems with Parental Controls Can't select a certain channel • The channel may be on in the Preferences menu. Go to the TV's AUDIO jacks. No sound, picture...
... instructions. • You may have been activated. The Remote Control Doesn't Work • Something might be set wrong. TV turns off unexpectedly • Sleep timer might have been activated because of the TV. Go to the INPUT button description on • Maybe the signal type is on page 10. Problems with Parental Controls Can't select a certain channel • The channel may be on in the Preferences menu. Go to the TV's AUDIO jacks. No sound, picture...
User Guide & Warranty
Page 38
... from date of purchase for parts. • One year from date of shipment to help assure adequate ventilation. Caution: Using video games or any Authorized RCA Television Service Center for the picture tubes. Any additional information should be permanently imprinted on the screen, or allow liquid to repair your warranty. What your warranty does not cover: • Customer instruction. (Your Owner's Manual describes how to scratch or...
... from date of purchase for parts. • One year from date of shipment to help assure adequate ventilation. Caution: Using video games or any Authorized RCA Television Service Center for the picture tubes. Any additional information should be permanently imprinted on the screen, or allow liquid to repair your warranty. What your warranty does not cover: • Customer instruction. (Your Owner's Manual describes how to scratch or...

Spec Sheet
Page 1
... devices such as a DVD Player, or a Satellite Receiver) to be Connected Digital 3-Line Comb Filter Front Panel Lock Connections For One Rear L+R+V Device (when Component Video Input Unused), Plus One Set of up at selected time, or if no time selected, the next time TV is selectable with one button on the remote. Separates black-and-white detail from color information to single video inputs. Allows selection of Front L+R+V with S-Video Electronic On-Screen Notepad Benefits Reduces peripheral...
... devices such as a DVD Player, or a Satellite Receiver) to be Connected Digital 3-Line Comb Filter Front Panel Lock Connections For One Rear L+R+V Device (when Component Video Input Unused), Plus One Set of up at selected time, or if no time selected, the next time TV is selectable with one button on the remote. Separates black-and-white detail from color information to single video inputs. Allows selection of Front L+R+V with S-Video Electronic On-Screen Notepad Benefits Reduces peripheral...
Spec Sheet
Page 2
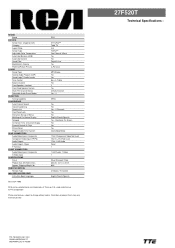
... SOUND Sound Type Second Audio Program (SAP) Sound Logic™ Audio Leveler Tone Control Balance Control Front Speakers (number) Front-Fired Speaker System Watts Per Channel Stereo Selectable Audio Preset Modes RECEPTION Tuning Capability CONVENIENCE Auto Channel Search Closed Captioning Favorite List Front Panel Lock Interactive Set-up w/ Menus Multilingual On-Screen Display Notepad On-Screen Time & Channel Display Parental Control (V-Chip) Picture Reset Programmable Timer System REAR CONNECTORS Audio/Video Inputs (Composite) Component Video Input (YPrPb) Audio Outputs Audio Outputs (Type...
... SOUND Sound Type Second Audio Program (SAP) Sound Logic™ Audio Leveler Tone Control Balance Control Front Speakers (number) Front-Fired Speaker System Watts Per Channel Stereo Selectable Audio Preset Modes RECEPTION Tuning Capability CONVENIENCE Auto Channel Search Closed Captioning Favorite List Front Panel Lock Interactive Set-up w/ Menus Multilingual On-Screen Display Notepad On-Screen Time & Channel Display Parental Control (V-Chip) Picture Reset Programmable Timer System REAR CONNECTORS Audio/Video Inputs (Composite) Component Video Input (YPrPb) Audio Outputs Audio Outputs (Type...


