User Guide & Warranty
Page 4
...you set the picture control as on the TV 9 Remote Control 10 Setup Menus Language 11 TV/Cable TV (CATV 12 Auto Search (Setting TV Channels 13 Manual Channel Tuning 14 Favorite Channel Setting 15 Adding or Erasing Channels 16 On-screen Menus Picture Adjustments 17 Preset Picture Mode 18 Clock... 19 On-Timer 20 Off-Timer 21 Closed Caption 22 Sleep Timer 23 Parental Lock Understanding Parental Lock 24 Changing Your Password 25 Blocking Programming with Movie Ratings 26 Blocking Programming with TV Ratings 27 Parental...
...you set the picture control as on the TV 9 Remote Control 10 Setup Menus Language 11 TV/Cable TV (CATV 12 Auto Search (Setting TV Channels 13 Manual Channel Tuning 14 Favorite Channel Setting 15 Adding or Erasing Channels 16 On-screen Menus Picture Adjustments 17 Preset Picture Mode 18 Clock... 19 On-Timer 20 Off-Timer 21 Closed Caption 22 Sleep Timer 23 Parental Lock Understanding Parental Lock 24 Changing Your Password 25 Blocking Programming with Movie Ratings 26 Blocking Programming with TV Ratings 27 Parental...
User Guide & Warranty
Page 6
...easy since you first need an optional combiner to connect the antennas to the 75 OHM ANTENNA INPUT jack on the rear of the TV. Set TV/CATV to this equipment if an unauthorized change or modification is provided to call the CATV system installer's attention to the screws on...reminder is made. Push the round end of the Canadian Electrical Code, Part 1) that provides guidelines for proper grounding and, in the instruction Manual. Plug the TV's power cord into the jack. Details are ready to connect it to 75 ohm adapter (not supplied with your local cable company. VHF ...
...easy since you first need an optional combiner to connect the antennas to the 75 OHM ANTENNA INPUT jack on the rear of the TV. Set TV/CATV to this equipment if an unauthorized change or modification is provided to call the CATV system installer's attention to the screws on...reminder is made. Push the round end of the Canadian Electrical Code, Part 1) that provides guidelines for proper grounding and, in the instruction Manual. Plug the TV's power cord into the jack. Details are ready to connect it to 75 ohm adapter (not supplied with your local cable company. VHF ...
User Guide & Warranty
Page 7
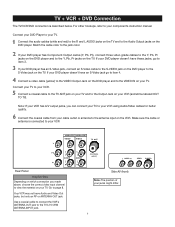
...Side AV (front) Note: The position of your component's instruction manual. Use a coaxial cable to connect the VCR's ANTENNA OUT jack to item 4. Match the cable color to TV connection is described below. it will appear on the TV on the remote control until the correct video input channel appears ...in the upper right corner of equipment. This would interfere with the picture display. Basic TV + VCR Connection The basic component (VCR, DVD player etc.) to the jack color. Connect the audio cables (white and red) to the R ...
...Side AV (front) Note: The position of your component's instruction manual. Use a coaxial cable to connect the VCR's ANTENNA OUT jack to item 4. Match the cable color to TV connection is described below. it will appear on the TV on the remote control until the correct video input channel appears ...in the upper right corner of equipment. This would interfere with the picture display. Basic TV + VCR Connection The basic component (VCR, DVD player etc.) to the jack color. Connect the audio cables (white and red) to the R ...
User Guide & Warranty
Page 8
.... Note: If your VCR has A/V output jacks, you made above, choose the correct video input channel to view the material on your component's instruction manual. Connect your TV to your DVD player has Component Output Jacks (Y, Pb, Pr), connect three video grade cables to the Y, Pb, Pr jacks on the DVD player... your DVD player has an S-Video jack, connect an S-Video cable to the S-VIDEO jack on the DVD player to the S-Video jack on the TV. If your VCR. If your DVD player doesn't have Audio and Video Out jacks, but only an RF or ANTENNA OUT jack. Connect a coaxial cable...
.... Note: If your VCR has A/V output jacks, you made above, choose the correct video input channel to view the material on your component's instruction manual. Connect your TV to your DVD player has Component Output Jacks (Y, Pb, Pr), connect three video grade cables to the Y, Pb, Pr jacks on the DVD player... your DVD player has an S-Video jack, connect an S-Video cable to the S-VIDEO jack on the DVD player to the S-Video jack on the TV. If your VCR. If your DVD player doesn't have Audio and Video Out jacks, but only an RF or ANTENNA OUT jack. Connect a coaxial cable...
User Guide & Warranty
Page 13
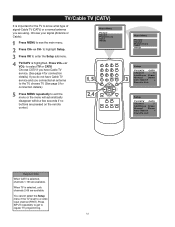
... CH+ or CH- You cannot select the Setup menu if the TV is highlighted. Main Menu Picture Sound Preferences Time Setup Setup TV/CATV CATV Channel 1 Add/Erase Erase Manual Down Auto Search Favorite List Setup TV/CATV CATV Channel 7 Add/Erase Erase Manual Down Auto Search Favorite List Helpful Hints When CATV is selected, channels...
... CH+ or CH- You cannot select the Setup menu if the TV is highlighted. Main Menu Picture Sound Preferences Time Setup Setup TV/CATV CATV Channel 1 Add/Erase Erase Manual Down Auto Search Favorite List Setup TV/CATV CATV Channel 7 Add/Erase Erase Manual Down Auto Search Favorite List Helpful Hints When CATV is selected, channels...
User Guide & Warranty
Page 14
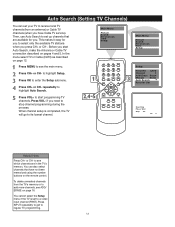
...). Before you press CH+ or CH-. Main Menu Picture Sound Preferences Time Setup Setup TV/CATV CATV Channel 1 Add/Erase Erase Manual Down Auto Search Favorite List Searching Please Wait Stop TV 2 Helpful Hints Press CH+ or CH- to regular TV programming. 13 Auto Search (Setting TV Channels) You can also select channels that are in...
...). Before you press CH+ or CH-. Main Menu Picture Sound Preferences Time Setup Setup TV/CATV CATV Channel 1 Add/Erase Erase Manual Down Auto Search Favorite List Searching Please Wait Stop TV 2 Helpful Hints Press CH+ or CH- to regular TV programming. 13 Auto Search (Setting TV Channels) You can also select channels that are in...
User Guide & Warranty
Page 15
... the Auto Search process. Press MENU to regular TV programming. 14 Main Menu Picture Sound Preferences Time Setup Setup TV/CATV CATV Channel 60 Add/Erase Erase Manual Down Auto Search Favorite List Setup TV/CATV CATV Channel 60 Add/Erase Erase Manual Down Auto Search Favorite List Setup TV/CATV Channel CATV 60 Add/Erase Erase...
... the Auto Search process. Press MENU to regular TV programming. 14 Main Menu Picture Sound Preferences Time Setup Setup TV/CATV CATV Channel 60 Add/Erase Erase Manual Down Auto Search Favorite List Setup TV/CATV CATV Channel 60 Add/Erase Erase Manual Down Auto Search Favorite List Setup TV/CATV Channel CATV 60 Add/Erase Erase...
User Guide & Warranty
Page 16
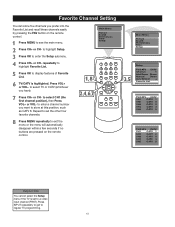
...). Press MENU repeatedly to display features of Favorite List. Main Menu Picture Sound Preferences Time Setup Setup TV/CATV CATV Channel 1 Add/Erase Erase Manual Down Auto Search Favorite List TV/CATV CATV CH1 CATV 1 CH2 CATV 2 CH3 CATV 3 CH4 CATV 4 CH5 CATV 5 TV/CATV CATV CH1 CATV 1 CH2 CATV 2 CH3 CATV 3 CH4 CATV 4 CH5...
...). Press MENU repeatedly to display features of Favorite List. Main Menu Picture Sound Preferences Time Setup Setup TV/CATV CATV Channel 1 Add/Erase Erase Manual Down Auto Search Favorite List TV/CATV CATV CH1 CATV 1 CH2 CATV 2 CH3 CATV 3 CH4 CATV 4 CH5 CATV 5 TV/CATV CATV CH1 CATV 1 CH2 CATV 2 CH3 CATV 3 CH4 CATV 4 CH5...

User Guide & Warranty
Page 17
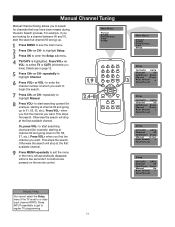
... or Erase. Press INPUT repeatedly to get to regular TV programming. 16 Main Menu Picture Sound Preferences Time Setup Setup TV/CATV CATV Channel 1 Add/Erase Erase Manual Down Auto Search Favorite List Setup TV/CATV CATV Channel 55 Add/Erase Erase Manual Down Auto Search Favorite List Setup TV/CATV CATV Channel 55 Add/Erase Erase...
... or Erase. Press INPUT repeatedly to get to regular TV programming. 16 Main Menu Picture Sound Preferences Time Setup Setup TV/CATV CATV Channel 1 Add/Erase Erase Manual Down Auto Search Favorite List Setup TV/CATV CATV Channel 55 Add/Erase Erase Manual Down Auto Search Favorite List Setup TV/CATV CATV Channel 55 Add/Erase Erase...
User Guide & Warranty
Page 27
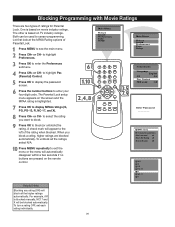
...password screen. Press OK to enter the Preferences submenu. Press the number buttons to highlight Preferences. Main Menu Picture Sound Preferences Time Setup Main Menu Picture Sound Preferences Time Setup Preferences Language English CC Off Par. to enter your four-digit code. Press MENU ...For example, if R is highlighted. One is based on the screen and the MPAA rating is blocked manually, NC17 and X will automatically disappear within a few seconds if no buttons are pressed on TV industry ratings. Press CH+ or CH- to display MPAA ratings (G, PG, PG-13, R, NC...
...password screen. Press OK to enter the Preferences submenu. Press the number buttons to highlight Preferences. Main Menu Picture Sound Preferences Time Setup Main Menu Picture Sound Preferences Time Setup Preferences Language English CC Off Par. to enter your four-digit code. Press MENU ...For example, if R is highlighted. One is based on the screen and the MPAA rating is blocked manually, NC17 and X will automatically disappear within a few seconds if no buttons are pressed on TV industry ratings. Press CH+ or CH- to display MPAA ratings (G, PG, PG-13, R, NC...
User Guide & Warranty
Page 38
...to lightning damage. 37 You can cause them to repair your warranty does not cover: • Customer instruction. (Your Owner's Manual describes how to the rental firm, whichever comes first. What your television. • Pay any external accessory with a soft,... ventilation. While cleaning do : • Pay any Authorized RCA Television Service Center the labor charges to be permanently imprinted on the picture tube (or projection TV picture tubes). Caution: Using video games or any Authorized RCA Television Service Center for extended periods of nature, such as required...
...to lightning damage. 37 You can cause them to repair your warranty does not cover: • Customer instruction. (Your Owner's Manual describes how to the rental firm, whichever comes first. What your television. • Pay any external accessory with a soft,... ventilation. While cleaning do : • Pay any Authorized RCA Television Service Center the labor charges to be permanently imprinted on the picture tube (or projection TV picture tubes). Caution: Using video games or any Authorized RCA Television Service Center for extended periods of nature, such as required...
User Guide & Warranty
Page 40
...not occur in a particular installation. Increase the separation between the equipment and receiver. 3. Printed in service for your product. Visit the RCA website at www.rca.com/television Please do not send any products to Part 15 of the FCC Rules. used in accordance with the limits for help.... If this manual or on , the user is connected. 4. Consult the dealer or an experienced radio/TV technician for a Class B digital device, pursuant...
...not occur in a particular installation. Increase the separation between the equipment and receiver. 3. Printed in service for your product. Visit the RCA website at www.rca.com/television Please do not send any products to Part 15 of the FCC Rules. used in accordance with the limits for help.... If this manual or on , the user is connected. 4. Consult the dealer or an experienced radio/TV technician for a Class B digital device, pursuant...


