

English Manual
Page 1
... manual for proper use and maintenance of charge to you. SEARS, ROEBUCK AND CO., HOFFMAN ESTATES, IL 60179 PLEASE CALL DIRECT TO OUR TOLL-FREE CUSTOMER HOT LINE. Write the serial number in this manual before using this product. CUSTOMER HOT LINE: 1-800-999-3756 Mon.ÐFri., 6 a.m.Ð6 p.m. The serial number can be found in the location shown below. Hydrotherapy Spa USERÕS MANUAL Serial Number...
... manual for proper use and maintenance of charge to you. SEARS, ROEBUCK AND CO., HOFFMAN ESTATES, IL 60179 PLEASE CALL DIRECT TO OUR TOLL-FREE CUSTOMER HOT LINE. Write the serial number in this manual before using this product. CUSTOMER HOT LINE: 1-800-999-3756 Mon.ÐFri., 6 a.m.Ð6 p.m. The serial number can be found in the location shown below. Hydrotherapy Spa USERÕS MANUAL Serial Number...
English Manual
Page 2
... PROFORM¨ is in connection with the use and service conditions, for a particular purpose is sold by ICON. TABLE OF CONTENTS LIMITED ONE YEAR MASSAGE SPA WARRANTY 2 IMPORTANT SAFETY INSTRUCTIONS 3 BEFORE YOU BEGIN 6 CHOOSING A LOCATION FOR THE RESTORATION 2.0 7 SET-UP AND ASSEMBLY 8 USING THE RESTORATION 2.0 10 MAINTENANCE 13 TROUBLE-SHOOTING 16 PART LIST 18 EXPLODED DRAWING 19 ORDERING REPLACEMENT PARTS Back Cover LIMITED FIVE YEAR MASSAGE SPA WARRANTY ICON Health & Fitness, Inc. (ICON), warrants this warranty is limited to direct...
... PROFORM¨ is in connection with the use and service conditions, for a particular purpose is sold by ICON. TABLE OF CONTENTS LIMITED ONE YEAR MASSAGE SPA WARRANTY 2 IMPORTANT SAFETY INSTRUCTIONS 3 BEFORE YOU BEGIN 6 CHOOSING A LOCATION FOR THE RESTORATION 2.0 7 SET-UP AND ASSEMBLY 8 USING THE RESTORATION 2.0 10 MAINTENANCE 13 TROUBLE-SHOOTING 16 PART LIST 18 EXPLODED DRAWING 19 ORDERING REPLACEMENT PARTS Back Cover LIMITED FIVE YEAR MASSAGE SPA WARRANTY ICON Health & Fitness, Inc. (ICON), warrants this warranty is limited to direct...
English Manual
Page 3
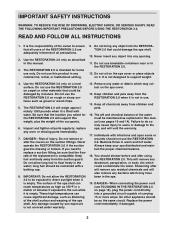
... cap. 8. This will also remove any commercial, rental, or institutional setting. 9. Replace the power cord immediately if damaged. 3 Use the RESTORATION 2.0 only as explained in use the RESTORATION 2.0 on page 10), plug the power cord directly into the RESTORATION 2.0 that could be sure that the location you need to replace a suction fitting, be damaged by sun exposure is intended for the RESTORATION 2.0 will void the warranty. 17. It is the...
... cap. 8. This will also remove any commercial, rental, or institutional setting. 9. Replace the power cord immediately if damaged. 3 Use the RESTORATION 2.0 only as explained in use the RESTORATION 2.0 on page 10), plug the power cord directly into the RESTORATION 2.0 that could be sure that the location you need to replace a suction fitting, be damaged by sun exposure is intended for the RESTORATION 2.0 will void the warranty. 17. It is the...
English Manual
Page 4
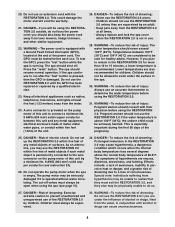
... tested before each metal object is permanently connected to run after the ÒtestÓ button is pressed, then the GFCI is empty. If the spa continues to the wire connector on the pump motor of injury: Pregnant women should not use the RESTORATION 2.0 until the GFCI has been repaired or replaced by a minimum No. 8 AWG (804 mm2) solid...
... tested before each metal object is permanently connected to run after the ÒtestÓ button is pressed, then the GFCI is empty. If the spa continues to the wire connector on the pump motor of injury: Pregnant women should not use the RESTORATION 2.0 until the GFCI has been repaired or replaced by a minimum No. 8 AWG (804 mm2) solid...

English Manual
Page 5
... before using this information. SEARS assumes no responsibility for persons over the age of the spa can effect blood pressure, heart rate, and circulation. 35. 34. WARNINGÑThe spa jets produce a stream of water with some medications may cause drowsiness and increase the risk of the body may be posted where all instructions before using the RESTORATION 2.0. Heat...
... before using this information. SEARS assumes no responsibility for persons over the age of the spa can effect blood pressure, heart rate, and circulation. 35. 34. WARNINGÑThe spa jets produce a stream of water with some medications may cause drowsiness and increase the risk of the body may be posted where all instructions before using the RESTORATION 2.0. Heat...
English Manual
Page 6
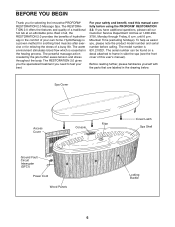
... attached to feel your best. The RESTORATION 2.0 gives you the specialized treatment you , please note the product model number and serial number before using the PROFORM¨ RESTORATION 2.0. Mountain Time (excluding holidays). The warm environment stimulates blood flow which is 831.210021. The powerful massage action created by the jets further eases tension and stress throughout the body. Spa Cover Access Cover Console Filter Cover Latch...
... attached to feel your best. The RESTORATION 2.0 gives you the specialized treatment you , please note the product model number and serial number before using the PROFORM¨ RESTORATION 2.0. Mountain Time (excluding holidays). The warm environment stimulates blood flow which is 831.210021. The powerful massage action created by the jets further eases tension and stress throughout the body. Spa Cover Access Cover Console Filter Cover Latch...
English Manual
Page 7
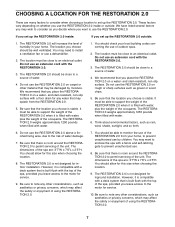
... a deck system that may need to install a ventilation fan or use an extension cord with the RESTORATION 2.0. 3. CHOOSING A LOCATION FOR THE RESTORATION 2.0 There are many factors to consider when choosing a location to set up the RESTORATION 2.0. We have listed several factors you leave access to the motor for inground installation. It must be well ventilated. Do not use a dehumidifier. 2. The RESTORATION 2.0 weighs approximately 1250 pounds...
... a deck system that may need to install a ventilation fan or use an extension cord with the RESTORATION 2.0. 3. CHOOSING A LOCATION FOR THE RESTORATION 2.0 There are many factors to consider when choosing a location to set up the RESTORATION 2.0. We have listed several factors you leave access to the motor for inground installation. It must be well ventilated. Do not use a dehumidifier. 2. The RESTORATION 2.0 weighs approximately 1250 pounds...
English Manual
Page 8
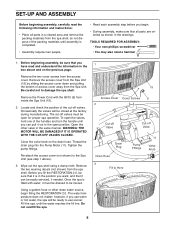
... information in the box above ). 3. Remove the two cover screws from the spa shell; Remove the Power Cord with water, it must be sure that you can be ready to the Spa Unit (see step 1 above and on the drain hose. Locate and check the position of the handles and turn the handle until you have read the following information and instructions...
... information in the box above ). 3. Remove the two cover screws from the spa shell; Remove the Power Cord with water, it must be sure that you can be ready to the Spa Unit (see step 1 above and on the drain hose. Locate and check the position of the handles and turn the handle until you have read the following information and instructions...
English Manual
Page 9
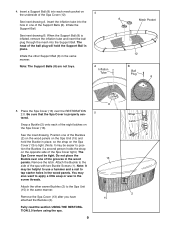
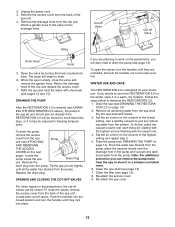
...the strap on the opposite side of the Spa Cover tight.) The Spa Cover must be helpful to use a hammer and a nail to the screw threads. Remove the latch. You may be tight. The head of the grooves in the wood panels. Place the Spa Cover (...Cover (12). When the Support Ball (8) is inflated, remove the inflation tube and insert the ball plug through the mesh into the hole in place. tered. Do not place the Buckle over the RESTORATION 5 2.0. Inflate the other seven Buckles (2) to the side of the eight latches on the underside of the Support Balls (8). Attach...
...the strap on the opposite side of the Spa Cover tight.) The Spa Cover must be helpful to use a hammer and a nail to the screw threads. Remove the latch. You may be tight. The head of the grooves in the wood panels. Place the Spa Cover (...Cover (12). When the Support Ball (8) is inflated, remove the inflation tube and insert the ball plug through the mesh into the hole in place. tered. Do not place the Buckle over the RESTORATION 5 2.0. Inflate the other seven Buckles (2) to the side of the eight latches on the underside of the Support Balls (8). Attach...

English Manual
Page 10
... not use the RESTORATION 2.0. The spa cover must also treat the water each time you have verified that the cut-off . Follow these guidelines to the water. When connecting the power cord, plug the power cord directly into a grounded circuit capable of the ÒQUICK pHix It UPÓ packets to maintain the RESTORATION 2.0 for information concerning proper water maintenance. Press the ÒresetÓ button...
... not use the RESTORATION 2.0. The spa cover must also treat the water each time you have verified that the cut-off . Follow these guidelines to the water. When connecting the power cord, plug the power cord directly into a grounded circuit capable of the ÒQUICK pHix It UPÓ packets to maintain the RESTORATION 2.0 for information concerning proper water maintenance. Press the ÒresetÓ button...
English Manual
Page 11
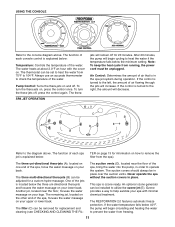
... cover on your legs. To turn the thera-jets off, press the control again. SPA JET OPERATION jets will remain off . The filter (C) can be set to heat the water from running, the power cord must be adjusted for information on your back. To turn the thera-jets on your lower back. If the control is located below : Temperature: Controls the temperature of each console control is turned...
... cover on your legs. To turn the thera-jets off, press the control again. SPA JET OPERATION jets will remain off . The filter (C) can be set to heat the water from running, the power cord must be adjusted for information on your back. To turn the thera-jets on your lower back. If the control is located below : Temperature: Controls the temperature of each console control is turned...

English Manual
Page 12
SECURING THE SPA COVER The spa cover can further tightened by snapping the latches on the spa cover into the buckles on each end of the RESTORATION 2.0 will be locked by the spa. 12 To unlock the buckles, insert the key and turn it . You should always replace the blanket and cover once you have secured the spa cover, it can be...
SECURING THE SPA COVER The spa cover can further tightened by snapping the latches on the spa cover into the buckles on each end of the RESTORATION 2.0 will be locked by the spa. 12 To unlock the buckles, insert the key and turn it . You should always replace the blanket and cover once you have secured the spa cover, it can be...

English Manual
Page 13
... filter Filter Housing for information concerning which chemicals you should always be cleaned monthly. Rinse the filter in your local pool and spa supplier for damage. Remove the two screws from the filter housing. 4. Allow the cover to several factors, such as user load, temperature, water conditions, and so forth. Turn off the power. 2. We recommend that...
... filter Filter Housing for information concerning which chemicals you should always be cleaned monthly. Rinse the filter in your local pool and spa supplier for damage. Remove the two screws from the filter housing. 4. Allow the cover to several factors, such as user load, temperature, water conditions, and so forth. Turn off the power. 2. We recommend that...

English Manual
Page 14
... major repairs are made. Spa Shell Spa Unit Access Cover Power Cord Cover Screws To replace the access cover, insert the top of the water regularly. Severe problems can be done, because after five minutes. Damage caused by sun exposure is not properly maintained. The pH reading should test the pH of the cover under the warranty. ATTACHING AND REMOVING THE ACCESS COVER To remove...
... major repairs are made. Spa Shell Spa Unit Access Cover Power Cord Cover Screws To replace the access cover, insert the top of the water regularly. Severe problems can be done, because after five minutes. Damage caused by sun exposure is not properly maintained. The pH reading should test the pH of the cover under the warranty. ATTACHING AND REMOVING THE ACCESS COVER To remove...
English Manual
Page 15
Unplug the power cord. 3. Open the valve by turning the knob counterclockwise. Refill the spa and treat the water with chemicals (see ATTACHING Pump AND REMOVING THE ACCESS COVER on page 14). To drain the pump, remove the access cover from the spa unit (see pages 13 and 14). OPENING AND CLOSING THE CUT-OFF VALVES For minor repairs to drain. 6. Locate both cut...
Unplug the power cord. 3. Open the valve by turning the knob counterclockwise. Refill the spa and treat the water with chemicals (see ATTACHING Pump AND REMOVING THE ACCESS COVER on page 14). To drain the pump, remove the access cover from the spa unit (see pages 13 and 14). OPENING AND CLOSING THE CUT-OFF VALVES For minor repairs to drain. 6. Locate both cut...
English Manual
Page 16
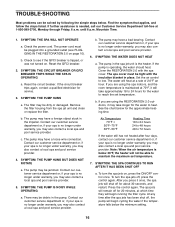
... longer under warranty, you may take approximately 18 to 24 hours for the water to maintain the maximum set temperature. The pump may have a loose wire connection. TROUBLE-SHOOTING Most problems can be solved by following the simple steps below the minimum setting. 16 Find the symptom that applies, and follow the steps listed. b. Check to 72 hours b. Reset the circuit...
... longer under warranty, you may take approximately 18 to 24 hours for the water to maintain the maximum set temperature. The pump may have a loose wire connection. TROUBLE-SHOOTING Most problems can be solved by following the simple steps below the minimum setting. 16 Find the symptom that applies, and follow the steps listed. b. Check to 72 hours b. Reset the circuit...
English Manual
Page 17
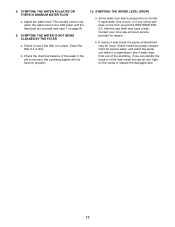
...tighten the clamp or replace the damaged seal. 17 8. Add water until the thera-jets are covered (see if water drips from any of the plumbing. If the pH is low. Contact your local spa and pool service... provider for excess water, and watch the pump unit while it is normal. b. A clamp or seal inside the pump compartment for repairs. This usually occurs only when the water level is incorrect, the sanitizing agents will not function properly. 10. If rapid water loss occurs, or if you can identify the location...see step 1 on the floor around the RESTORATION 2.0, then...
...tighten the clamp or replace the damaged seal. 17 8. Add water until the thera-jets are covered (see if water drips from any of the plumbing. If the pH is low. Contact your local spa and pool service... provider for excess water, and watch the pump unit while it is normal. b. A clamp or seal inside the pump compartment for repairs. This usually occurs only when the water level is incorrect, the sanitizing agents will not function properly. 10. If rapid water loss occurs, or if you can identify the location...see step 1 on the floor around the RESTORATION 2.0, then...
English Manual
Page 18
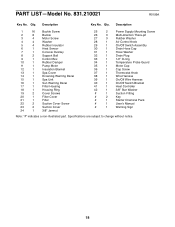
Qty. Specifications are subject to change without notice. 18 Qty. Description Key No. PART LISTÑModel No. 831.210021 R0199A Key No. Description 1 16 Buckle Screw 2 8 Buckle 3 4 Motor Screw 4 4 Washer 5 4 Rubber Insulator 6 1 Heat Sensor 7 1 Console Overlay 8 2 Support Ball 9 1 Control Box 10 1 Rubber Damper 11 1 Pump Motor 12 1 Insulation Blanket 13 1 Spa Cover 14 1 Drowning Warning Decal 15 1 Spa Unit 16 1 Sun Warning Decal 17 1 Filter Housing...
Qty. Specifications are subject to change without notice. 18 Qty. Description Key No. PART LISTÑModel No. 831.210021 R0199A Key No. Description 1 16 Buckle Screw 2 8 Buckle 3 4 Motor Screw 4 4 Washer 5 4 Rubber Insulator 6 1 Heat Sensor 7 1 Console Overlay 8 2 Support Ball 9 1 Control Box 10 1 Rubber Damper 11 1 Pump Motor 12 1 Insulation Blanket 13 1 Spa Cover 14 1 Drowning Warning Decal 15 1 Spa Unit 16 1 Sun Warning Decal 17 1 Filter Housing...
English Manual
Page 20
... MODEL NUMBER of the product (PROFORM¨ RESTORATION 2.0 Massage Spa). 3. MST ORDERING REPLACEMENT PARTS To order replacement parts, simply call our Customer Service Department toll-free at 1-800-999-3756, Monday through direct assistance from our factory. The trained technicians on page 18 of charge to give the following information when calling: 1. The KEY NUMBER and DESCRIPTION of the desired part(s) (see the front cover of this manual...
... MODEL NUMBER of the product (PROFORM¨ RESTORATION 2.0 Massage Spa). 3. MST ORDERING REPLACEMENT PARTS To order replacement parts, simply call our Customer Service Department toll-free at 1-800-999-3756, Monday through direct assistance from our factory. The trained technicians on page 18 of charge to give the following information when calling: 1. The KEY NUMBER and DESCRIPTION of the desired part(s) (see the front cover of this manual...


