
Instruction Manual
Page 2
... YOU BEGIN 5 PART IDENTIFICATION CHART 6 ASSEMBLY 7 HOW TO USE THE TREADMILL 17 HOW TO FOLD AND MOVE THE TREADMILL 29 MAINTENANCE AND TROUBLESHOOTING 30 EXERCISE GUIDELINES 33 PART LIST 34 EXPLODED DRAWING 36 ORDERING REPLACEMENT PARTS Back Cover RECYCLING INFORMATION Back Cover WARNING DECAL PLACEMENT This drawing shows the locations of Wi-Fi Alliance. Wi-Fi is missing or illegible, call the telephone number on the front cover of Wi-Fi...
... YOU BEGIN 5 PART IDENTIFICATION CHART 6 ASSEMBLY 7 HOW TO USE THE TREADMILL 17 HOW TO FOLD AND MOVE THE TREADMILL 29 MAINTENANCE AND TROUBLESHOOTING 30 EXERCISE GUIDELINES 33 PART LIST 34 EXPLODED DRAWING 36 ORDERING REPLACEMENT PARTS Back Cover RECYCLING INFORMATION Back Cover WARNING DECAL PLACEMENT This drawing shows the locations of Wi-Fi Alliance. Wi-Fi is missing or illegible, call the telephone number on the front cover of Wi-Fi...
Instruction Manual
Page 3
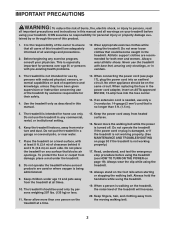
... replacing the fuse in the treadmill. Keep the treadmill indoors, away from heated surfaces. 16. Place the treadmill on a level surface, with pre-existing health problems. 12. Never move the walking belt while the power is not working properly. (See MAINTENANCE AND TROUBLESHOOTING on any commercial, rental, or institutional setting. 6. Do not operate the treadmill if the power cord or plug is damaged, or if the treadmill is not working...
... replacing the fuse in the treadmill. Keep the treadmill indoors, away from heated surfaces. 16. Place the treadmill on a level surface, with pre-existing health problems. 12. Never move the walking belt while the power is not working properly. (See MAINTENANCE AND TROUBLESHOOTING on any commercial, rental, or institutional setting. 6. Do not operate the treadmill if the power cord or plug is damaged, or if the treadmill is not working...
Instruction Manual
Page 4
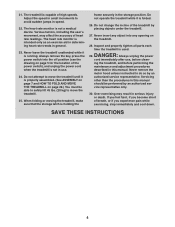
... the power cord when the treadmill is holding the frame securely in speed. 22. Do not change the incline of heart rate readings. Never remove the motor hood unless instructed to move the treadmill until it is used. The heart rate monitor is intended only as an exercise aid in determining heart rate trends in this manual. Servicing other than the procedures in general. 23. When folding or moving the treadmill, make sure that the storage latch is...
... the power cord when the treadmill is holding the frame securely in speed. 22. Do not change the incline of heart rate readings. Never remove the motor hood unless instructed to move the treadmill until it is used. The heart rate monitor is intended only as an exercise aid in determining heart rate trends in this manual. Servicing other than the procedures in general. 23. When folding or moving the treadmill, make sure that the storage latch is...

Instruction Manual
Page 5
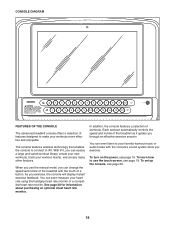
... for selecting the new PROFORM® PERFORMANCE 800I treadmill. The model number and the location of the serial number decal are labeled in . (86 cm) Weight: 194 lbs. (88 kg) Heart Rate Monitor Handrail Tablet Holder Console Accessory Tray Key/Clip Walking Belt Foot Rail Idler Roller Screws Motor Hood Power Switch Wheel Platform Cushions 5 The PERFORMANCE 800I treadmill provides an impressive selection of features designed to make your benefit, read this manual carefully before contacting us...
... for selecting the new PROFORM® PERFORMANCE 800I treadmill. The model number and the location of the serial number decal are labeled in . (86 cm) Weight: 194 lbs. (88 kg) Heart Rate Monitor Handrail Tablet Holder Console Accessory Tray Key/Clip Walking Belt Foot Rail Idler Roller Screws Motor Hood Power Switch Wheel Platform Cushions 5 The PERFORMANCE 800I treadmill provides an impressive selection of features designed to make your benefit, read this manual carefully before contacting us...

Instruction Manual
Page 11
... 85 10 97 13 10. start all four Screws, and then tighten them. 10 9 8 72 75 9 8 72 11 do not overtighten the #10 x 3/4" Screws (9). Then, remove and save the four indicated 5/16" x 3/4" Screws (13). Then, remove the Pulse Crossbar (75). Attach the Trays to avoid scratching the Console Base. 9 Remove and discard the two indicated screws (F). Set the Console Base (97) face down on...
... 85 10 97 13 10. start all four Screws, and then tighten them. 10 9 8 72 75 9 8 72 11 do not overtighten the #10 x 3/4" Screws (9). Then, remove and save the four indicated 5/16" x 3/4" Screws (13). Then, remove the Pulse Crossbar (75). Attach the Trays to avoid scratching the Console Base. 9 Remove and discard the two indicated screws (F). Set the Console Base (97) face down on...

Instruction Manual
Page 12
... sure that you removed in step 9 and four 5/16" Star Washers (7); Then, tighten the two ties (I 7 13 72 7 13 12 IF YOU DO NOT CONNECT THE CONNECTORS PROPERLY, THE CONSOLE MAY BECOME DAMAGED WHEN YOU TURN ON THE POWER. I ). Attach the console assembly (G) with the four 5/16" x 3/4" Screws (13) that no wires are pinched. Connect the Upright Wire (80) to the Console Ground Wires (76) on the...
... sure that you removed in step 9 and four 5/16" Star Washers (7); Then, tighten the two ties (I 7 13 72 7 13 12 IF YOU DO NOT CONNECT THE CONNECTORS PROPERLY, THE CONSOLE MAY BECOME DAMAGED WHEN YOU TURN ON THE POWER. I ). Attach the console assembly (G) with the four 5/16" x 3/4" Screws (13) that no wires are pinched. Connect the Upright Wire (80) to the Console Ground Wires (76) on the...
Instruction Manual
Page 15
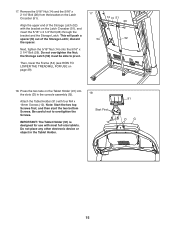
discard the spacer. the Storage Latch (52) must be able to overtighten the Screws. Attach the Tablet Holder (91) with most full-size tablets. Note: Start the two top Screws first, and then start the two bottom Screws. Next, tighten the 5/16" Nut (14) onto the 5/16" x 2 1/4" Bolt (26). Then, lower the Frame (54) (see HOW TO LOWER THE TREADMILL FOR USE on the Tablet...
discard the spacer. the Storage Latch (52) must be able to overtighten the Screws. Attach the Tablet Holder (91) with most full-size tablets. Note: Start the two top Screws first, and then start the two bottom Screws. Next, tighten the 5/16" Nut (14) onto the 5/16" x 2 1/4" Bolt (26). Then, lower the Frame (54) (see HOW TO LOWER THE TREADMILL FOR USE on the Tablet...
Instruction Manual
Page 18
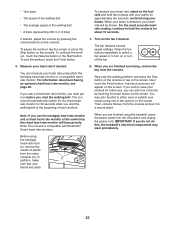
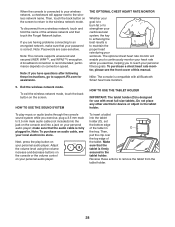
... an optional chest heart rate monitor. To set up the console, see page 19. When you use the touch screen, see page 19. You can change the speed and incline of the treadmill with the console's sound system while you exercise. Each workout automatically controls the speed and incline of workouts. To turn on the power, see page 20. 18 In addition, the console features a selection of the treadmill as it guides you...
... an optional chest heart rate monitor. To set up the console, see page 19. When you use the touch screen, see page 19. You can change the speed and incline of the treadmill with the console's sound system while you exercise. Each workout automatically controls the speed and incline of workouts. To turn on the power, see page 20. 18 In addition, the console features a selection of the treadmill as it guides you...
Instruction Manual
Page 19
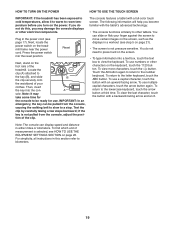
... it to warm to room temperature before you turn on the treadmill frame near the power cord. if the key is not pulled from the console, causing the walking belt to slow to press hard on the keyboard, touch the ?123 button. To view more characters, touch the ~[< button. Note: It may damage the console displays or other characters on the screen. •...
... it to warm to room temperature before you turn on the treadmill frame near the power cord. if the key is not pulled from the console, causing the walking belt to slow to press hard on the keyboard, touch the ?123 button. To view more characters, touch the ~[< button. Note: It may damage the console displays or other characters on the screen. •...
Instruction Manual
Page 20
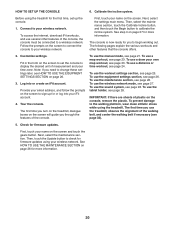
... the console. Provide your iFit account. 4. To use the manual mode, see page 28. The first time you to the walking platform, wear clean athletic shoes while using the treadmill for firmware updates using your own map workout, see page 32). 5. Then, touch the Update button to change these settings later, see page 24. Then, select the maintenance section, touch the Calibrate Incline button, and then touch the Begin button to display...
... the console. Provide your iFit account. 4. To use the manual mode, see page 28. The first time you to the walking platform, wear clean athletic shoes while using the treadmill for firmware updates using your own map workout, see page 32). 5. Then, touch the Update button to change these settings later, see page 24. Then, select the maintenance section, touch the Calibrate Incline button, and then touch the Begin button to display...
Instruction Manual
Page 21
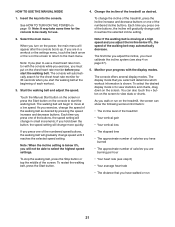
... exercise, you must calibrate the incline system (see step 6) • Your average heart rate • The distance that you press one of the buttons, the speed setting will automatically search for the chest heart rate monitor for 30 seconds when you start the walking belt at a high speed and you adjust the incline below 0%, you will not be ready for the console to be able to move at a low speed. HOW TO USE THE MANUAL MODE 4. Change the incline...
... exercise, you must calibrate the incline system (see step 6) • Your average heart rate • The distance that you press one of the buttons, the speed setting will automatically search for the chest heart rate monitor for 30 seconds when you start the walking belt at a high speed and you adjust the incline below 0%, you will not be ready for the console to be able to move at a low speed. HOW TO USE THE MANUAL MODE 4. Change the incline...
Instruction Manual
Page 22
... Resume button or the Start button. Turn on the screen. Step onto the walking platform and press the Stop button on the console or tap on the fan if desired. Next, touch the Finish button. A workout summary will have priority. Then, remove the key from the metal contacts (C). Before using the treadmill, press the power switch into the off the fan. 6. • Your pace • The speed of the walking belt •...
... Resume button or the Start button. Turn on the screen. Step onto the walking platform and press the Stop button on the console or tap on the fan if desired. Next, touch the Finish button. A workout summary will have priority. Then, remove the key from the metal contacts (C). Before using the treadmill, press the power switch into the off the fan. 6. • Your pace • The speed of the walking belt •...

Instruction Manual
Page 23
... use a map workout, the console must be able to the road. 23 A moment after you view the workout summary, touch the Finish button to return to move. During the workout, a map on page 27). After you touch the button, the walking belt will begin walking. See HOW TO TURN ON THE POWER on the screen. Navigate to select either save a workout for your workout. Monitor your heart rate...
... use a map workout, the console must be able to the road. 23 A moment after you view the workout summary, touch the Finish button to return to move. During the workout, a map on page 27). After you touch the button, the walking belt will begin walking. See HOW TO TURN ON THE POWER on the screen. Navigate to select either save a workout for your workout. Monitor your heart rate...

Instruction Manual
Page 24
... time to start the workout. Insert the key into the console. If you make a mistake, you can use a distance or time workout, the console must be connected to a wireless network (see HOW TO USE THE WIRELESS NETWORK MODE on page 27). Add workouts to your workout. 1. Touch the Start button on your iFit.com username and password. Browse the workout programs in to your heart rate if desired. Turn on page 22...
... time to start the workout. Insert the key into the console. If you make a mistake, you can use a distance or time workout, the console must be connected to a wireless network (see HOW TO USE THE WIRELESS NETWORK MODE on page 27). Add workouts to your workout. 1. Touch the Start button on your iFit.com username and password. Browse the workout programs in to your heart rate if desired. Turn on page 22...

Instruction Manual
Page 25
... view the workout summary, touch the Finish button to return to download a distance or time workout from the console. After you touch the button, the walking belt will appear on page 21. See step 6 on page 22. Exit the workout section. To exit the workout section, touch the back button on iFit.com. Monitor your heart rate if desired. Note: Before workouts will download, you select a distance or time workout, the...
... view the workout summary, touch the Finish button to return to download a distance or time workout from the console. After you touch the button, the walking belt will appear on page 21. See step 6 on page 22. Exit the workout section. To exit the workout section, touch the back button on iFit.com. Monitor your heart rate if desired. Note: Before workouts will download, you select a distance or time workout, the...
Instruction Manual
Page 28
... chest heart rate monitor will enable you to the wireless network mode. To exit the wireless network mode, touch the back button on the screen to return to continuously monitor your personal fitness goals. N0te: The console is fully plugged in D the tray. Note: To purchase an audio cable, see the front cover of the tablet. Note: Passwords are having problems connecting to reach your heart rate...
... chest heart rate monitor will enable you to the wireless network mode. To exit the wireless network mode, touch the back button on the screen to return to continuously monitor your personal fitness goals. N0te: The console is fully plugged in D the tray. Note: To purchase an audio cable, see the front cover of the tablet. Note: Passwords are having problems connecting to reach your heart rate...
Instruction Manual
Page 29
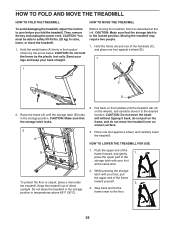
... a wheel (D). 1 A C A D 2. HOW TO FOLD AND MOVE THE TREADMILL HOW TO FOLD THE TREADMILL HOW TO MOVE THE TREADMILL To avoid damaging the treadmill, adjust the incline to the floor. 29 To protect the floor or carpet, place a mat under the treadmill. While pressing the storage latch with your foot, pull the upper end of direct sunlight. Then, remove the key and unplug the power cord. CAUTION: You must...
... a wheel (D). 1 A C A D 2. HOW TO FOLD AND MOVE THE TREADMILL HOW TO FOLD THE TREADMILL HOW TO MOVE THE TREADMILL To avoid damaging the treadmill, adjust the incline to the floor. 29 To protect the floor or carpet, place a mat under the treadmill. While pressing the storage latch with your foot, pull the upper end of direct sunlight. Then, remove the key and unplug the power cord. CAUTION: You must...
Instruction Manual
Page 30
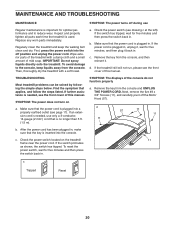
Inspect and properly tighten all parts each time the treadmill is important for five minutes and then press the switch back in. First, press the power switch into the console. d. TROUBLESHOOTING Most treadmill problems can be solved by following the simple steps below. SYMPTOM: The power does not turn on the treadmill 11 frame near the power cord. Next, remove the five #8 x 3/4" Screws (11), and carefully pivot off the Motor Hood (57...
Inspect and properly tighten all parts each time the treadmill is important for five minutes and then press the switch back in. First, press the power switch into the console. d. TROUBLESHOOTING Most treadmill problems can be solved by following the simple steps below. SYMPTOM: The power does not turn on the treadmill 11 frame near the power cord. Next, remove the five #8 x 3/4" Screws (11), and carefully pivot off the Motor Hood (57...
Instruction Manual
Page 31
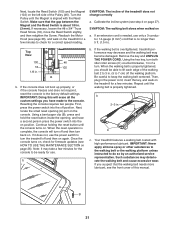
... (B), press and hold the reset button inside the opening (A) port on a. b b. Then, plug in . (5 to check for use. Your treadmill features a walking belt coated with the Reed Switch. Calibrate the incline system (see HOW TO USE THE MAINTENANCE SECTION on page 26). Once the console turns on, check for firmware updates (see step 4 on page 27). Remove the key and UNPLUG THE POWER CORD. Be careful to do so by an authorized service...
... (B), press and hold the reset button inside the opening (A) port on a. b b. Then, plug in . (5 to check for use. Your treadmill features a walking belt coated with the Reed Switch. Calibrate the incline system (see HOW TO USE THE MAINTENANCE SECTION on page 26). Once the console turns on, check for firmware updates (see step 4 on page 27). Remove the key and UNPLUG THE POWER CORD. Be careful to do so by an authorized service...

Instruction Manual
Page 33
The heart rate monitor is near the lowest number in general. The chart below shows recommended heart rates for energy. The three numbers listed above your age define your breath. If your goal is to strengthen your condition, complete three workouts each week, if desired. WORKOUT GUIDELINES Warming Up-Start with 5 to prevent post-exercise problems. EXERCISE FREQUENCY To maintain or improve your cardiovascular system, you...
The heart rate monitor is near the lowest number in general. The chart below shows recommended heart rates for energy. The three numbers listed above your age define your breath. If your goal is to strengthen your condition, complete three workouts each week, if desired. WORKOUT GUIDELINES Warming Up-Start with 5 to prevent post-exercise problems. EXERCISE FREQUENCY To maintain or improve your cardiovascular system, you...


