
English Manual
Page 3
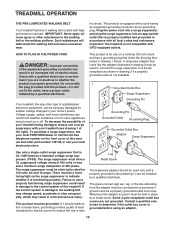
... the off . Failure to use an extension cord. 10. The pulse sensor is properly assembled. (See ASSEMBLY on page 6, and HOW TO FOLD AND MOVE THE TREADMILL on any surface that the storage latch is the responsibility of the owner to persons, read the following important precautions and information before operating the treadmill. 1. It is fully closed. 3 If the control system is running. Place the...
... the off . Failure to use an extension cord. 10. The pulse sensor is properly assembled. (See ASSEMBLY on page 6, and HOW TO FOLD AND MOVE THE TREADMILL on any surface that the storage latch is the responsibility of the owner to persons, read the following important precautions and information before operating the treadmill. 1. It is fully closed. 3 If the control system is running. Place the...
English Manual
Page 4
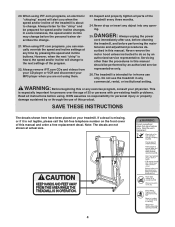
... health problems. Read all parts of this manual and order a free replacement decal. Servicing other than the procedures in any time by an authorized service representative only. 26. The treadmill is not legible, please call the toll-free telephone number on your physician. ICON assumes no responsibility for speed and/or incline changes. 20. When using iFIT.com programs, an electronic "chirping" sound will change . 21. Never remove the motor hood unless instructed...
... health problems. Read all parts of this manual and order a free replacement decal. Servicing other than the procedures in any time by an authorized service representative only. 26. The treadmill is not legible, please call the toll-free telephone number on your physician. ICON assumes no responsibility for speed and/or incline changes. 20. When using iFIT.com programs, an electronic "chirping" sound will change . 21. Never remove the motor hood unless instructed...
English Manual
Page 5
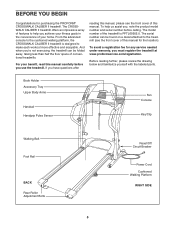
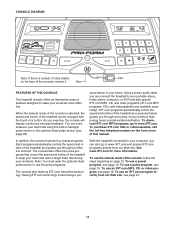
... cover of conventional treadmills. Before reading further, please review the drawing below and familiarize yourself with the labeled parts. If you achieve your fitness goals in the convenience of features to make each workout more effective and enjoyable. For your home. Book Holder Accessory Tray Upper Body Arms Handrail Handgrip Pulse Sensor Fan Console Key/Clip Walking Belt Foot Rail BACK Rear Roller Adjustment Bolts Reset/Off Circuit Breaker Power Cord Cushioned Walking...
... cover of conventional treadmills. Before reading further, please review the drawing below and familiarize yourself with the labeled parts. If you achieve your fitness goals in the convenience of features to make each workout more effective and enjoyable. For your home. Book Holder Accessory Tray Upper Body Arms Handrail Handgrip Pulse Sensor Fan Console Key/Clip Walking Belt Foot Rail BACK Rear Roller Adjustment Bolts Reset/Off Circuit Breaker Power Cord Cushioned Walking...

English Manual
Page 8
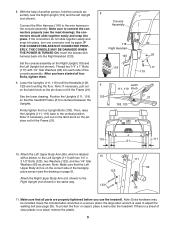
... not to drop the Bolts into the Right Upright and the lower end of the ground wires to four turns into the Right Handrail. Then, tighten two 5/16" x 1" Bolts (113) into the Right Upright. Remove the Console Back (104 [see drawing 7]) from the indicated plastic post on each Upright (119, 111). be included. Next, attach the Pulse Bar to damage the wires. 5. Note: Extra U-nuts...
... not to drop the Bolts into the Right Upright and the lower end of the ground wires to four turns into the Right Handrail. Then, tighten two 5/16" x 1" Bolts (113) into the Right Upright. Remove the Console Back (104 [see drawing 7]) from the indicated plastic post on each Upright (119, 111). be included. Next, attach the Pulse Bar to damage the wires. 5. Note: Extra U-nuts...
English Manual
Page 9
.... Set the console assembly on the latch knob so the pin does not hit the Frame (21). 8 Console Assembly 118 Right Handrail 120 118 93 117 119 9 Latch 111, 119 Knob 133 21 108, 120 119 21 111 10. After you use the treadmill. See the lower drawing. Attach the Right Upper Body Arm (not shown) to the Left Upright (111) with 1/4" Star Washers (93) into place, turn...
.... Set the console assembly on the latch knob so the pin does not hit the Frame (21). 8 Console Assembly 118 Right Handrail 120 118 93 117 119 9 Latch 111, 119 Knob 133 21 108, 120 119 21 111 10. After you use the treadmill. See the lower drawing. Attach the Right Upper Body Arm (not shown) to the Left Upright (111) with 1/4" Star Washers (93) into place, turn...
English Manual
Page 10
... local PROFORM dealer or call the toll-free telephone number on the front cover of your treadmill being turned on a nominal 120-volt circuit, and has a grounding plug that is functioning properly. This product must be held in your home's power. Whenever the adapter is grounded before using an adapter. 10 tric shock. Check with highperformance lubricant. Some 2-pole receptacle outlet box covers are...
... local PROFORM dealer or call the toll-free telephone number on the front cover of your treadmill being turned on a nominal 120-volt circuit, and has a grounding plug that is functioning properly. This product must be held in your home's power. Whenever the adapter is grounded before using an adapter. 10 tric shock. Check with highperformance lubricant. Some 2-pole receptacle outlet box covers are...
English Manual
Page 11
... workout. Using a stereo audio cable, you can be changed with the touch of a button. iFIT.com programs automatically control the speed and incline of the console, remove it guides you can even measure your heart rate using the built-in your workout; Having iFIT.com technology is a sheet of clear plastic Clip on page 12. To use the manual mode of your home. With the treadmill connected to your computer, you through every step of the console...
... workout. Using a stereo audio cable, you can be changed with the touch of a button. iFIT.com programs automatically control the speed and incline of the console, remove it guides you can even measure your heart rate using the built-in your workout; Having iFIT.com technology is a sheet of clear plastic Clip on page 12. To use the manual mode of your home. With the treadmill connected to your computer, you through every step of the console...
English Manual
Page 12
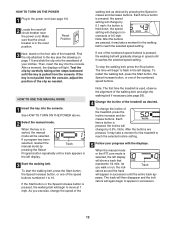
... page 26). 4 Change the incline of the speed buttons numbered 1 to the key (see page 10). 2 Locate the reset/off circuit breaker near the power cord. If a program has been selected, reselect the manual mode by Track pressing the Select Program button repeatedly until it reaches the selected speed setting. To stop the walking belt, press the Stop button. To restart the walking belt, press the Start button, the Speed increase button, or one of the treadmill as needed. pears. serted, the manual mode will then...
... page 26). 4 Change the incline of the speed buttons numbered 1 to the key (see page 10). 2 Locate the reset/off circuit breaker near the power cord. If a program has been selected, reselect the manual mode by Track pressing the Select Program button repeatedly until it reaches the selected speed setting. To stop the walking belt, press the Stop button. To restart the walking belt, press the Start button, the Speed increase button, or one of the treadmill as needed. pears. serted, the manual mode will then...
English Manual
Page 13
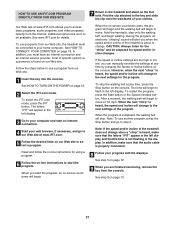
... storage position or the treadmill will not dis- When you have walked or run, and the speed of clear plastic from the console and put it in the "demo" mode. An "E" for English miles or an "M" for about 15 seconds. 7 Turn on the fan, press the fan button. To reset the displays, press the Stop button, remove the key, and then reinsert the key. 6 Measure your heart rate accurately. Before using the treadmill, switch...
... storage position or the treadmill will not dis- When you have walked or run, and the speed of clear plastic from the console and put it in the "demo" mode. An "E" for English miles or an "M" for about 15 seconds. 7 Turn on the fan, press the fan button. To reset the displays, press the Stop button, remove the key, and then reinsert the key. 6 Measure your heart rate accurately. Before using the treadmill, switch...
English Manual
Page 15
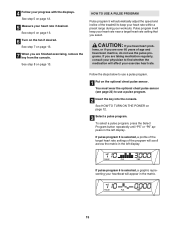
... finished exercising, remove the key from the console. You must wear the optional chest pulse sensor (see page 22) to use a pulse program. 2 Insert the key into the console. See step 7 on page 13. Pulse program 6 will automatically adjust the speed and incline of age and have heart prob- Follow the steps below to use a pulse program. 1 Put on page 12. 5 Measure your workouts. See step 5 on the optional chest pulse sensor. HOW TO USE A PULSE PROGRAM Pulse program 5 will keep your heart rate within...
... finished exercising, remove the key from the console. You must wear the optional chest pulse sensor (see page 22) to use a pulse program. 2 Insert the key into the console. See step 7 on page 13. Pulse program 6 will automatically adjust the speed and incline of age and have heart prob- Follow the steps below to use a pulse program. 1 Put on page 12. 5 Measure your workouts. See step 5 on the optional chest pulse sensor. HOW TO USE A PULSE PROGRAM Pulse program 5 will keep your heart rate within...
English Manual
Page 16
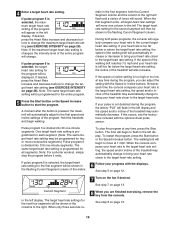
.... One target heart rate setting is pressed, the treadmill will automatically increase or decrease to bring your heart rate closer to the right. The time will begin walking. If your progress with the optional chest pulse sensor. The same target heart rate setting is programmed for two or more consecutive segments.) Pulse program 6 is not detected during the program, you are finished exercising, remove the key from the console. The walking belt will move at...
.... One target heart rate setting is pressed, the treadmill will automatically increase or decrease to bring your heart rate closer to the right. The time will begin walking. If your progress with the optional chest pulse sensor. The same target heart rate setting is programmed for two or more consecutive segments.) Pulse program 6 is not detected during the program, you are finished exercising, remove the key from the console. The walking belt will move at...
English Manual
Page 19
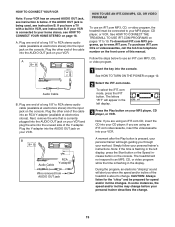
... a long 1/8" to www.iFIT.com. Simply follow your personal trainer describes the change. 19 Note: If you have a TV with a built-in the left display, press the Start button or the Speed increase button on the console. IN VIDEO AUDIO IN CH 34 OUT RF OUT RCA Y-adapter Audio Cable Wire removed from AUDIO OUT jack A moment after the Play button is being used, see instruction B. During the program, an electronic "chirping...
... a long 1/8" to www.iFIT.com. Simply follow your personal trainer describes the change. 19 Note: If you have a TV with a built-in the left display, press the Start button or the Speed increase button on the console. IN VIDEO AUDIO IN CH 34 OUT RF OUT RCA Y-adapter Audio Cable Wire removed from AUDIO OUT jack A moment after the Play button is being used, see instruction B. During the program, an electronic "chirping...
English Manual
Page 20
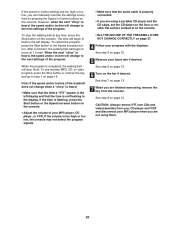
...: Always remove iFIT.com CDs and videocassettes from the console. When the program is not flashing in the display. See step 7 on page 13. 7 When you can manually override the settings at any time, press the Stop button on the console. To restart the program, press the Start button or the Speed increase button. Note: To use another flat surface instead of the treadmill does not change to the next settings of...
...: Always remove iFIT.com CDs and videocassettes from the console. When the program is not flashing in the display. See step 7 on page 13. 7 When you can manually override the settings at any time, press the Stop button on the console. To restart the program, press the Start button or the Speed increase button. Note: To use another flat surface instead of the treadmill does not change to the next settings of...
English Manual
Page 21
To select the iFIT.com mode, press the iFIT button. The letters "iFIT" will begin and the walking belt will stop the walking belt at any time by pressing the Speed or Incline buttons on the console. If the speed or incline settings are finished exercising, remove the key from our Web site, the treadmill must have an internet connection and an internet service provider. The time will appear in the left display. When the next "chirp...
To select the iFIT.com mode, press the iFIT button. The letters "iFIT" will begin and the walking belt will stop the walking belt at any time by pressing the Speed or Incline buttons on the console. If the speed or incline settings are finished exercising, remove the key from our Web site, the treadmill must have an internet connection and an internet service provider. The time will appear in the left display. When the next "chirp...
English Manual
Page 22
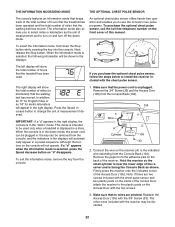
... the total number of miles that the walking belt has moved. IMPORTANT: If a "d" appears in a preset sequence, although the buttons on and turn off the demo mode. The other wires included with the two screws. 3. When the information mode is displayed in , the key can be plugged in a store. If you purchase the optional chest pulse sensor, follow the steps below to be used . This mode is in the demo mode, the power cord can be...
... the total number of miles that the walking belt has moved. IMPORTANT: If a "d" appears in a preset sequence, although the buttons on and turn off the demo mode. The other wires included with the two screws. 3. When the information mode is displayed in , the key can be plugged in a store. If you purchase the optional chest pulse sensor, follow the steps below to be used . This mode is in the demo mode, the power cord can be...

English Manual
Page 26
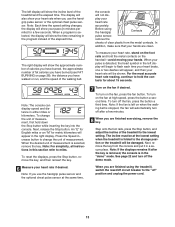
... the walking belt has shifted to 4 inches off -center or slips when walked on the left rear roller bolt clockwise 1/2 of this manual. Plug in the power cord, insert the key, and run the treadmill for a few minutes. Be careful to keep the walking belt centered. Reattach the Hood. Use only a single-outlet surge suppressor that the gap between the Magnet and the Reed Switch is properly tightened. If the walking belt...
... the walking belt has shifted to 4 inches off -center or slips when walked on the left rear roller bolt clockwise 1/2 of this manual. Plug in the power cord, insert the key, and run the treadmill for a few minutes. Be careful to keep the walking belt centered. Reattach the Hood. Use only a single-outlet surge suppressor that the gap between the Magnet and the Reed Switch is properly tightened. If the walking belt...
English Manual
Page 28
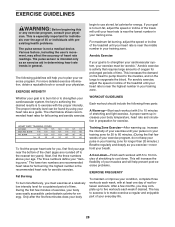
... your training zone. begin to make exercise a regular and enjoyable part of heart rate readings. The three numbers define your body uses easily accessible carbohydrate calories for individuals over the age of exercise, your "training zone." During the first few weeks of rest between workouts. This is near the middle number in your exercise program. For aerobic exercise, adjust the speed or incline of the treadmill until your heart rate is...
... your training zone. begin to make exercise a regular and enjoyable part of heart rate readings. The three numbers define your body uses easily accessible carbohydrate calories for individuals over the age of exercise, your "training zone." During the first few weeks of rest between workouts. This is near the middle number in your exercise program. For aerobic exercise, adjust the speed or incline of the treadmill until your heart rate is...

English Manual
Page 30
... 1/2" Screw Ground Wire Controller Transformer Electronics Bracket Bracket Grommet Lift Frame Bolt Motor Pivot Bolt Incline Wire Filter Wire Jack iFIT.com Cable Hood Belly Pan Audio Wire Belly Pan Clip Reset/Off Circuit Breaker Cable Nut Power Cord Power Cord Grommet Static Decal Plastic Tie Tie Clip Pulse Bar Plate, Left Pulse Bar Screw Pulse Bar Pulse Bar Plate, Right Cage Nut Console Frame Fan Fan Cover Resistance Knob Key/Clip Spring Washer Thrust Washer Thrust Bearing Resistance Plate Resistance Cone Cone Screw Cone Sleeve Resistance Bracket...
... 1/2" Screw Ground Wire Controller Transformer Electronics Bracket Bracket Grommet Lift Frame Bolt Motor Pivot Bolt Incline Wire Filter Wire Jack iFIT.com Cable Hood Belly Pan Audio Wire Belly Pan Clip Reset/Off Circuit Breaker Cable Nut Power Cord Power Cord Grommet Static Decal Plastic Tie Tie Clip Pulse Bar Plate, Left Pulse Bar Screw Pulse Bar Pulse Bar Plate, Right Cage Nut Console Frame Fan Fan Cover Resistance Knob Key/Clip Spring Washer Thrust Washer Thrust Bearing Resistance Plate Resistance Cone Cone Screw Cone Sleeve Resistance Bracket...
English Manual
Page 31
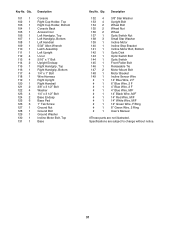
...# 1 # 1 # 1 # 1 3/8" Star Washer Upright Bolt Wheel Bolt Wheel Nut Wheel Optic Switch Nut Small Star Washer Incline Motor Incline Stop Bracket Incline Motor Bolt, Bottom Optic Disk Optic Switch Bolt Optic Switch Front Roller Bolt Releasable Tie Motor Mount Bolt Motor Bracket Incline Sensor Wire 14" Blue Wire, 2 F 6" Blue Wire, 2 F 4" Blue Wire, 2 F 4" Blue Wire, M/F 14" Black Wire, M/F 14" Red Wire, M/F 14" White Wire, M/F 12" Green Wire, F/Ring 8" Green Wire, 2 Ring User's Manual #These parts are subject to change without notice. 31 Specifications are not illustrated. Key No. Qty...
...# 1 # 1 # 1 # 1 3/8" Star Washer Upright Bolt Wheel Bolt Wheel Nut Wheel Optic Switch Nut Small Star Washer Incline Motor Incline Stop Bracket Incline Motor Bolt, Bottom Optic Disk Optic Switch Bolt Optic Switch Front Roller Bolt Releasable Tie Motor Mount Bolt Motor Bracket Incline Sensor Wire 14" Blue Wire, 2 F 6" Blue Wire, 2 F 4" Blue Wire, 2 F 4" Blue Wire, M/F 14" Black Wire, M/F 14" Red Wire, M/F 14" White Wire, M/F 12" Green Wire, F/Ring 8" Green Wire, 2 Ring User's Manual #These parts are subject to change without notice. 31 Specifications are not illustrated. Key No. Qty...

English Manual
Page 34
... pages 30 and 31) LIMITED WARRANTY ICON Health & Fitness, Inc. (ICON), warrants this manual. You may not apply to you , please be prepared to give the following information: • the MODEL NUMBER of the product (PFTL69505.0) • the NAME of the product (PROFORM CROSSWALK CALIBER II treadmill) • the SERIAL NUMBER of the product (see the front cover of this manual) • the KEY NUMBER and DESCRIPTION of the...
... pages 30 and 31) LIMITED WARRANTY ICON Health & Fitness, Inc. (ICON), warrants this manual. You may not apply to you , please be prepared to give the following information: • the MODEL NUMBER of the product (PFTL69505.0) • the NAME of the product (PROFORM CROSSWALK CALIBER II treadmill) • the SERIAL NUMBER of the product (see the front cover of this manual) • the KEY NUMBER and DESCRIPTION of the...


