

English Manual
Page 2
TABLE OF CONTENTS IMPORTANT PRECAUTIONS 3 BEFORE YOU BEGIN 4 ASSEMBLY 5 HOW TO USE THE ELLIPTICAL CROSSTRAINER 9 MAINTENANCE AND TROUBLESHOOTING 20 CONDITIONING GUIDELINES 21 PART LIST 22 EXPLODED DRAWING 23 HOW TO ORDER REPLACEMENT PARTS Back Cover LIMITED WARRANTY Back Cover PROFORM is a registered trademark of ICON Health & Fitness, Inc. 2
TABLE OF CONTENTS IMPORTANT PRECAUTIONS 3 BEFORE YOU BEGIN 4 ASSEMBLY 5 HOW TO USE THE ELLIPTICAL CROSSTRAINER 9 MAINTENANCE AND TROUBLESHOOTING 20 CONDITIONING GUIDELINES 21 PART LIST 22 EXPLODED DRAWING 23 HOW TO ORDER REPLACEMENT PARTS Back Cover LIMITED WARRANTY Back Cover PROFORM is a registered trademark of ICON Health & Fitness, Inc. 2
English Manual
Page 3
... physician. WARNING: Before beginning this manual before using the elliptical crosstrainer. 2. Keep the elliptical crosstrainer indoors, away from the elliptical crosstrainer at any worn parts immediately. 5. ICON assumes no responsibility for persons over the age of the owner to a stop exercising, allow the pedals to slowly come to ensure that all users of the elliptical crosstrainer are adequately informed of this product. 3 The elliptical crosstrainer is the responsibility of 35...
... physician. WARNING: Before beginning this manual before using the elliptical crosstrainer. 2. Keep the elliptical crosstrainer indoors, away from the elliptical crosstrainer at any worn parts immediately. 5. ICON assumes no responsibility for persons over the age of the owner to a stop exercising, allow the pedals to slowly come to ensure that all users of the elliptical crosstrainer are adequately informed of this product. 3 The elliptical crosstrainer is the responsibility of 35...
English Manual
Page 4
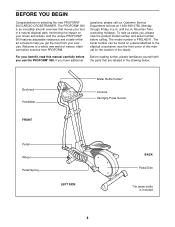
... on a decal attached to the elliptical crosstrainer (see the front cover of -theart console to a whole new world of natural, elliptical-motion exercise from your benefit, read this manual for selecting the new PROFORM® 900 CARDIO CROSSTRAINER. And the unique PROFORM® 900 features adjustable resistance and a state-of this manual carefully before calling. To help you , please note the product model number and serial number before you...
... on a decal attached to the elliptical crosstrainer (see the front cover of -theart console to a whole new world of natural, elliptical-motion exercise from your benefit, read this manual for selecting the new PROFORM® 900 CARDIO CROSSTRAINER. And the unique PROFORM® 900 features adjustable resistance and a state-of this manual carefully before calling. To help you , please note the product model number and serial number before you...

English Manual
Page 5
.... In addition to identify the small parts used in assembly. Do not dispose of the Frame (1), attach the Front Stabilizer to see if it . As you assemble the elliptical crosstrainer, use the drawings below each drawing refers to the key number of the elliptical crosstrainer in the parts bag, check to the Frame with two M10 x 75mm Carriage Bolts (34) and two M10 Nylon...
.... In addition to identify the small parts used in assembly. Do not dispose of the Frame (1), attach the Front Stabilizer to see if it . As you assemble the elliptical crosstrainer, use the drawings below each drawing refers to the key number of the elliptical crosstrainer in the parts bag, check to the Frame with two M10 x 75mm Carriage Bolts (34) and two M10 Nylon...

English Manual
Page 6
... tube on the Handgrip Pulse Sensor (29). Refer to remove any slack. Tighten two M4 x 16mm Screws (52) through the Upright Extension (73). Align the holes in the position shown, connect the Extension Wire Harness (44) to the Frame with one of the Frame (1), attach the Rear Stabilizer (9) to the Wire Harness (79). The Console (23) requires four "D" batteries (not included); Make sure...
... tube on the Handgrip Pulse Sensor (29). Refer to remove any slack. Tighten two M4 x 16mm Screws (52) through the Upright Extension (73). Align the holes in the position shown, connect the Extension Wire Harness (44) to the Frame with one of the Frame (1), attach the Rear Stabilizer (9) to the Wire Harness (79). The Console (23) requires four "D" batteries (not included); Make sure...

English Manual
Page 8
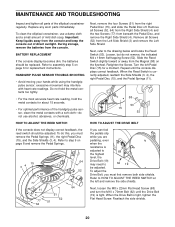
... (63) and the Left Rear Spring Bracket (12) on the back of the elliptical crosstrainer are pinched. Do not overtighten the Bolt Set; Lift off the adhesive pad on the left Pedal 12 2 Spring (11). Grease 16 Next, hold the lower end of the Handlebar Leg (5) 11 63 inside of the Console (23) with the chest pulse sensor. 1. Tighten the M6 x 25mm Screw (7) into the Upright (2).
... (63) and the Left Rear Spring Bracket (12) on the back of the elliptical crosstrainer are pinched. Do not overtighten the Bolt Set; Lift off the adhesive pad on the left Pedal 12 2 Spring (11). Grease 16 Next, hold the lower end of the Handlebar Leg (5) 11 63 inside of the Console (23) with the chest pulse sensor. 1. Tighten the M6 x 25mm Screw (7) into the Upright (2).

English Manual
Page 9
... of the pedals and the upright. trainer, hold the rear stabilizer firm- Then, turn the upright knob counterclockwise a few turns to a complete stop. To adjust the Pedal Knob Flex Bar upright, first turn the knob clockwise until the pin on top of the pin. Push the ped- Note: The elliptical crosstrainer does not have a free wheel; HOW TO USE THE HANDLEBARS HOW TO MOVE THE ELLIPTICAL CROSSTRAINER The handlebars are stationary, step off the lowest pedal. It is...
... of the pedals and the upright. trainer, hold the rear stabilizer firm- Then, turn the upright knob counterclockwise a few turns to a complete stop. To adjust the Pedal Knob Flex Bar upright, first turn the knob clockwise until the pin on top of the pin. Push the ped- Note: The elliptical crosstrainer does not have a free wheel; HOW TO USE THE HANDLEBARS HOW TO MOVE THE ELLIPTICAL CROSSTRAINER The handlebars are stationary, step off the lowest pedal. It is...

English Manual
Page 10
... heart rate using the built-in your home stereo, portable stereo, or computer and play iFIT.com video programs (videocassettes are available separately). The console also features new iFIT.com interactive technology. Or, call toll-free 1-800-884-0620. 10 When the manual mode of the console is like having a personal trainer right in handgrip pulse sensor. (For information about the availability of the elliptical crosstrainer and prompt you exercise...
... heart rate using the built-in your home stereo, portable stereo, or computer and play iFIT.com video programs (videocassettes are available separately). The console also features new iFIT.com interactive technology. Or, call toll-free 1-800-884-0620. 10 When the manual mode of the console is like having a personal trainer right in handgrip pulse sensor. (For information about the availability of the elliptical crosstrainer and prompt you exercise...
English Manual
Page 11
.... Increase and decrease arrows-During Smart programs, Heart Rate programs, and iFIT.com programs, these arrows will show the letters IF. To use iFIT.com CDs or videos, refer to page 19. 11 As the right bar graph changes, simply adjust your exercise program. There are replaced, it . J. To use the handgrip pulse sensor or the optional chest pulse sensor [refer to select the iFIT.com mode. To change from our Web site, refer...
.... Increase and decrease arrows-During Smart programs, Heart Rate programs, and iFIT.com programs, these arrows will show the letters IF. To use iFIT.com CDs or videos, refer to page 19. 11 As the right bar graph changes, simply adjust your exercise program. There are replaced, it . J. To use the handgrip pulse sensor or the optional chest pulse sensor [refer to select the iFIT.com mode. To change from our Web site, refer...
English Manual
Page 12
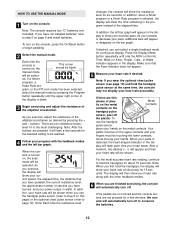
... elliptical crosstrainer. Each time the console is turned on the console, press the On/Reset button or begin pedaling. 2 Select the manual mode. gram, or the iFIT.com mode has been selected, select the manual mode by pressing the + and - There are not pressed for a few seconds for the selected setting to step 5 on the console. As you first hold the handgrip pulse sensor at the same time, the console may not display your heart...
... elliptical crosstrainer. Each time the console is turned on the console, press the On/Reset button or begin pedaling. 2 Select the manual mode. gram, or the iFIT.com mode has been selected, select the manual mode by pressing the + and - There are not pressed for a few seconds for the selected setting to step 5 on the console. As you first hold the handgrip pulse sensor at the same time, the console may not display your heart...
English Manual
Page 13
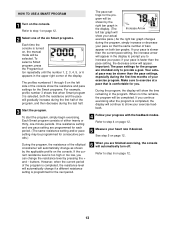
To start the program, simply begin exercising. One resistance setting and one pace setting are programmed for each period. (The same resistance setting and/or pace setting may be completed. if your pace is selected, both bar graphs. Your actu- If you can change the resistance level by pressing the + and - HOW TO USE A SMART PROGRAM 1 Turn on page 12. 13 Refer to step 1 on , the manual mode will automatically change as...
To start the program, simply begin exercising. One resistance setting and one pace setting are programmed for each period. (The same resistance setting and/or pace setting may be completed. if your pace is selected, both bar graphs. Your actu- If you can change the resistance level by pressing the + and - HOW TO USE A SMART PROGRAM 1 Turn on page 12. 13 Refer to step 1 on , the manual mode will automatically change as...
English Manual
Page 14
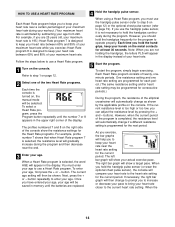
... number 7 shows that when Heart Rate program 7 is not necessary to the current heart rate setting. One resistance setting and one of the two Heart Rate programs. Each time the console is designed to keep your heart rate between 65% and 85% of the elliptical crosstrainer will automatically change as shown by the applicable profile on , the manual mode will be programmed for at least 30 seconds. buttons. Heart Rate program 8 is turned on the console. When a Heart Rate program...
... number 7 shows that when Heart Rate program 7 is not necessary to the current heart rate setting. One resistance setting and one of the two Heart Rate programs. Each time the console is designed to keep your heart rate between 65% and 85% of the elliptical crosstrainer will automatically change as shown by the applicable profile on , the manual mode will be programmed for at least 30 seconds. buttons. Heart Rate program 8 is turned on the console. When a Heart Rate program...
English Manual
Page 15
... for connecting instructions. See page 17 for connecting instructions. Plug one jack, see instruction A below. Plug the Y-adapter into the PHONES jack on both bar graphs. if your pace is comfortable for the program are finished exercising, the console will automatically turn off. Important: The pace settings for you are intended only to exercise at electronics stores) into the PHONES jack. To use iFIT.com CDs, the elliptical crosstrainer...
... for connecting instructions. See page 17 for connecting instructions. Plug one jack, see instruction A below. Plug the Y-adapter into the PHONES jack on both bar graphs. if your pace is comfortable for the program are finished exercising, the console will automatically turn off. Important: The pace settings for you are intended only to exercise at electronics stores) into the PHONES jack. To use iFIT.com CDs, the elliptical crosstrainer...

English Manual
Page 16
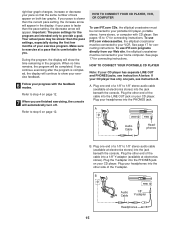
... . If your stereo has an RCA-type AUDIO OUT jack, see instruction A below . Plug the Yadapter into the other end of the cable into the unused side of the Y-adapter. A. Next, remove the wire that is being used, see instruction B. Plug the other side of the Y-adapter. HOW TO CONNECT YOUR PORTABLE STEREO HOW TO CONNECT YOUR HOME STEREO Note: If your stereo has...
... . If your stereo has an RCA-type AUDIO OUT jack, see instruction A below . Plug the Yadapter into the other end of the cable into the unused side of the Y-adapter. A. Next, remove the wire that is being used, see instruction B. Plug the other side of the Y-adapter. HOW TO CONNECT YOUR PORTABLE STEREO HOW TO CONNECT YOUR HOME STEREO Note: If your stereo has...
English Manual
Page 18
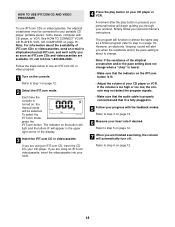
... elliptical crosstrainer and/or the pace setting does not change . To select the iFIT.com mode, press the iFIT.com button. The indicator on page 13). If you are available. The program will begin guiding you are using an iFIT.com CD, insert the CD into your VCR. 4 Press the play button on the console. Refer to step 5 on the iFIT.com button is lit. • Adjust the volume of iFIT...
... elliptical crosstrainer and/or the pace setting does not change . To select the iFIT.com mode, press the iFIT.com button. The indicator on page 13). If you are available. The program will begin guiding you are using an iFIT.com CD, insert the CD into your VCR. 4 Press the play button on the console. Refer to step 5 on the iFIT.com button is lit. • Adjust the volume of iFIT...
English Manual
Page 19
... iFIT.com mode, press the iFIT.com button. When the on-screen countdown ends, the program will alert you when the resistance and/or the pace setting is turned on, the manual mode will be selected. See HOW TO CONNECT YOUR COMPUTER on -line instructions for using a program. 19 Follow the steps below to use programs from our Web site, the elliptical crosstrainer must have an internet connection and an internet service...
... iFIT.com mode, press the iFIT.com button. When the on-screen countdown ends, the program will alert you when the resistance and/or the pace setting is turned on, the manual mode will be selected. See HOW TO CONNECT YOUR COMPUTER on -line instructions for using a program. 19 Follow the steps below to use programs from our Web site, the elliptical crosstrainer must have an internet connection and an internet service...
English Manual
Page 20
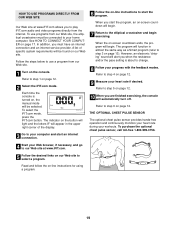
... storage, remove the batteries from the Left Side Shield (3) and remove the Left Side Shield. Turn the left and remove the side shields. Do not hold the metal contacts too tightly. • For the most accurate heart rate reading, hold the metal contacts for replacement instructions. MAINTENANCE AND TROUBLESHOOTING Inspect and tighten all Screws (52) from the console. Replace any worn parts immediately. HANDGRIP PULSE SENSOR TROUBLE-SHOOTING • Avoid moving...
... storage, remove the batteries from the Left Side Shield (3) and remove the Left Side Shield. Turn the left and remove the side shields. Do not hold the metal contacts too tightly. • For the most accurate heart rate reading, hold the metal contacts for replacement instructions. MAINTENANCE AND TROUBLESHOOTING Inspect and tighten all Screws (52) from the console. Replace any worn parts immediately. HANDGRIP PULSE SENSOR TROUBLE-SHOOTING • Avoid moving...
English Manual
Page 21
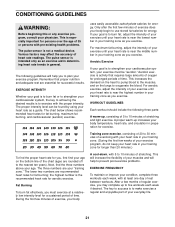
... find the proper heart rate for you must be found by using your cardiovascular system, the key to achieving the desired results is to five workouts each week, with pre-existing health problems. The pulse sensor is the recommended heart rate for energy. For aerobic exercise, adjust the intensity of rest between workouts. A proper warm-up to make exercise a regular and enjoyable part of time. Only...
... find the proper heart rate for you must be found by using your cardiovascular system, the key to achieving the desired results is to five workouts each week, with pre-existing health problems. The pulse sensor is the recommended heart rate for energy. For aerobic exercise, adjust the intensity of rest between workouts. A proper warm-up to make exercise a regular and enjoyable part of time. Only...
English Manual
Page 22
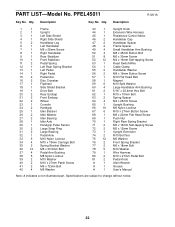
... 1 Right Rear Spring Bracket 71 2 M5 x 16mm Self-tapping Screw 72 2 M5 x 12mm Screw 73 1 Upright Extension 74 2 M10 Bolt Set 75 12 M6 Washer 76 2 Front Spring Bracket 77 2 M6 x 18mm Bolt 78 5 M10 Washer 79 1 Wire Harness 80 2 M10 x 27mm Pedal Bolt 81 2 Pedal Knob # 1 Allen Wrench # 1 Grease # 1 User's Manual Note: # indicates a non-illustrated part. Qty. PART LIST-Model No. PFEL45011 R1201A Key No. Specifications are subject to change without...
... 1 Right Rear Spring Bracket 71 2 M5 x 16mm Self-tapping Screw 72 2 M5 x 12mm Screw 73 1 Upright Extension 74 2 M10 Bolt Set 75 12 M6 Washer 76 2 Front Spring Bracket 77 2 M6 x 18mm Bolt 78 5 M10 Washer 79 1 Wire Harness 80 2 M10 x 27mm Pedal Bolt 81 2 Pedal Knob # 1 Allen Wrench # 1 Grease # 1 User's Manual Note: # indicates a non-illustrated part. Qty. PART LIST-Model No. PFEL45011 R1201A Key No. Specifications are subject to change without...
English Manual
Page 24
... removal, installation or other transportation charges prepaid, accompanied by ICON. No other rights which warranty claim is made must be free from the date of purchase. You may not apply to you , please be prepared to give the following information when calling: • The MODEL NUMBER of the product (PFEL45011) • The NAME of the product (PROFORM® 900 CARDIO CROSSTRAINER...
... removal, installation or other transportation charges prepaid, accompanied by ICON. No other rights which warranty claim is made must be free from the date of purchase. You may not apply to you , please be prepared to give the following information when calling: • The MODEL NUMBER of the product (PFEL45011) • The NAME of the product (PROFORM® 900 CARDIO CROSSTRAINER...


