

English Manual
Page 2
® TABLE OF CONTENTS IMPORTANT PRECAUTIONS 3 BEFORE YOU BEGIN 5 ASSEMBLY 6 OPERATION AND ADJUSTMENT 9 HOW TO FOLD AND MOVE THE TREADMILL 20 TROUBLE-SHOOTING 22 CONDITIONING GUIDELINES 24 PART LIST 27 ORDERING REPLACEMENT PARTS Back Cover FULL 90-DAY WARRANTY Back Cover Note: An EXPLODED DRAWING is attached in the center of this manual. 2
® TABLE OF CONTENTS IMPORTANT PRECAUTIONS 3 BEFORE YOU BEGIN 5 ASSEMBLY 6 OPERATION AND ADJUSTMENT 9 HOW TO FOLD AND MOVE THE TREADMILL 20 TROUBLE-SHOOTING 22 CONDITIONING GUIDELINES 24 PART LIST 27 ORDERING REPLACEMENT PARTS Back Cover FULL 90-DAY WARRANTY Back Cover Note: An EXPLODED DRAWING is attached in the center of this manual. 2

English Manual
Page 3
... the owner to the off . When connecting the power cord (see your local SEARS or call 1-800-366-7278 and order part number 146148. 3. Various factors, including the user's movement, may affect the accuracy of burns, fire, electric shock, or injury to raise, lower, or move the on/off switch.) 18. Never leave the treadmill unattended while it is UL 1449 listed as...
... the owner to the off . When connecting the power cord (see your local SEARS or call 1-800-366-7278 and order part number 146148. 3. Various factors, including the user's movement, may affect the accuracy of burns, fire, electric shock, or injury to raise, lower, or move the on/off switch.) 18. Never leave the treadmill unattended while it is UL 1449 listed as...
English Manual
Page 4
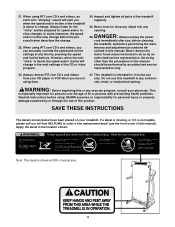
... change . 22. Note: This decal is not legible, please call our toll-free HELPLINE to do so by pressing the speed and incline buttons. WARNING: Before beginning this treadmill in -home use of actual size. 4 Servicing other than the procedures in the location shown. If a decal is missing, or if it is shown at any exercise program, consult your physician. Always remove iFIT.com CD's and videos...
... change . 22. Note: This decal is not legible, please call our toll-free HELPLINE to do so by pressing the speed and incline buttons. WARNING: Before beginning this treadmill in -home use of actual size. 4 Servicing other than the procedures in the location shown. If a decal is missing, or if it is shown at any exercise program, consult your physician. Always remove iFIT.com CD's and videos...
English Manual
Page 5
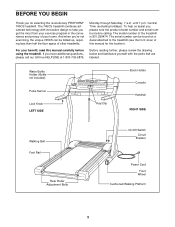
..., please review the drawing below and familiarize yourself with innovative design to the treadmill (see the front cover of your benefit, read this manual for selecting the revolutionary PROFORM® 745CS treadmill. Water Bottle Holder (Bottle not included) Pulse Sensor Lock Knob LEFT SIDE Key/Clip Book Holder Console Handrail RIGHT SIDE Walking Belt Foot Rail Rear Roller Adjustment Bolts On/Off Switch Circuit Breaker Power Cord Front Wheel Cushioned Walking Platform...
..., please review the drawing below and familiarize yourself with innovative design to the treadmill (see the front cover of your benefit, read this manual for selecting the revolutionary PROFORM® 745CS treadmill. Water Bottle Holder (Bottle not included) Pulse Sensor Lock Knob LEFT SIDE Key/Clip Book Holder Console Handrail RIGHT SIDE Walking Belt Foot Rail Rear Roller Adjustment Bolts On/Off Switch Circuit Breaker Power Cord Front Wheel Cushioned Walking Platform...

English Manual
Page 6
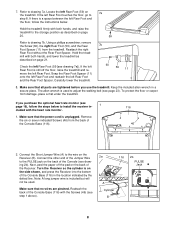
... tip the Uprights (82) down as 2 shown. If a Thick Base Pad (97) needs to be replaced, use the replacement Base Pad. Make sure that the Extension Leg is turned so the Thick Base Pad (97) is on the bottom. 103 Next, tip the treadmill to place a foot on the wheel as shown. Lower the side of the treadmill walking belt is completed...
... tip the Uprights (82) down as 2 shown. If a Thick Base Pad (97) needs to be replaced, use the replacement Base Pad. Make sure that the Extension Leg is turned so the Thick Base Pad (97) is on the bottom. 103 Next, tip the treadmill to place a foot on the wheel as shown. Lower the side of the treadmill walking belt is completed...
English Manual
Page 8
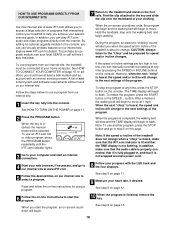
Refer to adjust the walking belt (see page 23). If there is used . Make sure that no wires are tightened before you purchase the optional heart rate monitor (see drawing 7a]). Reattach the right Rear Foot without the Rear Foot Spacer. If the left Rear Foot touches the floor, go to the storage position as described on the back of the Console Base (116). 116...
Refer to adjust the walking belt (see page 23). If there is used . Make sure that no wires are tightened before you purchase the optional heart rate monitor (see drawing 7a]). Reattach the right Rear Foot without the Rear Foot Spacer. If the left Rear Foot touches the floor, go to the storage position as described on the back of the Console Base (116). 116...
English Manual
Page 9
... electrically rated for electric current to the walking belt or the walking platform. The surge suppressor must be grounded. Important: The treadmill is properly grounded. Such substances will not fit the outlet, have a UL suppressed voltage rating of 400 volts or less and a minimum surge dissipation of your treadmill (see your home's power. HOW TO PLUG IN THE POWER CORD DANGER: Improper connection of...
... electrically rated for electric current to the walking belt or the walking platform. The surge suppressor must be grounded. Important: The treadmill is properly grounded. Such substances will not fit the outlet, have a UL suppressed voltage rating of 400 volts or less and a minimum surge dissipation of your treadmill (see your home's power. HOW TO PLUG IN THE POWER CORD DANGER: Improper connection of...

English Manual
Page 10
.... IFIT.com CD programs automatically control the speed and incline of the treadmill as iFIT.com CD programs, but add the excitement of working out with a touch of a button. In addition, you can use the manual mode of the console, follow the steps beginning on the console and place only a sealed water bottle in the water bottle holder. Video programs offer the same benefits as a personal trainer guides you exercise, the...
.... IFIT.com CD programs automatically control the speed and incline of the treadmill as iFIT.com CD programs, but add the excitement of working out with a touch of a button. In addition, you can use the manual mode of the console, follow the steps beginning on the console and place only a sealed water bottle in the water bottle holder. Video programs offer the same benefits as a personal trainer guides you exercise, the...
English Manual
Page 11
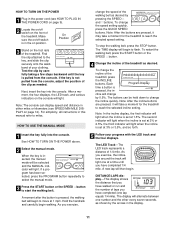
... then begin walking. To change the speed of the treadmill. The buttons can display speed and distance in either miles or kilometers (see HOW TO PLUG IN THE POWER CORD on page 9). 2 Locate the on/off switch is inserted, the manual mode will be held down to start the walking belt. HOW TO TURN ON THE POWER 1 Plug in the power cord (see SPEED/MIN-MILE DISPLAY on position. After a moment, the four displays, the LED track, and various...
... then begin walking. To change the speed of the treadmill. The buttons can display speed and distance in either miles or kilometers (see HOW TO PLUG IN THE POWER CORD on page 9). 2 Locate the on/off switch is inserted, the manual mode will be held down to start the walking belt. HOW TO TURN ON THE POWER 1 Plug in the power cord (see SPEED/MIN-MILE DISPLAY on position. After a moment, the four displays, the LED track, and various...
English Manual
Page 12
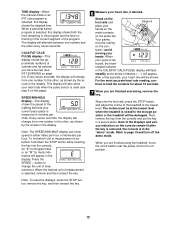
... mile). The incline must be damaged. TIME display-When the manual mode or an iFIT.com program is de- The display will change from one number and the other , as shown by the arrows in the display. Note: To reset the displays, press the STOP button, remove the key, and then reinsert the key. 6 Measure your hands. Note: If the displays and various indicators on the pulse bar. When your heart rate when the pulse sensor...
... mile). The incline must be damaged. TIME display-When the manual mode or an iFIT.com program is de- The display will change from one number and the other , as shown by the arrows in the display. Note: To reset the displays, press the STOP button, remove the key, and then reinsert the key. 6 Measure your hands. Note: If the displays and various indicators on the pulse bar. When your heart rate when the pulse sensor...
English Manual
Page 13
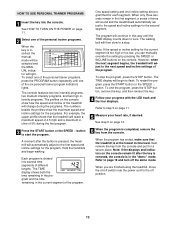
... trainer programs. When the key is pressed, the treadmill will automatically adjust to the first speed and incline settings for the programs. For example, the upper profile shows that the treadmill is completed, remove the key from the console and put it in the "demo" mode. To restart the program, press the START button or the SPEED v button. Refer to start the program. To end the program, press the STOP button, remove the key, and then reinsert the key. 4 Follow your heart rate...
... trainer programs. When the key is pressed, the treadmill will automatically adjust to the first speed and incline settings for the programs. For example, the upper profile shows that the treadmill is completed, remove the key from the console and put it in the "demo" mode. To restart the program, press the START button or the SPEED v button. Refer to start the program. To end the program, press the STOP button, remove the key, and then reinsert the key. 4 Follow your heart rate...
English Manual
Page 16
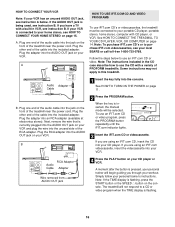
... the TIME display is flashing, press the START button or the SPEED v button on your personal trainer's instructions. Note: The instructions included in VCR, see instruction B. B ANT. Note: To purchase iFIT.com CD's or to this treadmill. 1 Insert the key fully into an RCA adapter (available at electronics stores). Follow the steps below . A moment after the button is connected to use an iFIT.com CD or video program, press the PROGRAM button repeatedly until...
... the TIME display is flashing, press the START button or the SPEED v button on your personal trainer's instructions. Note: The instructions included in VCR, see instruction B. B ANT. Note: To purchase iFIT.com CD's or to this treadmill. 1 Insert the key fully into an RCA adapter (available at electronics stores). Follow the steps below . A moment after the button is connected to use an iFIT.com CD or video program, press the PROGRAM button repeatedly until...
English Manual
Page 17
... the TIME display is flashing, press the START button or the SPEED v button on page 12. 7 When the iFIT.com CD or video program is finished, remove the key. To stop and the TIME display will begin to change. If the volume is too high or too low, the console may change before the personal trainer describes the change to move at any time, press the STOP button on the console. See step 6 on...
... the TIME display is flashing, press the START button or the SPEED v button on page 12. 7 When the iFIT.com CD or video program is finished, remove the key. To stop and the TIME display will begin to change. If the volume is too high or too low, the console may change before the personal trainer describes the change to move at any time, press the STOP button on the console. See step 6 on...
English Manual
Page 18
..., you can play iFIT.com audio and video programs directly from our internet site, the treadmill must have at any time by pressing the SPEED or INCLINE buttons on our internet site. Read and follow the on-line instructions for the "chirp" and be found on the console. When you start an internet connection. 4 Start your clothing. Hold the handrails, step onto the walking belt, and begin . When...
..., you can play iFIT.com audio and video programs directly from our internet site, the treadmill must have at any time by pressing the SPEED or INCLINE buttons on our internet site. Read and follow the on-line instructions for the "chirp" and be found on the console. When you start an internet connection. 4 Start your clothing. Hold the handrails, step onto the walking belt, and begin . When...
English Manual
Page 19
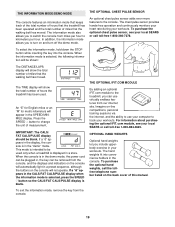
... upperbody exercise in the CALS/FAT CALS/PULSE display when the information mode is selected, press the SPEED w button so the CALS/FAT CALS/PULSE display is blank. OPTIONAL HAND WEIGHTS Optional hand weights let you to kilometers per hour to turn on the back cover of miles that the walking belt has moved. The chest pulse sensor provides hands-free operation and continuously monitors your heart rate during your workouts. To exit the information mode, remove the key from miles...
... upperbody exercise in the CALS/FAT CALS/PULSE display when the information mode is selected, press the SPEED w button so the CALS/FAT CALS/PULSE display is blank. OPTIONAL HAND WEIGHTS Optional hand weights let you to kilometers per hour to turn on the back cover of miles that the walking belt has moved. The chest pulse sensor provides hands-free operation and continuously monitors your heart rate during your workouts. To exit the information mode, remove the key from miles...
English Manual
Page 22
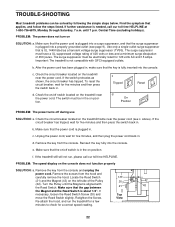
... breaker located on SOLUTION: a. To reset the circuit breaker, wait for five minutes and then press the switch back in . Reinsert the key fully into the console. e. f. Turn the Pulley until 7 p.m. If necessary, loosen the Reed Switch Screw (30) and Top move the Reed Switch slightly. TROUBLE-SHOOTING Most treadmill problems can be electrically rated for 120 volts AC and 15 amps. Make sure that the power cord is plugged into...
... breaker located on SOLUTION: a. To reset the circuit breaker, wait for five minutes and then press the switch back in . Reinsert the key fully into the console. e. f. Turn the Pulley until 7 p.m. If necessary, loosen the Reed Switch Screw (30) and Top move the Reed Switch slightly. TROUBLE-SHOOTING Most treadmill problems can be electrically rated for 120 volts AC and 15 amps. Make sure that the power cord is plugged into...
English Manual
Page 23
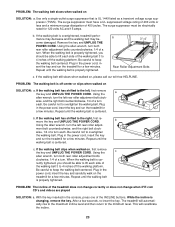
... tightened. Plug in the console, press one of a turn each side of the treadmill does not change correctly or does not change when iFIT.com CD's and videos are played SOLUTION: a. b 3"-4" Rear Roller Adjustment Bolts c. Using the c allen wrench, turn the left rear roller adjustment bolt clock- rectly tightened, you should be able to 4 inches off the walking platform. Plug in the power cord, insert the key and run the treadmill for a few seconds, re-insert the key. PROBLEM...
... tightened. Plug in the console, press one of a turn each side of the treadmill does not change correctly or does not change when iFIT.com CD's and videos are played SOLUTION: a. b 3"-4" Rear Roller Adjustment Bolts c. Using the c allen wrench, turn the left rear roller adjustment bolt clock- rectly tightened, you should be able to 4 inches off the walking platform. Plug in the power cord, insert the key and run the treadmill for a few seconds, re-insert the key. PROBLEM...
English Manual
Page 24
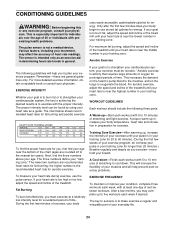
... "training zone." The key to 10 minutes of your exercise program, do not keep your pulse in your heart rate is to exercise with 5 to success is the recommended heart rate for exercise. CONDITIONING GUIDELINES WARNING: Before beginning this or any exercise program, consult your age. The proper intensity level can be "aerobic." For aerobic exercise, adjust the speed and incline of the treadmill until your exercise program. The lower two numbers...
... "training zone." The key to 10 minutes of your exercise program, do not keep your pulse in your heart rate is to exercise with 5 to success is the recommended heart rate for exercise. CONDITIONING GUIDELINES WARNING: Before beginning this or any exercise program, consult your age. The proper intensity level can be "aerobic." For aerobic exercise, adjust the speed and incline of the treadmill until your exercise program. The lower two numbers...
English Manual
Page 27
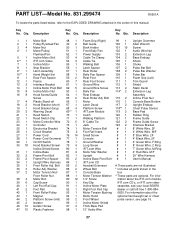
... Bolt iFIT.com Video Incline Motor Stop Bracket Latch Assembly Hand Weight Set Rear Foot Spacer Frame Interface Bracket Incline Motor Pivot Bolt Incline Motor Nut Hood Screw/Guide Screw Plastic Stand-off Hood Bracket (short) Hood Bracket (long) Warning Decal Reed Switch Reed Switch Clip Motor/Controller Wire Controller Electronics Bracket Circuit Breaker Power Cord Power Cord Grommet On/Off Switch Hood Bracket Screw/ Incline Shield Screw Incline Base Frame Pivot Bolt Frame Pivot Spacer Upright Wire Harness Front Roller Adj. Description Key No. For infor- Qty. PART LIST-Model...
... Bolt iFIT.com Video Incline Motor Stop Bracket Latch Assembly Hand Weight Set Rear Foot Spacer Frame Interface Bracket Incline Motor Pivot Bolt Incline Motor Nut Hood Screw/Guide Screw Plastic Stand-off Hood Bracket (short) Hood Bracket (long) Warning Decal Reed Switch Reed Switch Clip Motor/Controller Wire Controller Electronics Bracket Circuit Breaker Power Cord Power Cord Grommet On/Off Switch Hood Bracket Screw/ Incline Shield Screw Incline Base Frame Pivot Bolt Frame Pivot Spacer Upright Wire Harness Front Roller Adj. Description Key No. For infor- Qty. PART LIST-Model...
English Manual
Page 30
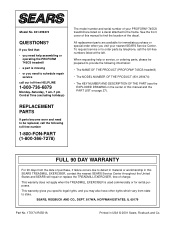
... manual and the PART LIST on a decal attached to state. To request service or to provide the following toll-free number 1-800-FON-PART (1-800-366-7278) The model number and serial number of the decal. This warranty gives you specific legal rights, and you visit your PROFORM® 745CS treadmill are available for rental purposes. All replacement parts are listed on page 27). When requesting help assembling or operating the PROFORM 745CS treadmill...
... manual and the PART LIST on a decal attached to state. To request service or to provide the following toll-free number 1-800-FON-PART (1-800-366-7278) The model number and serial number of the decal. This warranty gives you specific legal rights, and you visit your PROFORM® 745CS treadmill are available for rental purposes. All replacement parts are listed on page 27). When requesting help assembling or operating the PROFORM 745CS treadmill...


