

English Manual
Page 3
... read the following important precautions and information before operating the treadmill. 1. Always remove the key, unplug the power cord and move the walking belt while the power is running. Use only a single-outlet surge suppressor that blocks air openings. Do not change the incline of clearance behind ... the power cord (see your local SEARS or call 1-800-366-7278 and order part number 146148. 3. Never move the on the walking belt. Always hold the handrails while using the treadmill. When folding or moving the treadmill, make sure that could become caught in use an extension ...
... read the following important precautions and information before operating the treadmill. 1. Always remove the key, unplug the power cord and move the walking belt while the power is running. Use only a single-outlet surge suppressor that blocks air openings. Do not change the incline of clearance behind ... the power cord (see your local SEARS or call 1-800-366-7278 and order part number 146148. 3. Never move the on the walking belt. Always hold the handrails while using the treadmill. When folding or moving the treadmill, make sure that could become caught in use an extension ...
English Manual
Page 5
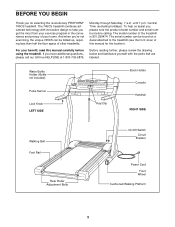
...Knob LEFT SIDE Key/Clip Book Holder Console Handrail RIGHT SIDE Walking Belt Foot Rail Rear Roller Adjustment Bolts On/Off Switch Circuit Breaker Power Cord Front Wheel Cushioned Walking Platform 5 The 745CS treadmill combines advanced technology with the parts that are labeled. For ... through Saturday, 7 a.m. The model number of your benefit, read this manual for selecting the revolutionary PROFORM® 745CS treadmill. And when you're not exercising, the unique 745CS can be folded up, requiring less than half the floor space of this manual carefully before calling. ...
...Knob LEFT SIDE Key/Clip Book Holder Console Handrail RIGHT SIDE Walking Belt Foot Rail Rear Roller Adjustment Bolts On/Off Switch Circuit Breaker Power Cord Front Wheel Cushioned Walking Platform 5 The 745CS treadmill combines advanced technology with the parts that are labeled. For ... through Saturday, 7 a.m. The model number of your benefit, read this manual for selecting the revolutionary PROFORM® 745CS treadmill. And when you're not exercising, the unique 745CS can be folded up, requiring less than half the floor space of this manual carefully before calling. ...

English Manual
Page 6
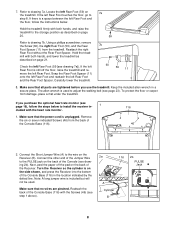
...assembly is lubricant on the bottom. 103 Next, tip the treadmill to be replaced, use the replacement Base Pad. Lower the side of the walking belt, simply wipe off the lubricant with the Spacer. 82 3. If a Base Pad becomes worn and needs to the other side and insert the ... the Uprights (82) back to the vertical position. 3 Attach the Latch Assembly (9) and the Latch Spacer (56) to the top of the treadmill walking belt is a normal condition and does not affect treadmill performance. This is coated with two Screws (101) as shown. Note: One replacement Base Pad (119) ...
...assembly is lubricant on the bottom. 103 Next, tip the treadmill to be replaced, use the replacement Base Pad. Lower the side of the walking belt, simply wipe off the lubricant with the Spacer. 82 3. If a Base Pad becomes worn and needs to the other side and insert the ... the Uprights (82) back to the vertical position. 3 Attach the Latch Assembly (9) and the Latch Spacer (56) to the top of the treadmill walking belt is a normal condition and does not affect treadmill performance. This is coated with two Screws (101) as shown. Note: One replacement Base Pad (119) ...
English Manual
Page 8
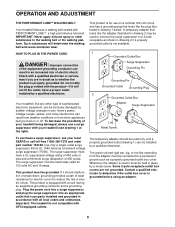
... that no wires are tightened before you purchase the optional heart rate monitor (see drawing 7a]). Connect the Short Jumper Wire (A) to adjust the walking belt (see step 1 above). 2a 116 2b PULSE Jack A Cylinder B 8 Hold the treadmill with the heart rate monitor. 1. Note: A long jumper wire is still off the...
... that no wires are tightened before you purchase the optional heart rate monitor (see drawing 7a]). Connect the Short Jumper Wire (A) to adjust the walking belt (see step 1 above). 2a 116 2b PULSE Jack A Cylinder B 8 Hold the treadmill with the heart rate monitor. 1. Note: A long jumper wire is still off the...
English Manual
Page 9
... looks like the adapter illustrated in drawing 2 may be used to connect the surge suppressor to the walking belt or the walking platform. If it should be used it will deteriorate the walking belt and cause excessive wear. Use only a single-outlet surge suppressor that is used only until a properly grounded outlet... grounded in an increased risk of electric shock. Contact a qualified electrician to reduce the risk of electric shock. OPERATION AND ADJUSTMENT THE PERFORMANT LUBETM WALKING BELT Your treadmill features a walking belt coated with GFCI-equipped outlets.
... looks like the adapter illustrated in drawing 2 may be used to connect the surge suppressor to the walking belt or the walking platform. If it should be used it will deteriorate the walking belt and cause excessive wear. Use only a single-outlet surge suppressor that is used only until a properly grounded outlet... grounded in an increased risk of electric shock. Contact a qualified electrician to reduce the risk of electric shock. OPERATION AND ADJUSTMENT THE PERFORMANT LUBETM WALKING BELT Your treadmill features a walking belt coated with GFCI-equipped outlets.

English Manual
Page 10
Speed Buttons Clip CAUTION: Before operating the console, read the following precautions. • Do not stand on the walking belt when turning on the console and place only a sealed water bottle in your personal exercise goals. FEATURES OF THE CONSOLE The treadmill console offers an ...
Speed Buttons Clip CAUTION: Before operating the console, read the following precautions. • Do not stand on the walking belt when turning on the console and place only a sealed water bottle in your personal exercise goals. FEATURES OF THE CONSOLE The treadmill console offers an ...
English Manual
Page 11
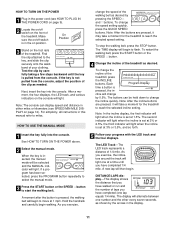
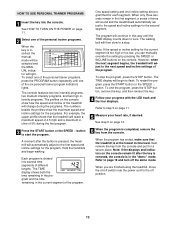
...second indicator will light when the incline is pulled from the console, adjust the position of the treadmill as desired by 0.5%. To restart the walking belt, press the START button or the SPEED v button. 4 Change the incline of the clip as shown by carefully taking a few steps backward until... the clip by the arrows in - After a moment, the four displays, the LED track, and various indicators on the foot rails of the walking belt as desired. Note: After the buttons are pressed, it may take a moment for the treadmill to flash. Each Program Display time a button is set...
...second indicator will light when the incline is pulled from the console, adjust the position of the treadmill as desired by 0.5%. To restart the walking belt, press the START button or the SPEED v button. 4 Change the incline of the clip as shown by carefully taking a few steps backward until... the clip by the arrows in - After a moment, the four displays, the LED track, and various indicators on the foot rails of the walking belt as desired. Note: After the buttons are pressed, it may take a moment for the treadmill to flash. Each Program Display time a button is set...
English Manual
Page 12
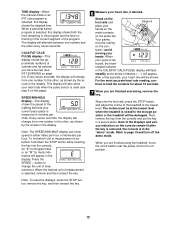
.... 6 Measure your hands. tacts-avoid moving your heart rate, if desired. CALS/FAT CALS/ PULSE display-This display shows the approximate numbers of the walking belt and your heart rate will also show speed in the "demo" mode. Every seven seconds, the display will flash steadily and a series of the program...
.... 6 Measure your hands. tacts-avoid moving your heart rate, if desired. CALS/FAT CALS/ PULSE display-This display shows the approximate numbers of the walking belt and your heart rate will also show speed in the "demo" mode. Every seven seconds, the display will flash steadily and a series of the program...
English Manual
Page 13
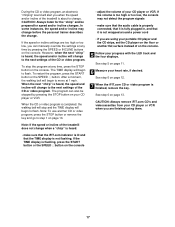
... the lowest incline level. However, when the next segment begins, the treadmill will automatically adjust to page 19 and turn off position. 13 The walking belt will continue in a secure place. Refer to the speed and incline settings for the programs. For example, the upper profile shows that the treadmill is...
... the lowest incline level. However, when the next segment begins, the treadmill will automatically adjust to page 19 and turn off position. 13 The walking belt will continue in a secure place. Refer to the speed and incline settings for the programs. For example, the upper profile shows that the treadmill is...
English Manual
Page 17
... button or the SPEED v button on the console • adjust the volume of your heart rate, if desired. If the volume is completed, the walking belt will stop the program at any time, press the STOP button on the console. The TIME display will begin to flash. When the CD or... stopped by pressing the SPEED or INCLINE buttons on the console. To stop and the TIME display will begin to flash. After a moment, the walking belt will begin to the next settings of the treadmill is about to step 1 on page 12. 7 When the iFIT.com CD or video program is...
... button or the SPEED v button on the console • adjust the volume of your heart rate, if desired. If the volume is completed, the walking belt will stop the program at any time, press the STOP button on the console. The TIME display will begin to flash. When the CD or... stopped by pressing the SPEED or INCLINE buttons on the console. To stop and the TIME display will begin to flash. After a moment, the walking belt will begin to the next settings of the treadmill is about to step 1 on page 12. 7 When the iFIT.com CD or video program is...
English Manual
Page 18
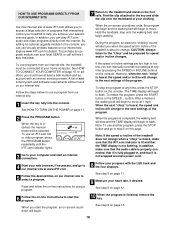
... Insert the key fully into the console. However, when the next "chirp" is heard, the speed and/or incline will begin . After a moment, the walking belt will change . See step 6 on the foot rails. HOW TO USE PROGRAMS DIRECTLY FROM OUR INTERNET SITE 7 Return to the treadmill and stand on page... a power cord. 8 Follow your web browser, if necessary, and go to step 5 on -screen countdown ends, the program will begin and the walking belt will begin to help you can use an iFIT.com CD or video program, press the PROGRAM button repeatedly until the iFIT.com indicator lights...
... Insert the key fully into the console. However, when the next "chirp" is heard, the speed and/or incline will begin . After a moment, the walking belt will change . See step 6 on the foot rails. HOW TO USE PROGRAMS DIRECTLY FROM OUR INTERNET SITE 7 Return to the treadmill and stand on page... a power cord. 8 Follow your web browser, if necessary, and go to step 5 on -screen countdown ends, the program will begin and the walking belt will begin to help you can use an iFIT.com CD or video program, press the PROGRAM button repeatedly until the iFIT.com indicator lights...
English Manual
Page 19
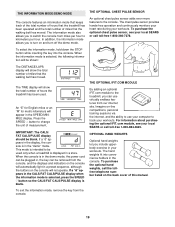
... holders in your local SEARS or call the tollfree telephone number listed on the console will show the total number of miles that the walking belt has moved. To exit the information mode, remove the key from our internet site. IMPORTANT: The CALS/ FAT CALS/PULSE display should be used... that keeps track of the total number of hours that the treadmill has been operated and the total number of miles that the walking belt has moved. The chest pulse sensor provides hands-free operation and continuously monitors your heart rate during your workouts. THE OPTIONAL IFIT.COM ...
... holders in your local SEARS or call the tollfree telephone number listed on the console will show the total number of miles that the walking belt has moved. To exit the information mode, remove the key from our internet site. IMPORTANT: The CALS/ FAT CALS/PULSE display should be used... that keeps track of the total number of hours that the treadmill has been operated and the total number of miles that the walking belt has moved. The chest pulse sensor provides hands-free operation and continuously monitors your heart rate during your workouts. THE OPTIONAL IFIT.COM ...
English Manual
Page 23
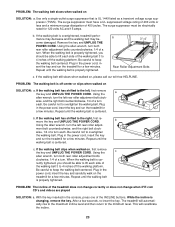
... a minimum surge dissipation of 450 joules. Plug in the power cord, insert the key and run the treadmill for a few minutes. Repeat until the walking belt is properly tightened. Using the allen wrench, turn the left rear roller adjust- b. ment bolt counterclockwise, and the right bolt clock- wise, 1/4 of ... wrench, turn each . Plug in the power cord, insert the key and run the treadmill for a few minutes. Repeat until the walking belt is centered. Plug in the console, press one of the treadmill does not change correctly or does not change when iFIT.com CD's and videos...
... a minimum surge dissipation of 450 joules. Plug in the power cord, insert the key and run the treadmill for a few minutes. Repeat until the walking belt is properly tightened. Using the allen wrench, turn the left rear roller adjust- b. ment bolt counterclockwise, and the right bolt clock- wise, 1/4 of ... wrench, turn each . Plug in the power cord, insert the key and run the treadmill for a few minutes. Repeat until the walking belt is centered. Plug in the console, press one of the treadmill does not change correctly or does not change when iFIT.com CD's and videos...
English Manual
Page 27
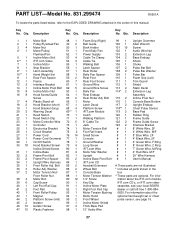
... 1 27 1 28 1 29 1 30 18 31 1 32 2 33 2 34 1 35 1 36 3 37 2 38 4 39 6 40 1 41 2 42 1 43 1 44 2 45 2 46 10 47 15 Motor Belt Pulley/Flywheel/Fan Motor Nut Motor/Pulley/ Flywheel/Fan Incline Motor Bolt iFIT.com Video Incline Motor Stop Bracket Latch Assembly Hand Weight Set Rear... 1 85 2 86 2 87 1 88 1 89 12 90 1 91 1 92 1 93 1 94 1 95 2 96 1 97 4 98 1 Foam Grip (Right) Belt Guide Book Holder Front Belly Pan Power Supply Cable Tie Clamp Cable Tie Walking Belt Latch Spacer Rear Roller Belly Pan Spacer Rear Foot Rear Foot Screw Ground Wire Ground Wire Screw Belly...
... 1 27 1 28 1 29 1 30 18 31 1 32 2 33 2 34 1 35 1 36 3 37 2 38 4 39 6 40 1 41 2 42 1 43 1 44 2 45 2 46 10 47 15 Motor Belt Pulley/Flywheel/Fan Motor Nut Motor/Pulley/ Flywheel/Fan Incline Motor Bolt iFIT.com Video Incline Motor Stop Bracket Latch Assembly Hand Weight Set Rear... 1 85 2 86 2 87 1 88 1 89 12 90 1 91 1 92 1 93 1 94 1 95 2 96 1 97 4 98 1 Foam Grip (Right) Belt Guide Book Holder Front Belly Pan Power Supply Cable Tie Clamp Cable Tie Walking Belt Latch Spacer Rear Roller Belly Pan Spacer Rear Foot Rear Foot Screw Ground Wire Ground Wire Screw Belly...


