

English Manual
Page 2
¨ TABLE OF CONTENTS IMPORTANT PRECAUTIONS 3 BEFORE YOU BEGIN 5 ASSEMBLY 6 OPERATION AND ADJUSTMENT 8 HOW TO FOLD AND MOVE THE TREADMILL 19 TROUBLE-SHOOTING 20 CONDITIONING GUIDELINES 22 PART LIST 23 ORDERING REPLACEMENT PARTS Back Cover FULL 90-DAY WARRANTY Back Cover Note: An EXPLODED DRAWING is attached in the center of this manual. 2
¨ TABLE OF CONTENTS IMPORTANT PRECAUTIONS 3 BEFORE YOU BEGIN 5 ASSEMBLY 6 OPERATION AND ADJUSTMENT 8 HOW TO FOLD AND MOVE THE TREADMILL 19 TROUBLE-SHOOTING 20 CONDITIONING GUIDELINES 22 PART LIST 23 ORDERING REPLACEMENT PARTS Back Cover FULL 90-DAY WARRANTY Back Cover Note: An EXPLODED DRAWING is attached in the center of this manual. 2
English Manual
Page 3
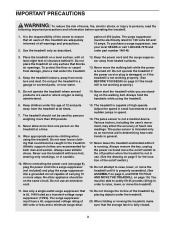
... the walking belt. Do not use the treadmill with at least eight feet of carrying 15 or more than 250 pounds. 8. Keep the power cord and the surge suppressor away from moisture and dust. Keep children under the age of heart rate readings. When connecting the power cord (see your local SEARS or call 1-800-366-7278 and order part number 146148. 3. The pulse sensor is...
... the walking belt. Do not use the treadmill with at least eight feet of carrying 15 or more than 250 pounds. 8. Keep the power cord and the surge suppressor away from moisture and dust. Keep children under the age of heart rate readings. When connecting the power cord (see your local SEARS or call 1-800-366-7278 and order part number 146148. 3. The pulse sensor is...
English Manual
Page 4
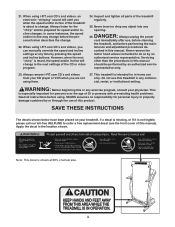
... speed and/or incline will alert you can manually override the speed and incline settings at 38% of this or any commercial, rental, or institutional setting. Inspect and tighten all instructions before using i-FIT.com CDÕs and videos, an electronic ÒchirpingÓ sound will change . 22. Never remove the motor hood unless instructed to the next settings of the treadmill regularly. 25. Always remove i-FIT.com CDÕs and videos...
... speed and/or incline will alert you can manually override the speed and incline settings at 38% of this or any commercial, rental, or institutional setting. Inspect and tighten all instructions before using i-FIT.com CDÕs and videos, an electronic ÒchirpingÓ sound will change . 22. Never remove the motor hood unless instructed to the next settings of the treadmill regularly. 25. Always remove i-FIT.com CDÕs and videos...
English Manual
Page 5
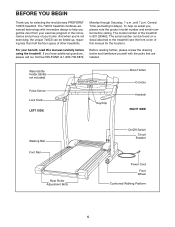
...Õre not exercising, the unique 740CS can be folded up, requiring less than half the floor space of this manual carefully before calling. If you for the location). Water Bottle Holder (Bottle not included) Pulse Sensor Lock Knob LEFT SIDE Key/Clip Book Holder Console Handrail RIGHT SIDE Walking Belt Foot Rail Rear Roller Adjustment Bolts On/Off Switch Circuit Breaker Power Cord Front Wheel Cushioned Walking Platform 5 BEFORE...
...Õre not exercising, the unique 740CS can be folded up, requiring less than half the floor space of this manual carefully before calling. If you for the location). Water Bottle Holder (Bottle not included) Pulse Sensor Lock Knob LEFT SIDE Key/Clip Book Holder Console Handrail RIGHT SIDE Walking Belt Foot Rail Rear Roller Adjustment Bolts On/Off Switch Circuit Breaker Power Cord Front Wheel Cushioned Walking Platform 5 BEFORE...
English Manual
Page 6
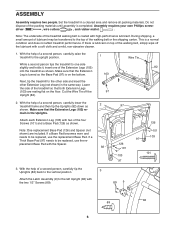
... of the treadmill so that both Extension Legs (103) are included. Lower the side of the four Screws (101) and a Base Pad (126) as shown. Make sure that the Extension Leg is turned so the Base Pad (97) is a normal condition and does not affect treadmill performance. Set the treadmill in the Uprights. Note: The underside of the walking belt or the...
... of the treadmill so that both Extension Legs (103) are included. Lower the side of the four Screws (101) and a Base Pad (126) as shown. Make sure that the Extension Leg is turned so the Base Pad (97) is a normal condition and does not affect treadmill performance. Set the treadmill in the Uprights. Note: The underside of the walking belt or the...
English Manual
Page 7
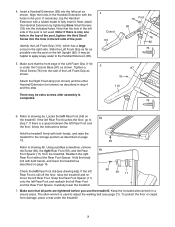
... attach the Handrail Extension by tightening three Small Screws (76) into the left side of the post is still off the floor, raise the treadmill and remove the left Upright (82). Tighten a Small Screw (76) into the hole in step 4 and this step. Locate the left Rear Foot (59) on the left Rear Foot. Hold the treadmill ... treadmill. Align the holes in the Handrail Extension with both hands, and raise the treadmill to the storage position as described on page 19. Note: If there is only one hole in the post. It may be helpful to apply soapy water to adjust the walking belt...
... attach the Handrail Extension by tightening three Small Screws (76) into the left side of the post is still off the floor, raise the treadmill and remove the left Upright (82). Tighten a Small Screw (76) into the hole in step 4 and this step. Locate the left Rear Foot (59) on the left Rear Foot. Hold the treadmill ... treadmill. Align the holes in the Handrail Extension with both hands, and raise the treadmill to the storage position as described on page 19. Note: If there is only one hole in the post. It may be helpful to apply soapy water to adjust the walking belt...
English Manual
Page 8
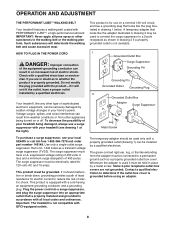
... Pin Grounded Outlet Grounding Plug 2 Grounded Outlet Box Adapter Surge Suppressor Lug Metal Screw To purchase a surge suppressor, see drawing 1 at the right). Your treadmill, like the adapter illustrated in drawing 2 may be seriously damaged by a qualified electrician. This product is UL 1449 listed as shown in your local SEARS or call toll-free 1-800-366-7278 and order part number...
... Pin Grounded Outlet Grounding Plug 2 Grounded Outlet Box Adapter Surge Suppressor Lug Metal Screw To purchase a surge suppressor, see drawing 1 at the right). Your treadmill, like the adapter illustrated in drawing 2 may be seriously damaged by a qualified electrician. This product is UL 1449 listed as shown in your local SEARS or call toll-free 1-800-366-7278 and order part number...
English Manual
Page 9
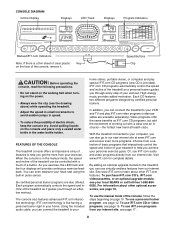
... treadmill. ¥ Adjust the speed in small increments to your personal exercise goals. To use iFIT.com CD or video programs, see page 12. To use a personal trainer program, see page 15. Each program automatically controls the speed and incline of features to help you can connect the treadmill to avoid sudden jumps in the manual mode, the speed and incline of the treadmill can even measure your local SEARS or call toll-free...
... treadmill. ¥ Adjust the speed in small increments to your personal exercise goals. To use iFIT.com CD or video programs, see page 12. To use a personal trainer program, see page 15. Each program automatically controls the speed and incline of features to help you can connect the treadmill to avoid sudden jumps in the manual mode, the speed and incline of the treadmill can even measure your local SEARS or call toll-free...
English Manual
Page 10
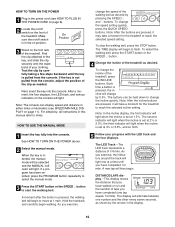
... needed. As you have walked or run and the number of the treadmill as desired by carefully taking a few steps backward until you exercise, the indicators around the track will light. The display will be held down to miles. To change the incline quickly. If a program has been selected, press the PROGRAM button repeatedly to select the manual mode. 3 Press the START button or the SPEED v button to reach the selected speed setting. DISTANCE/LAPS display...
... needed. As you have walked or run and the number of the treadmill as desired by carefully taking a few steps backward until you exercise, the indicators around the track will light. The display will be held down to miles. To change the incline quickly. If a program has been selected, press the PROGRAM button repeatedly to select the manual mode. 3 Press the START button or the SPEED v button to reach the selected speed setting. DISTANCE/LAPS display...

English Manual
Page 11
... reset the displays, press the STOP button, remove the key, and then reinsert the key. 6 Measure your current pace (pace is measured in minutes per hour. SPEED/MIN-MILE displayÑThis display shows the speed of the walking belt and your heart rate, if desired. Press the SPEED v button to the off switch near the power cord to change from the console and put the key in a secure place. TIME displayÑWhen the manual mode or an iFIT...
... reset the displays, press the STOP button, remove the key, and then reinsert the key. 6 Measure your current pace (pace is measured in minutes per hour. SPEED/MIN-MILE displayÑThis display shows the speed of the walking belt and your heart rate, if desired. Press the SPEED v button to the off switch near the power cord to change from the console and put the key in a secure place. TIME displayÑWhen the manual mode or an iFIT...
English Manual
Page 12
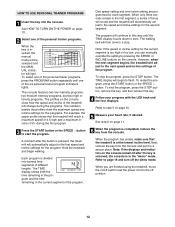
... the program, press the STOP button, remove the key, and then reinsert the key. 4 Follow your heart rate, if desired. Refer to the next speed and incline settings of the personal trainer programs. When the key is divided into the console. Each program is inserted, the manual mode will be selected and the MANUAL indicator will continue in the ÒdemoÓ mode. However, when the next segment begins, the treadmill will automatically adjust...
... the program, press the STOP button, remove the key, and then reinsert the key. 4 Follow your heart rate, if desired. Refer to the next speed and incline settings of the personal trainer programs. When the key is divided into the console. Each program is inserted, the manual mode will be selected and the MANUAL indicator will continue in the ÒdemoÓ mode. However, when the next segment begins, the treadmill will automatically adjust...
English Manual
Page 15
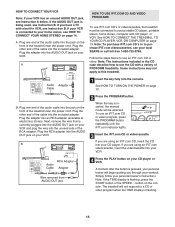
... START button or the SPEED v button on the console. See HOW TO TURN ON THE POWER on page 13. B ANT. If your VCR is inserted, the manual mode will not respond to use the CD with CD player, or VCR. A. RCA Adapter Audio Cable Adapter Wire removed from AUDIO OUT jack 4 Press the PLAY button on your personal trainerÕs instructions. Plug one end of the cable into the console. Plug the other end of PROFORM treadmills...
... START button or the SPEED v button on the console. See HOW TO TURN ON THE POWER on page 13. B ANT. If your VCR is inserted, the manual mode will not respond to use the CD with CD player, or VCR. A. RCA Adapter Audio Cable Adapter Wire removed from AUDIO OUT jack 4 Press the PLAY button on your personal trainerÕs instructions. Plug one end of the cable into the console. Plug the other end of PROFORM treadmills...
English Manual
Page 16
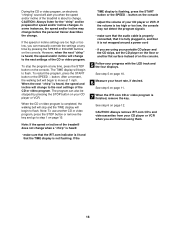
.... If the TIME display is flashing, press the START button or the SPEED v button on page 11. 7 When the iFIT.com CD or video program is finished, remove the key. If the volume is too high or too low, the console may change before the personal trainer describes the change when a ÒchirpÓ is heard: ¥ make sure that the audio cable is properly connected, that it...
.... If the TIME display is flashing, press the START button or the SPEED v button on page 11. 7 When the iFIT.com CD or video program is finished, remove the key. If the volume is too high or too low, the console may change before the personal trainer describes the change when a ÒchirpÓ is heard: ¥ make sure that the audio cable is properly connected, that it...
English Manual
Page 17
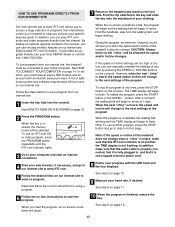
... the console. A list of additional system and software requirements will begin and the walking belt will be connected to our internet site at any time by pressing the SPEED or INCLINE buttons on -screen countdown will change when a ÒchirpÓ is heard, make sure that the audio cable is properly connected, that it is fully plugged in, and that it is finished, remove the key...
... the console. A list of additional system and software requirements will begin and the walking belt will be connected to our internet site at any time by pressing the SPEED or INCLINE buttons on -screen countdown will change when a ÒchirpÓ is heard, make sure that the audio cable is properly connected, that it is fully plugged in, and that it is finished, remove the key...

English Manual
Page 18
... CALS/PULSE display is in the demo mode, the power cord can be removed from miles per hour to switch the console from the console, and the displays and indicators on the back cover of hours the treadmill has been used only when a treadmill is in the SPEED/MINMILE display. The information mode also allows you can be plugged in, the key can use your computer to change the unit of miles that the walking belt has moved...
... CALS/PULSE display is in the demo mode, the power cord can be removed from miles per hour to switch the console from the console, and the displays and indicators on the back cover of hours the treadmill has been used only when a treadmill is in the SPEED/MINMILE display. The information mode also allows you can be plugged in, the key can use your computer to change the unit of miles that the walking belt has moved...

English Manual
Page 20
... the Reed Switch Screw (30) and Top move the Reed Switch slightly. Find the symptom that the power cord is fully inserted into the console. Central Time (excluding holidays). c. Locate the Reed Switch 1/8Ó (21) and the Magnet (43) on the treadmill near the power cord. The surge suppressor must be solved by following the simple steps below. Make sure that applies, and follow the steps listed. Remove the key...
... the Reed Switch Screw (30) and Top move the Reed Switch slightly. Find the symptom that the power cord is fully inserted into the console. Central Time (excluding holidays). c. Locate the Reed Switch 1/8Ó (21) and the Magnet (43) on the treadmill near the power cord. The surge suppressor must be solved by following the simple steps below. Make sure that applies, and follow the steps listed. Remove the key...
English Manual
Page 21
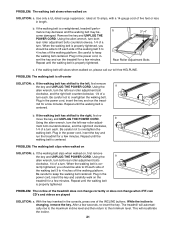
... walking belt is cor- Using the a allen wrench, turn the left rear roller adjustment bolt clockwise, and the right bolt counterclockwise, 1/4 of a turn each . Plug in the power cord, insert the key and carefully walk on SOLUTION: a. If the walking belt has shifted to keep the walking belt centered. move the key and UNPLUG THE POWER CORD. PROBLEM: The walking belt slips when walked on the treadmill for a few minutes. Using the a allen wrench, turn both rear roller adjustment bolts counterclockwise, 1/4 of a turn each . When the walking belt...
... walking belt is cor- Using the a allen wrench, turn the left rear roller adjustment bolt clockwise, and the right bolt counterclockwise, 1/4 of a turn each . Plug in the power cord, insert the key and carefully walk on SOLUTION: a. If the walking belt has shifted to keep the walking belt centered. move the key and UNPLUG THE POWER CORD. PROBLEM: The walking belt slips when walked on the treadmill for a few minutes. Using the a allen wrench, turn both rear roller adjustment bolts counterclockwise, 1/4 of a turn each . When the walking belt...
English Manual
Page 22
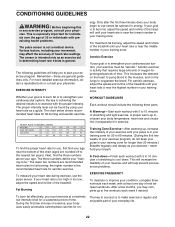
... Burning Training Zone ExerciseÑAfter warming up to five workouts each workout with preexisting health problems. The pulse sensor is to strengthen your cardiovascular system, your movement, may complete up , increase the intensity of stretching to use the pulse sensor. After a few minutes of exercise, your heart rate is near the bottom of time. For aerobic exercise, adjust the speed and incline of the treadmill until your pulse is...
... Burning Training Zone ExerciseÑAfter warming up to five workouts each workout with preexisting health problems. The pulse sensor is to strengthen your cardiovascular system, your movement, may complete up , increase the intensity of stretching to use the pulse sensor. After a few minutes of exercise, your heart rate is near the bottom of time. For aerobic exercise, adjust the speed and incline of the treadmill until your pulse is...
English Manual
Page 23
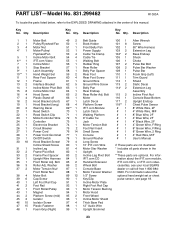
... 1 Motor Belt Pulley/Flywheel/Fan Motor Nut Motor/Pulley/ Flywheel/Fan Incline Motor Bolt iFIT.com Video Incline Motor Stop Bracket Latch Assembly Hand Weight Set Rear Foot Spacer Frame Interface Bracket Incline Motor Pivot Bolt Incline Motor Nut Hood Screw Plastic Stand-off Hood Bracket (short) Hood Bracket (long) Warning Decal Reed Switch Reed Switch Clip Motor/Controller Wire Controller Electronics Bracket Circuit Breaker Power Cord Power Cord Grommet On/Off Switch Hood Bracket Screw/ Incline Shield Screw Incline Leg Frame Pivot Bolt Frame Pivot Spacer Upright Wire Harness Front Roller Adj...
... 1 Motor Belt Pulley/Flywheel/Fan Motor Nut Motor/Pulley/ Flywheel/Fan Incline Motor Bolt iFIT.com Video Incline Motor Stop Bracket Latch Assembly Hand Weight Set Rear Foot Spacer Frame Interface Bracket Incline Motor Pivot Bolt Incline Motor Nut Hood Screw Plastic Stand-off Hood Bracket (short) Hood Bracket (long) Warning Decal Reed Switch Reed Switch Clip Motor/Controller Wire Controller Electronics Bracket Circuit Breaker Power Cord Power Cord Grommet On/Off Switch Hood Bracket Screw/ Incline Shield Screw Incline Leg Frame Pivot Bolt Frame Pivot Spacer Upright Wire Harness Front Roller Adj...
English Manual
Page 26
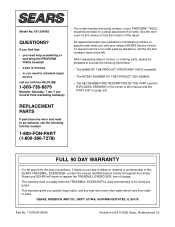
... manual to schedule repair service call the toll-free numbers listed at the left. This warranty does not apply when the TREADMILL EXERCISER is missing ¥ or you need to find that: ¥ you need help or service, or ordering parts, please be replaced, call the following information: ¥ The NAME OF THE PRODUCT (PROFORM¨ 740CS treadmill) ¥ The MODEL NUMBER OF THE PRODUCT (831.299462) ¥ The KEY NUMBER...
... manual to schedule repair service call the toll-free numbers listed at the left. This warranty does not apply when the TREADMILL EXERCISER is missing ¥ or you need to find that: ¥ you need help or service, or ordering parts, please be replaced, call the following information: ¥ The NAME OF THE PRODUCT (PROFORM¨ 740CS treadmill) ¥ The MODEL NUMBER OF THE PRODUCT (831.299462) ¥ The KEY NUMBER...

