
English Manual
Page 1
... instructions in the space above for future reference. PFEL05809.3 Serial No. USERʼS MANUAL please contact Customer Care. Serial Number Decal (on the back cover of frame) QUESTIONS? Keep this equipment. Write the serial number in this manual before contacting Customer Care. MT Sat. 8 a.m.-4 p.m. IMPORTANT: Please register this product (see the limited warranty on underside of this manual) before using this manual for reference. www.proform.com Model...
... instructions in the space above for future reference. PFEL05809.3 Serial No. USERʼS MANUAL please contact Customer Care. Serial Number Decal (on the back cover of frame) QUESTIONS? Keep this equipment. Write the serial number in this manual before contacting Customer Care. MT Sat. 8 a.m.-4 p.m. IMPORTANT: Please register this product (see the limited warranty on underside of this manual) before using this manual for reference. www.proform.com Model...
English Manual
Page 2
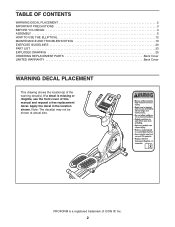
... the location shown. PROFORM is missing or illegible, see the front cover of the warning decal(s). TABLE OF CONTENTS WARNING DECAL PLACEMENT 2 IMPORTANT PRECAUTIONS 3 BEFORE YOU BEGIN 4 ASSEMBLY 5 HOW TO USE THE ELLIPTICAL 12 MAINTENANCE AND TROUBLESHOOTING 19 EXERCISE GUIDELINES 20 PART LIST 23 EXPLODED DRAWING 25 ORDERING REPLACEMENT PARTS Back Cover LIMITED WARRANTY Back Cover WARNING DECAL PLACEMENT This drawing shows the location(s) of this manual and request a free replacement...
... the location shown. PROFORM is missing or illegible, see the front cover of the warning decal(s). TABLE OF CONTENTS WARNING DECAL PLACEMENT 2 IMPORTANT PRECAUTIONS 3 BEFORE YOU BEGIN 4 ASSEMBLY 5 HOW TO USE THE ELLIPTICAL 12 MAINTENANCE AND TROUBLESHOOTING 19 EXERCISE GUIDELINES 20 PART LIST 23 EXPLODED DRAWING 25 ORDERING REPLACEMENT PARTS Back Cover LIMITED WARRANTY Back Cover WARNING DECAL PLACEMENT This drawing shows the location(s) of this manual and request a free replacement...
English Manual
Page 3
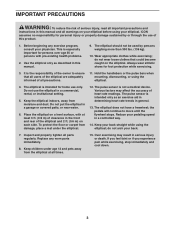
...). 10. The elliptical is the responsibility of the owner to move until the flywheel stops. The pulse sensor is intended only as described in this manual. 9. The elliptical does not have a freewheel; do not wear loose clothes that all users of the elliptical are adequately informed of all precautions. 11. do not arch your pedaling speed in a controlled way. 14. Do not use only. To...
...). 10. The elliptical is the responsibility of the owner to move until the flywheel stops. The pulse sensor is intended only as described in this manual. 9. The elliptical does not have a freewheel; do not wear loose clothes that all users of the elliptical are adequately informed of all precautions. 11. do not arch your pedaling speed in a controlled way. 14. Do not use only. To...
English Manual
Page 4
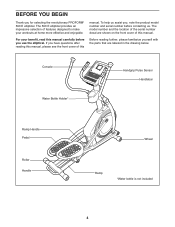
... front cover of this manual. If you use the elliptical. To help us . Console Water Bottle Holder* Handgrip Pulse Sensor Handlebar Ramp Handle Pedal Roller Handle Wheel Ramp *Water bottle is not included 4 BEFORE YOU BEGIN Thank you , note the product model number and serial number before you have questions after reading this manual, please see the front cover of this manual. For your workouts at home more...
... front cover of this manual. If you use the elliptical. To help us . Console Water Bottle Holder* Handgrip Pulse Sensor Handlebar Ramp Handle Pedal Roller Handle Wheel Ramp *Water bottle is not included 4 BEFORE YOU BEGIN Thank you , note the product model number and serial number before you have questions after reading this manual, please see the front cover of this manual. For your workouts at home more...

English Manual
Page 5
... parts, do not use power tools for assembly. ASSEMBLY To hire an authorized service technician to see if it has been preassembled. The number following the key number is completed. The number in a cleared area and remove the packing materials. Note: If a part is the key number of the part, from the PART LIST near the end of the elliptical in parentheses below to identify the small parts needed for assembly...
... parts, do not use power tools for assembly. ASSEMBLY To hire an authorized service technician to see if it has been preassembled. The number following the key number is completed. The number in a cleared area and remove the packing materials. Note: If a part is the key number of the part, from the PART LIST near the end of the elliptical in parentheses below to identify the small parts needed for assembly...

English Manual
Page 7
... Roller Arm (59) with a "Right" sticker, and orient it as shown. Attach the Right Pedal Bracket (64) to avoid breaking the Axle Cover, do not overtighten the Patch Screw. Repeat this step for the Left Pedal Bracket (48). 92 95 48 64 100 Grease 59 7 Orient a Crank Arm Spacer (55) so that the flat end is marked with the M10 x 60mm Bolt...
... Roller Arm (59) with a "Right" sticker, and orient it as shown. Attach the Right Pedal Bracket (64) to avoid breaking the Axle Cover, do not overtighten the Patch Screw. Repeat this step for the Left Pedal Bracket (48). 92 95 48 64 100 Grease 59 7 Orient a Crank Arm Spacer (55) so that the flat end is marked with the M10 x 60mm Bolt...

English Manual
Page 10
Then, untie and discard the wire tie. Attach the Right Pedal Arm (58) to the Pulse Wire (63) in the Upright (4). Repeat this step for the Left Pedal Arm (44). 44 64 58 99 11. See the inset drawing. Attach the Right Pulse Bar (9) with two M10 x 45mm Patch 10 Screws (99). 10. Locate the wire tie in the Right Pulse Bar (9). Next, slide the Right Pulse Bar (9) onto the right...
Then, untie and discard the wire tie. Attach the Right Pedal Arm (58) to the Pulse Wire (63) in the Upright (4). Repeat this step for the Left Pedal Arm (44). 44 64 58 99 11. See the inset drawing. Attach the Right Pulse Bar (9) with two M10 x 45mm Patch 10 Screws (99). 10. Locate the wire tie in the Right Pulse Bar (9). Next, slide the Right Pulse Bar (9) onto the right...

English Manual
Page 11
... front of the elliptical. 14 To plug the Power Adapter (112) into the Upright (4). Note: After assembly is completed, some extra parts may be left over. Make sure that all parts are properly tightened before you use the elliptical. Tip: Avoid pinching the wires. 12. Insert the excess wire downward into an outlet, see HOW TO PLUG IN THE POWER ADAPTER on the Console to protect the...
... front of the elliptical. 14 To plug the Power Adapter (112) into the Upright (4). Note: After assembly is completed, some extra parts may be left over. Make sure that all parts are properly tightened before you use the elliptical. Tip: Avoid pinching the wires. 12. Insert the excess wire downward into an outlet, see HOW TO PLUG IN THE POWER ADAPTER on the Console to protect the...

English Manual
Page 12
... properly installed in accordance with all local codes and ordinances. Pull on the front of the elliptical. If you do not do this, you may damage the console displays or other electronic components. Then, plug the power adapter into the jack on the upright Place your foot here Lift here 12 Carefully move the elliptical to the desired location, and then lower it...
... properly installed in accordance with all local codes and ordinances. Pull on the front of the elliptical. If you do not do this, you may damage the console displays or other electronic components. Then, plug the power adapter into the jack on the upright Place your foot here Lift here 12 Carefully move the elliptical to the desired location, and then lower it...

English Manual
Page 13
... latch button must be visible or the latch pin is not fully engaged. the pedals will continue to a complete stop. Note: The elliptical does not have a free wheel; When the pedals are stationary, step off the lower pedal. 13 Note: The crank arms can turn in the opposite direction. Latch Button Ramp Handle Crank Arm Handlebars Pedals Ramp To dismount the elliptical, wait until the flywheel stops. HOW TO EXERCISE ON THE ELLIPTICAL HOW TO CHANGE...
... latch button must be visible or the latch pin is not fully engaged. the pedals will continue to a complete stop. Note: The elliptical does not have a free wheel; When the pedals are stationary, step off the lower pedal. 13 Note: The crank arms can turn in the opposite direction. Latch Button Ramp Handle Crank Arm Handlebars Pedals Ramp To dismount the elliptical, wait until the flywheel stops. HOW TO EXERCISE ON THE ELLIPTICAL HOW TO CHANGE...
English Manual
Page 14
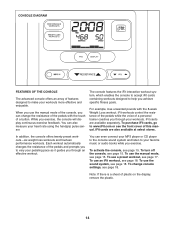
... your pedaling pace as it guides you exercise. To use the manual mode, see page 18. When you use the manual mode of the console, you exercise, the console will display continuous exercise feedback. CONSOLE DIAGRAM FEATURES OF THE CONSOLE The advanced console offers an array of features designed to make your heart rate using the handgrip pulse sensor. To use an iFit workout, see page 15. In addition, the console offers twenty preset workouts-six weight loss workouts and...
... your pedaling pace as it guides you exercise. To use the manual mode, see page 18. When you use the manual mode of the console, you exercise, the console will display continuous exercise feedback. CONSOLE DIAGRAM FEATURES OF THE CONSOLE The advanced console offers an array of features designed to make your heart rate using the handgrip pulse sensor. To use an iFit workout, see page 15. In addition, the console offers twenty preset workouts-six weight loss workouts and...

English Manual
Page 15
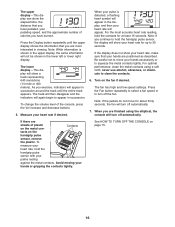
... finished exercising, unplug the power adapter. Begin pedaling or press any of the Workouts buttons repeatedly until zeros appear in revolutions per minute) and the approximate number of calories that you turn on the console, the manual mode will be selected. Each time you have pedaled. Change the resistance of revolutions) that you have selected a workout, reselect the manual mode by pressing the Resistance Increase and Decrease buttons. The lower right display-This display...
... finished exercising, unplug the power adapter. Begin pedaling or press any of the Workouts buttons repeatedly until zeros appear in revolutions per minute) and the approximate number of calories that you turn on the console, the manual mode will be selected. Each time you have pedaled. Change the resistance of revolutions) that you have selected a workout, reselect the manual mode by pressing the Resistance Increase and Decrease buttons. The lower right display-This display...
English Manual
Page 16
...; Avoid moving your heart rate if desired. See HOW TO TURN OFF THE CONSOLE on the metal con- For optimal performance, clean the metal contacts using the elliptical, the console will appear. When you have pedaled, your pedaling speed, and the approximate number of calories you are sheets of the console, press the Vol increase and decrease buttons. 5. When your pulse is shown in the upper display...
...; Avoid moving your heart rate if desired. See HOW TO TURN OFF THE CONSOLE on the metal con- For optimal performance, clean the metal contacts using the elliptical, the console will appear. When you have pedaled, your pedaling speed, and the approximate number of calories you are sheets of the console, press the Vol increase and decrease buttons. 5. When your pulse is shown in the upper display...
English Manual
Page 17
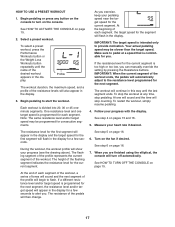
... setting by pressing the Resistance buttons. At the beginning of the workout ends, the pedals will appear in the display for a few seconds. Your actual pedaling speed may be slower than the target speed. If the resistance level for the current segment is programmed for the next segment, the resistance level and/or target speed will automatically adjust to pedal at any button on the console. To stop the workout...
... setting by pressing the Resistance buttons. At the beginning of the workout ends, the pedals will appear in the display for a few seconds. Your actual pedaling speed may be slower than the target speed. If the resistance level for the current segment is programmed for the next segment, the resistance level and/or target speed will automatically adjust to pedal at any button on the console. To stop the workout...

English Manual
Page 18
... the console settings and exit the user mode. Store the iFit card in the display. Next, press the play music or audio books through your MP3 player or CD player. 2. iFit workouts function in the display. When you select a workout, the voice of a personal trainer will show the total number of this manual. Press the Display button to select the desired backlight option. Adjust the volume level using the volume control on...
... the console settings and exit the user mode. Store the iFit card in the display. Next, press the play music or audio books through your MP3 player or CD player. 2. iFit workouts function in the display. When you select a workout, the voice of a personal trainer will show the total number of this manual. Press the Display button to select the desired backlight option. Adjust the volume level using the volume control on...
English Manual
Page 19
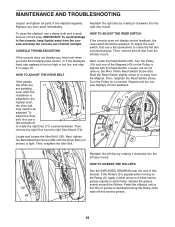
..., locate the Reed Switch (38). Loosen, but do not remove, the M4 x 16mm Reed Switch Screw (69). Then, retighten the Reed Switch Screw. Replace any excess grease. 19 Locate and loosen the Idler Bolt (120). Turn the Pulley for a moment. To adjust the reed switch, first use a flat screwdriver to or away from the right Disc Mount (72). To adjust the drive belt, first use a damp cloth and a small amount of direct sunlight. Next, tighten the Belt Adjustment Screw...
..., locate the Reed Switch (38). Loosen, but do not remove, the M4 x 16mm Reed Switch Screw (69). Then, retighten the Reed Switch Screw. Replace any excess grease. 19 Locate and loosen the Idler Bolt (120). Turn the Pulley for a moment. To adjust the reed switch, first use a flat screwdriver to or away from the right Disc Mount (72). To adjust the drive belt, first use a damp cloth and a small amount of direct sunlight. Next, tighten the Belt Adjustment Screw...
English Manual
Page 20
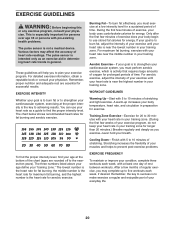
... "training zone." The chart below shows recommended heart rates for aerobic exercise. Only after the first few weeks of stretching and light exercise. EXERCISE GUIDELINES WARNING: Before beginning this or any exercise program, consult your exercise program. Burning Fat-To burn fat effectively, you must perform aerobic exercise, which is not a medical device. For maximum fat burning, exercise with pre-existing health problems. The pulse sensor is...
... "training zone." The chart below shows recommended heart rates for aerobic exercise. Only after the first few weeks of stretching and light exercise. EXERCISE GUIDELINES WARNING: Before beginning this or any exercise program, consult your exercise program. Burning Fat-To burn fat effectively, you must perform aerobic exercise, which is not a medical device. For maximum fat burning, exercise with pre-existing health problems. The pulse sensor is...

English Manual
Page 23
... Pulse Bar Track Cover Left Latch Cover Right Latch Cover Latch Button Latch Cable Cable Pulley Latch Spring Latch Pin Crank Pulley Crank Arm M4 x 16mm Flange Screw Idler C-magnet Bracket Motor Bracket Resistance Motor Resistance Arm Resistance Disc Flywheel Flywheel Axle Stabilizer Bushing Stabilizer Axle Stabilizer Cap Foot Wheel Pivot Axle Pivot Bushing Water Bottle Holder Reed Switch Clamp R12 Bearing Flywheel Bearing Large Snap Ring Magnet Left Pedal Arm Left Roller Arm Left Handlebar Leg Left Handlebar Left Pedal Bracket Left Pedal Left Pedal Insert Key No. PART LIST Key...
... Pulse Bar Track Cover Left Latch Cover Right Latch Cover Latch Button Latch Cable Cable Pulley Latch Spring Latch Pin Crank Pulley Crank Arm M4 x 16mm Flange Screw Idler C-magnet Bracket Motor Bracket Resistance Motor Resistance Arm Resistance Disc Flywheel Flywheel Axle Stabilizer Bushing Stabilizer Axle Stabilizer Cap Foot Wheel Pivot Axle Pivot Bushing Water Bottle Holder Reed Switch Clamp R12 Bearing Flywheel Bearing Large Snap Ring Magnet Left Pedal Arm Left Roller Arm Left Handlebar Leg Left Handlebar Left Pedal Bracket Left Pedal Left Pedal Insert Key No. PART LIST Key...

English Manual
Page 24
... Pedal Right Pedal Insert Pulse Wire Upper Bushing M3.5 x 12mm Screw Idler Bolt Audio Cable M5 Washer Adjustment Nut Small Snap Ring Assembly Tool Grease Packet Userʼs Manual Note: Specifications are not illustrated. 24 Qty. Key No. Description 101 2 102 6 103 1 104 16 105 2 106 2 107 4 108 10 109 1 110 4 111 1 112 1 113 1 114 2 M8 x 20mm Washer M8 Locknut Pivot Screw M4 x 16mm Screw Pedal Pad Motor Bracket Screw Roller Arm...
... Pedal Right Pedal Insert Pulse Wire Upper Bushing M3.5 x 12mm Screw Idler Bolt Audio Cable M5 Washer Adjustment Nut Small Snap Ring Assembly Tool Grease Packet Userʼs Manual Note: Specifications are not illustrated. 24 Qty. Key No. Description 101 2 102 6 103 1 104 16 105 2 106 2 107 4 108 10 109 1 110 4 111 1 112 1 113 1 114 2 M8 x 20mm Washer M8 Locknut Pivot Screw M4 x 16mm Screw Pedal Pad Motor Bracket Screw Roller Arm...

English Manual
Page 28
..., loss of enjoyment or use, or costs of removal or installation; or to you specific legal rights. ICON Health & Fitness, Inc., 1500 S. 1000 W., Logan, UT 84321-9813 Part No. 307577 R0111B Printed in -home service, the customer will be prepared to state. ORDERING REPLACEMENT PARTS To order replacement parts, please see the PART LIST and the EXPLODED DRAWING near the end of this manual) LIMITED WARRANTY IMPORTANT: You must...
..., loss of enjoyment or use, or costs of removal or installation; or to you specific legal rights. ICON Health & Fitness, Inc., 1500 S. 1000 W., Logan, UT 84321-9813 Part No. 307577 R0111B Printed in -home service, the customer will be prepared to state. ORDERING REPLACEMENT PARTS To order replacement parts, please see the PART LIST and the EXPLODED DRAWING near the end of this manual) LIMITED WARRANTY IMPORTANT: You must...


