

Uk Manual
Page 1
... all precautions and instructions in the space above for future reference. Save this equipment. PETL32571 Serial No. Write the serial number in this manual before using this manual for reference. As a manufacturer, we will guarantee complete satisfaction through our Customer Service Department. Class HC Fitness Product USERÕS MANUAL If you have questions, or if there are missing or damaged parts, we are...
... all precautions and instructions in the space above for future reference. Save this equipment. PETL32571 Serial No. Write the serial number in this manual before using this manual for reference. As a manufacturer, we will guarantee complete satisfaction through our Customer Service Department. Class HC Fitness Product USERÕS MANUAL If you have questions, or if there are missing or damaged parts, we are...
Uk Manual
Page 2
... walking belt whilst the power is being administered. 6. Always hold the handrails whilst using the treadmill. TABLE OF CONTENTS IMPORTANT PRECAUTIONS 2 BEFORE YOU BEGIN 4 ASSEMBLY 5 OPERATION AND ADJUSTMENT 7 HOW TO FOLD AND MOVE THE TREADMILL 10 MAINTENANCE AND TROUBLE-SHOOTING 12 CONDITIONING GUIDELINES 14 ORDERING REPLACEMENT PARTS Back Cover Note: A PART LIST and an EXPLODED DRAWING are attached in the centre of clearance behind it. Never use only a 14gauge cord...
... walking belt whilst the power is being administered. 6. Always hold the handrails whilst using the treadmill. TABLE OF CONTENTS IMPORTANT PRECAUTIONS 2 BEFORE YOU BEGIN 4 ASSEMBLY 5 OPERATION AND ADJUSTMENT 7 HOW TO FOLD AND MOVE THE TREADMILL 10 MAINTENANCE AND TROUBLE-SHOOTING 12 CONDITIONING GUIDELINES 14 ORDERING REPLACEMENT PARTS Back Cover Note: A PART LIST and an EXPLODED DRAWING are attached in the centre of clearance behind it. Never use only a 14gauge cord...
Uk Manual
Page 3
... months. 26. Always remove the key when the treadmill is not in the location shown. Unplug the power cord and adjust the roller guards, if necessary. 21. Inspect and tighten all instructions before performing the maintenance and adjustment procedures described in this product. The pulse sensor is intended for longer than the procedures in -home use this manual should be 1/8 inch (3 mm) from the rear roller (see the drawing...
... months. 26. Always remove the key when the treadmill is not in the location shown. Unplug the power cord and adjust the roller guards, if necessary. 21. Inspect and tighten all instructions before performing the maintenance and adjustment procedures described in this product. The pulse sensor is intended for longer than the procedures in -home use this manual should be 1/8 inch (3 mm) from the rear roller (see the drawing...
Uk Manual
Page 4
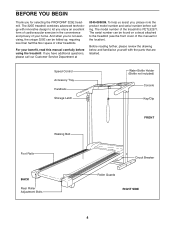
... the product model number and serial number before using the treadmill. And when youÕre not exercising, the unique 325E can be folded up, requiring less than half the floor space of this manual carefully before calling. Speed Control Accessory Tray Handrails Storage Latch Water Bottle Holder (Bottle not included) Console Key/Clip Walking Belt FRONT Foot Rails BACK Rear Roller Adjustment Bolts Circuit Breaker Roller Guards RIGHT SIDE 4 The serial number can be...
... the product model number and serial number before using the treadmill. And when youÕre not exercising, the unique 325E can be folded up, requiring less than half the floor space of this manual carefully before calling. Speed Control Accessory Tray Handrails Storage Latch Water Bottle Holder (Bottle not included) Console Key/Clip Walking Belt FRONT Foot Rails BACK Rear Roller Adjustment Bolts Circuit Breaker Roller Guards RIGHT SIDE 4 The serial number can be...
Uk Manual
Page 5
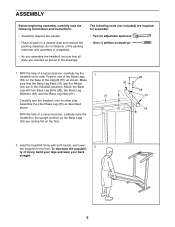
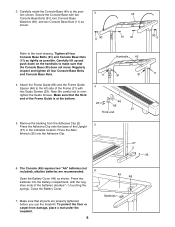
... in the indicated positions. The following information and instructions: ¥ Assembly requires two people. ¥ Place all parts are oriented as shown in a cleared area and remove the packing materials; Make sure that all parts in the drawings. Attach the Base Leg with both hands, and lower 2 the treadmill to the upright position so the Base Legs (55) are resting flat on...
... in the indicated positions. The following information and instructions: ¥ Assembly requires two people. ¥ Place all parts are oriented as shown in a cleared area and remove the packing materials; Make sure that all parts in the drawings. Attach the Base Leg with both hands, and lower 2 the treadmill to the upright position so the Base Legs (55) are resting flat on...
Uk Manual
Page 6
Note: Be careful not to make sure that the Console Base (45) does not move. tighten the Guide Screws. Make sure that all four Console Base Bolts and Console Base Nuts. The Console (49) requires two "AA" batteries (not included); Regularly inspect and tighten all parts are recommended. 6 Open the Battery Cover (48) as possible. Close the Battery Cover. 49 48 7. To protect the floor or carpet from...
Note: Be careful not to make sure that the Console Base (45) does not move. tighten the Guide Screws. Make sure that all four Console Base Bolts and Console Base Nuts. The Console (49) requires two "AA" batteries (not included); Regularly inspect and tighten all parts are recommended. 6 Open the Battery Cover (48) as possible. Close the Battery Cover. 49 48 7. To protect the floor or carpet from...
Uk Manual
Page 7
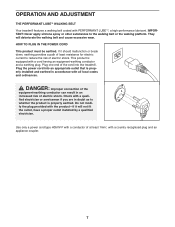
If it will deteriorate the walking belt and cause excessive wear. Plug the power cord into the treadmill. fy the plug provided with all local codes and ordinances. fied electrician or serviceman if you are in accordance with the productÑif it should malfunction or break down, earthing provides a path of least resistance for electric current to reduce the...
If it will deteriorate the walking belt and cause excessive wear. Plug the power cord into the treadmill. fy the plug provided with all local codes and ordinances. fied electrician or serviceman if you are in accordance with the productÑif it should malfunction or break down, earthing provides a path of least resistance for electric current to reduce the...
Uk Manual
Page 8
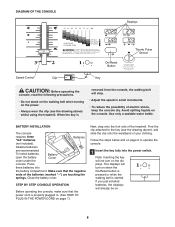
... treadmill. Follow the steps below and on the console. Note: Inserting the key will already be on. 8 DIAGRAM OF THE CONSOLE Displays On/Reset Button Thumb Pulse Sensor Speed Control Clip Key CAUTION: Before operating the console, read the following precautions. ¥ Do not stand on the walking belt when turning on the power. ¥ Always wear the clip (see the drawing above ) whilst using the treadmill. To install batteries, open the battery Battery Cover cover under the console...
... treadmill. Follow the steps below and on the console. Note: Inserting the key will already be on. 8 DIAGRAM OF THE CONSOLE Displays On/Reset Button Thumb Pulse Sensor Speed Control Clip Key CAUTION: Before operating the console, read the following precautions. ¥ Do not stand on the walking belt when turning on the power. ¥ Always wear the clip (see the drawing above ) whilst using the treadmill. To install batteries, open the battery Battery Cover cover under the console...
Uk Manual
Page 9
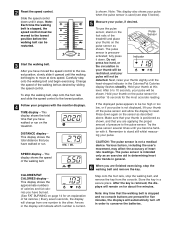
... the speed control. Arrows in a secure place. Store the key in the display will be restricted, and your pulse, if desired. After the key is stopped and no console buttons are finished exercising, stop the walking belt and remove the key. Note: Any time that your thumb slightly until the walking belt begins to conserve the batteries. Change the speed of heart rate readings. Note: This display also shows your pulse when the pulse sensor is...
... the speed control. Arrows in a secure place. Store the key in the display will be restricted, and your pulse, if desired. After the key is stopped and no console buttons are finished exercising, stop the walking belt and remove the key. Note: Any time that your thumb slightly until the walking belt begins to conserve the batteries. Change the speed of heart rate readings. Note: This display also shows your pulse when the pulse sensor is...
Uk Manual
Page 10
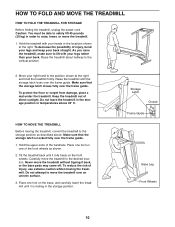
... may come off. Move your hands in temperatures above . Tilt the treadmill back until the storage latch locks over the frame guide. Do not attempt to the vertical position. 2. Make sure that the storage latch closes fully over the frame guide. Carefully move the treadmill over the frame guide. 1. HOW TO FOLD AND MOVE THE TREADMILL HOW TO FOLD THE TREADMILL FOR STORAGE Before folding the treadmill, unplug the power cord.
... may come off. Move your hands in temperatures above . Tilt the treadmill back until the storage latch locks over the frame guide. Do not attempt to the vertical position. 2. Make sure that the storage latch closes fully over the frame guide. Carefully move the treadmill over the frame guide. 1. HOW TO FOLD AND MOVE THE TREADMILL HOW TO FOLD THE TREADMILL FOR STORAGE Before folding the treadmill, unplug the power cord.

Uk Manual
Page 11
Storage Opened Latch Frame Guide 11 HOW TO LOWER THE TREADMILL FOR USE 1. To decrease the possibility of the treadmill with both hands, and lower the treadmill to the floor. Hold the treadmill firmly with your right hand as shown. Using your back straight. Hold the upper end of injury, bend your legs and keep your left hand, slide open the storage latch. Pivot the treadmill until the frame guide and the foot rail are past the storage latch. 2.
Storage Opened Latch Frame Guide 11 HOW TO LOWER THE TREADMILL FOR USE 1. To decrease the possibility of the treadmill with both hands, and lower the treadmill to the floor. Hold the treadmill firmly with your right hand as shown. Using your back straight. Hold the upper end of injury, bend your legs and keep your left hand, slide open the storage latch. Pivot the treadmill until the frame guide and the foot rail are past the storage latch. 2.
Uk Manual
Page 12
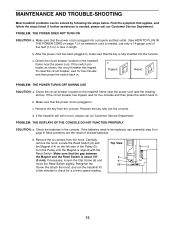
... and then press the switch back in , make sure that the key is needed , use only a 14-gauge cord of five feet (1,5 m) or less in the console. Locate the Reed Switch (8) and the Magnet (14) on page 6. Make sure that applies, and follow the steps listed. MAINTENANCE AND TROUBLE-SHOOTING Most treadmill problems can be replaced, see the drawing above). PROBLEM: THE POWER DOES NOT TURN ON SOLUTION: a. To reset the...
... and then press the switch back in , make sure that the key is needed , use only a 14-gauge cord of five feet (1,5 m) or less in the console. Locate the Reed Switch (8) and the Magnet (14) on page 6. Make sure that applies, and follow the steps listed. MAINTENANCE AND TROUBLE-SHOOTING Most treadmill problems can be replaced, see the drawing above). PROBLEM: THE POWER DOES NOT TURN ON SOLUTION: a. To reset the...
Uk Manual
Page 13
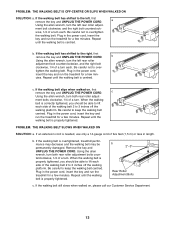
PROBLEM: THE WALKING BELT IS OFF-CENTRE OR SLIPS WHEN WALKED ON SOLUTION: a. Plug in the power cord, insert the key and run the treadmill for a few min- b Using the allen wrench, turn the left rear roller adjustment bolt counterclockwise, and the right bolt clockwise, 1/4 of a turn each . If the walking belt slips when walked on , please call our Customer Service Department. 13 Be careful to 3 inches off the walking platform. If the walking belt still slows...
PROBLEM: THE WALKING BELT IS OFF-CENTRE OR SLIPS WHEN WALKED ON SOLUTION: a. Plug in the power cord, insert the key and run the treadmill for a few min- b Using the allen wrench, turn the left rear roller adjustment bolt counterclockwise, and the right bolt clockwise, 1/4 of a turn each . If the walking belt slips when walked on , please call our Customer Service Department. 13 Be careful to 3 inches off the walking platform. If the walking belt still slows...
Uk Manual
Page 14
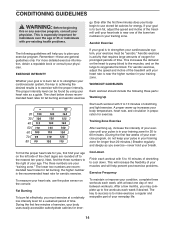
... large amounts of oxygen for ener- For aerobic exercise, adjust the speed and incline of the lower two numbers in your exercise program. WORKOUT GUIDELINES Each workout should include the following guidelines will help you , first find your age on the left side of stretching to make exercise a regular and enjoyable part of your heart rate, use stored fat calories for longer than 20 minutes...
... large amounts of oxygen for ener- For aerobic exercise, adjust the speed and incline of the lower two numbers in your exercise program. WORKOUT GUIDELINES Each workout should include the following guidelines will help you , first find your age on the left side of stretching to make exercise a regular and enjoyable part of your heart rate, use stored fat calories for longer than 20 minutes...
Uk Manual
Page 15
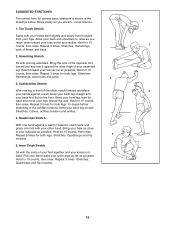
... floor. Stretches: Hamstrings, lower back and groin. 3 3. Inner Thigh Stretch Sit with one leg in the drawings below. Hold for 15 counts, then relax. Repeat 3 times. Bend your front leg, lean forward and move your knees outward. Repeat 3 times for both legs. Pull your feet toward ...Hold for 15 counts, then relax. SUGGESTED STRETCHES The correct form for 15 counts, then relax. Move slowly as you reach down toward you stretchÑnever bounce. 1. Toe Touch Stretch Stand with your extended leg. Allow your back and shoulders to your hands against a wall...
... floor. Stretches: Hamstrings, lower back and groin. 3 3. Inner Thigh Stretch Sit with one leg in the drawings below. Hold for 15 counts, then relax. Repeat 3 times. Bend your front leg, lean forward and move your knees outward. Repeat 3 times for both legs. Pull your feet toward ...Hold for 15 counts, then relax. SUGGESTED STRETCHES The correct form for 15 counts, then relax. Move slowly as you reach down toward you stretchÑnever bounce. 1. Toe Touch Stretch Stand with your extended leg. Allow your back and shoulders to your hands against a wall...
Uk Manual
Page 16
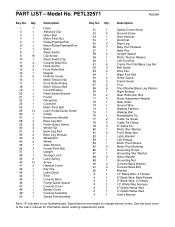
... Bolt Magnet Platform Screw Motor Tension Nut Front Roller/Pulley Motor Tension Bolt Circuit Breaker Reed Switch Bracket Frame Receptical Controller Motor Pivot Bolt Latch Screw/Guide Screw Choke Electronics Bracket Base Leg Bolt Roller Guard Screw Wheel Nut Base Leg Pad Base Leg Endcap Wheel Bolt Wheel Allen Wrench Frame Pivot Bolt Upright Storage Latch Latch Spring Screw Handrail Cover Key Clip Latch Decal Filter Console Base Frame Guide Spacer Console Cover Battery Cover Console Assembly Speed Potentiometer Key No. Specifications are subject to change without notice. PART LISTÑModel...
... Bolt Magnet Platform Screw Motor Tension Nut Front Roller/Pulley Motor Tension Bolt Circuit Breaker Reed Switch Bracket Frame Receptical Controller Motor Pivot Bolt Latch Screw/Guide Screw Choke Electronics Bracket Base Leg Bolt Roller Guard Screw Wheel Nut Base Leg Pad Base Leg Endcap Wheel Bolt Wheel Allen Wrench Frame Pivot Bolt Upright Storage Latch Latch Spring Screw Handrail Cover Key Clip Latch Decal Filter Console Base Frame Guide Spacer Console Cover Battery Cover Console Assembly Speed Potentiometer Key No. Specifications are subject to change without notice. PART LISTÑModel...
Uk Manual
Page 18
... treadmill) ¥ The MODEL NUMBER of the product (PETL32571) ¥ The PART NUMBER of the part (see the EXPLODED DRAWING and PART LIST attached in the centre of this manual) ¥ The DESCRIPTION of the part (see the EXPLODED DRAWING and PART LIST attached in Canada © 1999 ICON Health & Fitness, Inc. Part No. 147785 R0399A Printed in the centre of this manual). ORDERING REPLACEMENT PARTS To order replacement parts, contact the ICON Fitness Lifestyle...
... treadmill) ¥ The MODEL NUMBER of the product (PETL32571) ¥ The PART NUMBER of the part (see the EXPLODED DRAWING and PART LIST attached in the centre of this manual) ¥ The DESCRIPTION of the part (see the EXPLODED DRAWING and PART LIST attached in Canada © 1999 ICON Health & Fitness, Inc. Part No. 147785 R0399A Printed in the centre of this manual). ORDERING REPLACEMENT PARTS To order replacement parts, contact the ICON Fitness Lifestyle...

