
Uk Manual
Page 3
... openings. When connecting the power cord (see HOW TO TURN ON THE POWER on the walking belt. The pulse sensor is turned off. IMPORTANT PRECAUTIONS WARNING: To reduce the risk of serious injury, read all times. 8. Use the treadmill only as an exercise aid in determining heart rate trends in use of all warnings on page 26 if the treadmill is not working properly.) 15. Place the treadmill on the treadmill...
... openings. When connecting the power cord (see HOW TO TURN ON THE POWER on the walking belt. The pulse sensor is turned off. IMPORTANT PRECAUTIONS WARNING: To reduce the risk of serious injury, read all times. 8. Use the treadmill only as an exercise aid in determining heart rate trends in use of all warnings on page 26 if the treadmill is not working properly.) 15. Place the treadmill on the treadmill...
Uk Manual
Page 5
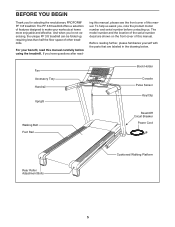
... familiarize yourself with the parts that are shown on the front cover of this manual carefully before contacting us. And when you have questions after read this manual. The PF 3.8 treadmill offers a selection of other treadmills. Fan Accessory Tray Handrail Upright Walking Belt Foot Rail Book Holder Console Pulse Sensor Key/Clip Reset/Off Circuit Breaker Power Cord Rear Roller Adjustment Bolts Cushioned Walking Platform 5 For your workouts at home more enjoyable and...
... familiarize yourself with the parts that are shown on the front cover of this manual carefully before contacting us. And when you have questions after read this manual. The PF 3.8 treadmill offers a selection of other treadmills. Fan Accessory Tray Handrail Upright Walking Belt Foot Rail Book Holder Console Pulse Sensor Key/Clip Reset/Off Circuit Breaker Power Cord Rear Roller Adjustment Bolts Cushioned Walking Platform 5 For your workouts at home more enjoyable and...

Uk Manual
Page 9
... try again. Tighten the four 3/8" x 4 1/2" Bolts (6). 10 10 7 Start First 74 9 95 Connectors 7 Front Edge 7 10 Start First 7 78 IF THE CONNECTORS ARE NOT CONNECTED PROPERLY, THE CONSOLE MAY BE DAMAGED WHEN THE POWER IS TURNED ON. Insert the indicated connectors into the Uprights (74, 78), and then fully insert the brackets. Attach the Bridge (95) with two 3/8" x 2" Bolts (4) and 3/8" Nuts...
... try again. Tighten the four 3/8" x 4 1/2" Bolts (6). 10 10 7 Start First 74 9 95 Connectors 7 Front Edge 7 10 Start First 7 78 IF THE CONNECTORS ARE NOT CONNECTED PROPERLY, THE CONSOLE MAY BE DAMAGED WHEN THE POWER IS TURNED ON. Insert the indicated connectors into the Uprights (74, 78), and then fully insert the brackets. Attach the Bridge (95) with two 3/8" x 2" Bolts (4) and 3/8" Nuts...

Uk Manual
Page 11
...) to install the receiver included with the bracket. Have a second person hold the Frame until 13 this step is used to align the Storage Latch with the chest pulse sensor. 1. Note: It may be necessary to move the Frame back and forth to adjust the walking belt (see page 23), follow the steps below to the position shown. If you use the treadmill. Attach the receiver...
...) to install the receiver included with the bracket. Have a second person hold the Frame until 13 this step is used to align the Storage Latch with the chest pulse sensor. 1. Note: It may be necessary to move the Frame back and forth to adjust the walking belt (see page 23), follow the steps below to the position shown. If you use the treadmill. Attach the receiver...

Uk Manual
Page 12
... of the power cord and tighten the screw in - Press the pins on the power cord into the socket on Treadmill See drawing 1. Important: Make sure that is secure and the screw has been tightened before using the power cord. Plug the power cord into an appropriate outlet that the adapter cover is properly installed and earthed in accordance with GFCI-equipped outlets. 2 Screw Adapter 3 Adapter Cover Pins Metal Clips Outlet DANGER: Improper connection of electric...
... of the power cord and tighten the screw in - Press the pins on the power cord into the socket on Treadmill See drawing 1. Important: Make sure that is secure and the screw has been tightened before using the power cord. Plug the power cord into an appropriate outlet that the adapter cover is properly installed and earthed in accordance with GFCI-equipped outlets. 2 Screw Adapter 3 Adapter Cover Pins Metal Clips Outlet DANGER: Improper connection of electric...
Uk Manual
Page 13
... optional chest pulse sensor. You can change the speed and incline of the treadmill with the touch of a button. The first time you can even measure your own learn workouts and save them for future use the manual mode, see page 17. You can view your workout history and track your workouts more effective and enjoyable. To identify yourself as it guides you exercise, the console will display continuous exercise...
... optional chest pulse sensor. You can change the speed and incline of the treadmill with the touch of a button. The first time you can even measure your own learn workouts and save them for future use the manual mode, see page 17. You can view your workout history and track your workouts more effective and enjoyable. To identify yourself as it guides you exercise, the console will display continuous exercise...
Uk Manual
Page 14
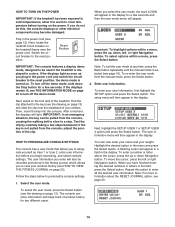
... then the user mode menu will appear in the field, press the Select button. Next, locate the reset/off the demo mode, hold down Navigation button. Switch the circuit breaker to the key (see page 16). If the displays light as soon as User 1 or User 2, enter user information before turning on the treadmill frame near the power cord. You can store information and keep track of the treadmill. To move the cursor, press the...
... then the user mode menu will appear in the field, press the Select button. Next, locate the reset/off the demo mode, hold down Navigation button. Switch the circuit breaker to the key (see page 16). If the displays light as soon as User 1 or User 2, enter user information before turning on the treadmill frame near the power cord. You can store information and keep track of the treadmill. To move the cursor, press the...
Uk Manual
Page 15
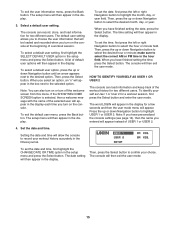
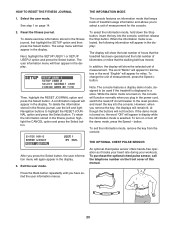
... time, first highlight the CHANGE DATE OR TIME option in the hour field. The date setting will then appear in the display for two different users. HOW TO IDENTIFY YOURSELF AS USER 1 OR USER 2 The console can record, store, and load information for a workout session, first press the Select button and enter the user mode. A list of USER 1 or USER 2. 4. The setup menu will then appear in...
... time, first highlight the CHANGE DATE OR TIME option in the hour field. The date setting will then appear in the display for two different users. HOW TO IDENTIFY YOURSELF AS USER 1 OR USER 2 The console can record, store, and load information for a workout session, first press the Select button and enter the user mode. A list of USER 1 or USER 2. 4. The setup menu will then appear in...

Uk Manual
Page 16
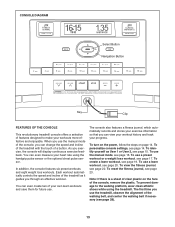
... pressing the Speed + and - If you press the Start button or the Speed + button, the walking belt will be displayed only while you press one of the ten numbered speed buttons. 5. If you use the handgrip pulse sensor (see THE INFORMATION MODE on page 17). Change the incline of calories you have selected a workout, press the Classic Workouts Enter/Exit button to return to select the desired display option. As you walk or run on the treadmill, the display...
... pressing the Speed + and - If you press the Start button or the Speed + button, the walking belt will be displayed only while you press one of the ten numbered speed buttons. 5. If you use the handgrip pulse sensor (see THE INFORMATION MODE on page 17). Change the incline of calories you have selected a workout, press the Classic Workouts Enter/Exit button to return to select the desired display option. As you walk or run on the treadmill, the display...
Uk Manual
Page 17
... the console. Contacts avoid moving your heart rate using the treadmill, switch the reset/off after a few minutes. One speed setting and one -minute segments. To return to turn off circuit breaker to the storage position or you select a preset workout or a weight loss workout, the display will appear in a pulse display along with other exercise information. 8. Press the Fan button repeatedly to select a fan speed or to the manual mode, press the Classic Workouts Enter/Exit button.
... the console. Contacts avoid moving your heart rate using the treadmill, switch the reset/off after a few minutes. One speed setting and one -minute segments. To return to turn off circuit breaker to the storage position or you select a preset workout or a weight loss workout, the display will appear in a pulse display along with other exercise information. 8. Press the Fan button repeatedly to select a fan speed or to the manual mode, press the Classic Workouts Enter/Exit button.
Uk Manual
Page 18
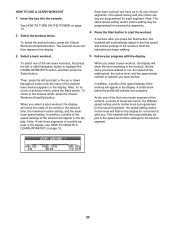
... low, you can override the setting by pressing the Speed or Incline buttons; If the speed setting or incline level for a moment to the first speed and incline settings of calories you are finished exercising, remove the key from the console. Press the Start button to a stop the workout at 2 kph. When you select a preset workout or a weight loss workout, the display will automatically adjust to alert you press the Start button, the treadmill will show the time remaining...
... low, you can override the setting by pressing the Speed or Incline buttons; If the speed setting or incline level for a moment to the first speed and incline settings of calories you are finished exercising, remove the key from the console. Press the Start button to a stop the workout at 2 kph. When you select a preset workout or a weight loss workout, the display will automatically adjust to alert you press the Start button, the treadmill will show the time remaining...
Uk Manual
Page 19
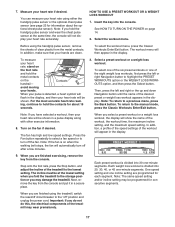
... the display. To select the workout menu, press the Classic Workouts Enter/Exit button. At the end of the numbered speed buttons. To return to a previous menu, press the Back button. Continue exercising and programming speed and incline settings for up to forty minutes. Press the Stop button twice and then press the Classic Workouts Enter/Exit button when you select a learn workout. When you are finished exercising, remove the key from the console. See step 9 on...
... the display. To select the workout menu, press the Classic Workouts Enter/Exit button. At the end of the numbered speed buttons. To return to a previous menu, press the Back button. Continue exercising and programming speed and incline settings for up to forty minutes. Press the Stop button twice and then press the Classic Workouts Enter/Exit button when you select a learn workout. When you are finished exercising, remove the key from the console. See step 9 on...
Uk Manual
Page 20
... key into the console. A moment after you select a learn workout appears in the display, see HOW TO CREATE A LEARN WORKOUT on page 14. 2. Follow your progress. If a different speed setting and/or incline level is programmed for the second segment, the speed setting and/or incline level will then automatically adjust to a previous menu, press the Back button. HOW TO USE A LEARN WORKOUT 1. When you press the Start button, the treadmill...
... key into the console. A moment after you select a learn workout appears in the display, see HOW TO CREATE A LEARN WORKOUT on page 14. 2. Follow your progress. If a different speed setting and/or incline level is programmed for the second segment, the speed setting and/or incline level will then automatically adjust to a previous menu, press the Back button. HOW TO USE A LEARN WORKOUT 1. When you press the Start button, the treadmill...
Uk Manual
Page 21
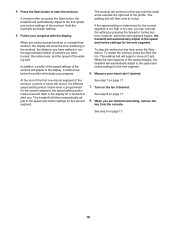
... of the profile. To change the workout while using it. The walking belt will begin to move at any time before the program ends, and then press the Classic Workouts Enter/Exit button. 7. To increase the length of the workout begins, the treadmill will automatically adjust to 40 segments. When you can change the speed or incline setting for the next segment. See step 7 on the fan if...
... of the profile. To change the workout while using it. The walking belt will begin to move at any time before the program ends, and then press the Classic Workouts Enter/Exit button. 7. To increase the length of the workout begins, the treadmill will automatically adjust to 40 segments. When you can change the speed or incline setting for the next segment. See step 7 on the fan if...
Uk Manual
Page 23
... manual. An optional chest pulse sensor offers hands-free operation as it tracks your heart rate during your workouts. To purchase the optional chest pulse sensor, call the telephone number on the front cover of measurement, press the Speed + button. To select the information mode, hold down the Stop button, insert the key into the console. Then, highlight the RESET JOURNAL option and press the Select button. Note: The console features a display demo mode, designed to be used if the treadmill is turned...
... manual. An optional chest pulse sensor offers hands-free operation as it tracks your heart rate during your workouts. To purchase the optional chest pulse sensor, call the telephone number on the front cover of measurement, press the Speed + button. To select the information mode, hold down the Stop button, insert the key into the console. Then, highlight the RESET JOURNAL option and press the Select button. Note: The console features a display demo mode, designed to be used if the treadmill is turned...

Uk Manual
Page 24
.... 3. Keep the treadmill out of injury, use extreme caution while moving the treadmill, convert the treadmill to the desired location. Hold the metal frame firmly in the storage position. 1. Make sure that the latch knob is resting in the storage position. Frame Handrail Wheels 24 Base HOW TO FOLD AND MOVE THE TREADMILL HOW TO FOLD THE TREADMILL FOR STORAGE Before folding the treadmill, adjust the incline to the vertical...
.... 3. Keep the treadmill out of injury, use extreme caution while moving the treadmill, convert the treadmill to the desired location. Hold the metal frame firmly in the storage position. 1. Make sure that the latch knob is resting in the storage position. Frame Handrail Wheels 24 Base HOW TO FOLD AND MOVE THE TREADMILL HOW TO FOLD THE TREADMILL FOR STORAGE Before folding the treadmill, adjust the incline to the vertical...

Uk Manual
Page 27
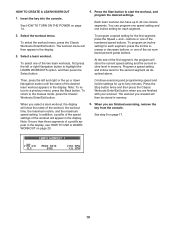
... longer than 1.5 m (5 ft.). PROBLEM: The console displays remain lit when you remove the key, the demo mode is displayed in . To turn off the walking platform. If the walking belt is aligned with the Reed Switch. 1/8 in a store. When the walking belt is properly tightened, you should be used if the treadmill is turned on SOLUTION: a. Then, plug in . (5 to 8 cm) off the demo mode, hold down the Stop button for a correct speed View reading. Reattach...
... longer than 1.5 m (5 ft.). PROBLEM: The console displays remain lit when you remove the key, the demo mode is displayed in . To turn off the walking platform. If the walking belt is aligned with the Reed Switch. 1/8 in a store. When the walking belt is properly tightened, you should be used if the treadmill is turned on SOLUTION: a. Then, plug in . (5 to 8 cm) off the demo mode, hold down the Stop button for a correct speed View reading. Reattach...

Uk Manual
Page 29
...-up to five workouts each week, with pre-existing health problems. The pulse sensor is not a medical device. Cooling Down-Finish with your heart rate in your body uses carbohydrate calories for energy. Stretching increases the flexibility of your exercise until your heart rate is to 30 minutes with 5 to burn fat, adjust the intensity of your training zone. You can use stored fat calories...
...-up to five workouts each week, with pre-existing health problems. The pulse sensor is not a medical device. Cooling Down-Finish with your heart rate in your body uses carbohydrate calories for energy. Stretching increases the flexibility of your exercise until your heart rate is to 30 minutes with 5 to burn fat, adjust the intensity of your training zone. You can use stored fat calories...

Uk Manual
Page 30
... 1 99 2 100 1 Front Roller/Pulley Bridge Wire Storage Latch Latch Knob Right Foot Rail Frame Rear Roller Bracket Rear Roller Left Rear Foot Right Rear Foot Hood Drive Belt Motor Bracket Motor Lift Frame Wire Tie Rear Roller Ground Wire Power Cord Plug Adapter Controller Reed Switch Reed Switch Clip Belly Pan Left Upright Incline Motor Left Upright Spacer Base Endcap Right Upright Right Upright Spacer Bolt Spacer Base Pad Caution Decal Base Wheel Releasable Tie 8" Tie Access Door Book Holder Console Console Fan Console Back Console Plastic Tie Console Frame Cup Holder...
... 1 99 2 100 1 Front Roller/Pulley Bridge Wire Storage Latch Latch Knob Right Foot Rail Frame Rear Roller Bracket Rear Roller Left Rear Foot Right Rear Foot Hood Drive Belt Motor Bracket Motor Lift Frame Wire Tie Rear Roller Ground Wire Power Cord Plug Adapter Controller Reed Switch Reed Switch Clip Belly Pan Left Upright Incline Motor Left Upright Spacer Base Endcap Right Upright Right Upright Spacer Bolt Spacer Base Pad Caution Decal Base Wheel Releasable Tie 8" Tie Access Door Book Holder Console Console Fan Console Back Console Plastic Tie Console Frame Cup Holder...
Uk Manual
Page 31
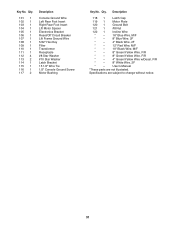
... Star Washer Latch Bracket 15 1/2" Wire Tie 1/2" Console Ground Screw Motor Bushing Key No. Key No. Userʼs Manual *These parts are subject to change without notice. 31 Qty. Description 118 1 Latch Cap 119 1 Motor Plate 120 1 Ground Bolt 121 1 #8 Nut 122 1 Incline Wire * - 16" Blue Wire, M/F * - 8" Blue Wire, 2F * - 4" Black Wire, 2F * - 12" Red Wire, M/F * - 10" Black Wire, M/F * - 8" Green/Yellow Wire, F/R * - 8" Green/Yellow Wire, F/R * - 4" Green/Yellow Wire w/Decal, F/R * - 8" White Wire, 2F * - Specifications are not illustrated...
... Star Washer Latch Bracket 15 1/2" Wire Tie 1/2" Console Ground Screw Motor Bushing Key No. Key No. Userʼs Manual *These parts are subject to change without notice. 31 Qty. Description 118 1 Latch Cap 119 1 Motor Plate 120 1 Ground Bolt 121 1 #8 Nut 122 1 Incline Wire * - 16" Blue Wire, M/F * - 8" Blue Wire, 2F * - 4" Black Wire, 2F * - 12" Red Wire, M/F * - 10" Black Wire, M/F * - 8" Green/Yellow Wire, F/R * - 8" Green/Yellow Wire, F/R * - 4" Green/Yellow Wire w/Decal, F/R * - 8" White Wire, 2F * - Specifications are not illustrated...


