

English Manual
Page 1
... more! Model No. Serial Number Decal QUESTIONS? The trained technicians on our Customer Hot Line will guarantee complete satisfaction through direct assistance from our factory. As a manufacturer, we are committed to you have questions, or if there are missing parts, we will provide immediate assistance, free of charge to providing complete customer satisfaction. MST ¨ USER'S MANUAL CAUTION Read...
... more! Model No. Serial Number Decal QUESTIONS? The trained technicians on our Customer Hot Line will guarantee complete satisfaction through direct assistance from our factory. As a manufacturer, we are committed to you have questions, or if there are missing parts, we will provide immediate assistance, free of charge to providing complete customer satisfaction. MST ¨ USER'S MANUAL CAUTION Read...

English Manual
Page 2
... use an extension cord. 4. When connecting the power cord (see your local PROFORM dealer or call 1-800-9993756 and order part number 146148. 7. Keep children under the treadmill. Keep the power cord and the surge suppres- Never allow more amps. Never move the walking belt while the power is not working properly.) 2 Keep the treadmill indoors, away from the treadmill at a time. 9. To purchase a surge suppressor, see page 7), plug...
... use an extension cord. 4. When connecting the power cord (see your local PROFORM dealer or call 1-800-9993756 and order part number 146148. 7. Keep children under the treadmill. Keep the power cord and the surge suppres- Never allow more amps. Never move the walking belt while the power is not working properly.) 2 Keep the treadmill indoors, away from the treadmill at a time. 9. To purchase a surge suppressor, see page 7), plug...

English Manual
Page 3
... TO FOLD AND MOVE THE TREADMILL on the walking belt. Apply the decal in speed. 16. DANGER: 21. Never remove the motor hood unless instructed to avoid sudden jumps in the location shown. Never leave the treadmill unattended while it is not legible, please call our Customer Service Department, toll-free, to raise, lower, or move the treadmill. 18. Inspect and tighten all instructions before performing the maintenance and adjustment procedures...
... TO FOLD AND MOVE THE TREADMILL on the walking belt. Apply the decal in speed. 16. DANGER: 21. Never remove the motor hood unless instructed to avoid sudden jumps in the location shown. Never leave the treadmill unattended while it is not legible, please call our Customer Service Department, toll-free, to raise, lower, or move the treadmill. 18. Inspect and tighten all instructions before performing the maintenance and adjustment procedures...

English Manual
Page 4
... model number of the treadmill is not included) Storage Latch Walking Belt Foot Rail RIGHT SIDE Upright Circuit Breaker Power Cord Rear Roller Adjustment Bolt BACK Incline Leg Cushioned Walking Platform for the location). The serial number can be found on a decal attached to the treadmill (see the front cover of this manual carefully before calling. BEFORE YOU BEGIN Thank you have additional questions, please call our Customer Service Department toll-free Before reading further, please review...
... model number of the treadmill is not included) Storage Latch Walking Belt Foot Rail RIGHT SIDE Upright Circuit Breaker Power Cord Rear Roller Adjustment Bolt BACK Incline Leg Cushioned Walking Platform for the location). The serial number can be found on a decal attached to the treadmill (see the front cover of this manual carefully before calling. BEFORE YOU BEGIN Thank you have additional questions, please call our Customer Service Department toll-free Before reading further, please review...
English Manual
Page 5
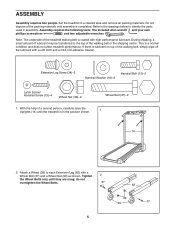
... and your own phillips screwdriver and two adjustable wrenches . Attach a Wheel (38) to identify the parts used in a cleared area and remove all packing materials. Tighten 2 the Wheel Bolts only until assembly is a normal condition and does not affect treadmill performance. Extension Leg Screw (34)Ð2 Handrail Washer (16)Ð2 Handrail Bolt (15)Ð2 Latch Screw/ Handrail Screw (13)Ð4 Wheel Nut (39)Ð2 Wheel...
... and your own phillips screwdriver and two adjustable wrenches . Attach a Wheel (38) to identify the parts used in a cleared area and remove all packing materials. Tighten 2 the Wheel Bolts only until assembly is a normal condition and does not affect treadmill performance. Extension Leg Screw (34)Ð2 Handrail Washer (16)Ð2 Handrail Bolt (15)Ð2 Latch Screw/ Handrail Screw (13)Ð4 Wheel Nut (39)Ð2 Wheel...

English Manual
Page 6
... Base Pad (36) is used to tip the Uprights [14] in the Upright. Make sure that each Upright (14). Make sure that all parts are tightened before you use the treadmill. (Note: The ratchet screws shown at the far right are factory set and should not be helpful to adjust the walking belt (see page 13). Attach the other Extension Leg (41) (not shown) in...
... Base Pad (36) is used to tip the Uprights [14] in the Upright. Make sure that each Upright (14). Make sure that all parts are tightened before you use the treadmill. (Note: The ratchet screws shown at the far right are factory set and should not be helpful to adjust the walking belt (see page 13). Attach the other Extension Leg (41) (not shown) in...

English Manual
Page 7
.... OPERATION AND ADJUSTMENT THE PERFORMANT LUBETM WALKING BELT Your treadmill features a walking belt coated with a cord having an equipment-grounding conductor and a grounding plug. Such substances will not fit the outlet, have a UL suppressed voltage rating of 400 volts or less and a minimum surge dissipation of electric shock. Do not modify the plug provided with your homeÕs power. Whenever the adapter is equipped...
.... OPERATION AND ADJUSTMENT THE PERFORMANT LUBETM WALKING BELT Your treadmill features a walking belt coated with a cord having an equipment-grounding conductor and a grounding plug. Such substances will not fit the outlet, have a UL suppressed voltage rating of 400 volts or less and a minimum surge dissipation of electric shock. Do not modify the plug provided with your homeÕs power. Whenever the adapter is equipped...

English Manual
Page 8
... the treadmill. Use only a sealable water bottle. DIAGRAM OF THE CONSOLE Speed Control Displays Clip Key CAUTION: Before operating the console, read the following precautions. ¥ Do not stand on the walking belt when turning on the power. ¥ Always wear the clip (see the drawing above), and slide the clip onto the waistband of your clothing. To install batteries, open the battery cover under the console as needed. Press two batteries...
... the treadmill. Use only a sealable water bottle. DIAGRAM OF THE CONSOLE Speed Control Displays Clip Key CAUTION: Before operating the console, read the following precautions. ¥ Do not stand on the walking belt when turning on the power. ¥ Always wear the clip (see the drawing above), and slide the clip onto the waistband of your clothing. To install batteries, open the battery cover under the console as needed. Press two batteries...

English Manual
Page 9
... treadmill can be changed by sliding the speed control. To stop the walking belt and remove the key from one number to the next. Every seven sec- Arrows in miles per hour. CALS/FAT CALS/ SPEED displayÑThis display shows the approximate numbers of calories and fat calories you have moved the speed control to move at any time, press the ON/RESET button. 2 Reset the speed control. mill is in miles. cline will not turn...
... treadmill can be changed by sliding the speed control. To stop the walking belt and remove the key from one number to the next. Every seven sec- Arrows in miles per hour. CALS/FAT CALS/ SPEED displayÑThis display shows the approximate numbers of calories and fat calories you have moved the speed control to move at any time, press the ON/RESET button. 2 Reset the speed control. mill is in miles. cline will not turn...
English Manual
Page 10
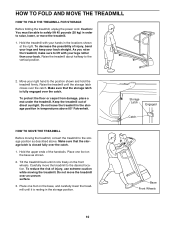
.... HOW TO FOLD AND MOVE THE TREADMILL HOW TO FOLD THE TREADMILL FOR STORAGE Before folding the treadmill, unplug the power cord. As you raise the treadmill, make sure to the desired location. Move your back. Keep the treadmill out of the handrails. Hold the upper ends of direct sunlight. Hold the treadmill with your legs rather than your right hand to raise, lower, or move the treadmill over the...
.... HOW TO FOLD AND MOVE THE TREADMILL HOW TO FOLD THE TREADMILL FOR STORAGE Before folding the treadmill, unplug the power cord. As you raise the treadmill, make sure to the desired location. Move your back. Keep the treadmill out of the handrails. Hold the upper ends of direct sunlight. Hold the treadmill with your legs rather than your right hand to raise, lower, or move the treadmill over the...
English Manual
Page 11
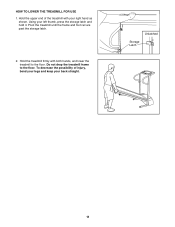
Using your back straight. Pivot the treadmill until the frame and foot rail are past the storage latch. 2. Hold the treadmill firmly with your right hand as shown. Unlatched Storage Latch 11 HOW TO LOWER THE TREADMILL FOR USE 1. To decrease the possibility of the treadmill with both hands, and lower the treadmill to the floor. Do not drop the treadmill frame to the floor. Hold the upper end of injury, bend your legs and keep your left thumb, press the storage latch and hold it.
Using your back straight. Pivot the treadmill until the frame and foot rail are past the storage latch. 2. Hold the treadmill firmly with your right hand as shown. Unlatched Storage Latch 11 HOW TO LOWER THE TREADMILL FOR USE 1. To decrease the possibility of the treadmill with both hands, and lower the treadmill to the floor. Do not drop the treadmill frame to the floor. Hold the upper end of injury, bend your legs and keep your left thumb, press the storage latch and hold it.

English Manual
Page 12
... minutes and then press the switch back in the console. Make sure that applies, and follow the steps listed. c. Remove the key from the hood. Reinsert the key fully into the console. See step 1 on the treadmill frame near the power cord. d. SYMPTOM: THE DISPLAYS OF THE CONSOLE DO NOT FUNCTION PROPERLY a. Most problems are the result of drained batteries. b. Remove the key from the console and UNPLUG THE POWER CORD. Make sure...
... minutes and then press the switch back in the console. Make sure that applies, and follow the steps listed. c. Remove the key from the hood. Reinsert the key fully into the console. See step 1 on the treadmill frame near the power cord. d. SYMPTOM: THE DISPLAYS OF THE CONSOLE DO NOT FUNCTION PROPERLY a. Most problems are the result of drained batteries. b. Remove the key from the console and UNPLUG THE POWER CORD. Make sure...

English Manual
Page 13
... the walking platform. tighten the walking belt. SYMPTOM: THE WALKING BELT SLOWS WHEN WALKED ON a. Plug in the power cord, insert the key and run the treadmill for a few minutes. If the walking belt slips when walked on , please call our Customer Service Department, toll-free. 5. Using the allen wrench, turn both rear roller adjustment bolts clockwise, 1/4 of a turn each side of a turn . Using the allen wrench, a turn the left rear roller adjustment bolt counterclockwise, and the right bolt clockwise, 1/4 of the walking belt 2 to...
... the walking platform. tighten the walking belt. SYMPTOM: THE WALKING BELT SLOWS WHEN WALKED ON a. Plug in the power cord, insert the key and run the treadmill for a few minutes. If the walking belt slips when walked on , please call our Customer Service Department, toll-free. 5. Using the allen wrench, turn both rear roller adjustment bolts clockwise, 1/4 of a turn each side of a turn . Using the allen wrench, a turn the left rear roller adjustment bolt counterclockwise, and the right bolt clockwise, 1/4 of the walking belt 2 to...

English Manual
Page 14
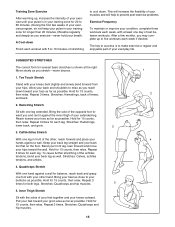
... of your exercise program, keep your heart rate near one of the lower two numbers in preparation for prolonged periods of oxygen for exercise. 14 To measure your heart rate, stop exercising.) If your heart rate is high performance athletic conditioning, set the speed control on page 15). A proper warm-up Start each workout with pre-existing health problems. The following three important parts: A Warm-up increases your wrist as a guide. CONDITIONING...
... of your exercise program, keep your heart rate near one of the lower two numbers in preparation for prolonged periods of oxygen for exercise. 14 To measure your heart rate, stop exercising.) If your heart rate is high performance athletic conditioning, set the speed control on page 15). A proper warm-up Start each workout with pre-existing health problems. The following three important parts: A Warm-up increases your wrist as a guide. CONDITIONING...
English Manual
Page 15
... exercise program, do not keep your pulse in your training zone for longer than 20 minutes.) Breathe regularly and deeply as you reach down Finish each week, with 5 to prevent post-exercise problems. Exercise Frequency To maintain or improve your knees outward. Calf/Achilles Stretch With one leg extended...three workouts each workout with at the right. The key to success is in your training zone for 20 to 60 minutes. (During the first few months, you and rest it against the inner thigh of the other hand. SUGGESTED STRETCHES The correct form for each leg. Move ...
... exercise program, do not keep your pulse in your training zone for longer than 20 minutes.) Breathe regularly and deeply as you reach down Finish each week, with 5 to prevent post-exercise problems. Exercise Frequency To maintain or improve your knees outward. Calf/Achilles Stretch With one leg extended...three workouts each workout with at the right. The key to success is in your training zone for 20 to 60 minutes. (During the first few months, you and rest it against the inner thigh of the other hand. SUGGESTED STRETCHES The correct form for each leg. Move ...

English Manual
Page 16
... Controller Extension Leg Circuit Breaker Power Cord Grommet Power Cord Right Upright Spacer Isolator Belly Pan Fastener Choke Motor Locknut Key No. PFTL29100 R0800A Key No. Bolt Rear Roller Endcap Allen Wrench Rubber Ring Foot Rail Rear Roller Platform Screw Catch Walking Platform Walking Belt Front Roller Adjustment Bolt Clip Screw Ratchet Pivot Bolt Sensor Clip Front Roller/Pulley Reed Switch Magnet Incline Leg Spacer (short) Incline Leg Spacer (long) Endcap Screw Endcap (Left) 8Ó White Wire, M/F 4Ó Red Wire, M/F 4Ó Blue Wire, M/F UserÕs Manual * Includes all parts...
... Controller Extension Leg Circuit Breaker Power Cord Grommet Power Cord Right Upright Spacer Isolator Belly Pan Fastener Choke Motor Locknut Key No. PFTL29100 R0800A Key No. Bolt Rear Roller Endcap Allen Wrench Rubber Ring Foot Rail Rear Roller Platform Screw Catch Walking Platform Walking Belt Front Roller Adjustment Bolt Clip Screw Ratchet Pivot Bolt Sensor Clip Front Roller/Pulley Reed Switch Magnet Incline Leg Spacer (short) Incline Leg Spacer (long) Endcap Screw Endcap (Left) 8Ó White Wire, M/F 4Ó Red Wire, M/F 4Ó Blue Wire, M/F UserÕs Manual * Includes all parts...

English Manual
Page 18
... PRODUCT (PROFORM¨ 285T treadmill). ¥ The SERIAL NUMBER OF THE PRODUCT (see the front cover of this manual). ¥ The KEY NUMBER AND DESCRIPTION OF THE PART(S) (see the EXPLODED DRAWING and PART LIST attached to the center of this product to be pre-authorized by an ICON authorized service center, to products used for commercial or rental purposes, or to products used as store display models. Some...
... PRODUCT (PROFORM¨ 285T treadmill). ¥ The SERIAL NUMBER OF THE PRODUCT (see the front cover of this manual). ¥ The KEY NUMBER AND DESCRIPTION OF THE PART(S) (see the EXPLODED DRAWING and PART LIST attached to the center of this product to be pre-authorized by an ICON authorized service center, to products used for commercial or rental purposes, or to products used as store display models. Some...

