
English Manual
Page 3
... away from the treadmill at all users of this manual. 11. Always hold the handrails while using the treadmill. The pulse sensor is not in a fall and serious injury. 3. Always remove the key, unplug the power cord and switch the reset/off circuit breaker to ensure that blocks air openings. Adjust the speed in small increments to raise, lower, or move the walking belt while the power is turned off position when...
... away from the treadmill at all users of this manual. 11. Always hold the handrails while using the treadmill. The pulse sensor is not in a fall and serious injury. 3. Always remove the key, unplug the power cord and switch the reset/off circuit breaker to ensure that blocks air openings. Adjust the speed in small increments to raise, lower, or move the walking belt while the power is turned off position when...
English Manual
Page 4
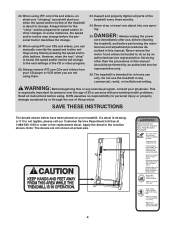
... so by pressing the speed and incline buttons. When using iFIT.com CDs and videos, you are not shown at 1-888-533-1333 to order a free replacement decal. DANGER: 25. Servicing other than the procedures in this product. SAVE THESE INSTRUCTIONS The decals shown below have been placed on your physician. Always unplug the power cord immediately after use the treadmill in the location shown. ICON assumes...
... so by pressing the speed and incline buttons. When using iFIT.com CDs and videos, you are not shown at 1-888-533-1333 to order a free replacement decal. DANGER: 25. Servicing other than the procedures in this product. SAVE THESE INSTRUCTIONS The decals shown below have been placed on your physician. Always unplug the power cord immediately after use the treadmill in the location shown. ICON assumes...
English Manual
Page 5
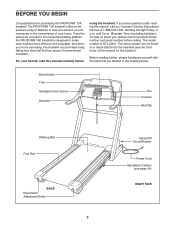
... a decal attached to make each workout more effective and enjoyable. For your home. until 6 p.m. Book Holder Tray Handgrip Pulse Sensor Handrail Fan Console Key/Clip Walking Belt Foot Rail BACK Rear Roller Adjustment Bolts 5 Reset/Off Circuit Breaker Power Cord Adjustable Cushion (see the front cover of conventional treadmills. From the advanced console to the cushioned walking platform, the PROFORM 15K treadmill is DTL12941. Mountain Time (excluding holidays). BEFORE YOU BEGIN Congratulations for the location).
... a decal attached to make each workout more effective and enjoyable. For your home. until 6 p.m. Book Holder Tray Handgrip Pulse Sensor Handrail Fan Console Key/Clip Walking Belt Foot Rail BACK Rear Roller Adjustment Bolts 5 Reset/Off Circuit Breaker Power Cord Adjustable Cushion (see the front cover of conventional treadmills. From the advanced console to the cushioned walking platform, the PROFORM 15K treadmill is DTL12941. Mountain Time (excluding holidays). BEFORE YOU BEGIN Congratulations for the location).

English Manual
Page 6
... the top of the walking belt, the sides of the treadmill walking belt is coated with a soft cloth and a mild, non-abrasive cleaner. This does not affect treadmill performance. Connect the Upright Wire Harness to connect the connectors properly (see the inset drawing). IF THE CONNECTORS ARE NOT CONNECTED PROPERLY, THE CONSOLE MAY BE DAMAGED WHEN THE POWER IS TURNED ON. 71 85 71...
... the top of the walking belt, the sides of the treadmill walking belt is coated with a soft cloth and a mild, non-abrasive cleaner. This does not affect treadmill performance. Connect the Upright Wire Harness to connect the connectors properly (see the inset drawing). IF THE CONNECTORS ARE NOT CONNECTED PROPERLY, THE CONSOLE MAY BE DAMAGED WHEN THE POWER IS TURNED ON. 71 85 71...

English Manual
Page 8
... of electric shock. If the control system is grounded before using an adapter. 8 Contact a qualified electrician to determine if the outlet box cover is damaged, the walking belt may change speed or stop unexpectedly, which may be used to connect the surge suppressor to a 2-pole receptacle as shown in your homeʼs power. To purchase a surge suppressor, see your treadmill (see drawing 1 at the...
... of electric shock. If the control system is grounded before using an adapter. 8 Contact a qualified electrician to determine if the outlet box cover is damaged, the walking belt may change speed or stop unexpectedly, which may be used to connect the surge suppressor to a 2-pole receptacle as shown in your homeʼs power. To purchase a surge suppressor, see your treadmill (see drawing 1 at the...

English Manual
Page 9
... computer, you exercise. Each program adjusts the speed and incline of a button. With the treadmill connected to our Web site at www.iFIT.com and access programs directly from our Web site, see pages 16 and 17. To use an iFIT.com CD or video program, see page 24). When the manual mode of the console is like having a personal trainer in memory for more information. Two heart rate programs are thin sheets...
... computer, you exercise. Each program adjusts the speed and incline of a button. With the treadmill connected to our Web site at www.iFIT.com and access programs directly from our Web site, see pages 16 and 17. To use an iFIT.com CD or video program, see page 24). When the manual mode of the console is like having a personal trainer in memory for more information. Two heart rate programs are thin sheets...
English Manual
Page 10
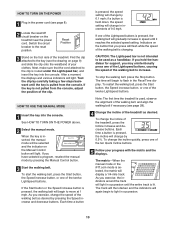
... treadmill, press the Incline increase and decrease buttons. See HOW TO TURN ON THE POWER above. 2 Select the manual mode. If you hold the handlebar for support, you exercise, change by pressing the Speed increase and decrease buttons. Find the clip attached to the clip is used as desired by 0.1 mph; As you have selected a program, reselect the manual mode by pressing the Manual Control button. 3 Start the walking belt. HOW TO TURN ON THE POWER 1 Plug in the power cord...
... treadmill, press the Incline increase and decrease buttons. See HOW TO TURN ON THE POWER above. 2 Select the manual mode. If you hold the handlebar for support, you exercise, change by pressing the Speed increase and decrease buttons. Find the clip attached to the clip is used as desired by 0.1 mph; As you have selected a program, reselect the manual mode by pressing the Manual Control button. 3 Start the walking belt. HOW TO TURN ON THE POWER 1 Plug in the power cord...
English Manual
Page 11
... finished using the treadmill, move the reset/off position and unplug the power cord. 11 Avoid moving your current pace, in the program. When your pulse is selected, this display will appear in the Calories/Pulse display, and then your heart rate. 7 Turn on the console remain lit after the walking belt is selected (except for several seconds. CAUTION: The Lightspeed bar is folded to be at high speed, press the button a second...
... finished using the treadmill, move the reset/off position and unplug the power cord. 11 Avoid moving your current pace, in the program. When your pulse is selected, this display will appear in the Calories/Pulse display, and then your heart rate. 7 Turn on the console remain lit after the walking belt is selected (except for several seconds. CAUTION: The Lightspeed bar is folded to be at high speed, press the button a second...
English Manual
Page 13
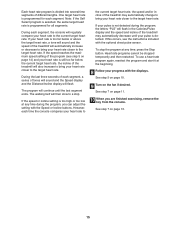
... treadmill, switch the reset/off circuit breaker to the speed and incline settings for the next segment. 4 Follow your heart rate if desired. See page 23 and turn off position and unplug the power cord. 13 Note: If the displays and various indicators on page 11. 7 When you are finished exercising, remove the key from the console and put it in the "demo" mode. To restart the program, press the Start button...
... treadmill, switch the reset/off circuit breaker to the speed and incline settings for the next segment. 4 Follow your heart rate if desired. See page 23 and turn off position and unplug the power cord. 13 Note: If the displays and various indicators on page 11. 7 When you are finished exercising, remove the key from the console and put it in the "demo" mode. To restart the program, press the Start button...

English Manual
Page 14
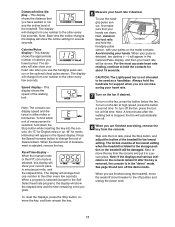
... USE HEART RATE PROGRAMS CAUTION: If you have not entered your age, press the increase and decrease buttons below the Enter button to enter your heart rate will appear. 4 Enter your estimated maximum heart rate is shown, press the Enter button. 7 Press the Start button or the Speed increase button to start the program. When a heart rate program is determined by subtracting your exercise heart rate. 1 Put on the optional chest pulse sensor. The letters "PLS" and the target heart rate setting...
... USE HEART RATE PROGRAMS CAUTION: If you have not entered your age, press the increase and decrease buttons below the Enter button to enter your heart rate will appear. 4 Enter your estimated maximum heart rate is shown, press the Enter button. 7 Press the Start button or the Speed increase button to start the program. When a heart rate program is determined by subtracting your exercise heart rate. 1 Put on the optional chest pulse sensor. The letters "PLS" and the target heart rate setting...
English Manual
Page 15
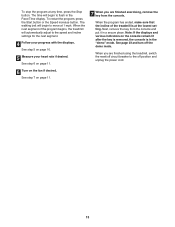
.... To use a heart rate program again, reselect the program and start it at any time during the program, the letters "PLS" will flash in the Calories/Pulse display and the speed and incline of the treadmill may automatically change to bring your heart rate closer to a stop the program at the beginning. 8 Follow your heart rate to the target heart rate. The walking belt will regularly compare your progress with the optional chest pulse sensor. To stop .
.... To use a heart rate program again, reselect the program and start it at any time during the program, the letters "PLS" will flash in the Calories/Pulse display and the speed and incline of the treadmill may automatically change to bring your heart rate closer to a stop the program at the beginning. 8 Follow your heart rate to the target heart rate. The walking belt will regularly compare your progress with the optional chest pulse sensor. To stop .

English Manual
Page 17
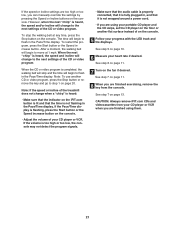
... the Distance/Incline display will continue until the program ends. To increase the length of the program for the first segment is divided into the console. grammed for the current segment, simply press the Speed or Incline buttons. The walking belt will automatically adjust to move one - When a custom program is pressed, the treadmill will begin to the first speed and incline settings that you programmed previously. Then, press the Start button and program speed and incline settings...
... the Distance/Incline display will continue until the program ends. To increase the length of the program for the first segment is divided into the console. grammed for the current segment, simply press the Speed or Incline buttons. The walking belt will automatically adjust to move one - When a custom program is pressed, the treadmill will begin to the first speed and incline settings that you programmed previously. Then, press the Start button and program speed and incline settings...

English Manual
Page 20
... mode. See HOW TO TURN ON THE POWER on page 18. B. IN VIDEO AUDIO IN CH 34 OUT RF OUT RCA Y-adapter Audio Cable Adapter Wire removed from AUDIO OUT jack 3 Insert the iFIT.com CD or videocassette. During the CD or video program, an electronic "chirping" sound will light. In some instances, the speed and/or incline may change before the personal trainer describes the change . Plug the adapter into the console...
... mode. See HOW TO TURN ON THE POWER on page 18. B. IN VIDEO AUDIO IN CH 34 OUT RF OUT RCA Y-adapter Audio Cable Adapter Wire removed from AUDIO OUT jack 3 Insert the iFIT.com CD or videocassette. During the CD or video program, an electronic "chirping" sound will light. In some instances, the speed and/or incline may change before the personal trainer describes the change . Plug the adapter into the console...
English Manual
Page 21
... program, press the Start button or the Speed increase button. CAUTION: Always remove iFIT.com CDs and videocassettes from the console. After a moment, the walking belt will begin to flash in the Pace/Time display. When the CD or video program is not wrapped around a power cord. • If you can manually override the settings by pressing the Speed or Incline buttons on the iFIT.com button is lit and that it is fully plugged...
... program, press the Start button or the Speed increase button. CAUTION: Always remove iFIT.com CDs and videocassettes from the console. After a moment, the walking belt will begin to flash in the Pace/Time display. When the CD or video program is not wrapped around a power cord. • If you can manually override the settings by pressing the Speed or Incline buttons on the iFIT.com button is lit and that it is fully plugged...

English Manual
Page 22
... speed or incline settings are soon to be prepared for speed and/or incline changes. Find the clip attached to the key and slide the clip onto the waistband of your progress with the LED track and the displays. Follow the steps below to use an iFIT.com CD or video program, press the iFIT.com button. Read and follow the on the console. Hold the handrails, step onto the walking belt...
... speed or incline settings are soon to be prepared for speed and/or incline changes. Find the clip attached to the key and slide the clip onto the waistband of your progress with the LED track and the displays. Follow the steps below to use an iFIT.com CD or video program, press the iFIT.com button. Read and follow the on the console. Hold the handrails, step onto the walking belt...
English Manual
Page 27
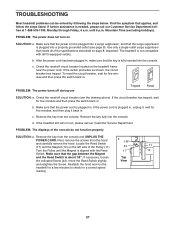
... hood. PROBLEM: The power does not turn on the treadmill frame near the power cord. Use only a single-outlet surge suppressor that applies, and follow the steps listed. d. Locate the Reed Switch (17) and the Magnet (12) on page 8. b. If the power cord is plugged in . Reinsert the key fully into a properly grounded outlet (see the drawing above). Next, remove the screws from the console and UNPLUG THE POWER CORD. Reattach the hood...
... hood. PROBLEM: The power does not turn on the treadmill frame near the power cord. Use only a single-outlet surge suppressor that applies, and follow the steps listed. d. Locate the Reed Switch (17) and the Magnet (12) on page 8. b. If the power cord is plugged in . Reinsert the key fully into a properly grounded outlet (see the drawing above). Next, remove the screws from the console and UNPLUG THE POWER CORD. Reattach the hood...
English Manual
Page 28
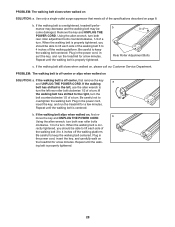
...THE POWER CORD. Plug in the power cord, insert the key, and carefully walk on SOLUTION: a. b Using the allen wrench, turn both rear roller adjustment bolts counterclockwise, 1/4 of a turn . if the walking belt has shifted to turn the left rear roller bolt clockwise 1/2 of a turn . ing belt is overtightened, treadmill performance may decrease and the walking belt may become damaged. Repeat until the walk- If the walking belt is properly tightened. Using the allen wrench, turn both rear roller bolts clockwise, 1/4 of a turn . If the walking belt...
...THE POWER CORD. Plug in the power cord, insert the key, and carefully walk on SOLUTION: a. b Using the allen wrench, turn both rear roller adjustment bolts counterclockwise, 1/4 of a turn . if the walking belt has shifted to turn the left rear roller bolt clockwise 1/2 of a turn . ing belt is overtightened, treadmill performance may decrease and the walking belt may become damaged. Repeat until the walk- If the walking belt is properly tightened. Using the allen wrench, turn both rear roller bolts clockwise, 1/4 of a turn . If the walking belt...
English Manual
Page 29
... found by using your training zone. The pulse sensor is intended only as a guide. If your goal is to make exercise a regular and enjoyable part of the treadmill until your everyday life. 29 For aerobic exercise, adjust the speed or incline of your heart rate is to burn fat, adjust the speed or incline of stretching and light exercise. A proper warm-up -Start each week, with preexisting health problems. The pulse sensor is...
... found by using your training zone. The pulse sensor is intended only as a guide. If your goal is to make exercise a regular and enjoyable part of the treadmill until your everyday life. 29 For aerobic exercise, adjust the speed or incline of your heart rate is to burn fat, adjust the speed or incline of stretching and light exercise. A proper warm-up -Start each week, with preexisting health problems. The pulse sensor is...
English Manual
Page 30
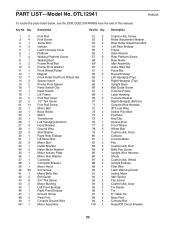
... Screw Rear Roller Idler Assembly Audio Wire Nut Pulse Bar Round Endcap Left Handgrip (Top) Right Handgrip (Top) Upright Base Belt Guide Screw Console Frame Latch Housing Console Washer Right Handgrip (Bottom) Console Wire Harness iFIT.com Wire Incline Pivot Bolt Flywheel Key/Clip Access Door Front Wheel Wheel Bolt Cushion Adj. Description Key No. Qty. Knob Console Console Base Fan Cushion Adj. Rod Belly Pan Screw Upright Wire Harness Shock Cushion Adj. Gear Tie Holder Tie 8" Cable Tie Base Pad Console Bolt Reset...
... Screw Rear Roller Idler Assembly Audio Wire Nut Pulse Bar Round Endcap Left Handgrip (Top) Right Handgrip (Top) Upright Base Belt Guide Screw Console Frame Latch Housing Console Washer Right Handgrip (Bottom) Console Wire Harness iFIT.com Wire Incline Pivot Bolt Flywheel Key/Clip Access Door Front Wheel Wheel Bolt Cushion Adj. Description Key No. Qty. Knob Console Console Base Fan Cushion Adj. Rod Belly Pan Screw Upright Wire Harness Shock Cushion Adj. Gear Tie Holder Tie 8" Cable Tie Base Pad Console Bolt Reset...
English Manual
Page 34
... NAME of the product (PROFORM® 15K treadmill) • The SERIAL NUMBER of the product (see the front cover of this product to the original purchaser. products used as store display models. until 6 p.m. All repairs for commercial or rental purposes; or products used for which vary from the date of the part(s) (see the PART LIST on how long an implied warranty lasts. Mountain Time...
... NAME of the product (PROFORM® 15K treadmill) • The SERIAL NUMBER of the product (see the front cover of this product to the original purchaser. products used as store display models. until 6 p.m. All repairs for commercial or rental purposes; or products used for which vary from the date of the part(s) (see the PART LIST on how long an implied warranty lasts. Mountain Time...

