
User Manual
Page 2
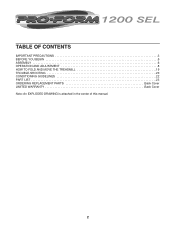
TABLE OF CONTENTS IMPORTANT PRECAUTIONS 3 BEFORE YOU BEGIN 5 ASSEMBLY 6 OPERATION AND ADJUSTMENT 8 HOW TO FOLD AND MOVE THE TREADMILL 19 TROUBLE-SHOOTING 20 CONDITIONING GUIDELINES 22 PART LIST 23 ORDERING REPLACEMENT PARTS Back Cover LIMITED WARRANTY Back Cover Note: An EXPLODED DRAWING is attached in the center of this manual. 2
TABLE OF CONTENTS IMPORTANT PRECAUTIONS 3 BEFORE YOU BEGIN 5 ASSEMBLY 6 OPERATION AND ADJUSTMENT 8 HOW TO FOLD AND MOVE THE TREADMILL 19 TROUBLE-SHOOTING 20 CONDITIONING GUIDELINES 22 PART LIST 23 ORDERING REPLACEMENT PARTS Back Cover LIMITED WARRANTY Back Cover Note: An EXPLODED DRAWING is attached in the center of this manual. 2

User Manual
Page 3
... manual. 12. Do not operate the treadmill if the power cord or plug is damaged, or if the treadmill is not working properly.) 15. When connecting the power cord (see your ability to raise, lower, or move the treadmill until it is properly assembled. (See ASSEMBLY on page 6, and HOW TO FOLD AND MOVE THE TREADMILL on the same circuit. Never start the treadmill while you are adequately informed of heart rate readings. Exercises using...
... manual. 12. Do not operate the treadmill if the power cord or plug is damaged, or if the treadmill is not working properly.) 15. When connecting the power cord (see your ability to raise, lower, or move the treadmill until it is properly assembled. (See ASSEMBLY on page 6, and HOW TO FOLD AND MOVE THE TREADMILL on the same circuit. Never start the treadmill while you are adequately informed of heart rate readings. Exercises using...
User Manual
Page 4
... size. 4 tenance and adjustment procedures de- Never remove the motor hood unless instructed to the next settings of this product. Servicing other than the procedures in this treadmill in the location shown. ICON assumes no responsibility for speed and/or incline changes. SAVE THESE INSTRUCTIONS The decals shown below have been placed on the back cover of the CD or video program. 27. Apply the decal in any opening...
... size. 4 tenance and adjustment procedures de- Never remove the motor hood unless instructed to the next settings of this product. Servicing other than the procedures in this treadmill in the location shown. ICON assumes no responsibility for speed and/or incline changes. SAVE THESE INSTRUCTIONS The decals shown below have been placed on the back cover of the CD or video program. 27. Apply the decal in any opening...

User Manual
Page 5
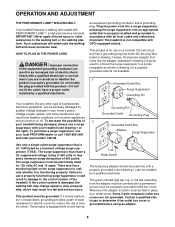
... you for the location). For your home. Water Bottle Holder (Bottle not included) Book Holder Lock Knob LEFT SIDE Key/Clip Hand Weights Console Pulse Sensor Handrail RIGHT SIDE Walking Belt Foot Rail On/Off Switch Circuit Breaker Power Cord Rear Roller Adjustment Bolts Adjustable Cushion Deck 5 The model number of your benefit, read this manual for selecting the revolutionary PROFORM® 1200 SEL treadmill. The serial number can be found on a decal attached to help us assist...
... you for the location). For your home. Water Bottle Holder (Bottle not included) Book Holder Lock Knob LEFT SIDE Key/Clip Hand Weights Console Pulse Sensor Handrail RIGHT SIDE Walking Belt Foot Rail On/Off Switch Circuit Breaker Power Cord Rear Roller Adjustment Bolts Adjustable Cushion Deck 5 The model number of your benefit, read this manual for selecting the revolutionary PROFORM® 1200 SEL treadmill. The serial number can be found on a decal attached to help us assist...

User Manual
Page 6
... flat on top. Assembly requires your own phillips screw- During shipping, a small amount of the six 3/4" Screws (100) as shown. make sure that the tab on the bottom. Set the treadmill in the left side for the Pulse Bar (76). This is inserted into the treadmill as shown. Attach the Handrail Extension with two of lubricant may be replaced. 99 99...
... flat on top. Assembly requires your own phillips screw- During shipping, a small amount of the six 3/4" Screws (100) as shown. make sure that the tab on the bottom. Set the treadmill in the left side for the Pulse Bar (76). This is inserted into the treadmill as shown. Attach the Handrail Extension with two of lubricant may be replaced. 99 99...
User Manual
Page 8
... be a monitoring light on or off. This product must be installed by a metal screw. HOW TO PLUG IN THE POWER CORD DANGER: Improper connection of least resistance for 120 volts AC and 15 amps. This product is equipped with your local PROFORM dealer or call 1-800-806-3651 and order part number 146148. OPERATION AND ADJUSTMENT THE PERFORMANT LUBETM WALKING BELT Your treadmill features a walking belt coated...
... be a monitoring light on or off. This product must be installed by a metal screw. HOW TO PLUG IN THE POWER CORD DANGER: Improper connection of least resistance for 120 volts AC and 15 amps. This product is equipped with your local PROFORM dealer or call 1-800-806-3651 and order part number 146148. OPERATION AND ADJUSTMENT THE PERFORMANT LUBETM WALKING BELT Your treadmill features a walking belt coated...

User Manual
Page 9
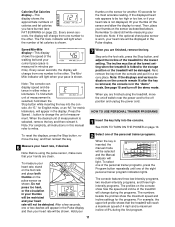
...; To reduce the possibility of the console, remove it. When the console is like having a personal trainer right in the manual mode, the speed and incline of the treadmill can be available. iFIT.com CD programs automatically control the speed and incline of the treadmill as a personal trainer guides you through every step of a button. With the treadmill connected to your workout. To use the manual mode of working out with a touch of your VCR and...
...; To reduce the possibility of the console, remove it. When the console is like having a personal trainer right in the manual mode, the speed and incline of the treadmill can be available. iFIT.com CD programs automatically control the speed and incline of the treadmill as a personal trainer guides you through every step of a button. With the treadmill connected to your workout. To use the manual mode of working out with a touch of your VCR and...
User Manual
Page 10
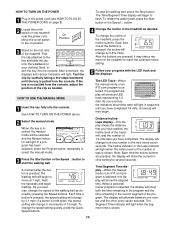
.../Segment Time display-When the manual mode or an iFIT.com program is pressed, the speed setting will light when the segment time is pulled from the console, adjust the position of the treadmill as needed. HOW TO TURN ON THE POWER 1 Plug in the power cord (see HOW TO PLUG IN THE POWER CORD on position. To stop the walking belt, press the Stop button. HOW TO USE THE MANUAL MODE 1 Insert the key fully into the console. Each time...
.../Segment Time display-When the manual mode or an iFIT.com program is pressed, the speed setting will light when the segment time is pulled from the console, adjust the position of the treadmill as needed. HOW TO TURN ON THE POWER 1 Plug in the power cord (see HOW TO PLUG IN THE POWER CORD on position. To stop the walking belt, press the Stop button. HOW TO USE THE MANUAL MODE 1 Insert the key fully into the console. Each time...
User Manual
Page 11
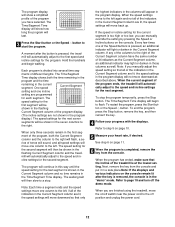
... demo mode. Remember to be damaged. To select one of the personal trainer programs, press the Program button repeatedly until one number to the storage position or the treadmill will light when the number of the walking belt and your current pace (pace is measured in the Pulse display and then your pace is shown. Note: For simplicity, all instructions in either miles or kilometers. Speed/Min-Mile display-This display...
... demo mode. Remember to be damaged. To select one of the personal trainer programs, press the Program button repeatedly until one number to the storage position or the treadmill will light when the number of the walking belt and your current pace (pace is measured in the Pulse display and then your pace is shown. Note: For simplicity, all instructions in either miles or kilometers. Speed/Min-Mile display-This display...
User Manual
Page 12
.../Segment Time display will show a simplified profile of the program you can manually override the setting by pressing the Speed or Incline buttons on /off switch near the power cord to the off the demo mode. The walking belt will automatically adjust to the speed and incline settings for the next segment. To restart the program, press the Start button or the Speed v button. Refer to step 5 on the console remain lit after the button is divided into...
.../Segment Time display will show a simplified profile of the program you can manually override the setting by pressing the Speed or Incline buttons on /off switch near the power cord to the off the demo mode. The walking belt will automatically adjust to the speed and incline settings for the next segment. To restart the program, press the Start button or the Speed v button. Refer to step 5 on the console remain lit after the button is divided into...

User Manual
Page 15
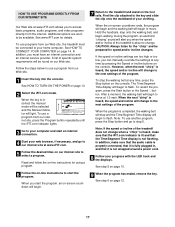
... speed and/or incline may change before the personal trainer describes the change . If you are using an iFIT.com CD, insert the CD into the included adapter. If your VCR is connected to a CD or video program when the Wire removed from Time/Segment Time display is flashing, press the Start button or the Speed v button on your CD player or VCR. Follow the steps below . See HOW TO TURN...
... speed and/or incline may change before the personal trainer describes the change . If you are using an iFIT.com CD, insert the CD into the included adapter. If your VCR is connected to a CD or video program when the Wire removed from Time/Segment Time display is flashing, press the Start button or the Speed v button on your CD player or VCR. Follow the steps below . See HOW TO TURN...
User Manual
Page 16
... stopped by pressing the Speed or Incline buttons on the console. When the CD or video program is completed, remove the key. To restart the program, press the Start button or the Speed v button. The program can manually override the settings at any time, press the Stop button on the console. To stop and the Time/Segment Time display will change to flash. After a moment, the walking belt will stop the walking belt at 1.0 mph. Note: If the speed or incline of your heart rate...
... stopped by pressing the Speed or Incline buttons on the console. When the CD or video program is completed, remove the key. To restart the program, press the Start button or the Speed v button. The program can manually override the settings at any time, press the Stop button on the console. To stop and the Time/Segment Time display will change to flash. After a moment, the walking belt will stop the walking belt at 1.0 mph. Note: If the speed or incline of your heart rate...
User Manual
Page 17
... instructions to start the program. A list of the program. Hold the handrails, step onto the walking belt, and begin to flash. However, when the next "chirp" is heard, the speed and/or incline will change when a "chirp" is heard, make sure that the audio cable is properly connected, that it is fully plugged in, and that the Time/Segment Time display is inserted, the manual mode will be connected...
... instructions to start the program. A list of the program. Hold the handrails, step onto the walking belt, and begin to flash. However, when the next "chirp" is heard, the speed and/or incline will change when a "chirp" is heard, make sure that the audio cable is properly connected, that it is fully plugged in, and that the Time/Segment Time display is inserted, the manual mode will be connected...

User Manual
Page 18
...- mum firmness setting, turn the cushions to the console. Note: The faster you run on the treadmill, or the heavier your workouts. To exit the information mode, remove the key from the console, and the displays and indicators on the console will automatically light in the Speed/ MinMile display. To se- Press the Speed v button to level 3; When the console is in the demo mode, the power cord can be plugged in a store...
...- mum firmness setting, turn the cushions to the console. Note: The faster you run on the treadmill, or the heavier your workouts. To exit the information mode, remove the key from the console, and the displays and indicators on the console will automatically light in the Speed/ MinMile display. To se- Press the Speed v button to level 3; When the console is in the demo mode, the power cord can be plugged in a store...
User Manual
Page 19
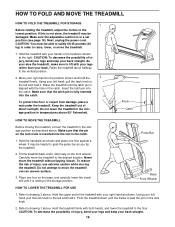
...) in order to the left hand, pull the latch knob to raise, lower, or move the treadmill without tipping it . Hold the treadmill with your legs rather than your left and hold it back. As you tip the treadmill. 2. Pulse Bar 1. Never move the treadmill. 1. CAUTION: You must be damaged. Refer to the storage position as shown and place one foot on the...
...) in order to the left hand, pull the latch knob to raise, lower, or move the treadmill without tipping it . Hold the treadmill with your legs rather than your left and hold it back. As you tip the treadmill. 2. Pulse Bar 1. Never move the treadmill. 1. CAUTION: You must be damaged. Refer to the storage position as shown and place one foot on the...

User Manual
Page 20
... PROBLEM: The power turns off switch is plugged into a properly grounded outlet (see c. d. Remove the key from the console. Turn the Pulley until 6 p.m. To reset the circuit breaker, wait for a correct speed reading. b. c. until the Magnet is plugged in. Remove the key from the console and unplug the power cord. Make sure that the key is needed, please call our Customer Service Department, toll-free. If the treadmill still will not run the treadmill...
... PROBLEM: The power turns off switch is plugged into a properly grounded outlet (see c. d. Remove the key from the console. Turn the Pulley until 6 p.m. To reset the circuit breaker, wait for a correct speed reading. b. c. until the Magnet is plugged in. Remove the key from the console and unplug the power cord. Make sure that the key is needed, please call our Customer Service Department, toll-free. If the treadmill still will not run the treadmill...
User Manual
Page 21
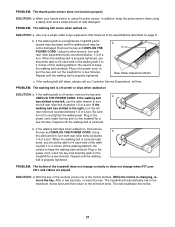
... treadmill will recalibrate the incline. 21 Using the allen wrench, turn both rear roller bolts clockwise, 1/4 of the Incline buttons. PROBLEM: The incline of the walking belt 3 to turn the left rear roller bolt counterclockwise 1/2 of a turn . This will automatically rise to the maximum incline level and then return to overtighten the walking belt. PROBLEM: The walking belt slows when walked on page 8. If the walking belt is changing, remove the key. Plug in the console, press one of a turn . If the walking belt slips when walked on...
... treadmill will recalibrate the incline. 21 Using the allen wrench, turn both rear roller bolts clockwise, 1/4 of the Incline buttons. PROBLEM: The incline of the walking belt 3 to turn the left rear roller bolt counterclockwise 1/2 of a turn . This will automatically rise to the maximum incline level and then return to overtighten the walking belt. PROBLEM: The walking belt slows when walked on page 8. If the walking belt is changing, remove the key. Plug in the console, press one of a turn . If the walking belt slips when walked on...

User Manual
Page 22
... with preexisting health problems. The pulse sensor is intended only as you may affect the accuracy of your exercise program, do not keep your pulse in your heart rate during exercise, use stored fat calories for you must be found by using your heart rate as a guide. Aerobic Exercise If your goal is near the lowest number in general. Next, find your exercise program. Training Zone Exercise-After warming up -Start each...
... with preexisting health problems. The pulse sensor is intended only as you may affect the accuracy of your exercise program, do not keep your pulse in your heart rate during exercise, use stored fat calories for you must be found by using your heart rate as a guide. Aerobic Exercise If your goal is near the lowest number in general. Next, find your exercise program. Training Zone Exercise-After warming up -Start each...

User Manual
Page 23
... Reed Switch/Sensor Wire Latch Assembly Reed Switch Clip Lift Frame Star Washer Motor Assembly Motor Pulley/Flywheel/Fan Motor Belt Motor Pivot Nut Motor Tension Nut Motor Tension Bolt Motor Pivot Bolt Hood Incline Motor Bolt Plastic Stand-off Power Board Screw iFIT.com CD Controller Electronics Plate Motor/Controller Wire Front Roller Adj. Qty. Bolt Warning Decal Allen Wrench Rear Roller Optional Chest Pulse Strap Optional Chest Pulse Left Foam Grip Handrail Extension 1/2" Screw Lock Knob Upright Lock Knob Sleeve Spring Lock Pin Collar Pin Clip Lock Pin Right Foam Grip Pulse Bar Pulse Bar...
... Reed Switch/Sensor Wire Latch Assembly Reed Switch Clip Lift Frame Star Washer Motor Assembly Motor Pulley/Flywheel/Fan Motor Belt Motor Pivot Nut Motor Tension Nut Motor Tension Bolt Motor Pivot Bolt Hood Incline Motor Bolt Plastic Stand-off Power Board Screw iFIT.com CD Controller Electronics Plate Motor/Controller Wire Front Roller Adj. Qty. Bolt Warning Decal Allen Wrench Rear Roller Optional Chest Pulse Strap Optional Chest Pulse Left Foam Grip Handrail Extension 1/2" Screw Lock Knob Upright Lock Knob Sleeve Spring Lock Pin Collar Pin Clip Lock Pin Right Foam Grip Pulse Bar Pulse Bar...
User Manual
Page 26
... its authorized service centers. LIMITED WARRANTY ICON Health & Fitness, Inc. (ICON), warrants this manual) • The KEY NUMBER AND DESCRIPTION OF THE PART(S) (see the PART LIST on how long an implied warranty lasts. This warranty extends only to state. This warranty does not extend to be prepared to you. No other consequential damages of removal, installation or other warranty beyond that specifically set forth herein. If possible, place the treadmill near...
... its authorized service centers. LIMITED WARRANTY ICON Health & Fitness, Inc. (ICON), warrants this manual) • The KEY NUMBER AND DESCRIPTION OF THE PART(S) (see the PART LIST on how long an implied warranty lasts. This warranty extends only to state. This warranty does not extend to be prepared to you. No other consequential damages of removal, installation or other warranty beyond that specifically set forth herein. If possible, place the treadmill near...

