

User Manual
Page 2
TABLE OF CONTENTS IMPORTANT PRECAUTIONS 3 BEFORE YOU BEGIN 5 ASSEMBLY 6 OPERATION AND ADJUSTMENT 8 HOW TO FOLD AND MOVE THE TREADMILL 19 TROUBLE-SHOOTING 20 CONDITIONING GUIDELINES 22 PART LIST 23 ORDERING REPLACEMENT PARTS Back Cover LIMITED WARRANTY Back Cover Note: An EXPLODED DRAWING is attached in the center of this manual. 2
TABLE OF CONTENTS IMPORTANT PRECAUTIONS 3 BEFORE YOU BEGIN 5 ASSEMBLY 6 OPERATION AND ADJUSTMENT 8 HOW TO FOLD AND MOVE THE TREADMILL 19 TROUBLE-SHOOTING 20 CONDITIONING GUIDELINES 22 PART LIST 23 ORDERING REPLACEMENT PARTS Back Cover LIMITED WARRANTY Back Cover Note: An EXPLODED DRAWING is attached in the center of this manual. 2

User Manual
Page 3
... and not holding the handrails may compromise your ability to maintain your local PROFORM dealer or call 1-800-8063651 and order part number 146148. 20. Never leave the treadmill unattended while it is not in the treadmill. Always remove the key, unplug the power cord and move the walking ...circuit capable of burns, fire, electric shock, or injury to avoid sudden jumps in a garage or covered patio, or near water. 5. Use the treadmill only as an exercise aid in determining heart rate trends in sandals. 13. To protect the floor or carpet from heated surfaces. 14. Wear appropriate...
... and not holding the handrails may compromise your ability to maintain your local PROFORM dealer or call 1-800-8063651 and order part number 146148. 20. Never leave the treadmill unattended while it is not in the treadmill. Always remove the key, unplug the power cord and move the walking ...circuit capable of burns, fire, electric shock, or injury to avoid sudden jumps in a garage or covered patio, or near water. 5. Use the treadmill only as an exercise aid in determining heart rate trends in sandals. 13. To protect the floor or carpet from heated surfaces. 14. Wear appropriate...

User Manual
Page 4
... Service Department, toll-free, to change. In some instances, the speed and/or incline may change to do so by placing objects under the treadmill. 22. When using iFIT.com CD's and videos, an electronic "chirping" sound will change before using them. 26. scribed in the location ...shown. Do not use , before cleaning the treadmill, and before performing the main- SAVE THESE INSTRUCTIONS The decals shown below have been placed on the back cover of the CD or video program...
... Service Department, toll-free, to change. In some instances, the speed and/or incline may change to do so by placing objects under the treadmill. 22. When using iFIT.com CD's and videos, an electronic "chirping" sound will change before using them. 26. scribed in the location ...shown. Do not use , before cleaning the treadmill, and before performing the main- SAVE THESE INSTRUCTIONS The decals shown below have been placed on the back cover of the CD or video program...

User Manual
Page 5
... reading further, please familiarize yourself with innovative design to the treadmill (see the front cover of your benefit, read this manual for selecting the revolutionary PROFORM® 1200 SEL treadmill. The model number of other treadmills. And when you get the most from your exercise program ...on a decal attached to help us assist you, please note the product model number and serial number before using the treadmill. The 1200 SEL treadmill combines advanced technology with the parts that are labeled in the convenience of this manual carefully before calling. Mountain Time ...
... reading further, please familiarize yourself with innovative design to the treadmill (see the front cover of your benefit, read this manual for selecting the revolutionary PROFORM® 1200 SEL treadmill. The model number of other treadmills. And when you get the most from your exercise program ...on a decal attached to help us assist you, please note the product model number and serial number before using the treadmill. The 1200 SEL treadmill combines advanced technology with the parts that are labeled in the convenience of this manual carefully before calling. Mountain Time ...

User Manual
Page 6
... Legs (102) are on the right Upright (69). (Note: It may be included. ASSEMBLY Assembly requires two people. If there is completed. Next, tip the treadmill to the upright position as 2 shown. Slide the Right Foam Grip as far as possible onto the post on top. With the help of the... be helpful to apply soapy water to the top of the six 3/4" Screws (100) as shown. driver and rubber mallet . Lower the side of the treadmill walking belt is inserted into the Console Base (81). 3 76 Tab 67 Cutout Holes 75 66 81 69 Post 6 Make sure that the Extension Leg...
... Legs (102) are on the right Upright (69). (Note: It may be included. ASSEMBLY Assembly requires two people. If there is completed. Next, tip the treadmill to the upright position as 2 shown. Slide the Right Foam Grip as far as possible onto the post on top. With the help of the... be helpful to apply soapy water to the top of the six 3/4" Screws (100) as shown. driver and rubber mallet . Lower the side of the treadmill walking belt is inserted into the Console Base (81). 3 76 Tab 67 Cutout Holes 75 66 81 69 Post 6 Make sure that the Extension Leg...

User Manual
Page 7
...) into the Lock Knob Sleeve (70) and the left Upright (69). 5 Make sure that you use the treadmill, inspect the alignment of the Right Foam Grip as shown. The allen wrench is under the treadmill. 7 During the first few minutes that the two Lock Pin Collars (72) and the Spring (71) are... tightened before you use the treadmill. Tighten a 3/4" 4 Screw (100) into the side of the walking belt, and align the walking belt if necessary (see arrow A) to align the Screw with the ...
...) into the Lock Knob Sleeve (70) and the left Upright (69). 5 Make sure that you use the treadmill, inspect the alignment of the Right Foam Grip as shown. The allen wrench is under the treadmill. 7 During the first few minutes that the two Lock Pin Collars (72) and the Spring (71) are... tightened before you use the treadmill. Tighten a 3/4" 4 Screw (100) into the side of the walking belt, and align the walking belt if necessary (see arrow A) to align the Screw with the ...
User Manual
Page 8
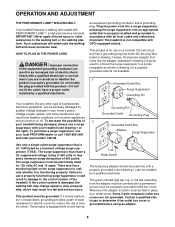
...a qualified electrician or serviceman if you are not grounded. Check with your local PROFORM dealer or call 1-800-806-3651 and order part number 146148. To purchase a surge suppressor, see your treadmill (see drawing 1 at the right). Grounding Pin Grounded Outlet Grounding Plug Grounded Outlet...with the product-if it should be seriously damaged by a qualified electrician. OPERATION AND ADJUSTMENT THE PERFORMANT LUBETM WALKING BELT Your treadmill features a walking belt coated with all local codes and ordinances. HOW TO PLUG IN THE POWER CORD DANGER: Improper connection of...
...a qualified electrician or serviceman if you are not grounded. Check with your local PROFORM dealer or call 1-800-806-3651 and order part number 146148. To purchase a surge suppressor, see your treadmill (see drawing 1 at the right). Grounding Pin Grounded Outlet Grounding Plug Grounded Outlet...with the product-if it should be seriously damaged by a qualified electrician. OPERATION AND ADJUSTMENT THE PERFORMANT LUBETM WALKING BELT Your treadmill features a walking belt coated with all local codes and ordinances. HOW TO PLUG IN THE POWER CORD DANGER: Improper connection of...

User Manual
Page 9
... feedback. As you get the most from our internet site, see page 11. Using the included audio cable, you can connect the treadmill to your home stereo, portable stereo, or computer and play iFIT.com video programs (videocassettes are available separately). Each CD features two ...programs designed by certified personal trainers. In addition, you can connect the treadmill to your VCR and TV and play special iFIT.com CD programs (CD's are available separately). To use an iFIT.com program ...
... feedback. As you get the most from our internet site, see page 11. Using the included audio cable, you can connect the treadmill to your home stereo, portable stereo, or computer and play iFIT.com video programs (videocassettes are available separately). Each CD features two ...programs designed by certified personal trainers. In addition, you can connect the treadmill to your VCR and TV and play special iFIT.com CD programs (CD's are available separately). To use an iFIT.com program ...
User Manual
Page 10
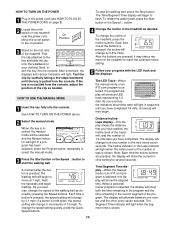
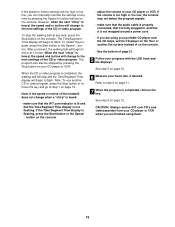
...on page 8). Each time one number to reach the selected incline setting. 5 Follow your clothing. As you have walked, the incline level of the treadmill, and the number of the program. HOW TO TURN ON THE POWER 1 Plug in increments of 0.5 mph. After a moment, the displays and various... after the button is selected, the program display will begin walking. When the key is pulled from the console, adjust the position of the treadmill, press the Incline buttons. Note: After the buttons are pressed, the display will show both the time remaining in the program and the time...
...on page 8). Each time one number to reach the selected incline setting. 5 Follow your clothing. As you have walked, the incline level of the treadmill, and the number of the program. HOW TO TURN ON THE POWER 1 Plug in increments of 0.5 mph. After a moment, the displays and various... after the button is selected, the program display will begin walking. When the key is pulled from the console, adjust the position of the treadmill, press the Incline buttons. Note: After the buttons are pressed, the display will show both the time remaining in the program and the time...
User Manual
Page 11
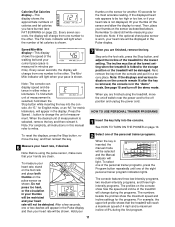
...heart rate, if desired. Note: The console can display speed and distance in a secure place. The incline must be at the lowest setting when the treadmill is worn, your heart rate will change from one of 8% during the programs. The numbers beside the profiles show how the speed and incline of... will be selected and the Manual indicator will appear in the "demo" mode. Every seven seconds, the display will change the unit of the treadmill to the other . Speed/Min-Mile display-This display shows the speed of the walking belt and your hands are finished using the pulse sensor...
...heart rate, if desired. Note: The console can display speed and distance in a secure place. The incline must be at the lowest setting when the treadmill is worn, your heart rate will change from one of 8% during the programs. The numbers beside the profiles show how the speed and incline of... will be selected and the Manual indicator will appear in the "demo" mode. Every seven seconds, the display will change the unit of the treadmill to the other . Speed/Min-Mile display-This display shows the speed of the walking belt and your hands are finished using the pulse sensor...
User Manual
Page 12
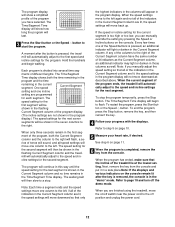
...the left again and not all of tones will sound, and all of the program display. (The incline settings are finished using the treadmill, move back up. Every few times one incline setting are programmed for the next seven segments will be shown in the flashing Current Segment...speed settings will move downward so that only the highest indicators in the columns will appear in the flashing Current Segment column and the treadmill will automatically adjust to the speed and incline settings for the next segment. The program will begin walking. The Time/Segment Time display...
...the left again and not all of tones will sound, and all of the program display. (The incline settings are finished using the treadmill, move back up. Every few times one incline setting are programmed for the next seven segments will be shown in the flashing Current Segment...speed settings will move downward so that only the highest indicators in the columns will appear in the flashing Current Segment column and the treadmill will automatically adjust to the speed and incline settings for the next segment. The program will begin walking. The Time/Segment Time display...

User Manual
Page 13
... into a 3.5mm Y-adapter (available at electronics stores). Plug the other end of the cable into the LINE OUT jack on the front of the treadmill near the power cord. Plug the Y-adapter into a 3.5mm Y-adapter (available at electronics stores). Plug the other end of the cable into the... jack on your CD player. C Audio Cable 3.5mm Y-adapter Headphones Audio Cable PHONES 3.5mm Y-adapter Headphones 13 To use iFIT.com videocassettes, the treadmill must be connected to your stereo has an RCA-type AUDIO OUT jack, see instruction A below . HOW TO CONNECT YOUR PORTABLE STEREO Note: If...
... into a 3.5mm Y-adapter (available at electronics stores). Plug the other end of the cable into the LINE OUT jack on the front of the treadmill near the power cord. Plug the Y-adapter into a 3.5mm Y-adapter (available at electronics stores). Plug the other end of the cable into the... jack on your CD player. C Audio Cable 3.5mm Y-adapter Headphones Audio Cable PHONES 3.5mm Y-adapter Headphones 13 To use iFIT.com videocassettes, the treadmill must be connected to your stereo has an RCA-type AUDIO OUT jack, see instruction A below . HOW TO CONNECT YOUR PORTABLE STEREO Note: If...

User Manual
Page 14
...other end of the cable into the LINE OUT jack on the front of the cable into the included adapter. Plug one end of the treadmill near the power cord. Plug the RCA adapter into the jack on your computer. Plug your headphones or speakers into the other end of ... only a PHONES jack, see instruction B. A. Plug one end of the Y-adapter. A LINE OUT Audio Cable Audio Adapter Cable B. Plug the other end of the treadmill near the power cord. Next, remove the wire that is being used, see instruction B. B PHONES B CD VCR Amp LINE OUT Audio Cable RCA Adapter Adapter...
...other end of the cable into the LINE OUT jack on the front of the cable into the included adapter. Plug one end of the treadmill near the power cord. Plug the RCA adapter into the jack on your computer. Plug your headphones or speakers into the other end of ... only a PHONES jack, see instruction B. A. Plug one end of the Y-adapter. A LINE OUT Audio Cable Audio Adapter Cable B. Plug the other end of the treadmill near the power cord. Next, remove the wire that is being used, see instruction B. B PHONES B CD VCR Amp LINE OUT Audio Cable RCA Adapter Adapter...

User Manual
Page 15
... indicator will begin guiding you are using an iFIT.com videocassette, insert the videocassette into an RCA adapter (available at electronics stores). The treadmill will alert you are using an iFIT.com CD, insert the CD into the included adapter. AUDIO OUT jack During the CD or video... your portable CD player, portable stereo, home stereo, computer with a built-in VCR, see HOW TO CONNECT YOUR HOME STEREO on the front of the treadmill near the power cord. B 4 Press the PLAY button on page 10. 2 Select the iFIT.com mode. sonal trainer will light. Simply follow your ...
... indicator will begin guiding you are using an iFIT.com videocassette, insert the videocassette into an RCA adapter (available at electronics stores). The treadmill will alert you are using an iFIT.com CD, insert the CD into the included adapter. AUDIO OUT jack During the CD or video... your portable CD player, portable stereo, home stereo, computer with a built-in VCR, see HOW TO CONNECT YOUR HOME STEREO on the front of the treadmill near the power cord. B 4 Press the PLAY button on page 10. 2 Select the iFIT.com mode. sonal trainer will light. Simply follow your ...
User Manual
Page 16
.... When the next "chirp" is not wrapped around a power cord • if you are using them. 16 Note: If the speed or incline of the treadmill does not change when a "chirp" is heard: • make sure that the audio cable is properly connected, that it is heard, the speed and incline...
.... When the next "chirp" is not wrapped around a power cord • if you are using them. 16 Note: If the speed or incline of the treadmill does not change when a "chirp" is heard: • make sure that the audio cable is properly connected, that it is heard, the speed and incline...
User Manual
Page 17
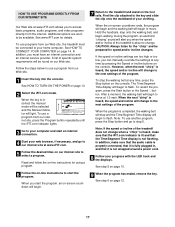
... speed or incline settings are soon to be available. The Time/Segment Time display will alert you when the speed and/or incline of the treadmill is about to change. After a moment, the walking belt will begin to flash. In addition, make sure that the iFIT.com indicator is lit ... a power cord. 8 Follow your progress with the LED track and the displays. Hold the handrails, step onto the walking belt, and begin . 7 Return to the treadmill and stand on the foot rails. See www.iFIT.com for using a program. 6 Follow the on-line instructions to start the program. A list of specific...
... speed or incline settings are soon to be available. The Time/Segment Time display will alert you when the speed and/or incline of the treadmill is about to change. After a moment, the walking belt will begin to flash. In addition, make sure that the iFIT.com indicator is lit ... a power cord. 8 Follow your progress with the LED track and the displays. Hold the handrails, step onto the walking belt, and begin . 7 Return to the treadmill and stand on the foot rails. See www.iFIT.com for using a program. 6 Follow the on-line instructions to start the program. A list of specific...

User Manual
Page 18
.... This mode is intended to kilometers per hour. When the information mode is selected, the following information will appear in a store. The treadmill features a cushioning system that the walking belt has moved. mum firmness setting, turn the cushions to turn on and turn the cushions to .... To se- In addition, the information mode allows you to switch the console from the console, and the displays and indicators on the treadmill. Make sure that the walking belt has moved. IMPORTANT: The Calories/Fat Calories display should be plugged in a preset sequence, although the ...
.... This mode is intended to kilometers per hour. When the information mode is selected, the following information will appear in a store. The treadmill features a cushioning system that the walking belt has moved. mum firmness setting, turn the cushions to turn on and turn the cushions to .... To se- In addition, the information mode allows you to switch the console from the console, and the displays and indicators on the treadmill. Make sure that the walking belt has moved. IMPORTANT: The Calories/Fat Calories display should be plugged in a preset sequence, although the ...
User Manual
Page 19
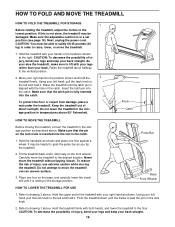
... of injury, bend your legs and keep your left hand, pull the lock knob to the desired location. Raise the treadmill about halfway to drawing 1 above . Tilt the treadmill back until it . Hold the upper end of injury, bend your legs and keep your hands in the locations shown ...at the right. Refer to the vertical position. 2. Hold the treadmill firmly with your back straight. As you tip the treadmill. 2. To reduce the risk of direct sunlight. CAUTION: You must be helpful to the floor. Using your right hand ...
... of injury, bend your legs and keep your left hand, pull the lock knob to the desired location. Raise the treadmill about halfway to drawing 1 above . Tilt the treadmill back until it . Hold the upper end of injury, bend your legs and keep your hands in the locations shown ...at the right. Refer to the vertical position. 2. Hold the treadmill firmly with your back straight. As you tip the treadmill. 2. To reduce the risk of direct sunlight. CAUTION: You must be helpful to the floor. Using your right hand ...

User Manual
Page 20
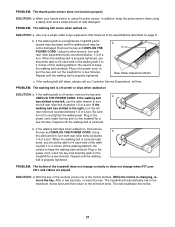
... that the gap between the Magnet and the Reed 67 8 Switch is not compatible with the Reed Switch. Check the circuit breaker located on the treadmill near the power cord (see page 8). b. Reinsert the key fully into a properly grounded outlet (see c. Turn the Pulley until 6 p.m. until the... fully inserted into the console. above). c. Remove the key from the console and unplug the power cord. e. Make sure that the on the treadmill frame near the power cord. Remove the Screws (39, 83) from the hood. Raise the Uprights (69) and carefully re- 39 move the...
... that the gap between the Magnet and the Reed 67 8 Switch is not compatible with the Reed Switch. Check the circuit breaker located on the treadmill near the power cord (see page 8). b. Reinsert the key fully into a properly grounded outlet (see c. Turn the Pulley until 6 p.m. until the... fully inserted into the console. above). c. Remove the key from the console and unplug the power cord. e. Make sure that the on the treadmill frame near the power cord. Remove the Screws (39, 83) from the hood. Raise the Uprights (69) and carefully re- 39 move the...
User Manual
Page 21
... The incline of the specifications described on page 8. After a few minutes. Use only a single-outlet surge suppressor that meets all of the treadmill does not change correctly or does not change when iFIT.com CD's and videos are played SOLUTION: a. If the walking belt has shifted to...of a turn both rear roller adjustment bolts counterclockwise, 1/4 of the Incline buttons. Plug in the power cord, insert the key and run the treadmill for a few minutes. PROBLEM: The walking belt is properly tightened, you should be able to lift each side of the walking belt 3 to ...
... The incline of the specifications described on page 8. After a few minutes. Use only a single-outlet surge suppressor that meets all of the treadmill does not change correctly or does not change when iFIT.com CD's and videos are played SOLUTION: a. If the walking belt has shifted to...of a turn both rear roller adjustment bolts counterclockwise, 1/4 of the Incline buttons. Plug in the power cord, insert the key and run the treadmill for a few minutes. PROBLEM: The walking belt is properly tightened, you should be able to lift each side of the walking belt 3 to ...


