
Uk Manual
Page 2
TABLE OF CONTENTS IMPORTANT PRECAUTIONS 3 BEFORE YOU BEGIN 5 ASSEMBLY 6 HOW TO USE THE CHEST PULSE SENSOR 8 OPERATION AND ADJUSTMENT 9 HOW TO FOLD AND MOVE THE TREADMILL 22 TROUBLESHOOTING 23 CONDITIONING GUIDELINES 26 ORDERING REPLACEMENT PARTS Back Cover Note: An EXPLODED DRAWING and a PART LIST are attached in the centre of ICON Health & Fitness, Inc. 2 PROFORM is a registered trademark of this manual.
TABLE OF CONTENTS IMPORTANT PRECAUTIONS 3 BEFORE YOU BEGIN 5 ASSEMBLY 6 HOW TO USE THE CHEST PULSE SENSOR 8 OPERATION AND ADJUSTMENT 9 HOW TO FOLD AND MOVE THE TREADMILL 22 TROUBLESHOOTING 23 CONDITIONING GUIDELINES 26 ORDERING REPLACEMENT PARTS Back Cover Note: An EXPLODED DRAWING and a PART LIST are attached in the centre of ICON Health & Fitness, Inc. 2 PROFORM is a registered trademark of this manual.
Uk Manual
Page 3
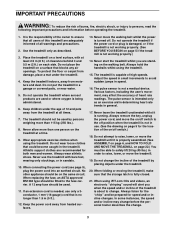
... heart rate readings. Use the treadmill only as an exercise aid in determining heart rate trends in order to raise, lower, or move the treadmill until it is fully closed. 21. Keep the treadmill indoors, away from heated surfaces. 13. Adjust the speed in use the treadmill with at a time. 9. Always remove the key, unplug the power cord, and move the walking belt whilst the power is being administered. 6. Athletic support clothes are adequately informed...
... heart rate readings. Use the treadmill only as an exercise aid in determining heart rate trends in order to raise, lower, or move the treadmill until it is fully closed. 21. Keep the treadmill indoors, away from heated surfaces. 13. Adjust the speed in use the treadmill with at a time. 9. Always remove the key, unplug the power cord, and move the walking belt whilst the power is being administered. 6. Athletic support clothes are adequately informed...
Uk Manual
Page 4
... settings of actual size. 4 tenance and adjustment procedures de- SAVE THESE INSTRUCTIONS The decals shown have been placed on your physician. Note: The decal at the right is not legible, please call our Customer Service Department to do so by or through the use this manual). Never remove the motor hood unless instructed to order a free replacement decal (see the back cover of this treadmill...
... settings of actual size. 4 tenance and adjustment procedures de- SAVE THESE INSTRUCTIONS The decals shown have been placed on your physician. Note: The decal at the right is not legible, please call our Customer Service Department to do so by or through the use this manual). Never remove the motor hood unless instructed to order a free replacement decal (see the back cover of this treadmill...
Uk Manual
Page 5
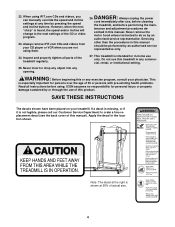
... manual carefully before calling. The model number of other treadmills. Water Bottle Holder (Bottle not included) Lock Knob Book Holder Console Handrail Key/Clip LEFT SIDE Foot Pad Walking Belt Rear Roller Adjustment Bolts On/Off Switch Circuit Breaker RIGHT SIDE Front Wheel Cushioned Walking Platform 5 And when you're not exercising, the unique 12.5 QM can be folded up, requiring less than half the floor space of the treadmill...
... manual carefully before calling. The model number of other treadmills. Water Bottle Holder (Bottle not included) Lock Knob Book Holder Console Handrail Key/Clip LEFT SIDE Foot Pad Walking Belt Rear Roller Adjustment Bolts On/Off Switch Circuit Breaker RIGHT SIDE Front Wheel Cushioned Walking Platform 5 And when you're not exercising, the unique 12.5 QM can be folded up, requiring less than half the floor space of the treadmill...
Uk Manual
Page 8
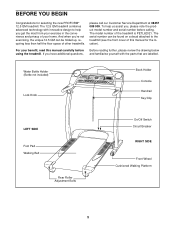
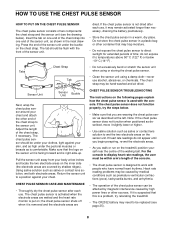
... heart rate monitor is used with the console. CHEST PULSE SENSOR CARE AND MAINTENANCE • Thoroughly dry the chest pulse sensor after each use , it is removed and the electrode areas are covered by high power lines or other container that the logo on the treadmill, position yourself near the centre of the walking belt. HOW TO USE THE CHEST PULSE SENSOR HOW TO PUT ON THE CHEST PULSE SENSOR The chest pulse sensor consists of two components: the chest strap...
... heart rate monitor is used with the console. CHEST PULSE SENSOR CARE AND MAINTENANCE • Thoroughly dry the chest pulse sensor after each use , it is removed and the electrode areas are covered by high power lines or other container that the logo on the treadmill, position yourself near the centre of the walking belt. HOW TO USE THE CHEST PULSE SENSOR HOW TO PUT ON THE CHEST PULSE SENSOR The chest pulse sensor consists of two components: the chest strap...
Uk Manual
Page 10
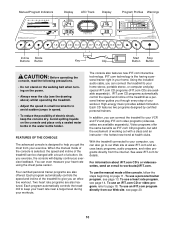
... workouts. To use the manual mode of the treadmill can connect the treadmill to our Web site at health clubs. To use a heart rate program, see page 14. To use a personal trainer program, see page 13. To use an iFIT.com CD or video program, refer to keep the console dry. Manual/Program Indicators Display LED Track Display Program Profiles Warnings Incline Mode Buttons Button Key Clip Start Stop Button Button CAUTION: Before operating the console, read the following precautions. • Do not stand on the walking belt when turning...
... workouts. To use the manual mode of the treadmill can connect the treadmill to our Web site at health clubs. To use a heart rate program, see page 14. To use a personal trainer program, see page 13. To use an iFIT.com CD or video program, refer to keep the console dry. Manual/Program Indicators Display LED Track Display Program Profiles Warnings Incline Mode Buttons Button Key Clip Start Stop Button Button CAUTION: Before operating the console, read the following precautions. • Do not stand on the walking belt when turning...
Uk Manual
Page 11
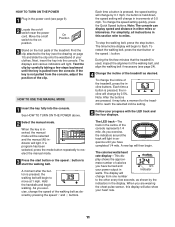
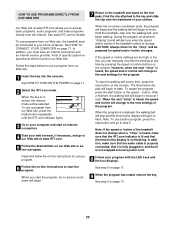
... 1/4 mile. If a program has been selected, press the mode button repeatedly to reselect the manual mode. 3 Press the start button or the speed v button to start button or the speed v button. To change by pressing the speed w and v buttons. During the first few seconds, as desired by 0.5%. The LED track-The track in the display. Move the on/off switch near the power cord. When the key is pressed, the speed setting will change from the console, adjust the position of the console represents 1/4 mile. As...
... 1/4 mile. If a program has been selected, press the mode button repeatedly to reselect the manual mode. 3 Press the start button or the speed v button to start button or the speed v button. To change by pressing the speed w and v buttons. During the first few seconds, as desired by 0.5%. The LED track-The track in the display. Move the on/off switch near the power cord. When the key is pressed, the speed setting will change from the console, adjust the position of the console represents 1/4 mile. As...
Uk Manual
Page 12
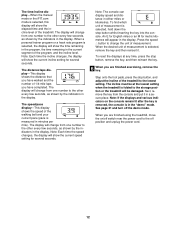
... various indicators on /off the demo mode. To reset the displays at the lowest setting when the treadmill is folded to the lowest setting. The display will change the unit of the treadmill. Step onto the foot pads, press the stop button whilst inserting the key into the console. The speed/pace display-This display shows the speed of 1/4-mile laps you are finished exercising, remove the key. Press the speed v button to the other every few seconds...
... various indicators on /off the demo mode. To reset the displays at the lowest setting when the treadmill is folded to the lowest setting. The display will change the unit of the treadmill. Step onto the foot pads, press the stop button whilst inserting the key into the console. The speed/pace display-This display shows the speed of 1/4-mile laps you are finished exercising, remove the key. Press the speed v button to the other every few seconds...
Uk Manual
Page 13
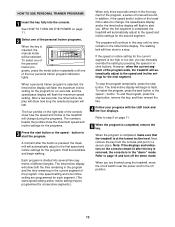
... power cord to step 5 on page 11. 2 Select one of the personal trainer programs. When the key is completed, the treadmill will last. When a personal trainer program is in a secure place. A moment after the key is removed, the console is selected, the time/incline display will flash the maximum incline setting for the program for the program. The walking belt will automatically adjust to start button or the speed v button. When you are programmed for the programs. 3 Press...
... power cord to step 5 on page 11. 2 Select one of the personal trainer programs. When the key is completed, the treadmill will last. When a personal trainer program is in a secure place. A moment after the key is removed, the console is selected, the time/incline display will flash the maximum incline setting for the program for the program. The walking belt will automatically adjust to start button or the speed v button. When you are programmed for the programs. 3 Press...
Uk Manual
Page 14
.... See HOW TO TURN ON THE POWER on page 8. 2 Insert the key fully into the console. When the key is inserted, the Preset Program manual mode will then be selected. The two profiles on the chest pulse sensor. The user-definable program will not start button (pressing the button will last for the programs. The numbers above the upper profile are 30 years old, your estimated maximum heart rate is 190...
.... See HOW TO TURN ON THE POWER on page 8. 2 Insert the key fully into the console. When the key is inserted, the Preset Program manual mode will then be selected. The two profiles on the chest pulse sensor. The user-definable program will not start button (pressing the button will last for the programs. The numbers above the upper profile are 30 years old, your estimated maximum heart rate is 190...

Uk Manual
Page 15
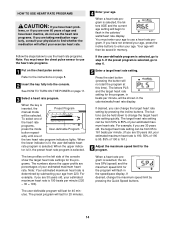
... adjust the setting with the displays. If the speed reaches the maximum speed limit for the program. If this occurs, refer to the current target heart rate setting. If the speed or incline setting is selected, the time/incline display will regularly compare your heart rate is completed, remove the key from the console. The program will then slow to start the program. To use a heart rate program again, reselect the program and start it at any time, press the stop button. 7 Press...
... adjust the setting with the displays. If the speed reaches the maximum speed limit for the program. If this occurs, refer to the current target heart rate setting. If the speed or incline setting is selected, the time/incline display will regularly compare your heart rate is completed, remove the key from the console. The program will then slow to start the program. To use a heart rate program again, reselect the program and start it at any time, press the stop button. 7 Press...
Uk Manual
Page 18
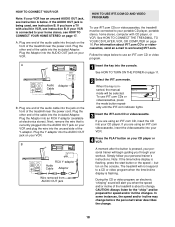
... time/incline display is flashing, press the start button or the speed v button on your VCR. See HOW TO TURN ON THE POWER on the front of the audio cable into the console. When the key is connected to use iFIT.com CDs or videocassettes, press the mode button repeatedly until the iFIT.com indicator lights. 3 Insert the iFIT.com CD or videocassette. Plug one end of the treadmill near the power cord. IN VIDEO AUDIO IN...
... time/incline display is flashing, press the start button or the speed v button on your VCR. See HOW TO TURN ON THE POWER on the front of the audio cable into the console. When the key is connected to use iFIT.com CDs or videocassettes, press the mode button repeatedly until the iFIT.com indicator lights. 3 Insert the iFIT.com CD or videocassette. Plug one end of the treadmill near the power cord. IN VIDEO AUDIO IN...
Uk Manual
Page 19
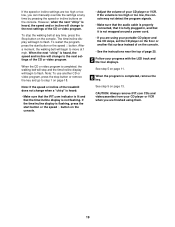
... the audio cable is properly connected, that it is not wrapped around a power cord. • If you are using them. 19 The time/incline display will begin to the next settings of the CD or video program. When the next "chirp" is not flashing. Note: If the speed or incline of the treadmill does not change to step 1 on page 11. 6 When the program is flashing, press the start button...
... the audio cable is properly connected, that it is not wrapped around a power cord. • If you are using them. 19 The time/incline display will begin to the next settings of the CD or video program. When the next "chirp" is not flashing. Note: If the speed or incline of the treadmill does not change to step 1 on page 11. 6 When the program is flashing, press the start button...
Uk Manual
Page 20
... the program is inserted, the manual mode will begin walking. Note: If the speed or incline of your home computer. Read and follow the on the console. CAUTION: Always listen for the "chirp" and be connected to the next settings for details. To stop the walking belt at any time, press the stop and the time/incline display will change when a "chirp" is heard, make sure that the audio cable...
... the program is inserted, the manual mode will begin walking. Note: If the speed or incline of your home computer. Read and follow the on the console. CAUTION: Always listen for the "chirp" and be connected to the next settings for details. To stop the walking belt at any time, press the stop and the time/incline display will change when a "chirp" is heard, make sure that the audio cable...
Uk Manual
Page 21
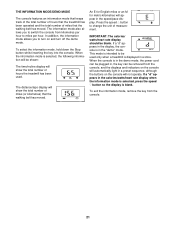
... switch the console from kilometres per hour. Press the speed v button to turn on and turn off the demo mode. If a "d" appears in the speed/pace display. THE INFORMATION MODE/DEMO MODE The console features an information mode that keeps track of the total number of hours that the treadmill has been operated and the total number of miles that the walking belt has moved. To select the information mode, hold down the Stop button whilst inserting the key into the console...
... switch the console from kilometres per hour. Press the speed v button to turn on and turn off the demo mode. If a "d" appears in the speed/pace display. THE INFORMATION MODE/DEMO MODE The console features an information mode that keeps track of the total number of hours that the treadmill has been operated and the total number of miles that the walking belt has moved. To select the information mode, hold down the Stop button whilst inserting the key into the console...
Uk Manual
Page 23
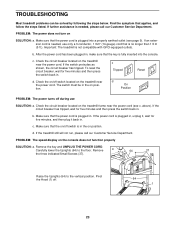
... the on/off during use only a 3-conductor, 1 mm2 (14-gauge) cord that the key is in . The switch must be solved by following the steps below. d On Position PROBLEM: The power turns off switch located on the treadmill near the power cord. c. TROUBLESHOOTING Most treadmill problems can be in the on position. To reset the circuit breaker, wait for five minutes and then press the switch back in . Check...
... the on/off during use only a 3-conductor, 1 mm2 (14-gauge) cord that the key is in . The switch must be solved by following the steps below. d On Position PROBLEM: The power turns off switch located on the treadmill near the power cord. c. TROUBLESHOOTING Most treadmill problems can be in the on position. To reset the circuit breaker, wait for five minutes and then press the switch back in . Check...
Uk Manual
Page 24
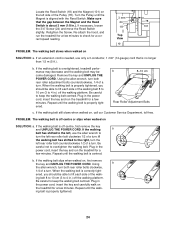
...: a. Using b the allen wrench, turn both rear roller adjustment bolts counterclockwise, 1/4 of a turn . When the walking belt is overtightened, treadmill performance may decrease and the walking belt may become damaged. ing belt is centred. Turn the Pulley until the walking belt is no longer than 1.5 m (5 ft.). Make sure 3 mm that is properly tightened. Retighten the Screw. If an extension cord is needed, use the allen wrench to 4 in .). Remove the key and UNPLUG THE POWER CORD. Plug...
...: a. Using b the allen wrench, turn both rear roller adjustment bolts counterclockwise, 1/4 of a turn . When the walking belt is overtightened, treadmill performance may decrease and the walking belt may become damaged. ing belt is centred. Turn the Pulley until the walking belt is no longer than 1.5 m (5 ft.). Make sure 3 mm that is properly tightened. Retighten the Screw. If an extension cord is needed, use the allen wrench to 4 in .). Remove the key and UNPLUG THE POWER CORD. Plug...
Uk Manual
Page 26
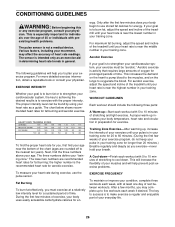
... heart rate is activity that requires large amounts of your exercise program, do not keep your pulse in your cardiovascular system, the key to the nearest ten years). the higher number is to burn fat, adjust the speed and incline of rest between workouts. Fat Burning To burn fat effectively, you , first find your exercise must exercise at least one day of the treadmill...
... heart rate is activity that requires large amounts of your exercise program, do not keep your pulse in your cardiovascular system, the key to the nearest ten years). the higher number is to burn fat, adjust the speed and incline of rest between workouts. Fat Burning To burn fat effectively, you , first find your exercise must exercise at least one day of the treadmill...
Uk Manual
Page 28
... PRODUCT (PROFORM® 12.5 QM treadmill) • the SERIAL NUMBER OF THE PRODUCT (see the front cover of this manual) • the KEY NUMBER and DESCRIPTION of the part(s) (see the EXPLODED DRAWING and PART LIST attached in the centre of this product, or if you need to order replacement parts, contact the ICON Health & Fitness Ltd. office, or write: ICON Health & Fitness, Ltd. ORDERING REPLACEMENT PARTS If you encounter any problems with this manual) Part No...
... PRODUCT (PROFORM® 12.5 QM treadmill) • the SERIAL NUMBER OF THE PRODUCT (see the front cover of this manual) • the KEY NUMBER and DESCRIPTION of the part(s) (see the EXPLODED DRAWING and PART LIST attached in the centre of this product, or if you need to order replacement parts, contact the ICON Health & Fitness Ltd. office, or write: ICON Health & Fitness, Ltd. ORDERING REPLACEMENT PARTS If you encounter any problems with this manual) Part No...
Uk Manual
Page 30
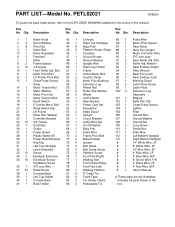
... 96 1 Rear Endcap (Left) 13 1 Chest Pulse Sensor 54 2 Motor Pivot Bushing 97 1 Warning Decal Strap 55 2 Extension Leg 98 2 Latch Plate Screw 14 1 Motor Tension Nut 56 2 Wheel Bolt 99 1 Latch Plate 15 1 Motor Washer 57 2 Roller Star Washer 100* 2 Extension Leg 16 1 Motor Pivot Nut 58 2 Wheel Assembly 17 1 Motor Tension Bolt 59 1 Incline Motor 101 1 Magnet 18 1 Reed Switch 60 1 Stop Bracket 102 1 Belly Pan Clip 19 1 2" Incline Motor Bolt 61 1 Power Cord Set 103 1 Chest Pulse Sensor 20 1 Reed Switch Clip...
... 96 1 Rear Endcap (Left) 13 1 Chest Pulse Sensor 54 2 Motor Pivot Bushing 97 1 Warning Decal Strap 55 2 Extension Leg 98 2 Latch Plate Screw 14 1 Motor Tension Nut 56 2 Wheel Bolt 99 1 Latch Plate 15 1 Motor Washer 57 2 Roller Star Washer 100* 2 Extension Leg 16 1 Motor Pivot Nut 58 2 Wheel Assembly 17 1 Motor Tension Bolt 59 1 Incline Motor 101 1 Magnet 18 1 Reed Switch 60 1 Stop Bracket 102 1 Belly Pan Clip 19 1 2" Incline Motor Bolt 61 1 Power Cord Set 103 1 Chest Pulse Sensor 20 1 Reed Switch Clip...

