Installation Manual
Page 4
... loop antenna 20 Using external antennas 20 Connecting the speakers 21 Speaker terminals 22 A and B speaker systems 22 Hints on speaker placement 22 Connecting additional amplifiers 24 AC outlet 25 Operating other Pioneer components . . . . 25 Using this receiver with a Pioneer plasma display 26 05 Controls and displays Front panel ... analog inputs 41 Using the sleep timer 41 07 Setting up the receiver Choosing your receiver setup 42 Speaker setting 43 Surround back speaker setting 44 Subwoofer setting 44 Crossover frequency setting 44 LFE attenuator setting 45 Front left...
... loop antenna 20 Using external antennas 20 Connecting the speakers 21 Speaker terminals 22 A and B speaker systems 22 Hints on speaker placement 22 Connecting additional amplifiers 24 AC outlet 25 Operating other Pioneer components . . . . 25 Using this receiver with a Pioneer plasma display 26 05 Controls and displays Front panel ... analog inputs 41 Using the sleep timer 41 07 Setting up the receiver Choosing your receiver setup 42 Speaker setting 43 Surround back speaker setting 44 Subwoofer setting 44 Crossover frequency setting 44 LFE attenuator setting 45 Front left...

Installation Manual
Page 5
Surround left speaker distance setting . . 46 Subwoofer distance setting 46 Dynamic range control setting 47 Dual mono setting 47 Component video input settings 47 Digital input settings 47 SR+ control for Pioneer plasma displays 48 Manually calibrating your listening area (MCACC 49 Setting separate channel levels for ...listening modes 50 Using the SR+ mode with a Pioneer plasma display 51 08 Using the tuner Listening to the radio 53 Improving FM stereo sound 53 Tuning directly to a station 53...
Surround left speaker distance setting . . 46 Subwoofer distance setting 46 Dynamic range control setting 47 Dual mono setting 47 Component video input settings 47 Digital input settings 47 SR+ control for Pioneer plasma displays 48 Manually calibrating your listening area (MCACC 49 Setting separate channel levels for ...listening modes 50 Using the SR+ mode with a Pioneer plasma display 51 08 Using the tuner Listening to the radio 53 Improving FM stereo sound 53 Tuning directly to a station 53...
Installation Manual
Page 6
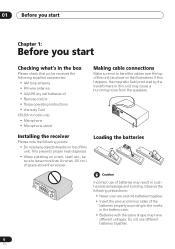
...to leave more than 8 inches (20 cm.) of this unit. Loading the batteries Incorrect use of batteries may cause a humming noise from the speakers. Do not use new and old batteries together. • Insert the plus and minus sides of the batteries properly according to the marks in the... loop antenna • FM wire antenna • AA/LR6 dry cell batteries x2 • Remote control • These operating instructions • Warranty Card VSX-D914 model only: • Microphone • Microphone stand Making cable connections Make sure not to bend the cables over the top of this unit (as...
...to leave more than 8 inches (20 cm.) of this unit. Loading the batteries Incorrect use of batteries may cause a humming noise from the speakers. Do not use new and old batteries together. • Insert the plus and minus sides of the batteries properly according to the marks in the... loop antenna • FM wire antenna • AA/LR6 dry cell batteries x2 • Remote control • These operating instructions • Warranty Card VSX-D914 model only: • Microphone • Microphone stand Making cable connections Make sure not to bend the cables over the top of this unit (as...
Installation Manual
Page 8
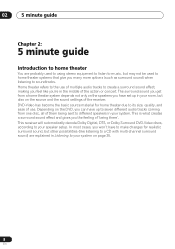
...the source and the sound settings of multiple audio tracks to create a surround sound effect, making you 're in your system on the speakers you many more options (such as surround sound) when listening to your system. Home theater refers to the use . DVD-Video has ... depends not only on page 35. 8 En 02 5 minute guide Chapter 2: 5 minute guide Introduction to home theater You are explained in your speaker setup. This receiver will automatically decode Dolby Digital, DTS, or Dolby Surround DVD-Video discs, according to soundtracks. The surround sound you get from ...
...the source and the sound settings of multiple audio tracks to create a surround sound effect, making you 're in your system on the speakers you many more options (such as surround sound) when listening to your system. Home theater refers to the use . DVD-Video has ... depends not only on page 35. 8 En 02 5 minute guide Chapter 2: 5 minute guide Introduction to home theater You are explained in your speaker setup. This receiver will automatically decode Dolby Digital, DTS, or Dolby Surround DVD-Video discs, according to soundtracks. The surround sound you get from ...
Installation Manual
Page 10
... to the left channel (-) terminal (shown below . The receiver will vary. Simply connect the speakers you connect the speaker on the right to the right terminal and the speaker on your speakers. You can use speakers with just two stereo speakers (the front speakers in the manner shown below ). 10 En 02 5 minute guide 3 Connect your TV...
... to the left channel (-) terminal (shown below . The receiver will vary. Simply connect the speakers you connect the speaker on the right to the right terminal and the speaker on your speakers. You can use speakers with just two stereo speakers (the front speakers in the manner shown below ). 10 En 02 5 minute guide 3 Connect your TV...

Installation Manual
Page 11
Surround back speaker (or subwoofer) R SURROUND BACK L 4 Plug in the receiver and switch it on your DVD player or source discs, you may only get digital 2 channel stereo and analog sound. VSX-D914 model only - Also make sure that DVD/LD is showing in the receiver's display, indicating that... came with the TV if you can hook up a subwoofer instead of speakers to the surround back speaker terminals. See also Choosing your receiver setup...
Surround back speaker (or subwoofer) R SURROUND BACK L 4 Plug in the receiver and switch it on your DVD player or source discs, you may only get digital 2 channel stereo and analog sound. VSX-D914 model only - Also make sure that DVD/LD is showing in the receiver's display, indicating that... came with the TV if you can hook up a subwoofer instead of speakers to the surround back speaker terminals. See also Choosing your receiver setup...
Installation Manual
Page 12
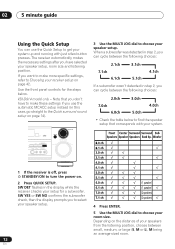
VSX-D914 model only - When a subwoofer was detected in step 2, you can cycle between the ...JOG dial to choose your receiver setup on page 42. SW DET flashes in the display while the receiver checks your speakers from the listening position, choose between the following choices: 2.1ch 3.1ch 7.1ch 6.1ch 5.1ch 4.1ch If a subwoofer...receiver automatically makes the necessary settings after you have to make more specific settings, refer to Choosing your room size. SPEAKERS SB CH MODE MULTI JOG TONE QUICK SETUP VIDEO INPUT S-VIDEO VIDEO L AUDIO R ENTER MULTI JOG MASTER VOLUME ...
VSX-D914 model only - When a subwoofer was detected in step 2, you can cycle between the ...JOG dial to choose your receiver setup on page 42. SW DET flashes in the display while the receiver checks your speakers from the listening position, choose between the following choices: 2.1ch 3.1ch 7.1ch 6.1ch 5.1ch 4.1ch If a subwoofer...receiver automatically makes the necessary settings after you have to make more specific settings, refer to Choosing your room size. SPEAKERS SB CH MODE MULTI JOG TONE QUICK SETUP VIDEO INPUT S-VIDEO VIDEO L AUDIO R ENTER MULTI JOG MASTER VOLUME ...

Installation Manual
Page 13
5 minute guide 02 6 Press ENTER. 7 Use the MULTI JOG dial to the front speakers than the front speakers 8 Press ENTER to confirm your listening position. If you are nearer to choose your setup. If you are nearer to the surround speakers than the surround speakers MID - The display shows the speaker setup, room size and listening position that you are equal distance from the front and surround speakers BACK - If you have selected. 13 En You can cycle between the following choices: FWD MID BACK FWD -
5 minute guide 02 6 Press ENTER. 7 Use the MULTI JOG dial to the front speakers than the front speakers 8 Press ENTER to confirm your listening position. If you are nearer to choose your setup. If you are nearer to the surround speakers than the surround speakers MID - The display shows the speaker setup, room size and listening position that you are equal distance from the front and surround speakers BACK - If you have selected. 13 En You can cycle between the following choices: FWD MID BACK FWD -
Installation Manual
Page 14
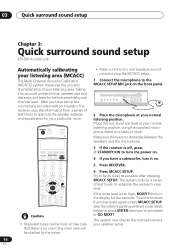
03 Quick surround sound setup Chapter 3: Quick surround sound setup VSX-D914 model only Automatically calibrating your listening area (MCACC) ...the microphone and your system, the receiver uses the information from a series of test tones to optimize the speaker settings and equalization for both channel delay and channel level. DVD/LD TV/SAT DVR/VCR TVCONT MULTI ...a table or chair. The system outputs a series of your listening area, taking into account ambient noise, speaker size and distance, and tests for your normal listening position. Place the mic about ear level at your ...
03 Quick surround sound setup Chapter 3: Quick surround sound setup VSX-D914 model only Automatically calibrating your listening area (MCACC) ...the microphone and your system, the receiver uses the information from a series of test tones to optimize the speaker settings and equalization for both channel delay and channel level. DVD/LD TV/SAT DVR/VCR TVCONT MULTI ...a table or chair. The system outputs a series of your listening area, taking into account ambient noise, speaker size and distance, and tests for your normal listening position. Place the mic about ear level at your ...
Installation Manual
Page 15
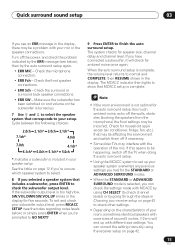
... Indicates a subwoofer is selected, you can correct the setting manually using CH SELECT (to show that may be a problem with your room, sometimes identical speakers with cone sizes of the mic. To exit and check your setup. If this seems to your subwoofer output level, press MCACC SETUP (see the... of around 5 inches (12cm) will check for the auto surround setup (too much ambient noise, echo off the walls, obstacles blocking the speakers from the microphone) the final settings may be happening, switch off the power, and check the problem indicated by going through the steps in ...
... Indicates a subwoofer is selected, you can correct the setting manually using CH SELECT (to show that may be a problem with your room, sometimes identical speakers with cone sizes of the mic. To exit and check your setup. If this seems to your subwoofer output level, press MCACC SETUP (see the... of around 5 inches (12cm) will check for the auto surround setup (too much ambient noise, echo off the walls, obstacles blocking the speakers from the microphone) the final settings may be happening, switch off the power, and check the problem indicated by going through the steps in ...
Installation Manual
Page 19
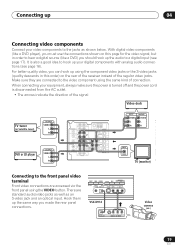
STEREO/ DIRECT SIGNAL MIDNIGHT/ SELECT LOUDNESS SPEAKERS SB CH MODE MULTI JOG TONE QUICK SETUP ODE MCACC VIDEO INPUT SETUP MIC DIGITAL IN S-VIDEO VIDEO L AUDIO R VSX-D914 DIGITAL OUT V L R VIDEO OUTPUT Video camera (etc.) 19 En When connecting your equipment, always make sure the power is turned off and the power ...
STEREO/ DIRECT SIGNAL MIDNIGHT/ SELECT LOUDNESS SPEAKERS SB CH MODE MULTI JOG TONE QUICK SETUP ODE MCACC VIDEO INPUT SETUP MIC DIGITAL IN S-VIDEO VIDEO L AUDIO R VSX-D914 DIGITAL OUT V L R VIDEO OUTPUT Video camera (etc.) 19 En When connecting your equipment, always make sure the power is turned off and the power ...
Installation Manual
Page 21
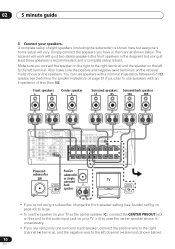
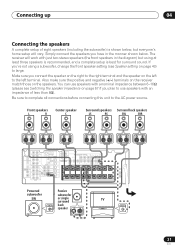
... will work with just two stereo speakers (the front speakers in the diagram) but using a subwoofer, change the front speaker setting (see Switching the speaker impedance on the left terminal. Front speakers L R Center speaker C Surround speakers Surround back speakers LS RS SBL SBR CENTER IN DIGITAL...surround sound. Be sure to complete all connections before connecting this unit to use speakers with a nominal impedance between 6-16Ω (please see Speaker setting on the speakers. Also make sure the positive and negative (+/-) terminals on the receiver match ...
... will work with just two stereo speakers (the front speakers in the diagram) but using a subwoofer, change the front speaker setting (see Switching the speaker impedance on the left terminal. Front speakers L R Center speaker C Surround speakers Surround back speakers LS RS SBL SBR CENTER IN DIGITAL...surround sound. Be sure to complete all connections before connecting this unit to use speakers with a nominal impedance between 6-16Ω (please see Speaker setting on the speakers. Also make sure the positive and negative (+/-) terminals on the receiver match ...
Installation Manual
Page 22
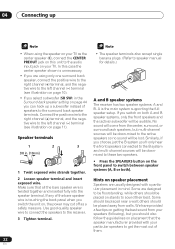
... (+) terminal, and the negative wire to the left channel (-) terminal (see illustration on your TV. If any of the bare speaker wire is unnecessary. • If you are using the speaker on page 10). • If you select subwoofer (SB SW) in . (10mm) 1 Twist exposed wire strands together. 2...get the most out of them. 22 En A is twisted together and inserted fully into the speaker terminal. Hints on placement that all the bare speaker wire is the main system supporting the full speaker setup. Some should be placed near a wall; We have provided a few tips on getting the...
... (+) terminal, and the negative wire to the left channel (-) terminal (see illustration on your TV. If any of the bare speaker wire is unnecessary. • If you are using the speaker on page 10). • If you select subwoofer (SB SW) in . (10mm) 1 Twist exposed wire strands together. 2...get the most out of them. 22 En A is twisted together and inserted fully into the speaker terminal. Hints on placement that all the bare speaker wire is the main system supporting the full speaker setup. Some should be placed near a wall; We have provided a few tips on getting the...
Installation Manual
Page 23
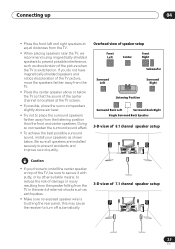
...it with putty, or by other suitable means, to reduce the risk of damage or injury resulting from the speaker falling from the TV. • Place the center speaker above or below the TV so that the sound of the center channel is touching the rear panel, this ...automatically. 3-D view of external shocks such as earthquakes. • Make sure no exposed speaker wire is localized at equal distances from the TV. • When placing speakers near the TV, we recommend using magnetically shielded speakers to prevent possible interference, such as shown below. Connecting up 04 • Place ...
...it with putty, or by other suitable means, to reduce the risk of damage or injury resulting from the speaker falling from the TV. • Place the center speaker above or below the TV so that the sound of the center channel is touching the rear panel, this ...automatically. 3-D view of external shocks such as earthquakes. • Make sure no exposed speaker wire is localized at equal distances from the TV. • When placing speakers near the TV, we recommend using magnetically shielded speakers to prevent possible interference, such as shown below. Connecting up 04 • Place ...
Installation Manual
Page 24
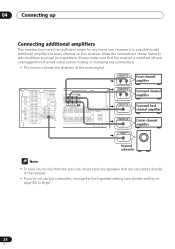
Make the connections shown below to add amplifiers to the receiver. • If you're not using a subwoofer, change the front speaker setting (see Speaker setting on this receiver. IN DIGITAL OUT OPT IN AUX FM UNBAL AM SIGNABLE / LD) IN ¥ L L SURROUND BACK CD 75 Ω LOOP ANTENNA... This receiver has more than sufficient power for any home use, however it is switched off and unplugged from the pre-outs, disconnect any speakers that the receiver is possible to add additional amplifiers to every channel on page 43) to large. 24 En Always make sure that are ...
Make the connections shown below to add amplifiers to the receiver. • If you're not using a subwoofer, change the front speaker setting (see Speaker setting on this receiver. IN DIGITAL OUT OPT IN AUX FM UNBAL AM SIGNABLE / LD) IN ¥ L L SURROUND BACK CD 75 Ω LOOP ANTENNA... This receiver has more than sufficient power for any home use, however it is switched off and unplugged from the pre-outs, disconnect any speakers that the receiver is possible to add additional amplifiers to every channel on page 43) to large. 24 En Always make sure that are ...
Installation Manual
Page 26
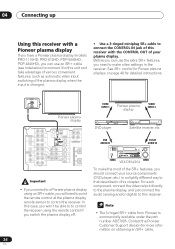
... as automatic video input switching of the plasma display when the input is commercially available under the part number ADE7095. VIDEO INPUT 1 Pioneer plasma display VIDEO INPUT 2 DVD player Satellite receiver, etc DVD AUDIO IN STANDBY/ PHONES MULTI JOG TV/SAT AUDIO IN AUDIO/VIDEO...SPEAKERS SB CH MODE MULTI JOG TONE QUICK SETUP BAND LISTENING MODE MPX INPUT ATT FL DIMMER MCACC SETUP MIC DIGITAL IN VIDEO INPUT S-VIDEO VIDEO L AUDIO R ENTER MULTI JOG MASTER VOLUME DOWN UP VSX-D814/914 To make a few settings in this receiver. • The 3-ringed SR+ cable from Pioneer...
... as automatic video input switching of the plasma display when the input is commercially available under the part number ADE7095. VIDEO INPUT 1 Pioneer plasma display VIDEO INPUT 2 DVD player Satellite receiver, etc DVD AUDIO IN STANDBY/ PHONES MULTI JOG TV/SAT AUDIO IN AUDIO/VIDEO...SPEAKERS SB CH MODE MULTI JOG TONE QUICK SETUP BAND LISTENING MODE MPX INPUT ATT FL DIMMER MCACC SETUP MIC DIGITAL IN VIDEO INPUT S-VIDEO VIDEO L AUDIO R ENTER MULTI JOG MASTER VOLUME DOWN UP VSX-D814/914 To make a few settings in this receiver. • The 3-ringed SR+ cable from Pioneer...
Installation Manual
Page 27
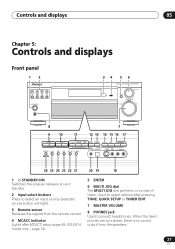
... panel 12 DVD/LD TV/SAT DVR/VCR VIDEO CD-R/ CD TAPE/MD TUNER AUX STANDBY/ON PHONES 34 5 6 AUDIO/VIDEO MULTI-CHANNEL RECEIVER VSX-D914 ENTER MULTI JOG MASTER VOLUME DOWN UP 8 7 9 10 11 12 13 14 15 16 17 STATION TUNING ADVANCED STEREO/ STANDARD SURROUND DIRECT ...on and standby. 2 Input select buttons Press to select an input source (selected source button will light). 3 Remote sensor Receives the signals from the speakers. 27 En When the headphones are connected, there is no sound output from the remote control. 4 MCACC indicator Lights after pressing TONE, QUICK SETUP ...
... panel 12 DVD/LD TV/SAT DVR/VCR VIDEO CD-R/ CD TAPE/MD TUNER AUX STANDBY/ON PHONES 34 5 6 AUDIO/VIDEO MULTI-CHANNEL RECEIVER VSX-D914 ENTER MULTI JOG MASTER VOLUME DOWN UP 8 7 9 10 11 12 13 14 15 16 17 STATION TUNING ADVANCED STEREO/ STANDARD SURROUND DIRECT ...on and standby. 2 Input select buttons Press to select an input source (selected source button will light). 3 Remote sensor Receives the signals from the speakers. 27 En When the headphones are connected, there is no sound output from the remote control. 4 MCACC indicator Lights after pressing TONE, QUICK SETUP ...
Installation Manual
Page 28
... front panel video terminal on page 19. 19 DIGITAL IN See Connecting to the front panel video terminal on page 19. 20 MCACC SETUP MIC (VSX-D914 model only) Connect the microphone supplied with your system to the MCACC SETUP MIC jack when using the auto surround setup (MCACC) (page 14... SELECT Use to select an input signal (page 37). 13 MIDNIGHT/LOUDNESS Use Midnight when listening to movie soundtracks at low volume (page 40). 14 SPEAKERS Use to memorize and name a station for recall (page 54). 28 En buttons Selects the frequency when using the tuner (page 54). 10 TUNING +/- ADVANCED...
... front panel video terminal on page 19. 19 DIGITAL IN See Connecting to the front panel video terminal on page 19. 20 MCACC SETUP MIC (VSX-D914 model only) Connect the microphone supplied with your system to the MCACC SETUP MIC jack when using the auto surround setup (MCACC) (page 14... SELECT Use to select an input signal (page 37). 13 MIDNIGHT/LOUDNESS Use Midnight when listening to movie soundtracks at low volume (page 40). 14 SPEAKERS Use to memorize and name a station for recall (page 54). 28 En buttons Selects the frequency when using the tuner (page 54). 10 TUNING +/- ADVANCED...

Installation Manual
Page 29
... receiver is in sleep mode. 9 ATT Lights when INPUT ATT is used to attenuate (reduce) the level of the analog input signal. 10 Speaker indicator Shows the speaker system currently in surround sound on page 35 for the most accurate reproduction of the receiver is on the source, this lights to indicate...
... receiver is in sleep mode. 9 ATT Lights when INPUT ATT is used to attenuate (reduce) the level of the analog input signal. 10 Speaker indicator Shows the speaker system currently in surround sound on page 35 for the most accurate reproduction of the receiver is on the source, this lights to indicate...
Installation Manual
Page 32
... Displays TV information on /off the power of the TV. DTV ON/OFF Switches a digital TV on -screen. to adjust the volume on your speaker system using a TV, VCR, DVR, etc. 32 En AUDIO Changes the audio language or channel on /off . CH +/- CLASS Switches between the...a double cassette deck player. Use to find radio frequen- CH RETURN Returns to select channels when using Multi-Channel Acoustic Calibration (MCACC) (page 49, VSX-D914 model only - Use to the last channel selected with DTV. 6 (TUNE/ST +/-) /ENTER Use the arrow buttons when setting up information screens on...
... Displays TV information on /off the power of the TV. DTV ON/OFF Switches a digital TV on -screen. to adjust the volume on your speaker system using a TV, VCR, DVR, etc. 32 En AUDIO Changes the audio language or channel on /off . CH +/- CLASS Switches between the...a double cassette deck player. Use to find radio frequen- CH RETURN Returns to select channels when using Multi-Channel Acoustic Calibration (MCACC) (page 49, VSX-D914 model only - Use to the last channel selected with DTV. 6 (TUNE/ST +/-) /ENTER Use the arrow buttons when setting up information screens on...


