Owner's Manual
Page 4
... Connecting an HDD/DVD recorder, VCR and other sources 36 Choosing the input signal 36 Selecting the multichannel analog inputs . . . 36 Selecting the front audio inputs 36 06 The System Setup menu Using the System Setup menu 37 Manual MCACC speaker setup 37 Fine Channel Level 38 Fine Speaker Distance 39 Acoustic Calibration EQ 40 Manual speaker setup 42 Speaker Setting 42 Crossover Network 43 Channel Level 44 Speaker Distance 45 07 Using the tuner Listening to the radio 46 Improving FM stereo sound 46 Tuning directly to a station...
... Connecting an HDD/DVD recorder, VCR and other sources 36 Choosing the input signal 36 Selecting the multichannel analog inputs . . . 36 Selecting the front audio inputs 36 06 The System Setup menu Using the System Setup menu 37 Manual MCACC speaker setup 37 Fine Channel Level 38 Fine Speaker Distance 39 Acoustic Calibration EQ 40 Manual speaker setup 42 Speaker Setting 42 Crossover Network 43 Channel Level 44 Speaker Distance 45 07 Using the tuner Listening to the radio 46 Improving FM stereo sound 46 Tuning directly to a station...
Owner's Manual
Page 7
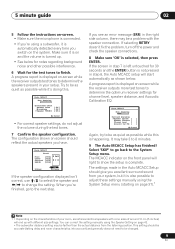
... your speakers as shown below for surround sound in and switch on -screen automatic MCACC setup to do this. 4 Use the on the receiver, followed by your DVD player, subwoofer and TV. Listening to Surround Sound With the following quick setup guide, you 're in surround sound on page 20. Subwoofer (SW) Front Left (L) Front Right (R) Surround Right (RS) Center (C) Surround Left (LS) Listening position 3 Plug in no time at all connections before connecting to...
... your speakers as shown below for surround sound in and switch on -screen automatic MCACC setup to do this. 4 Use the on the receiver, followed by your DVD player, subwoofer and TV. Listening to Surround Sound With the following quick setup guide, you 're in surround sound on page 20. Subwoofer (SW) Front Left (L) Front Right (R) Surround Right (RS) Center (C) Surround Left (LS) Listening position 3 Plug in no time at all connections before connecting to...

Owner's Manual
Page 8
... MCACC PORTABLE jack on the remote control, then press the SETUP button. Make sure there are unplugged. Use / / / and ENTER on your TV. Use component or composite connections for your particular room. RECEIVER INPUT SELECT SOURCE MULTI CONTROL TV CTRL DVD TV DVR CD-R XM SIRIUS CD FM AM PORTABLE iPod RECEIVER RECEIVER CONTROL ONE TOUCH COPY CH+ AV PARAMETER TOP MENU ST TUNE ENTER T.EDIT MENU ST GUIDE CATEGORY TUNE CH- An on-screen display (OSD...
... MCACC PORTABLE jack on the remote control, then press the SETUP button. Make sure there are unplugged. Use / / / and ENTER on your TV. Use component or composite connections for your particular room. RECEIVER INPUT SELECT SOURCE MULTI CONTROL TV CTRL DVD TV DVR CD-R XM SIRIUS CD FM AM PORTABLE iPod RECEIVER RECEIVER CONTROL ONE TOUCH COPY CH+ AV PARAMETER TOP MENU ST TUNE ENTER T.EDIT MENU ST GUIDE CATEGORY TUNE CH- An on-screen display (OSD...
Owner's Manual
Page 9
... Italiano Nederlands Español 5 minute guide 02 5 Follow the instructions on-screen. • Make sure the microphone is connected. • If you're using a subwoofer, it is automatically detected every time you switch on -screen while the receiver outputs more test tones to determine the optimum receiver settings for channel level, speaker distance, and Acoustic Calibration EQ. 1.Auto MCACC Now Analyzing Surround Analyzing Speaker System [ ] Speaker Distance [ ] Channel Level [ ] Acoustic Cal EQ [ ] :Cancel Again...
... Italiano Nederlands Español 5 minute guide 02 5 Follow the instructions on-screen. • Make sure the microphone is connected. • If you're using a subwoofer, it is automatically detected every time you switch on -screen while the receiver outputs more test tones to determine the optimum receiver settings for channel level, speaker distance, and Acoustic Calibration EQ. 1.Auto MCACC Now Analyzing Surround Analyzing Speaker System [ ] Speaker Distance [ ] Channel Level [ ] Acoustic Cal EQ [ ] :Cancel Again...

Owner's Manual
Page 10
... CONTROL) to the frequency balance of your speaker system based on the acoustic characteristics of the sound signal. Adjustments to switch on phase correction. STEREO/ AUTO/DIRECT A.L.C. If a crest of a wave meets a trough (as shown in increased amplitude, clarity and presence of your room (see page 40 for more on this) Press RETURN after you have finished checking each screen. 02 5 minute guide...
... CONTROL) to the frequency balance of your speaker system based on the acoustic characteristics of the sound signal. Adjustments to switch on phase correction. STEREO/ AUTO/DIRECT A.L.C. If a crest of a wave meets a trough (as shown in increased amplitude, clarity and presence of your room (see page 40 for more on this) Press RETURN after you have finished checking each screen. 02 5 minute guide...

Owner's Manual
Page 13
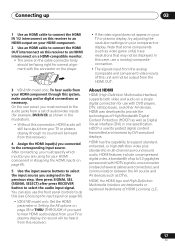
... SUB WOOFER PREOUT MONITOR OUT DVR / VCR OUT VIDEO OPT 2 (TV / SAT) OPT 1 (CD) (ASSIGNABLE) R S P E A K A E R S DVD/multi-channel decoder with multi-channel analog output jacks VSX-918V 1 2 The illustration shows the VSX-918V, but connections for the input you connected the set-top box to. 3 See Using the component video jacks on this receiver as shown below.1 VSX-918V HDMI IN R IN (DVD / BD) IN 1 IN (ASSIGNABLE) OUT (TV / SAT) IN 2 IN OUT IN XM IN IN DIGITAL IN COAX 1 OUT (DVD / BD) (ASSIGNABLE) AUDIO AUX...
... SUB WOOFER PREOUT MONITOR OUT DVR / VCR OUT VIDEO OPT 2 (TV / SAT) OPT 1 (CD) (ASSIGNABLE) R S P E A K A E R S DVD/multi-channel decoder with multi-channel analog output jacks VSX-918V 1 2 The illustration shows the VSX-918V, but connections for the input you connected the set-top box to. 3 See Using the component video jacks on this receiver as shown below.1 VSX-918V HDMI IN R IN (DVD / BD) IN 1 IN (ASSIGNABLE) OUT (TV / SAT) IN 2 IN OUT IN XM IN IN DIGITAL IN COAX 1 OUT (DVD / BD) (ASSIGNABLE) AUDIO AUX...

Owner's Manual
Page 15
... other video sources This receiver has audio/video inputs and outputs suitable for the video connection. 3 If your video component also has a component video output, you can connect this receiver. See Using the component video jacks on this too. Note 1 If your video component has a digital audio output, connect it to the DIGITAL OPT 1 (CD) input.2 VSX-918V HDMI IN R IN (DVD / BD) IN 1 IN (ASSIGNABLE) OUT (TV / SAT) IN 2 IN OUT IN XM IN IN DIGITAL IN COAX 1 OUT (DVD / BD) (ASSIGNABLE) AUDIO AUX L CD ANTENNA FM UNBAL DIGITAL...
... other video sources This receiver has audio/video inputs and outputs suitable for the video connection. 3 If your video component also has a component video output, you can connect this receiver. See Using the component video jacks on this too. Note 1 If your video component has a digital audio output, connect it to the DIGITAL OPT 1 (CD) input.2 VSX-918V HDMI IN R IN (DVD / BD) IN 1 IN (ASSIGNABLE) OUT (TV / SAT) IN 2 IN OUT IN XM IN IN DIGITAL IN COAX 1 OUT (DVD / BD) (ASSIGNABLE) AUDIO AUX L CD ANTENNA FM UNBAL DIGITAL...
Owner's Manual
Page 16
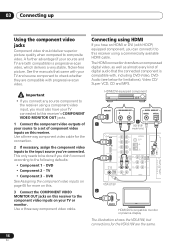
... En Connecting using HDMI If you can connect it to this receiver using a component video input, you must also have an HDMI or DVI (with HDCP) equipped component, you have your TV connected to this receiver's COMPONENT VIDEO MONITOR OUT jacks. 1 Connect the component video outputs of your source to be done if you 've connected. HDMI/DVI-equipped component HDMI OUT 1 ANALOG AUDIO OUT R L DIGITAL AUDIO OUT COAXIAL OPTICAL 3 (VSX-818V model only) HDMI IN R IN AUX L CD ANTENNA FM UNBAL DIGITAL IN (DVD / BD) IN 1 IN (ASSIGNABLE) OUT...
... En Connecting using HDMI If you can connect it to this receiver using a component video input, you must also have an HDMI or DVI (with HDCP) equipped component, you have your TV connected to this receiver's COMPONENT VIDEO MONITOR OUT jacks. 1 Connect the component video outputs of your source to be done if you 've connected. HDMI/DVI-equipped component HDMI OUT 1 ANALOG AUDIO OUT R L DIGITAL AUDIO OUT COAXIAL OPTICAL 3 (VSX-818V model only) HDMI IN R IN AUX L CD ANTENNA FM UNBAL DIGITAL IN (DVD / BD) IN 1 IN (ASSIGNABLE) OUT...
Owner's Manual
Page 17
... devices. HDCP is used to multi-channel surround-sound audio. You can also use the front panel controls to do this (see Choosing the input signal on page 36). • VSX-918V model only: Set the HDMI parameter in Assigning the HDMI inputs on page 65. 5 Use the input source buttons to select the input source you connected to the corresponding input source. About HDMI HDMI (High Definition Multimedia Interface) supports both video and audio on a single digital connection for your HDMI component in Setting the AV options on...
... devices. HDCP is used to multi-channel surround-sound audio. You can also use the front panel controls to do this (see Choosing the input signal on page 36). • VSX-918V model only: Set the HDMI parameter in Assigning the HDMI inputs on page 65. 5 Use the input source buttons to select the input source you connected to the corresponding input source. About HDMI HDMI (High Definition Multimedia Interface) supports both video and audio on a single digital connection for your HDMI component in Setting the AV options on...

Owner's Manual
Page 18
...the rear panel connections. AC OUTLET 120 V 60 Hz SWITCHED 100W MAX 0.8 A MAX AUDIO OUT Digital audio player, etc. VIDEO L AUDIO R MCACC iPod DIRECT PORTABLE VIDEO L R AUDIO/VIDEO OUTPUT Video camera (etc.) 18 En Use a stereo mini-jack cable to the front panel audio mini jack Front audio connections are accessed via the front panel using the VIDEO/PORTABLE button. Total electrical power consumption of equipment should be connected to the front panel video terminal Front video connections are standard audio/video jacks. This receiver AUX MCACC PORTABLE MASTER VOLUME AC...
...the rear panel connections. AC OUTLET 120 V 60 Hz SWITCHED 100W MAX 0.8 A MAX AUDIO OUT Digital audio player, etc. VIDEO L AUDIO R MCACC iPod DIRECT PORTABLE VIDEO L R AUDIO/VIDEO OUTPUT Video camera (etc.) 18 En Use a stereo mini-jack cable to the front panel audio mini jack Front audio connections are accessed via the front panel using the VIDEO/PORTABLE button. Total electrical power consumption of equipment should be connected to the front panel video terminal Front video connections are standard audio/video jacks. This receiver AUX MCACC PORTABLE MASTER VOLUME AC...

Owner's Manual
Page 20
... connections for surround sound. 03 Connecting up Connecting the speakers A complete setup of less than 8 Ω). If you're not using a subwoofer, change the front speaker setting (see Switching the speaker impedance on the left terminal. SUB TER WOOFER R SURROUND L DVD 5.1CH INPUT Y SIRIUS IN (ASSIGNABLE) (DVR / VCR) IN 3 (DVD / BD) IN 1 PB PR Y PB PR FRONT MONITOR OUT COMPONENT VIDEO (TV / SAT) IN 2 LR SURROUND L CENTER R L B AC OUTLET Speaker system B The illustration shows the VSX-918V, but everyone's home setup will work...
... connections for surround sound. 03 Connecting up Connecting the speakers A complete setup of less than 8 Ω). If you're not using a subwoofer, change the front speaker setting (see Switching the speaker impedance on the left terminal. SUB TER WOOFER R SURROUND L DVD 5.1CH INPUT Y SIRIUS IN (ASSIGNABLE) (DVR / VCR) IN 3 (DVD / BD) IN 1 PB PR Y PB PR FRONT MONITOR OUT COMPONENT VIDEO (TV / SAT) IN 2 LR SURROUND L CENTER R L B AC OUTLET Speaker system B The illustration shows the VSX-918V, but everyone's home setup will work...

Owner's Manual
Page 24
... most accurate reproduction of input signal: AUTO Lights when AUTO signal select is on. 04 Controls and displays 10 MCACC PORTABLE jack Use to connect a microphone when performing Auto MCACC setup, or connect an auxiliary component using a stereo mini-jack cable (page 18). 11 PHONES jack Use to select an Acoustic Calibration EQ setting (page 33). 20 Listening mode buttons AUTO SURR/STREAM DIRECT Switches between Auto surround mode (Auto playback on page 30) and Stream Direct playback. Used to find radio frequencies (page 46). 14 SOUND RETRIEVER Press to...
... most accurate reproduction of input signal: AUTO Lights when AUTO signal select is on. 04 Controls and displays 10 MCACC PORTABLE jack Use to connect a microphone when performing Auto MCACC setup, or connect an auxiliary component using a stereo mini-jack cable (page 18). 11 PHONES jack Use to select an Acoustic Calibration EQ setting (page 33). 20 Listening mode buttons AUTO SURR/STREAM DIRECT Switches between Auto surround mode (Auto playback on page 30) and Stream Direct playback. Used to find radio frequencies (page 46). 14 SOUND RETRIEVER Press to...

Owner's Manual
Page 27
...-versa. Also functions as the SETUP button for recall (page 47). SUBTITLE* Displays/changes the subtitles included in multilingual DVD-Video discs. ì REC* Start recording. REC STOP* Stops recording. There are used to a DTV)). MASTER VOLUME +/- RETURN Confirm and exit the current menu screen. Also used to select preset radio stations (page 47). 7 Component control buttons The main buttons ( , , etc.) are other component controls Use the number buttons to control DVD menus/options. The controls above these buttons can be...
...-versa. Also functions as the SETUP button for recall (page 47). SUBTITLE* Displays/changes the subtitles included in multilingual DVD-Video discs. ì REC* Start recording. REC STOP* Stops recording. There are used to a DTV)). MASTER VOLUME +/- RETURN Confirm and exit the current menu screen. Also used to select preset radio stations (page 47). 7 Component control buttons The main buttons ( , , etc.) are other component controls Use the number buttons to control DVD menus/options. The controls above these buttons can be...

Owner's Manual
Page 28
... prevent distortion. Use to select an input signal (page 36). 04 Controls and displays TUNER DISP* Switches between the iPod controls and the receiver controls (page 57). Off). SIGNAL SEL Use to select channels. These buttons are dedicated to control the TV assigned to the TV CTRL MULTI CONTROL button. DIMMER Dims or brightens the display. ANALOG ATT Attenuates (lowers) the level of FM broadcasts. You can access a radio station directly using the number buttons (page 46). Also use to select a disc in this...
... prevent distortion. Use to select an input signal (page 36). 04 Controls and displays TUNER DISP* Switches between the iPod controls and the receiver controls (page 57). Off). SIGNAL SEL Use to select channels. These buttons are dedicated to control the TV assigned to the TV CTRL MULTI CONTROL button. DIMMER Dims or brightens the display. ANALOG ATT Attenuates (lowers) the level of FM broadcasts. You can access a radio station directly using the number buttons (page 46). Also use to select a disc in this...

Owner's Manual
Page 36
... order. • HDMI (VSX-918V model only) - Selects the digital input. The input signal is playing an analog signal. With other sources 1 Turn on the power of the playback component. 2 Turn on the power of the component you can't use any of the receiver to select between input signals.1 1 Press RECEIVER on the remote control. 2 Press SIGNAL SEL (SIGNAL SELECT) to select the input signal corresponding to both analog and digital inputs on the rear of the sound features/modes and only the volume and channel levels can only playback Dolby Digital, PCM (32 kHz...
... order. • HDMI (VSX-918V model only) - Selects the digital input. The input signal is playing an analog signal. With other sources 1 Turn on the power of the playback component. 2 Turn on the power of the component you can't use any of the receiver to select between input signals.1 1 Press RECEIVER on the remote control. 2 Press SIGNAL SEL (SIGNAL SELECT) to select the input signal corresponding to both analog and digital inputs on the rear of the sound features/modes and only the volume and channel levels can only playback Dolby Digital, PCM (32 kHz...

Owner's Manual
Page 37
... Manual speaker setup on page 8. You only need to the digital, component video and HDMI inputs (see Automatically setting up for system setup. 37 En Note 1 If headphones are connected to the receiver, disconnect them. 2 • You can use the System Setup menu when the iPod, XM Radio, SIRIUS Radio or PORTABLE input is a quick and effective automatic surround setup (see The Input Assign menu on page 66). This is selected. • Press SETUP at any time...
... Manual speaker setup on page 8. You only need to the digital, component video and HDMI inputs (see Automatically setting up for system setup. 37 En Note 1 If headphones are connected to the receiver, disconnect them. 2 • You can use the System Setup menu when the iPod, XM Radio, SIRIUS Radio or PORTABLE input is a quick and effective automatic surround setup (see The Input Assign menu on page 66). This is selected. • Press SETUP at any time...
Owner's Manual
Page 38
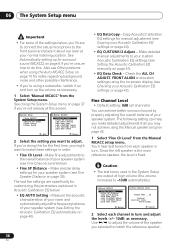
... page 37 if you're not already at your speaker system (see Other problems when using a subwoofer, switch it about ear level at this for surround sound (MCACC) on and turn and adjust the levels (+/- 10dB) as necessary. 1 Select 'Manual MCACC' from the System Setup menu. Since the left speaker is the main reference speaker, the level is fixed. Caution • The test tones used in Acoustic Calibration EQ below: • EQ AUTO Setting -
... page 37 if you're not already at your speaker system (see Other problems when using a subwoofer, switch it about ear level at this for surround sound (MCACC) on and turn and adjust the levels (+/- 10dB) as necessary. 1 Select 'Manual MCACC' from the System Setup menu. Since the left speaker is the main reference speaker, the level is fixed. Caution • The test tones used in Acoustic Calibration EQ below: • EQ AUTO Setting -
Owner's Manual
Page 44
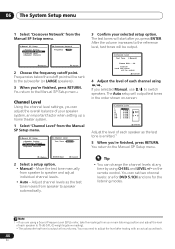
...level settings, you selected Manual, use / to switch speakers. After the volume increases to speaker automatically. Adjust channel levels as the test tone is output at any time by using /. on -screen: 3c.Channel Level L 0.0dB C [ 0.0dB ] R [ 0.0dB ] RS [ 0.0dB ] LS [ 0.0dB ] SW [ 0.0dB ] :Finish Adjust the level of your speaker system, an important factor when setting up a home theater system. 1 Select 'Channel Level' from the Manual SP Setup menu. 3.Manual SP Setup a.Speaker Setting b.Crossover Network c.Channel Level d.Speaker Distance 3b.Crossover Network Frequency...
...level settings, you selected Manual, use / to switch speakers. After the volume increases to speaker automatically. Adjust channel levels as the test tone is output at any time by using /. on -screen: 3c.Channel Level L 0.0dB C [ 0.0dB ] R [ 0.0dB ] RS [ 0.0dB ] LS [ 0.0dB ] SW [ 0.0dB ] :Finish Adjust the level of your speaker system, an important factor when setting up a home theater system. 1 Select 'Channel Level' from the Manual SP Setup menu. 3.Manual SP Setup a.Speaker Setting b.Crossover Network c.Channel Level d.Speaker Distance 3b.Crossover Network Frequency...

Owner's Manual
Page 50
... be turned on directly by both the receiver and the remote control. The LED blinks again. 4 Repeat steps 2 through 3 to try a different code, or to enter a code for the component you want to control. 09 Controlling the rest of your system Selecting preset codes directly RECEIVER INPUT SELECT SOURCE MULTI CONTROL TV CTRL DVD TV DVR CD-R CD XM FM STEREO/ SIRIUS AM PORTABLE iPod RECEIVER TUNER DISP CLASS MPX D.ACCESS MIDNIGHT ANALOG ATT DIMMER ENTER DISC SLEEP SIGNAL...
... be turned on directly by both the receiver and the remote control. The LED blinks again. 4 Repeat steps 2 through 3 to try a different code, or to enter a code for the component you want to control. 09 Controlling the rest of your system Selecting preset codes directly RECEIVER INPUT SELECT SOURCE MULTI CONTROL TV CTRL DVD TV DVR CD-R CD XM FM STEREO/ SIRIUS AM PORTABLE iPod RECEIVER TUNER DISP CLASS MPX D.ACCESS MIDNIGHT ANALOG ATT DIMMER ENTER DISC SLEEP SIGNAL...
Owner's Manual
Page 68
Sound is on page 36). subwoofer output). Broadcast stations cannot be • Connect an outdoor antenna (refer to prevent the output of the subwoofer. Noise during playback of a cassette deck. • Move the cassette deck away from LD or DVD player. • Set the SIGNAL SELECT to AUTO, DIGITAL or ANALOG according to the type of connections made between the speakers and the system again using the Auto MCACC • Low-frequency noise could have...
Sound is on page 36). subwoofer output). Broadcast stations cannot be • Connect an outdoor antenna (refer to prevent the output of the subwoofer. Noise during playback of a cassette deck. • Move the cassette deck away from LD or DVD player. • Set the SIGNAL SELECT to AUTO, DIGITAL or ANALOG according to the type of connections made between the speakers and the system again using the Auto MCACC • Low-frequency noise could have...


