Owner's Manual
Page 3
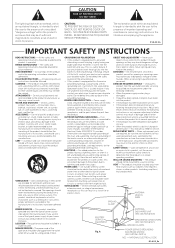
... objects have been adhered to qualified service personnel under the following the operating instructions. OUTDOOR ANTENNA GROUNDING - See Figure A. This will often require extensive work by following conditions: • When the power-supply cord or plug is a safety feature. OVERLOADING - Do not overload wall outlets, extension cords, or integral convenience receptacles as the original part. Never spill liquid of any kind...
... objects have been adhered to qualified service personnel under the following the operating instructions. OUTDOOR ANTENNA GROUNDING - See Figure A. This will often require extensive work by following conditions: • When the power-supply cord or plug is a safety feature. OVERLOADING - Do not overload wall outlets, extension cords, or integral convenience receptacles as the original part. Never spill liquid of any kind...
Owner's Manual
Page 4
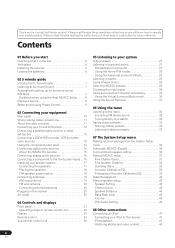
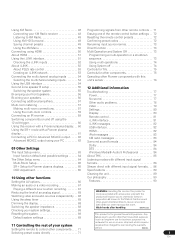
...Problems when using the Auto MCACC Setup . . . . . 9 Playing a source 9 Better sound using Phase Control 9 03 Connecting your equipment Rear panel 10 When making cable connections 11 About the video converter 11 Connecting your TV and DVD player 12 Connecting a satellite/cable receiver or other set-top box 13 Connecting a DVD/HDD recorder, VCR and other video sources 13 Using the component video jacks 14 Connecting digital audio sources 15 About the WMA9 Pro decoder 15 Connecting analog audio sources 16 Connecting a component to the front panel inputs . . 16 Installing your speaker...
...Problems when using the Auto MCACC Setup . . . . . 9 Playing a source 9 Better sound using Phase Control 9 03 Connecting your equipment Rear panel 10 When making cable connections 11 About the video converter 11 Connecting your TV and DVD player 12 Connecting a satellite/cable receiver or other set-top box 13 Connecting a DVD/HDD recorder, VCR and other video sources 13 Using the component video jacks 14 Connecting digital audio sources 15 About the WMA9 Pro decoder 15 Connecting analog audio sources 16 Connecting a component to the front panel inputs . . 16 Installing your speaker...
Owner's Manual
Page 5
... harm. K041_En Selecting preset codes directly 71 5 En Using XM Radio 48 Programming signals from other remote controls . . 71 Connecting your XM Radio receiver 48 Erasing one of the remote control button settings . . 72 Listening to XM Radio 49 Resetting the remote control presets 72 Using XM HD Surround 49 Confirming preset codes 72 Saving channel presets 49 Renaming input source names 73 Using the XM Menu 50 Direct function 73 Connecting using HDMI 50 Multi Operation and System Off 73 About HDMI 51 Programming a multi-operation or a shutdown Using the i.LINK...
... harm. K041_En Selecting preset codes directly 71 5 En Using XM Radio 48 Programming signals from other remote controls . . 71 Connecting your XM Radio receiver 48 Erasing one of the remote control button settings . . 72 Listening to XM Radio 49 Resetting the remote control presets 72 Using XM HD Surround 49 Confirming preset codes 72 Saving channel presets 49 Renaming input source names 73 Using the XM Menu 50 Direct function 73 Connecting using HDMI 50 Multi Operation and System Off 73 About HDMI 51 Programming a multi-operation or a shutdown Using the i.LINK...

Owner's Manual
Page 8
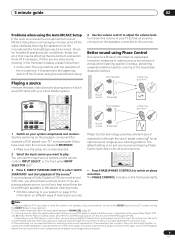
... CD-R i Pod VIDEO 2 VIDEO 1 TV CONT XM RADIO TUNER ROOM2/3 RECEIVER D.ACCESS +10 AV PARAMETER TOP MENU ì TUNE DTVMENU ST SETUP ENTER CLASS DISC ENTER CH LEVEL MENU ST T.EDIT ì RETURN CATEGORY TUNE GUIDE TV CONTROL BAND TV VOL INPUT SELECT TV CH VOL 1 Switch on the receiver and your TV. 2 Connect the microphone to 6 minutes. 9 The Auto MCACC Setup has finished! Use the / / / buttons and ENTER to navigate through Surround back speaker setting on page...
... CD-R i Pod VIDEO 2 VIDEO 1 TV CONT XM RADIO TUNER ROOM2/3 RECEIVER D.ACCESS +10 AV PARAMETER TOP MENU ì TUNE DTVMENU ST SETUP ENTER CLASS DISC ENTER CH LEVEL MENU ST T.EDIT ì RETURN CATEGORY TUNE GUIDE TV CONTROL BAND TV VOL INPUT SELECT TV CH VOL 1 Switch on the receiver and your TV. 2 Connect the microphone to 6 minutes. 9 The Auto MCACC Setup has finished! Use the / / / buttons and ENTER to navigate through Surround back speaker setting on page...
Owner's Manual
Page 9
... PHASE MCACC S.DIRECT 4 Use the volume control to be incorrect. DIRECT (STREAM DIRECT) to select 'AUTO SURROUND' and start playback of the source.3 If you're playing a Dolby Digital or DTS surround sound DVD disc, you are the basic instructions for all sound is coming from the microphone) the final settings may be happening, switch off if necessary. If you should be set to output Dolby Digital, DTS and 88.2 kHz / 96 kHz PCM (2 channel) audio, and if there...
... PHASE MCACC S.DIRECT 4 Use the volume control to be incorrect. DIRECT (STREAM DIRECT) to select 'AUTO SURROUND' and start playback of the source.3 If you're playing a Dolby Digital or DTS surround sound DVD disc, you are the basic instructions for all sound is coming from the microphone) the final settings may be happening, switch off if necessary. If you should be set to output Dolby Digital, DTS and 88.2 kHz / 96 kHz PCM (2 channel) audio, and if there...
Owner's Manual
Page 13
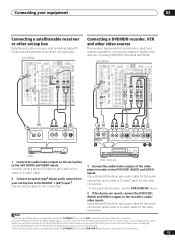
... FL SUB W. CENTER SURROUND R L IN XM OUT DIGITAL PB PB PR PR OUT DVR/ VCR 2 IN ASSIGNABLE 1 3 S - VIDEO VIDEO COMPONENT VIDEO VIDEO R L AUDIO R SURROUND L BACK MULTI CH IN OUT CONTROL DIGITAL OUT R AUDIO L VIDEO AV OUT S-VIDEO OPTICAL COAXIAL DIGITAL OUT 3 R AUDIO L VIDEO AV OUT S-VIDEO R AUDIO L AV IN VIDEO S-VIDEO 12 STB 1 Connect the audio/video outputs on the set-top box to the DVR/VCR1 AUDIO and VIDEO inputs. Use a stereo RCA/phono jack audio cable for the audio connection and a video or S-video4 cable for the connection. VSX-84TXSi MULTI...
... FL SUB W. CENTER SURROUND R L IN XM OUT DIGITAL PB PB PR PR OUT DVR/ VCR 2 IN ASSIGNABLE 1 3 S - VIDEO VIDEO COMPONENT VIDEO VIDEO R L AUDIO R SURROUND L BACK MULTI CH IN OUT CONTROL DIGITAL OUT R AUDIO L VIDEO AV OUT S-VIDEO OPTICAL COAXIAL DIGITAL OUT 3 R AUDIO L VIDEO AV OUT S-VIDEO R AUDIO L AV IN VIDEO S-VIDEO 12 STB 1 Connect the audio/video outputs on the set-top box to the DVR/VCR1 AUDIO and VIDEO inputs. Use a stereo RCA/phono jack audio cable for the audio connection and a video or S-video4 cable for the connection. VSX-84TXSi MULTI...
Owner's Manual
Page 24
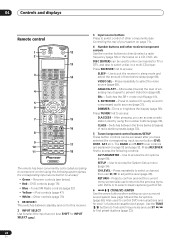
...). 4 Number buttons and other components (see below) • Red - 04 Controls and displays Remote control RECEIVER INPUT SELECT 1 2 SYSTEM OFF SOURCE 12 13 CD DVD TV VIDEO 2 SAT VIDEO1 TVCONT 3 DVR2 CD-R XMRADIO ROOM2/3 DVR1 i Pod TUNER RECEIVER 14 SLEEP VIDEO SEL ANALOG ATT SR+ DIMMER S.RETRIEVER 4 D.ACCESS +10 CLASS DISC ENTER AV PARAMETER 5 TOP MENU ì TUNE CH LEVEL MENU DTVMENU ST ST T.EDIT 6 SETUP ENTER ì RETURN CATEGORY TUNE GUIDE TV CONTROL BAND 7 TV VOL INPUT SELECT...
...). 4 Number buttons and other components (see below) • Red - 04 Controls and displays Remote control RECEIVER INPUT SELECT 1 2 SYSTEM OFF SOURCE 12 13 CD DVD TV VIDEO 2 SAT VIDEO1 TVCONT 3 DVR2 CD-R XMRADIO ROOM2/3 DVR1 i Pod TUNER RECEIVER 14 SLEEP VIDEO SEL ANALOG ATT SR+ DIMMER S.RETRIEVER 4 D.ACCESS +10 CLASS DISC ENTER AV PARAMETER 5 TOP MENU ì TUNE CH LEVEL MENU DTVMENU ST ST T.EDIT 6 SETUP ENTER ì RETURN CATEGORY TUNE GUIDE TV CONTROL BAND 7 TV VOL INPUT SELECT...
Owner's Manual
Page 25
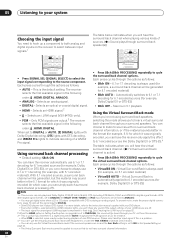
... remote control button settings on page 71): SETUP - Switches between direct and stereo playback. STANDARD - If the signal is weak then switching to select Auto Surround (page 27) or Stream Direct (page 29) listening. 25 En See Resetting the remote control presets on this button to perform multi operations (page 73). 11 SHIFT Press to access the controls outlined in tuner: MPX - See Multi Operation and System Off on page 72. 14 RECEIVER Switches the remote to control the receiver (used...
... remote control button settings on page 71): SETUP - Switches between direct and stereo playback. STANDARD - If the signal is weak then switching to select Auto Surround (page 27) or Stream Direct (page 29) listening. 25 En See Resetting the remote control presets on this button to perform multi operations (page 73). 11 SHIFT Press to access the controls outlined in tuner: MPX - See Multi Operation and System Off on page 72. 14 RECEIVER Switches the remote to control the receiver (used...
Owner's Manual
Page 30
... be output during playback of sources. (ì=Sound plays through the options as follows: • AUTO - For more details, refer to the instruction manual supplied with the THX, STEREO or Stream Direct modes. • You can choose to hear a virtual surround back channel through your surround speakers. ANALOG. • ANALOG - HDMI; With other digital signal formats, set to NO in the following order: ; Selects an analog signal. • DIGITAL - Selects an i.LINK signal (VSX-84TXSi...
... be output during playback of sources. (ì=Sound plays through the options as follows: • AUTO - For more details, refer to the instruction manual supplied with the THX, STEREO or Stream Direct modes. • You can choose to hear a virtual surround back channel through your surround speakers. ANALOG. • ANALOG - HDMI; With other digital signal formats, set to NO in the following order: ; Selects an analog signal. • DIGITAL - Selects an i.LINK signal (VSX-84TXSi...
Owner's Manual
Page 35
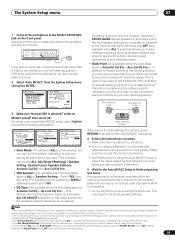
... wave adjustment to save the FRONT ALIGN and/or OFF settings. 6 Switch the Multi-Point setting OFF if you 're using THX speakers, select YES. ( Next ) : Return to determine the speakers present in your Auto Mode setting, you can use one channel. A progress report is selected. The System Setup menu 07 1 Connect the microphone to the MCACC SETUP MIC jack on -screen while the receiver outputs test tones to Auto MCACC 1. Make sure there are using a subwoofer, it 's about ear level at...
... wave adjustment to save the FRONT ALIGN and/or OFF settings. 6 Switch the Multi-Point setting OFF if you 're using THX speakers, select YES. ( Next ) : Return to determine the speakers present in your Auto Mode setting, you can use one channel. A progress report is selected. The System Setup menu 07 1 Connect the microphone to the MCACC SETUP MIC jack on -screen while the receiver outputs test tones to Auto MCACC 1. Make sure there are using a subwoofer, it 's about ear level at...
Owner's Manual
Page 57
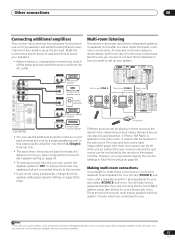
... to add amplifiers to power your speakers. • Before making or changing the connections, switch off while one (or both) of the sub rooms is on) and the sub rooms can , however, use sound controls (such as well. VIDEO VIDEO COMPONENT VIDEO VIDEO R L AUDIO R SURROUND L BACK MULTI CH IN OUT CONTROL IR receiver CD DVD DVR2 DVR1 TV SAT SYSSTOEUMROCFEF CD-R i Pod SLEEP SR+ VIDEO 2 VIDEO 1 XM RADIO D.ACCESS +10 AVTOPAPRMAEMNEUTEìR DTV MENU TUNER VIDSEEOL SETUP CATEGORY GUIDE TV...
... to add amplifiers to power your speakers. • Before making or changing the connections, switch off while one (or both) of the sub rooms is on) and the sub rooms can , however, use sound controls (such as well. VIDEO VIDEO COMPONENT VIDEO VIDEO R L AUDIO R SURROUND L BACK MULTI CH IN OUT CONTROL IR receiver CD DVD DVR2 DVR1 TV SAT SYSSTOEUMROCFEF CD-R i Pod SLEEP SR+ VIDEO 2 VIDEO 1 XM RADIO D.ACCESS +10 AVTOPAPRMAEMNEUTEìR DTV MENU TUNER VIDSEEOL SETUP CATEGORY GUIDE TV...

Owner's Manual
Page 58
...) digital output to the MULTI-ROOM & SOURCE MONITOR OUT jacks on page 63) are available. Please note that the sound in the sub room will allow you can listen to in each sub room: Sub room Input sources available ROOM2 (ZONE2) iPod, XM Radio, the built-in Surround back speaker setting on the rear of speakers attached to use this receiver. With video sources, only composite video is not available for example, changing the input source...
...) digital output to the MULTI-ROOM & SOURCE MONITOR OUT jacks on page 63) are available. Please note that the sound in the sub room will allow you can listen to in each sub room: Sub room Input sources available ROOM2 (ZONE2) iPod, XM Radio, the built-in Surround back speaker setting on the rear of speakers attached to use this receiver. With video sources, only composite video is not available for example, changing the input source...

Owner's Manual
Page 61
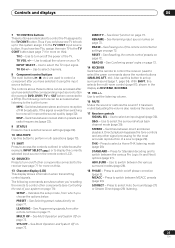
.... 61 En RECEIVER INPUT SELECT SYSTEM OFF SOURCE SLEEP SR+ VIDEO SEL DIMMER ANALOG ATT S.RETRIEVER DVD player Satellite receiver, etc DVD/LD AUDIO IN STANDBY/ON PHASE CONTROL PHASE CONTROL INPUT SELECTOR MCACC AUTO SURR/ POSITION STREAM DIRECT DIGITAL PRECISION PROCESSING SAT AUDIO IN AUDIO/VIDEO MULTI-CHANNEL RECEIVER VSX-84TXSi HOME THX STANDARD SURROUND ADVANCED SURROUND MASTER VOLUME This receiver To make the most of your Pioneer plasma display even easier. Using the SR+ mode with a Pioneer plasma display When connected using an SR+ cable, a number of features...
.... 61 En RECEIVER INPUT SELECT SYSTEM OFF SOURCE SLEEP SR+ VIDEO SEL DIMMER ANALOG ATT S.RETRIEVER DVD player Satellite receiver, etc DVD/LD AUDIO IN STANDBY/ON PHASE CONTROL PHASE CONTROL INPUT SELECTOR MCACC AUTO SURR/ POSITION STREAM DIRECT DIGITAL PRECISION PROCESSING SAT AUDIO IN AUDIO/VIDEO MULTI-CHANNEL RECEIVER VSX-84TXSi HOME THX STANDARD SURROUND ADVANCED SURROUND MASTER VOLUME This receiver To make the most of your Pioneer plasma display even easier. Using the SR+ mode with a Pioneer plasma display When connected using an SR+ cable, a number of features...

Owner's Manual
Page 67
... components you 're currently listening to (as you used to connect your recorder as in Dolby Pro Logic IIx Music mode (also available with 2 Pro Logic II 5.1 channel sound). Note 1 • The receiver's volume, AV parameters (the tone controls, for more on page 13. Making an audio or a video recording You can 't make a digital recording from an audio or video source connected to the radio station, load the CD, video, DVD etc. 3 Prepare the recorder. Playing a different source...
... components you 're currently listening to (as you used to connect your recorder as in Dolby Pro Logic IIx Music mode (also available with 2 Pro Logic II 5.1 channel sound). Note 1 • The receiver's volume, AV parameters (the tone controls, for more on page 13. Making an audio or a video recording You can 't make a digital recording from an audio or video source connected to the radio station, load the CD, video, DVD etc. 3 Prepare the recorder. Playing a different source...

Owner's Manual
Page 75
Selects channels. Cable TV/Satellite TV/TV/DTV TV VOL +/- Use to choose the RED DTV commands on . Cable TV/Satellite TV/TV/DTV Controls for other components This remote control can control components after entering the proper codes or teaching the receiver the commands (see Setting the remote to control other components on page 71 for fast reverse playback. Button (s) Function Components SOURCE Press to switch the component between Cable TV/Satellite standby and on the...
Selects channels. Cable TV/Satellite TV/TV/DTV TV VOL +/- Use to choose the RED DTV commands on . Cable TV/Satellite TV/TV/DTV Controls for other components This remote control can control components after entering the proper codes or teaching the receiver the commands (see Setting the remote to control other components on page 71 for fast reverse playback. Button (s) Function Components SOURCE Press to switch the component between Cable TV/Satellite standby and on the...

Owner's Manual
Page 76
... if you use just the remote sensor of one set of analog audio or video jacks connected to another component for grounding purposes. 1 Decide which can be able to control any component in the same way for the connection. VCR/DVD/DVR player AUDIO Changes the audio language or DVD/DVR player channel. Note 1 • If you want to control all your system Button (s) Function Components TOP MENU Displays the disc 'top' menu of another Pioneer component. Cassette deck...
... if you use just the remote sensor of one set of analog audio or video jacks connected to another component for grounding purposes. 1 Decide which can be able to control any component in the same way for the connection. VCR/DVD/DVR player AUDIO Changes the audio language or DVD/DVR player channel. Note 1 • If you want to control all your system Button (s) Function Components TOP MENU Displays the disc 'top' menu of another Pioneer component. Cassette deck...

Owner's Manual
Page 77
... set of speaker wire touching the rear panel or another component. Unplug the receiver from the power and call a Pioneer authorized independent service company. switches off or the Phase Control indicator so, re-attach the speaker wires, making sure there are connected properly (see Connecting your equipment on . Disconnect from the wall and call a Pioneer authorized independent service company. Note that the MCACC setup microphone is disconnected. • Make sure the correct input signal is selected...
... set of speaker wire touching the rear panel or another component. Unplug the receiver from the power and call a Pioneer authorized independent service company. switches off or the Phase Control indicator so, re-attach the speaker wires, making sure there are connected properly (see Connecting your equipment on . Disconnect from the wall and call a Pioneer authorized independent service company. Note that the MCACC setup microphone is disconnected. • Make sure the correct input signal is selected...
Owner's Manual
Page 78
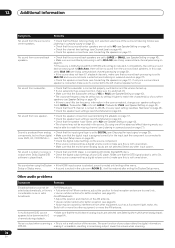
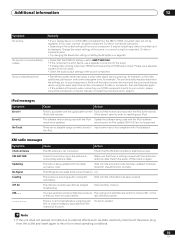
... input jack the component is connected to -80 dB, or a very quiet setting (see Bass Peak Level on page 45). • Check the speaker level settings (see Channel Level on page 44). making it will be For FM broadcasts selected automatically, or there is set to a wall, etc. By using the System • If the HDMI input source is selected, sound is Dolby Surround EX or DTS ES with no flag to DIGITAL (see Connecting the speakers...
... input jack the component is connected to -80 dB, or a very quiet setting (see Bass Peak Level on page 45). • Check the speaker level settings (see Channel Level on page 44). making it will be For FM broadcasts selected automatically, or there is set to a wall, etc. By using the System • If the HDMI input source is selected, sound is Dolby Surround EX or DTS ES with no flag to DIGITAL (see Connecting the speakers...

Owner's Manual
Page 80
... your speakers' low frequency limitations, no adjustment needed. This receiver cannot show the playback sample rate when using the Auto MCACC Setup on the graphical output. After using the SIGNAL SELECT Setup menu on page 43, and use Auto MCACC Setup again. Change the speaker setting manually in Speaker Setting on page 63). calibrated for the Auto Mode in Automatic MCACC (Expert) on the remote control repeatedly to select a different brightness. light when playing Dolby/DTS • Check the playback (especially the digital output) settings of...
... your speakers' low frequency limitations, no adjustment needed. This receiver cannot show the playback sample rate when using the Auto MCACC Setup on the graphical output. After using the SIGNAL SELECT Setup menu on page 43, and use Auto MCACC Setup again. Change the speaker setting manually in Speaker Setting on page 63). calibrated for the Auto Mode in Automatic MCACC (Expert) on the remote control repeatedly to select a different brightness. light when playing Dolby/DTS • Check the playback (especially the digital output) settings of...
Owner's Manual
Page 83
... the power plug from the Switch off the receiver and reconnect the iPod to work, try resetting your monitor, please consult the component or monitor manual or contact the manufacturer for the audio. • If analog video is a DVI device, use a separate connection for example). Switch the power off the video converter and reconnect the source and display device using the component, S-video or composite jacks. • Try changing the Resolution setting (in the output settings...
... the power plug from the Switch off the receiver and reconnect the iPod to work, try resetting your monitor, please consult the component or monitor manual or contact the manufacturer for the audio. • If analog video is a DVI device, use a separate connection for example). Switch the power off the video converter and reconnect the source and display device using the component, S-video or composite jacks. • Try changing the Resolution setting (in the output settings...


