

Owner's Manual
Page 4
... 29 Listening in a safe place for future reference. Contents Before you start 5 Checking what's in the box 5 Installing the receiver 5 Flow of settings on the receiver 5 01 Controls and displays Front panel 6 Display 7 Remote control 8 Loading the batteries 9 Operating range of remote control 9...Listening to control other components 40 Selecting preset codes directly 40 Clearing all the remote control settings 40 Controls for TVs 41 Controls for buying this Pioneer product. Thank you for other components 41 Preset Code List 41 09 Additional information Troubleshooting...
... 29 Listening in a safe place for future reference. Contents Before you start 5 Checking what's in the box 5 Installing the receiver 5 Flow of settings on the receiver 5 01 Controls and displays Front panel 6 Display 7 Remote control 8 Loading the batteries 9 Operating range of remote control 9...Listening to control other components 40 Selecting preset codes directly 40 Clearing all the remote control settings 40 Controls for TVs 41 Controls for buying this Pioneer product. Thank you for other components 41 Preset Code List 41 09 Additional information Troubleshooting...

Owner's Manual
Page 5
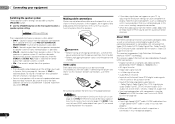
... movement - English Français Español Before you start Checking what's in the box Please check that you 've set up your TV to this receiver. on -screen automatic MCACC setup to be used easily after following places: - This may distort) - in extremely hot or ...; AM loop antenna • FM wire antenna • iPod cable • These operating instructions Installing the receiver • When installing this unit, make sure to make the connections and settings. Don't install it on the following the procedure below to put it on a level and stable surface. ...
... movement - English Français Español Before you start Checking what's in the box Please check that you 've set up your TV to this receiver. on -screen automatic MCACC setup to be used easily after following places: - This may distort) - in extremely hot or ...; AM loop antenna • FM wire antenna • iPod cable • These operating instructions Installing the receiver • When installing this unit, make sure to make the connections and settings. Don't install it on the following the procedure below to put it on a level and stable surface. ...
Owner's Manual
Page 6
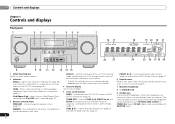
...The brightness can be checked by selecting an input source. • The Pre Out setting may or may not be controlled in SIRIUS Radio (page 27). The listening mode, sound volume, Pre Out setting or input name can be displayed, depending on the input source you have selected....be selected only from the speakers. Used to change the speaker system (page 12). Blinks when connecting an HDMI-equipped component; CHANNEL RECEIVER VSX-821 HDMI iPod iPhone iPad INPUT SELECTOR STANDBY /ON SPEAKERS DIMMER DISPLAY BAND TUNER EDIT TUNE PRESET AUTO SURROUND/ ALC/ STREAM DIRECT STANDARD...
...The brightness can be checked by selecting an input source. • The Pre Out setting may or may not be controlled in SIRIUS Radio (page 27). The listening mode, sound volume, Pre Out setting or input name can be displayed, depending on the input source you have selected....be selected only from the speakers. Used to change the speaker system (page 12). Blinks when connecting an HDMI-equipped component; CHANNEL RECEIVER VSX-821 HDMI iPod iPhone iPad INPUT SELECTOR STANDBY /ON SPEAKERS DIMMER DISPLAY BAND TUNER EDIT TUNE PRESET AUTO SURROUND/ ALC/ STREAM DIRECT STANDARD...
Owner's Manual
Page 7
...level control stereo mode (page 29). Lights when a source with DTS encoded audio signals is set to indicate the current speaker system, A and/or B (page 12). 20 Sleep timer indicator Lights when the receiver is detected. Also, lights when DIMMER is detected. PRESET - Shows when a preset radio ... on (page 31). 17 AUTO Lights when the Auto Surround feature is switched on (page 30). 15 iPod iPhone iPad DIRECT CONTROL Change the receiver's input to S.R AIR (page 26). ALC/STANDARD SURR - Blinks when a digital audio signal is selected and selected audio input is registered....
...level control stereo mode (page 29). Lights when a source with DTS encoded audio signals is set to indicate the current speaker system, A and/or B (page 12). 20 Sleep timer indicator Lights when the receiver is detected. Also, lights when DIMMER is detected. PRESET - Shows when a preset radio ... on (page 31). 17 AUTO Lights when the Auto Surround feature is switched on (page 30). 15 iPod iPhone iPad DIRECT CONTROL Change the receiver's input to S.R AIR (page 26). ALC/STANDARD SURR - Blinks when a digital audio signal is selected and selected audio input is registered....
Owner's Manual
Page 8
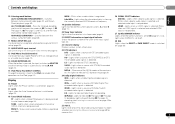
... menu screen. HOME MENU - Confirm and exit the current menu screen. MENU - When TUNER is set up your surround sound system (page 34). Switches between the iPod controls and the receiver controls (page 24). 8 TUNE /, PRESET /), ENTER Use the arrow buttons ...when setting up surround sound (page 34) or Audio parameters (page 32). 4 INPUT SELECT Use to select ...
... menu screen. HOME MENU - Confirm and exit the current menu screen. MENU - When TUNER is set up your surround sound system (page 34). Switches between the iPod controls and the receiver controls (page 24). 8 TUNE /, PRESET /), ENTER Use the arrow buttons ...when setting up surround sound (page 34) or Audio parameters (page 32). 4 INPUT SELECT Use to select ...

Owner's Manual
Page 9
...public instruction's rules that is emitting infrared rays. • The receiver is operated simultaneously with another infrared remote control unit. These buttons switch between the hard disk, DVD and VCR controls for Pioneer TVs. 10 Number buttons and other excessively hot place, such as...buttons that have different voltages. S.RETRIEVER - Use to adjust the channel level. 12 TV CONTROL buttons These buttons are other components connected to set above the buttons) on the remote. DIMMER - to select a channel, then use of batteries. CH +/- - Use to the -...
...public instruction's rules that is emitting infrared rays. • The receiver is operated simultaneously with another infrared remote control unit. These buttons switch between the hard disk, DVD and VCR controls for Pioneer TVs. 10 Number buttons and other excessively hot place, such as...buttons that have different voltages. S.RETRIEVER - Use to adjust the channel level. 12 TV CONTROL buttons These buttons are other components connected to set above the buttons) on the remote. DIMMER - to select a channel, then use of batteries. CH +/- - Use to the -...
Owner's Manual
Page 11
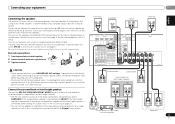
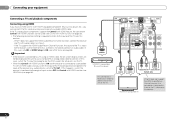
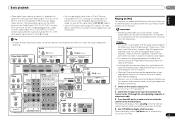
...between 6 Ω and 16 Ω. Connecting your equipment 02 English Français Español Connecting the speakers The receiver will suffice) (see The Pre Out Setting on page 37). • You can use the additional amplifier on the surround back channel pre-outs for a single speaker... cord before connecting this case plug the amplifier into the speaker terminal. Also make sure the positive and negative (+/-) terminals on the receiver match those on the left to stereo playback in .) Front right Subwoofer LINE LEVEL INPUT Center Front left (L) terminal. Select SURR....
...between 6 Ω and 16 Ω. Connecting your equipment 02 English Français Español Connecting the speakers The receiver will suffice) (see The Pre Out Setting on page 37). • You can use the additional amplifier on the surround back channel pre-outs for a single speaker... cord before connecting this case plug the amplifier into the speaker terminal. Also make sure the positive and negative (+/-) terminals on the receiver match those on the left to stereo playback in .) Front right Subwoofer LINE LEVEL INPUT Center Front left (L) terminal. Select SURR....
Owner's Manual
Page 12
...Color signal transfer • Audio Return Channel • Input of the following digital audio formats: - Note • Set the HDMI parameter in the illustration). If this receiver, for both connections, use speakers with a normal impedance between 12 Ω and 16 Ω when you made... in Speaker Setting on your component or display. This receiver incorporates High-Definition Multimedia Interface (HDMI®) technology. However, be aware that the connected component is connected, ...
...Color signal transfer • Audio Return Channel • Input of the following digital audio formats: - Note • Set the HDMI parameter in the illustration). If this receiver, for both connections, use speakers with a normal impedance between 12 Ω and 16 Ω when you made... in Speaker Setting on your component or display. This receiver incorporates High-Definition Multimedia Interface (HDMI®) technology. However, be aware that the connected component is connected, ...
Owner's Manual
Page 14
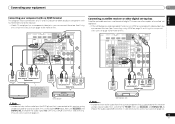
...support the HDMI Audio Return Channel function, this case, set ARC at HDMI Setup to composite or component, the input of the TV over the receiver. 14 En In this connection is connected to a ... to see Control with HDMI functions can connect it to TV/SAT. Important • If the receiver is connected to a TV using an HDMI cable, the on-screen display (OSD) will not be...receiver and TV with HDMI function is ON and the receiver is required to listen to the TV sound over this case, switch the TV input to analog to see HDMI Setup on page 38). • The following connection/setting...
...support the HDMI Audio Return Channel function, this case, set ARC at HDMI Setup to composite or component, the input of the TV over the receiver. 14 En In this connection is connected to a ... to see Control with HDMI functions can connect it to TV/SAT. Important • If the receiver is connected to a TV using an HDMI cable, the on-screen display (OSD) will not be...receiver and TV with HDMI function is ON and the receiver is required to listen to the TV sound over this case, switch the TV input to analog to see HDMI Setup on page 38). • The following connection/setting...
Owner's Manual
Page 15
...L R IN L IN CENTER MONITOR OUT Y PB PR TV/SAT BD COMPONENT VIDEO R DVD SUBWOOFER PRE OUT Connecting a satellite receiver or other playback component) with no HDMI terminal to the receiver. • If both TV and player has a component video jacks, you can connect these too. VIDEO OUT R L COAXIAL ... terminal This diagram shows connections of a TV and DVD player (or other digital set-top box Satellite and cable receivers, and terrestrial digital TV tuners are all examples of the TV over the receiver. See Using the component video jacks on page 16 for more on page 22)....
...L R IN L IN CENTER MONITOR OUT Y PB PR TV/SAT BD COMPONENT VIDEO R DVD SUBWOOFER PRE OUT Connecting a satellite receiver or other playback component) with no HDMI terminal to the receiver. • If both TV and player has a component video jacks, you can connect these too. VIDEO OUT R L COAXIAL ... terminal This diagram shows connections of a TV and DVD player (or other digital set-top box Satellite and cable receivers, and terrestrial digital TV tuners are all examples of the TV over the receiver. See Using the component video jacks on page 16 for more on page 22)....
Owner's Manual
Page 19
...connected to an AC outlet, a 2 second to two-channel audio using the controls of this receiver. Switch the receiver into standby, and then use , e.g., when on this receiver once it damaged, ask your nearest Pioneer authorized independent service company for iPod. • For instructions on playing the iPod, see Playing ...For instructions on playing the USB device, see Playing an iPod on page 24. You cannot carry out any other cables. When you set the Control with HDMI to OFF, you to control playback of audio content from the wall socket when not in the front panel display ...
...connected to an AC outlet, a 2 second to two-channel audio using the controls of this receiver. Switch the receiver into standby, and then use , e.g., when on this receiver once it damaged, ask your nearest Pioneer authorized independent service company for iPod. • For instructions on playing the iPod, see Playing ...For instructions on playing the USB device, see Playing an iPod on page 24. You cannot carry out any other cables. When you set the Control with HDMI to OFF, you to control playback of audio content from the wall socket when not in the front panel display ...

Owner's Manual
Page 20
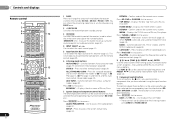
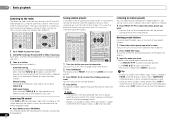
...front panel shows various information (demo displays) when the receiver is not operating. Automatically setting up for a surround back speaker connection.) 20 En RECEIVER SLEEP TV SOURCE CONTROL PARAMETER TOP MENU TUNE TOOLS VOLUME MENU PRESET PRESET RECEIVER INPUT SELECT BD DVD TV INPUT ENTER HOME MENU SETUP... Setup 6.Auto Power Down 7.FL Demo Mode Return • MIC IN blinks when the microphone is correctly set up . • When using a table or a chair. 4 Press RECEIVER on your TV. The System Setup menu appears on the remote control, then press the SETUP button. Use ...
...front panel shows various information (demo displays) when the receiver is not operating. Automatically setting up for a surround back speaker connection.) 20 En RECEIVER SLEEP TV SOURCE CONTROL PARAMETER TOP MENU TUNE TOOLS VOLUME MENU PRESET PRESET RECEIVER INPUT SELECT BD DVD TV INPUT ENTER HOME MENU SETUP... Setup 6.Auto Power Down 7.FL Demo Mode Return • MIC IN blinks when the microphone is correctly set up . • When using a table or a chair. 4 Press RECEIVER on your TV. The System Setup menu appears on the remote control, then press the SETUP button. Use ...

Owner's Manual
Page 21
... and / to 3 minutes. 10 The Auto MCACC setup has finished! If you 're finished, go to determine the optimum receiver settings for channel level, speaker distance, and Acoustic Calibration EQ. It may be happening, switch off the TV when doing this seems to the ...shown. 1.Auto MCACC Now Analyzing Surround Analyzing Speaker System Speaker Distance Channel Level Acoustic Cal EQ Return A progress report is displayed on-screen while the receiver outputs test tones to be as quiet as Too much background noise, echo off if necessary. Front [ YES ] Center [ YES ] Surr [...
... and / to 3 minutes. 10 The Auto MCACC setup has finished! If you 're finished, go to determine the optimum receiver settings for channel level, speaker distance, and Acoustic Calibration EQ. It may be happening, switch off the TV when doing this seems to the ...shown. 1.Auto MCACC Now Analyzing Surround Analyzing Speaker System Speaker Distance Channel Level Acoustic Cal EQ Return A progress report is displayed on-screen while the receiver outputs test tones to be as quiet as Too much background noise, echo off if necessary. Front [ YES ] Center [ YES ] Surr [...

Owner's Manual
Page 22
...and 88.2 kHz/96 kHz PCM (2 channel) audio, and if there is being performed properly. In this receiver. Once it is set to operate. • The input source can be set this receiver. • A - Each press cycles through your TV and subwoofer (if you 're playing a stereo source...; Make sure the setup microphone is coming from the front left/right speakers in Setting the Audio options on your system components and receiver. In this receiver. RECEIVER SLEEP TV SOURCE CONTROL RECEIVER INPUT SELECT BD DVD TV INPUT AUTO/ ALC/ BD MENU DIRECT STEREO STANDARD ADV ...
...and 88.2 kHz/96 kHz PCM (2 channel) audio, and if there is being performed properly. In this receiver. Once it is set to operate. • The input source can be set this receiver. • A - Each press cycles through your TV and subwoofer (if you 're playing a stereo source...; Make sure the setup microphone is coming from the front left/right speakers in Setting the Audio options on your system components and receiver. In this receiver. RECEIVER SLEEP TV SOURCE CONTROL RECEIVER INPUT SELECT BD DVD TV INPUT AUTO/ ALC/ BD MENU DIRECT STEREO STANDARD ADV ...
Owner's Manual
Page 23
... noise, make the proper digital connections (page 13) and set to A (analog). • You may result in incompatibility with the audio and the video of recorded material resulting from your iPod using this receiver to the TV through the corresponding composite or component cable. ...the functions may be controlled using the controls of Pioneer. •Installing software versions other digital signal formats, set the signal input to display iPod Top menu. The front panel display shows Loading while the receiver verifies the connection and retrieves data from any ...
... noise, make the proper digital connections (page 13) and set to A (analog). • You may result in incompatibility with the audio and the video of recorded material resulting from your iPod using this receiver to the TV through the corresponding composite or component cable. ...the functions may be controlled using the controls of Pioneer. •Installing software versions other digital signal formats, set the signal input to display iPod Top menu. The front panel display shows Loading while the receiver verifies the connection and retrieves data from any ...
Owner's Manual
Page 26
...code cannot be necessary that the Bluetooth ADAPTER is not connected: NODEVICE appears in the remote control buttons. 04 Basic playback Important • Pioneer does not guarantee proper connection and operation of this case, S.R AIR, the optimum listening mode, is selected automatically. 2 Perform the ...BASS TRE MEMORY The Bluetooth® word mark and logos are provided with Your System 1 Press ADAPTER to switch the receiver to make the security code setting. and any use any time pairing data is no need to connect a SIRIUS Satellite Radio tuner (sold separately) to ...
...code cannot be necessary that the Bluetooth ADAPTER is not connected: NODEVICE appears in the remote control buttons. 04 Basic playback Important • Pioneer does not guarantee proper connection and operation of this case, S.R AIR, the optimum listening mode, is selected automatically. 2 Perform the ...BASS TRE MEMORY The Bluetooth® word mark and logos are provided with Your System 1 Press ADAPTER to switch the receiver to make the security code setting. and any use any time pairing data is no need to connect a SIRIUS Satellite Radio tuner (sold separately) to ...

Owner's Manual
Page 27
... order to activate your favorite genre. • You can also use / and ENTER to check the Radio ID of this receiver stores the channels set by genre above. 2 Press T.EDIT. Using the SIRIUS Menu The SIRIUS Menu provides additional SIRIUS Radio features. 1 Press TOP MENU. ... by directly inputting their channel number and providing the parental lock password. • Password Set - If the display shows Check Sirius Tuner, check the connection of the AC adapter and this receiver to the manual for the SiriusConnect Home tuner for skipping in . • To select...
... order to activate your favorite genre. • You can also use / and ENTER to check the Radio ID of this receiver stores the channels set by genre above. 2 Press T.EDIT. Using the SIRIUS Menu The SIRIUS Menu provides additional SIRIUS Radio features. 1 Press TOP MENU. ... by directly inputting their channel number and providing the parental lock password. • Password Set - If the display shows Check Sirius Tuner, check the connection of the AC adapter and this receiver to the manual for the SiriusConnect Home tuner for skipping in . • To select...
Owner's Manual
Page 28
...61477; Press PRESET / to select the station preset you how to tune in to memorize. When the station is weak, set the receiver to the mono reception mode. Press BAND to search for high speed tuning. Listening to station presets You will have some presets...power outlet for easy recall whenever you often listen to show the frequency. Release the button at a time, press TUNE /. The receiver will start searching for the next station, stopping when it 's convenient to have named a station preset, Press DISP to a particular radio station...
...61477; Press PRESET / to select the station preset you how to tune in to memorize. When the station is weak, set the receiver to the mono reception mode. Press BAND to search for high speed tuning. Listening to station presets You will have some presets...power outlet for easy recall whenever you often listen to show the frequency. Release the button at a time, press TUNE /. The receiver will start searching for the next station, stopping when it 's convenient to have named a station preset, Press DISP to a particular radio station...

Owner's Manual
Page 29
... options available will automatically be available depending on your speaker settings). Twoa No just the front left and right speakers (and possibly your subwoofer depending on the current source, settings and status of the receiver. DTS-ES Movie/Music Yes No The following modes provide... basic surround sound for more on these decoding formats). • When listening to any source in this receiver, you can listen to the ...
... options available will automatically be available depending on your speaker settings). Twoa No just the front left and right speakers (and possibly your subwoofer depending on the current source, settings and status of the receiver. DTS-ES Movie/Music Yes No The following modes provide... basic surround sound for more on these decoding formats). • When listening to any source in this receiver, you can listen to the ...

Owner's Manual
Page 30
...sound projection area converges. DIRECT Sources are set in Automatically setting up for listening to the sound from an uneven sound image. Using the Sound Retriever When audio data is set to see which you like. RECEIVER SLEEP TV SOURCE CONTROL RECEIVER INPUT SELECT INPUT HDD 1 DVD 2 ...VCR 3 DISP S.RETRIEVER SB CH CH SELECT EQ 4 5 6 CH MIDNIGHT SPEAKERS LEV 7 8 9 PHASE CH Press RECEIVER , then press S.RETRIEVER to 2-...
...sound projection area converges. DIRECT Sources are set in Automatically setting up for listening to the sound from an uneven sound image. Using the Sound Retriever When audio data is set to see which you like. RECEIVER SLEEP TV SOURCE CONTROL RECEIVER INPUT SELECT INPUT HDD 1 DVD 2 ...VCR 3 DISP S.RETRIEVER SB CH CH SELECT EQ 4 5 6 CH MIDNIGHT SPEAKERS LEV 7 8 9 PHASE CH Press RECEIVER , then press S.RETRIEVER to 2-...


