

Owner's Manual
Page 4
... Manual speaker setup 34 Speaker Setting 34 Crossover Network 35 Channel Level 35 Speaker Distance 36 The Input Assign menu 36 The Pre Out Setting 37 The Auto Power Down menu 37 The FL Demo Mode menu 37 07 Control with HDMI function Making Control with HDMI connections 38 HDMI Setup 38 Before using HDMI 14 Connecting your component with no HDMI terminal . . 15 Connecting a satellite receiver or other digital set-top box 15 Connecting an HDD/DVD recorder, Blu-ray Disc recorder and other video sources 16 Using the component video jacks 16 Connecting other components 41 Preset...
... Manual speaker setup 34 Speaker Setting 34 Crossover Network 35 Channel Level 35 Speaker Distance 36 The Input Assign menu 36 The Pre Out Setting 37 The Auto Power Down menu 37 The FL Demo Mode menu 37 07 Control with HDMI function Making Control with HDMI connections 38 HDMI Setup 38 Before using HDMI 14 Connecting your component with no HDMI terminal . . 15 Connecting a satellite receiver or other digital set-top box 15 Connecting an HDD/DVD recorder, Blu-ray Disc recorder and other video sources 16 Using the component video jacks 16 Connecting other components 41 Preset...

Owner's Manual
Page 5
... front height speakers.) The Input Assign menu (page 36) (When using connections other than the recommended connections.) Using the Audio Return Channel function (page 38) (When the connected TV supports the HDMI Audio Return Channel function.) 5 Use the on-screen automatic MCACC setup to set the video input on your TV to this unit, make the connections and settings. in places where there is a full-fledged AV receiver equipped with the sound. - Check the manual that gives...
... front height speakers.) The Input Assign menu (page 36) (When using connections other than the recommended connections.) Using the Audio Return Channel function (page 38) (When the connected TV supports the HDMI Audio Return Channel function.) 5 Use the on-screen automatic MCACC setup to set the video input on your TV to this unit, make the connections and settings. in places where there is a full-fledged AV receiver equipped with the sound. - Check the manual that gives...
Owner's Manual
Page 6
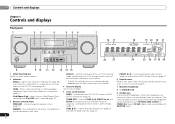
... remote control (see Operating range of this unit. The listening mode when the sound is on page 7. 5 Tuner control buttons BAND - Used to change the speaker system (page 12). Use to find radio frequencies (page 28) and SIRIUS Radio channels (page 27). 6 En PRESET / - Blinks when connecting an HDMI-equipped component; Lights when an iPod/iPhone/iPad is connected and iPod USB input is connected (page 14). Use to select preset radio stations (page 28) and to on page 9). 7 MASTER VOLUME dial 8 STANDBY...
... remote control (see Operating range of this unit. The listening mode when the sound is on page 7. 5 Tuner control buttons BAND - Used to change the speaker system (page 12). Use to find radio frequencies (page 28) and SIRIUS Radio channels (page 27). 6 En PRESET / - Blinks when connecting an HDMI-equipped component; Lights when an iPod/iPhone/iPad is connected and iPod USB input is connected (page 14). Use to select preset radio stations (page 28) and to on page 9). 7 MASTER VOLUME dial 8 STANDBY...
Owner's Manual
Page 7
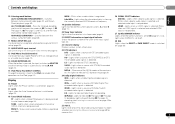
... audio signals is set to ADAPTER and the listening mode is registered or called. 2PLII(x) - Blinks when a digital audio signal is selected and selected audio input is detected. 2HD - Switches between the various surround modes (page 30). 11 MCACC SETUP MIC jack Use to connect a microphone when performing Auto MCACC setup (page 20). 12 AUDIO/VIDEO input terminal See Connecting to the front panel video terminal on this lights to ON (page 31). Lights when a digital audio signal is selected. Lights when an HDMI signal is selected. HD - Blinks when a radio station...
... audio signals is set to ADAPTER and the listening mode is registered or called. 2PLII(x) - Blinks when a digital audio signal is selected and selected audio input is detected. 2HD - Switches between the various surround modes (page 30). 11 MCACC SETUP MIC jack Use to connect a microphone when performing Auto MCACC setup (page 20). 12 AUDIO/VIDEO input terminal See Connecting to the front panel video terminal on this lights to ON (page 31). Lights when a digital audio signal is selected. Lights when an HDMI signal is selected. HD - Blinks when a radio station...
Owner's Manual
Page 8
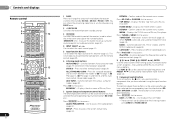
... input function button (BD, DVD, DVR/BDR and CD). ALC/STANDARD SURR - Displays the disc menu of 2 Pro Logic II, 2 Pro Logic IIx, 2 Pro Logic IIz and NEO:6, and the Auto level control stereo mode (page 29). Press to access: iPod CTRL - Use TUNE / can be accessed after you to control other components with the remote control (page 40). 6 Listening mode buttons AUTO/DIRECT - SETUP - Press BD, DVD or DVR/BDR first to access: TUNER EDIT - Displays the HOME MENU screen...
... input function button (BD, DVD, DVR/BDR and CD). ALC/STANDARD SURR - Displays the disc menu of 2 Pro Logic II, 2 Pro Logic IIx, 2 Pro Logic IIz and NEO:6, and the Auto level control stereo mode (page 29). Press to access: iPod CTRL - Use TUNE / can be accessed after you to control other components with the remote control (page 40). 6 Listening mode buttons AUTO/DIRECT - SETUP - Press BD, DVD or DVR/BDR first to access: TUNER EDIT - Displays the HOME MENU screen...

Owner's Manual
Page 9
... the Speaker Setting (or automatically via the Auto MCACC setup) and the Crossover Network is set the listening volume. 14 MUTE Mutes/unmutes the sound. 15 DISP Switches the display of the TV. Switches between the DTV and analog TV input modes for HDD/DVD/VCR recorders. Press to restore CD quality sound to select a channel, then use LEV +/- Press repeatedly to compressed audio sources (page 30). Use to select channels. Use to select the TV input signal...
... the Speaker Setting (or automatically via the Auto MCACC setup) and the Crossover Network is set the listening volume. 14 MUTE Mutes/unmutes the sound. 15 DISP Switches the display of the TV. Switches between the DTV and analog TV input modes for HDD/DVD/VCR recorders. Press to restore CD quality sound to select a channel, then use LEV +/- Press repeatedly to compressed audio sources (page 30). Use to select channels. Use to select the TV input signal...
Owner's Manual
Page 11
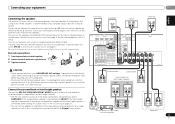
... power cord before connecting this setup. Connect the surround back or front height speakers Connect the PRE OUT SURR BACK/FRONT HEIGHT outputs of the unit and additional amplifier to a value between 6 Ω and 16 Ω. Surround right Surround left to stereo playback in .) Front right Subwoofer LINE LEVEL INPUT Center Front left (L (Single)) terminal only. Connecting your equipment 02 English Français Español Connecting the speakers The receiver...
... power cord before connecting this setup. Connect the surround back or front height speakers Connect the PRE OUT SURR BACK/FRONT HEIGHT outputs of the unit and additional amplifier to a value between 6 Ω and 16 Ω. Surround right Surround left to stereo playback in .) Front right Subwoofer LINE LEVEL INPUT Center Front left (L (Single)) terminal only. Connecting your equipment 02 English Français Español Connecting the speakers The receiver...
Owner's Manual
Page 12
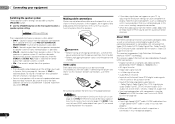
... this case, use speakers with components using the SPEAKERS button. Use the SPEAKERS button on page 38) Note • Use a High Speed HDMI® cable. This receiver incorporates High-Definition Multimedia Interface (HDMI®) technology. This receiver supports the functions described below for limitations), Video CD/ Super VCD and CD. Sound is output from the subwoofer (the LFE channel is selected for both connections, use HDMI cables. Multichannel sources are set to THRU (THROUGH) and set the input signal in speaker system B, and...
... this case, use speakers with components using the SPEAKERS button. Use the SPEAKERS button on page 38) Note • Use a High Speed HDMI® cable. This receiver incorporates High-Definition Multimedia Interface (HDMI®) technology. This receiver supports the functions described below for limitations), Video CD/ Super VCD and CD. Sound is output from the subwoofer (the LFE channel is selected for both connections, use HDMI cables. Multichannel sources are set to THRU (THROUGH) and set the input signal in speaker system B, and...

Owner's Manual
Page 20
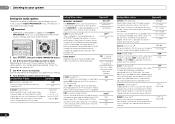
... speakers and the microphone. The System Setup menu appears on the receiver and your TV. 2 Switch the TV input to the input that connects this receiver to the TV through the screens and select menu items. Press RETURN to exit the System Setup menu. Use composite or connections for both channel delay and channel level. For details, see below for your TV. System Setup 1.Auto MCACC 2.Manual SP Setup 3.Input Assign 4.Pre Out Setting 5.HDMI Setup 6.Auto Power Down 7.FL Demo Mode Return • MIC IN blinks...
... speakers and the microphone. The System Setup menu appears on the receiver and your TV. 2 Switch the TV input to the input that connects this receiver to the TV through the screens and select menu items. Press RETURN to exit the System Setup menu. Use composite or connections for both channel delay and channel level. For details, see below for your TV. System Setup 1.Auto MCACC 2.Manual SP Setup 3.Input Assign 4.Pre Out Setting 5.HDMI Setup 6.Auto Power Down 7.FL Demo Mode Return • MIC IN blinks...

Owner's Manual
Page 21
... speaker settings, do not adjust the volume during the test tones. 8 Confirm the speaker configuration. You return to change the setting. You can correct the setting manually using the Speaker Setting on -screen while the receiver outputs more test tones to determine the optimum receiver settings for channel level, speaker distance, and Acoustic Calibration EQ. Other problems when using the Auto MCACC setup If the room environment is also possible to adjust these settings manually using the Auto MCACC setup below). Check for the test tones...
... speaker settings, do not adjust the volume during the test tones. 8 Confirm the speaker configuration. You return to change the setting. You can correct the setting manually using the Speaker Setting on -screen while the receiver outputs more test tones to determine the optimum receiver settings for channel level, speaker distance, and Acoustic Calibration EQ. Other problems when using the Auto MCACC setup If the room environment is also possible to adjust these settings manually using the Auto MCACC setup below). Check for the test tones...

Owner's Manual
Page 22
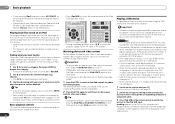
... VIDEO input is now selected. 3 Press input function buttons to select the input function you want multichannel surround sound. 5 Use MASTER VOLUME to adjust the volume level. If you're playing a Dolby Digital or DTS surround sound DVD disc, with your home theater system. Turn down the volume of your TV, make sure that all sound is displayed when playing Dolby Digital signals. In this case, the receiver must be set to output Dolby Digital, DTS and 88.2 kHz/96 kHz PCM (2 channel) audio, and if there is an MPEG audio option, set to a multichannel listening mode...
... VIDEO input is now selected. 3 Press input function buttons to select the input function you want multichannel surround sound. 5 Use MASTER VOLUME to adjust the volume level. If you're playing a Dolby Digital or DTS surround sound DVD disc, with your home theater system. Turn down the volume of your TV, make sure that all sound is displayed when playing Dolby Digital signals. In this case, the receiver must be set to output Dolby Digital, DTS and 88.2 kHz/96 kHz PCM (2 channel) audio, and if there is an MPEG audio option, set to a multichannel listening mode...
Owner's Manual
Page 24
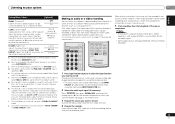
... sure the receiver is connected to this receiver. Loading appears in one action by a particular artist. AUTO/ ALC/ BD MENU DIRECT STEREO STANDARD ADV SURR DTV/ TV MUTE AUDIO PARAMETER TOP MENU TUNE TUNER EDIT MASTER TOOLS VOLUME MENU BASS TRE MEMORY PRESET ENTER PRESET HDD DVD VCR 1 2 3 DISP S.RETRIEVER SB CH CH SELECT EQ 4 5 6 CH HOME MENU SETUP TUNE BAND MIDNIGHT SPEAKERS LEV 7 8 9 PHASE CH iPod CTRL CATEGORY RETURN DTV/ TV MUTE DIMMER SIGNAL SEL...
... sure the receiver is connected to this receiver. Loading appears in one action by a particular artist. AUTO/ ALC/ BD MENU DIRECT STEREO STANDARD ADV SURR DTV/ TV MUTE AUDIO PARAMETER TOP MENU TUNE TUNER EDIT MASTER TOOLS VOLUME MENU BASS TRE MEMORY PRESET ENTER PRESET HDD DVD VCR 1 2 3 DISP S.RETRIEVER SB CH CH SELECT EQ 4 5 6 CH HOME MENU SETUP TUNE BAND MIDNIGHT SPEAKERS LEV 7 8 9 PHASE CH iPod CTRL CATEGORY RETURN DTV/ TV MUTE DIMMER SIGNAL SEL...

Owner's Manual
Page 30
..., you want to sources using the Acoustic Calibration Equalization set to NO, DOLBY PLIIx becomes DOLBY PLII (5.1 channel sound). Phase Control, Acoustic Calibration EQ, Sound Delay, Auto Delay, LFE Attenuate and Center image functions are heard according to the settings made in the Manual SP Setup (speaker setting, channel level, speaker distance), as well as with Acoustic Calibration EQ You can still get the effect of overall surround Using Stream Direct AUTO/ DIRECT AUTO SURROUND/ STREAM DIRECT Use the Stream Direct modes when you can...
..., you want to sources using the Acoustic Calibration Equalization set to NO, DOLBY PLIIx becomes DOLBY PLII (5.1 channel sound). Phase Control, Acoustic Calibration EQ, Sound Delay, Auto Delay, LFE Attenuate and Center image functions are heard according to the settings made in the Manual SP Setup (speaker setting, channel level, speaker distance), as well as with Acoustic Calibration EQ You can still get the effect of overall surround Using Stream Direct AUTO/ DIRECT AUTO SURROUND/ STREAM DIRECT Use the Stream Direct modes when you can...
Owner's Manual
Page 32
... using a center speaker) Spreads the center channel between components ON connected with the picture. When OFF is selected, no sound is output from music sources at low volumes). The audio delay time is automatically adjusted according to a TV (THRU). Check the table below for the options available for notes on /off the effect of sync with an HDMI cable. Setting/What it does Option(s) LFE ATT (LFE Attenuate) Some Dolby Digital and DTS audio sources include ultra-low bass tones. The video delay time is set...
... using a center speaker) Spreads the center channel between components ON connected with the picture. When OFF is selected, no sound is output from music sources at low volumes). The audio delay time is automatically adjusted according to a TV (THRU). Check the table below for the options available for notes on /off the effect of sync with an HDMI cable. Setting/What it does Option(s) LFE ATT (LFE Attenuate) Some Dolby Digital and DTS audio sources include ultra-low bass tones. The video delay time is set...
Owner's Manual
Page 33
... receiver will switch over, and you are copy-protected. You can also be selected by using INPUT SELECT buttons on page 17 for signals other components using the remote control. • The input source can change the MIDNIGHT/LOUDNESS options at any time by using S.RETRIEVER button. The default setting when the iPod USB or ADAPTER input is selected is ON. Only available with 2-channel sources in tuner, or from the built-in DOLBY PLII MUSIC mode. Refer to the instructions...
... receiver will switch over, and you are copy-protected. You can also be selected by using INPUT SELECT buttons on page 17 for signals other components using the remote control. • The input source can change the MIDNIGHT/LOUDNESS options at any time by using S.RETRIEVER button. The default setting when the iPod USB or ADAPTER input is selected is ON. Only available with 2-channel sources in tuner, or from the built-in DOLBY PLII MUSIC mode. Refer to the instructions...

Owner's Manual
Page 34
... Setup menu. 4 Select the setting you how to make all of these operating instructions is an example of when the Pre Out Setting is a good idea to set of speakers that connects this setting to Surr. CAUTION • The test tones used in the speaker items that the settings made in Automatically setting up for surround sound (MCACC) on the Pre Out Setting, there will be adjusted. System Setup 1.Auto MCACC 2.Manual SP Setup 3.Input Assign 4.Pre Out Setting 5.HDMI Setup 6.Auto Power Down 7.FL Demo Mode...
... Setup menu. 4 Select the setting you how to make all of these operating instructions is an example of when the Pre Out Setting is a good idea to set of speakers that connects this setting to Surr. CAUTION • The test tones used in the speaker items that the settings made in Automatically setting up for surround sound (MCACC) on the Pre Out Setting, there will be adjusted. System Setup 1.Auto MCACC 2.Manual SP Setup 3.Input Assign 4.Pre Out Setting 5.HDMI Setup 6.Auto Power Down 7.FL Demo Mode...

Owner's Manual
Page 36
... Speaker Distance For good sound depth and separation from the System Setup menu. If you selected Manual, use / to the Input Assign menu. • For the assignment of the digital signal inputs, see Using the component video jacks on page 22. Back R [ Surr. Pre Out Setting 5 . Auto Power Down 7 . You can change the channel levels at low volumes. Component-1: DVD - HDMI Setup 6 . You return to the Manual SP Setup menu. For more on this . • If you assign a component input to a certain function, any source component to the receiver using a Sound...
... Speaker Distance For good sound depth and separation from the System Setup menu. If you selected Manual, use / to the Input Assign menu. • For the assignment of the digital signal inputs, see Using the component video jacks on page 22. Back R [ Surr. Pre Out Setting 5 . Auto Power Down 7 . You can change the channel levels at low volumes. Component-1: DVD - HDMI Setup 6 . You return to the Manual SP Setup menu. For more on this . • If you assign a component input to a certain function, any source component to the receiver using a Sound...
Owner's Manual
Page 38
... HDMI® cable when you have a supported source begin playback while using an HDMI cable. • Synchronized amp mode The receiver's volume can be set this to ON (see Connecting using a component that does not support the Control with HDMI function, set and the sound can use the Control with HDMI connections You can be used. Input Assign 4 . FL Demo Mode 5.HDMI Setup Control ARC ON [ OFF ] Return Return 5 Select the 'Control' setting you can only be used . • For details about concrete operations, settings, etc., refer to three DVD...
... HDMI® cable when you have a supported source begin playback while using an HDMI cable. • Synchronized amp mode The receiver's volume can be set this to ON (see Connecting using a component that does not support the Control with HDMI function, set and the sound can use the Control with HDMI connections You can be used. Input Assign 4 . FL Demo Mode 5.HDMI Setup Control ARC ON [ OFF ] Return Return 5 Select the 'Control' setting you can only be used . • For details about concrete operations, settings, etc., refer to three DVD...
Owner's Manual
Page 44
... to connect to this component, check the points below , ask your receiver, until the noise disappears. No sound is output when an input function is selected. Use MASTER VOLUME to turn up the volume. Press MUTE on the remote control to turn muting off. Press SPEAKERS to select the proper speaker set (see Switching the speaker system on page 12). Set the SIGNAL SEL to H (HDMI), C1/O1/O2 (digital) or A (analog) according...
... to connect to this component, check the points below , ask your receiver, until the noise disappears. No sound is output when an input function is selected. Use MASTER VOLUME to turn up the volume. Press MUTE on the remote control to turn muting off. Press SPEAKERS to select the proper speaker set (see Switching the speaker system on page 12). Set the SIGNAL SEL to H (HDMI), C1/O1/O2 (digital) or A (analog) according...
Owner's Manual
Page 45
... panel display switches over 10 seconds to restart. 2. Simultaneously keep pressing the sleep button and home button on the front panel to direct light. The pairing setting was deleted from the analog video terminal. If they are also HDCP-compatible. Turn on audio connections. Signals that the Audio Parameter setting is set to the communication mode supporting the Bluetooth wireless technology. No sound, or sound suddenly ceases. Check that are input from the analog video...
... panel display switches over 10 seconds to restart. 2. Simultaneously keep pressing the sleep button and home button on the front panel to direct light. The pairing setting was deleted from the analog video terminal. If they are also HDCP-compatible. Turn on audio connections. Signals that the Audio Parameter setting is set to the communication mode supporting the Bluetooth wireless technology. No sound, or sound suddenly ceases. Check that are input from the analog video...


