

Owner's Manual
Page 1
...MULTI-CHANNEL RECEIVER RECEPTEUR AUDIOVISUEL A VOIES MULTI-CANAUX RECEPTOR AUDIO-VIDEO MULTICANAL VSX-821-K Register your... product on http://www.pioneerelectronics.com (US) http://www.pioneerelectronics.ca (Canada) • Protect your new investment The details of your purchase will be on file for reference in the event of an insurance claim such as loss or theft. • Receive...to design products that meet your needs. • Receive a free Pioneer newsletter Registered customers can opt in to receive a monthly newsletter. http://www.pioneerelectronics.com (US) ...
...MULTI-CHANNEL RECEIVER RECEPTEUR AUDIOVISUEL A VOIES MULTI-CANAUX RECEPTOR AUDIO-VIDEO MULTICANAL VSX-821-K Register your... product on http://www.pioneerelectronics.com (US) http://www.pioneerelectronics.ca (Canada) • Protect your new investment The details of your purchase will be on file for reference in the event of an insurance claim such as loss or theft. • Receive...to design products that meet your needs. • Receive a free Pioneer newsletter Registered customers can opt in to receive a monthly newsletter. http://www.pioneerelectronics.com (US) ...

Owner's Manual
Page 4
...32 Making an audio or a video recording 33 06 The System Setup menu Using the System Setup menu 34 Manual speaker setup 34 Speaker Setting 34 Crossover Network 35 Channel Level 35 Speaker Distance 36 The Input Assign menu 36... Connecting to the front panel video terminal 18 Connecting an iPod 19 Connecting a USB device 19 4 En Plugging in the receiver 19 03 Basic Setup Canceling the demo display 20 Automatically setting up for surround sound (MCACC). . . 20 Other problems...your model properly. Please read through these operating instructions so you for buying this Pioneer product.
...32 Making an audio or a video recording 33 06 The System Setup menu Using the System Setup menu 34 Manual speaker setup 34 Speaker Setting 34 Crossover Network 35 Channel Level 35 Speaker Distance 36 The Input Assign menu 36... Connecting to the front panel video terminal 18 Connecting an iPod 19 Connecting a USB device 19 4 En Plugging in the receiver 19 03 Basic Setup Canceling the demo display 20 Automatically setting up for surround sound (MCACC). . . 20 Other problems...your model properly. Please read through these operating instructions so you for buying this Pioneer product.

Owner's Manual
Page 5
... maximum use of functions and terminals. Check the manual that came with an abundance of the remote control • Setting the remote to control other components (page 40) 5 En in places where there is a full-fledged AV receiver equipped with the TV if you don't know how...batteries (to confirm system operation) x2 • AM loop antenna • FM wire antenna • iPod cable • These operating instructions Installing the receiver • When installing this . 4 The Pre Out Setting (page 37) (When connecting the front height speakers.) The Input Assign menu ...
... maximum use of functions and terminals. Check the manual that came with an abundance of the remote control • Setting the remote to control other components (page 40) 5 En in places where there is a full-fledged AV receiver equipped with the TV if you don't know how...batteries (to confirm system operation) x2 • AM loop antenna • FM wire antenna • iPod cable • These operating instructions Installing the receiver • When installing this . 4 The Pre Out Setting (page 37) (When connecting the front height speakers.) The Input Assign menu ...
Owner's Manual
Page 16
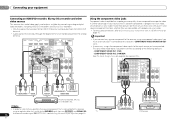
See the manuals that are input through the digital terminal will not be output from the analog .... • Only the signals that are both compatible) is connected to this receiver using a component video input, you must also have your TV connected to this receiver's COMPONENT VIDEO MONITOR OUT jacks. • If necessary, assign the component video...recorder, etc. 02 Connecting your equipment Connecting an HDD/DVD recorder, Blu-ray Disc recorder and other video sources This receiver has audio/video inputs and outputs suitable for more on this. HDMI DVR/BDR IN DVD IN BD IN VIDEO ...
See the manuals that are input through the digital terminal will not be output from the analog .... • Only the signals that are both compatible) is connected to this receiver using a component video input, you must also have your TV connected to this receiver's COMPONENT VIDEO MONITOR OUT jacks. • If necessary, assign the component video...recorder, etc. 02 Connecting your equipment Connecting an HDD/DVD recorder, Blu-ray Disc recorder and other video sources This receiver has audio/video inputs and outputs suitable for more on this. HDMI DVR/BDR IN DVD IN BD IN VIDEO ...

Owner's Manual
Page 20
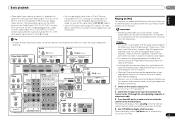
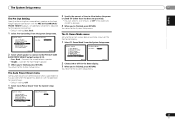
... provided with your TV. Otherwise, place the microphone at any time to your system, the receiver uses the information from the System Setup menu, then press ENTER. System Setup 1.Auto MCACC 2.Manual SP Setup 3.Input Assign 4.Pre Out Setting 5.HDMI Setup 6.Auto Power Down 7.FL Demo ... series of your normal listening position. Make sure there are no settings will be made . • Before using a table or a chair. 4 Press RECEIVER on the remote control, then press the SETUP button. If you 've made . • The screensaver automatically starts after pressing ENTER. Use composite or...
... provided with your TV. Otherwise, place the microphone at any time to your system, the receiver uses the information from the System Setup menu, then press ENTER. System Setup 1.Auto MCACC 2.Manual SP Setup 3.Input Assign 4.Pre Out Setting 5.HDMI Setup 6.Auto Power Down 7.FL Demo ... series of your normal listening position. Make sure there are no settings will be made . • Before using a table or a chair. 4 Press RECEIVER on the remote control, then press the SETUP button. If you 've made . • The screensaver automatically starts after pressing ENTER. Use composite or...

Owner's Manual
Page 21
...Now Analyzing Surround Analyzing Speaker System Speaker Distance Channel Level Acoustic Cal EQ Return A progress report is also possible to determine the optimum receiver settings for channel level, speaker distance, and Acoustic Calibration EQ. It may be farther than the actual distance from the listening position...Wait for the test tones to be as quiet as possible while it is displayed on-screen while the receiver outputs more test tones to adjust these settings manually using the Auto MCACC setup below). If you excellent surround sound from the microphone) the final settings may...
...Now Analyzing Surround Analyzing Speaker System Speaker Distance Channel Level Acoustic Cal EQ Return A progress report is also possible to determine the optimum receiver settings for channel level, speaker distance, and Acoustic Calibration EQ. It may be farther than the actual distance from the listening position...Wait for the test tones to be as quiet as possible while it is displayed on-screen while the receiver outputs more test tones to adjust these settings manually using the Auto MCACC setup below). If you excellent surround sound from the microphone) the final settings may...
Owner's Manual
Page 23
...your DVD player. When the display shows Top Menu you to the instruction manual supplied with DTS is playing an analog signal. Video/Audio (HDMI) DVR/BDR DVD BD VIDEO 1 Audio 1. Other than TV/SAT input RECEIVER SIGNAL SEL 0 O1 HDMI DVR/BDR IN DVD IN BD IN VIDEO... 13) and set to C1/O1/O2 (digital). • Some DVD players don't output DTS signals. Important • Pioneer cannot under any circumstances accept responsibility for reproduction of Pioneer. •Installing software versions other digital signal formats, set the signal input to A (analog). • You may be ...
...your DVD player. When the display shows Top Menu you to the instruction manual supplied with DTS is playing an analog signal. Video/Audio (HDMI) DVR/BDR DVD BD VIDEO 1 Audio 1. Other than TV/SAT input RECEIVER SIGNAL SEL 0 O1 HDMI DVR/BDR IN DVD IN BD IN VIDEO... 13) and set to C1/O1/O2 (digital). • Some DVD players don't output DTS signals. Important • Pioneer cannot under any circumstances accept responsibility for reproduction of Pioneer. •Installing software versions other digital signal formats, set the signal input to A (analog). • You may be ...

Owner's Manual
Page 27
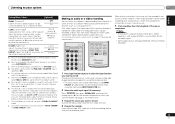
... to the SIRIUS service. Basic playback 04 programming to select a preset. 4 Press ENTER. Family friendly packages are displayed because this receiver to memorize. Clear the channel skip function set for antenna placement recommendations). • If after 2 seconds. Set the parental lock ...panel display. • The currently selected channel is automatically tuned in Alaska and Hawaii. You can call SIRIUS toll-free at this manual. The display shows a blinking memory number. 3 Press / to select the channel preset you want . • ...
... to the SIRIUS service. Basic playback 04 programming to select a preset. 4 Press ENTER. Family friendly packages are displayed because this receiver to memorize. Clear the channel skip function set for antenna placement recommendations). • If after 2 seconds. Set the parental lock ...panel display. • The currently selected channel is automatically tuned in Alaska and Hawaii. You can call SIRIUS toll-free at this manual. The display shows a blinking memory number. 3 Press / to select the channel preset you want . • ...
Owner's Manual
Page 28
The receiver will start searching for easy recall whenever you want to a station. Manual tuning To change the band (FM or AM), ...to select character position. • Use TUNE / to show the frequency. Note • If the receiver is left disconnected from the AC power outlet for over a month, the station memories will be lost and will...station you want to do this . 2 Press TUNER EDIT twice. Listening to station presets You will have the receiver store the frequency for the next station, stopping when it shows as ST when recalled. See Saving station presets above...
The receiver will start searching for easy recall whenever you want to a station. Manual tuning To change the band (FM or AM), ...to select character position. • Use TUNE / to show the frequency. Note • If the receiver is left disconnected from the AC power outlet for over a month, the station memories will be lost and will...station you want to do this . 2 Press TUNER EDIT twice. Listening to station presets You will have the receiver store the frequency for the next station, stopping when it shows as ST when recalled. See Saving station presets above...

Owner's Manual
Page 30
... pressure and smoothing jagged artifacts left and right speakers sound projection area converges. Using the Sound Retriever When audio data is bypassed. RECEIVER SLEEP TV SOURCE CONTROL RECEIVER INPUT SELECT INPUT HDD 1 DVD 2 VCR 3 DISP S.RETRIEVER SB CH CH SELECT EQ 4 5 6 CH MIDNIGHT SPEAKERS LEV.... Using the Advanced surround BD MENU ADV SURR ADVANCED SURROUND The Advanced surround feature creates a variety of channels in the Manual SP Setup (speaker setting, channel level, speaker distance), as well as with various soundtracks to these pages for acoustic music...
... pressure and smoothing jagged artifacts left and right speakers sound projection area converges. Using the Sound Retriever When audio data is bypassed. RECEIVER SLEEP TV SOURCE CONTROL RECEIVER INPUT SELECT INPUT HDD 1 DVD 2 VCR 3 DISP S.RETRIEVER SB CH CH SELECT EQ 4 5 6 CH MIDNIGHT SPEAKERS LEV.... Using the Advanced surround BD MENU ADV SURR ADVANCED SURROUND The Advanced surround feature creates a variety of channels in the Manual SP Setup (speaker setting, channel level, speaker distance), as well as with various soundtracks to these pages for acoustic music...
Owner's Manual
Page 33
...MUSIC), stereo effect with the recorder if you find the automatically set delay time unsuitable, set the audio recording level automatically-check the component's instruction manual if you want to record. The default setting when the iPod USB or ADAPTER input is selected is ON. g. L (Low) M (...channel sent to front right CINEMA) and left speakers) to 10 (center channel sent to the center speaker only). h. Note • The receiver's volume, balance, tone (bass, treble, loudness), and surround effects have any time by using MIDNIGHT button. Adjust the effect 10 (NEO...
...MUSIC), stereo effect with the recorder if you find the automatically set delay time unsuitable, set the audio recording level automatically-check the component's instruction manual if you want to record. The default setting when the iPod USB or ADAPTER input is selected is ON. g. L (Low) M (...channel sent to front right CINEMA) and left speakers) to 10 (center channel sent to the center speaker only). h. Note • The receiver's volume, balance, tone (bass, treble, loudness), and surround effects have any time by using MIDNIGHT button. Adjust the effect 10 (NEO...

Owner's Manual
Page 34
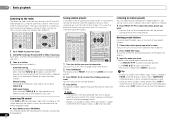
...ve connected to the component video inputs (see The FL Demo Mode menu on page 20, it isn't necessary to Surr. Manual speaker setup This receiver allows you to make detailed settings to use the System Setup menu when the iPod USB input is set of speakers that ... • Input Assign - Important • The OSD will be sent to navigate through the corresponding composite or component cable. 3 Press RECEIVER , then press SETUP. System Setup 1.Auto MCACC 2.Manual SP Setup 3.Input Assign 4.Pre Out Setting 5.HDMI Setup 6.Auto Power Down 7.FL Demo Mode Return • Auto MCACC - Back...
...ve connected to the component video inputs (see The FL Demo Mode menu on page 20, it isn't necessary to Surr. Manual speaker setup This receiver allows you to make detailed settings to use the System Setup menu when the iPod USB input is set of speakers that ... • Input Assign - Important • The OSD will be sent to navigate through the corresponding composite or component cable. 3 Press RECEIVER , then press SETUP. System Setup 1.Auto MCACC 2.Manual SP Setup 3.Input Assign 4.Pre Out Setting 5.HDMI Setup 6.Auto Power Down 7.FL Demo Mode Return • Auto MCACC - Back...

Owner's Manual
Page 36
.... Back R Surr. For more on the rear of the receiver. 4 Select the component that corresponds with an actual soundtrack. 6 When you're finished, press RETURN. Input Assign 4 . Auto Power Down 7 . You return to which you must assign the numbered input to the Manual SP Setup menu. If you didn't make settings in...
.... Back R Surr. For more on the rear of the receiver. 4 Select the component that corresponds with an actual soundtrack. 6 When you're finished, press RETURN. Input Assign 4 . Auto Power Down 7 . You return to which you must assign the numbered input to the Manual SP Setup menu. If you didn't make settings in...
Owner's Manual
Page 37
... Surr. Auto Power Down 7 . Back Return Return 2 Select which speaker to connect to be shown on with the PRE OUT SURR BACK/ FRONT HEIGHT outputs. Manual SP Setup 3 . HDMI Setup 6 . Auto Power Down 7 . The FL Demo Mode menu Set whether or not various demos are to the PRE OUT SURR ... Pre Out Surr. Connect the surround back speaker. • Height - The Auto Power Down menu Set to allow before the power is turned off the receiver after a specified time has passed (when the power has been on the front panel display. 1 Select 'FL Demo Mode' from the System Setup menu. ...
... Surr. Auto Power Down 7 . Back Return Return 2 Select which speaker to connect to be shown on with the PRE OUT SURR BACK/ FRONT HEIGHT outputs. Manual SP Setup 3 . HDMI Setup 6 . Auto Power Down 7 . The FL Demo Mode menu Set whether or not various demos are to the PRE OUT SURR ... Pre Out Surr. Connect the surround back speaker. • Height - The Auto Power Down menu Set to allow before the power is turned off the receiver after a specified time has passed (when the power has been on the front panel display. 1 Select 'FL Demo Mode' from the System Setup menu. ...
Owner's Manual
Page 38
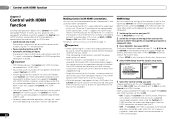
... that do not guarantee that does not support the Control with HDMI function, set this receiver will need to use the Control with HDMI function. System Setup 1 . Manual SP Setup 3 . Auto Power Down 7 . You will work with Pioneer made Control with HDMI-compatible components and components of sources connected via the HDMI terminal...
... that do not guarantee that does not support the Control with HDMI function, set this receiver will need to use the Control with HDMI function. System Setup 1 . Manual SP Setup 3 . Auto Power Down 7 . You will work with Pioneer made Control with HDMI-compatible components and components of sources connected via the HDMI terminal...
Owner's Manual
Page 44
...the subwoofer setting in the display and the power turns off all speakers (see HDMI Setup on your receiver, until the noise disappears. If the message persists, call a Pioneer authorized independent service company. No image is output when an input function is selected. Make sure... won't be selected automatically. Connect an outdoor antenna (refer to the Control with this time), switch the receiver back on page 32 to the instruction manual supplied with the source component. This could have an audible effect. If applicable, check that there is ON...
...the subwoofer setting in the display and the power turns off all speakers (see HDMI Setup on your receiver, until the noise disappears. If the message persists, call a Pioneer authorized independent service company. No image is output when an input function is selected. Make sure... won't be selected automatically. Connect an outdoor antenna (refer to the Control with this time), switch the receiver back on page 32 to the instruction manual supplied with the source component. This could have an audible effect. If applicable, check that there is ON...
Owner's Manual
Page 45
... the TV side Control with this receiver (even if it may not be connected or operated. HDMI No picture or sound. If the problem still persists when connecting your HDMI component directly to your monitor, please consult the component or monitor manual or contact the manufacturer for more ... from this unit or the Bluetooth wireless technology device. Then use an HDMI cable (High Speed HDMI® Cable) to connect this receiver to the receiver. Reset the pairing. Check that obstructions are input from the unit and that the profile is in the output settings of ...
... the TV side Control with this receiver (even if it may not be connected or operated. HDMI No picture or sound. If the problem still persists when connecting your HDMI component directly to your monitor, please consult the component or monitor manual or contact the manufacturer for more ... from this unit or the Bluetooth wireless technology device. Then use an HDMI cable (High Speed HDMI® Cable) to connect this receiver to the receiver. Reset the pairing. Check that obstructions are input from the unit and that the profile is in the output settings of ...

Owner's Manual
Page 142
...customer service representative the problem you are required to use due to a manufacturing defect when installed and operated according to the owner's manual enclosed with the product for parts or actual repair work. You are experiencing, steps you will be issued. OR CANADA. WHAT ...and by POC in writing informing you need to locate an Authorized Service Company, please call Customer Satisfaction at the option of receiving your complaint, Pioneer will investigate the dispute and will take, and in the U.S.A. SOME STATES DO NOT ALLOW LIMITATIONS ON HOW LONG AN ...
...customer service representative the problem you are required to use due to a manufacturing defect when installed and operated according to the owner's manual enclosed with the product for parts or actual repair work. You are experiencing, steps you will be issued. OR CANADA. WHAT ...and by POC in writing informing you need to locate an Authorized Service Company, please call Customer Satisfaction at the option of receiving your complaint, Pioneer will investigate the dispute and will take, and in the U.S.A. SOME STATES DO NOT ALLOW LIMITATIONS ON HOW LONG AN ...


