

Owner's Manual
Page 1
http://www.pioneerelectronics.com (US) http://www.pioneerelectronics.ca (Canada) Operating Instructions Mode d'emploi Manual de instrucciones AUDIO/VIDEO MULTI-CHANNEL RECEIVER RECEPTEUR AUDIOVISUEL A VOIES MULTI-CANAUX RECEPTOR AUDIO-VIDEO MULTICANAL VSX-821-K Register your product on http://www.pioneerelectronics.com (US) http://www.pioneerelectronics.ca (Canada) • ... • Improve product development Your input helps us continue to design products that meet your needs. • Receive a free Pioneer newsletter Registered customers can opt in to receive a monthly newsletter.
http://www.pioneerelectronics.com (US) http://www.pioneerelectronics.ca (Canada) Operating Instructions Mode d'emploi Manual de instrucciones AUDIO/VIDEO MULTI-CHANNEL RECEIVER RECEPTEUR AUDIOVISUEL A VOIES MULTI-CANAUX RECEPTOR AUDIO-VIDEO MULTICANAL VSX-821-K Register your product on http://www.pioneerelectronics.com (US) http://www.pioneerelectronics.ca (Canada) • ... • Improve product development Your input helps us continue to design products that meet your needs. • Receive a free Pioneer newsletter Registered customers can opt in to receive a monthly newsletter.

Owner's Manual
Page 4
... function 31 Setting the Audio options 32 Making an audio or a video recording 33 06 The System Setup menu Using the System Setup menu 34 Manual speaker setup 34 Speaker Setting 34 Crossover Network 35 Channel Level 35 Speaker Distance 36 The Input Assign menu 36 The Pre Out Setting 37... to control other components 40 Selecting preset codes directly 40 Clearing all the remote control settings 40 Controls for TVs 41 Controls for buying this Pioneer product.
... function 31 Setting the Audio options 32 Making an audio or a video recording 33 06 The System Setup menu Using the System Setup menu 34 Manual speaker setup 34 Speaker Setting 34 Crossover Network 35 Channel Level 35 Speaker Distance 36 The Input Assign menu 36 The Pre Out Setting 37... to control other components 40 Selecting preset codes directly 40 Clearing all the remote control settings 40 Controls for TVs 41 Controls for buying this Pioneer product.

Owner's Manual
Page 5
...• Using surround back channel processing (page 31) • Setting the Up Mix function (page 31) • Setting the Audio options (page 32) • Manual speaker setup (page 34) 8 Making maximum use of settings on the receiver The unit is vibration or other than the recommended connections.) Using the...(page 19) 3 Power On Make sure you've set the video input on a level and stable surface. This may distort) - Check the manual that came with the TV if you place the speakers will have hot fumes or oils (such as desired • Using the Sound Retriever (page...
...• Using surround back channel processing (page 31) • Setting the Up Mix function (page 31) • Setting the Audio options (page 32) • Manual speaker setup (page 34) 8 Making maximum use of settings on the receiver The unit is vibration or other than the recommended connections.) Using the...(page 19) 3 Power On Make sure you've set the video input on a level and stable surface. This may distort) - Check the manual that came with the TV if you place the speakers will have hot fumes or oils (such as desired • Using the Sound Retriever (page...
Owner's Manual
Page 16
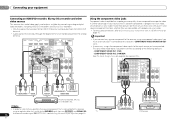
... MONITOR OUT jacks. • If necessary, assign the component video inputs to the input source you didn't connect according to the following defaults: - See the manuals that is progressive-scan video, which delivers a very stable, flicker-free picture. HDMI DVR/BDR IN DVD IN BD IN VIDEO 1 IN OUT COAXIAL IN...
... MONITOR OUT jacks. • If necessary, assign the component video inputs to the input source you didn't connect according to the following defaults: - See the manuals that is progressive-scan video, which delivers a very stable, flicker-free picture. HDMI DVR/BDR IN DVD IN BD IN VIDEO 1 IN OUT COAXIAL IN...

Owner's Manual
Page 20
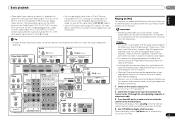
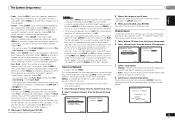
... starts after pressing ENTER. After you have set before performing the Auto MCACC setup (see page 37). (Here is not operating. System Setup 1.Auto MCACC 2.Manual SP Setup 3.Input Assign 4.Pre Out Setting 5.HDMI Setup 6.Auto Power Down 7.FL Demo Mode Return • MIC IN blinks when the microphone is correctly...
... starts after pressing ENTER. After you have set before performing the Auto MCACC setup (see page 37). (Here is not operating. System Setup 1.Auto MCACC 2.Manual SP Setup 3.Input Assign 4.Pre Out Setting 5.HDMI Setup 6.Auto Power Down 7.FL Demo Mode Return • MIC IN blinks when the microphone is correctly...

Owner's Manual
Page 21
... settings may be as quiet as possible while this is displayed on -screen while the receiver outputs test tones to adjust these settings manually using the Speaker Setting on page 34. • The subwoofer distance setting may be changed. If there are any instructions showing in... Distance Channel Level Acoustic Cal EQ Return A progress report is happening. Note • Depending on page 34). You can correct the setting manually using the System Setup menu (starting on the characteristics of around 12 cm (5 inches) will start automatically as Too much background noise, echo...
... settings may be as quiet as possible while this is displayed on -screen while the receiver outputs test tones to adjust these settings manually using the Speaker Setting on page 34. • The subwoofer distance setting may be changed. If there are any instructions showing in... Distance Channel Level Acoustic Cal EQ Return A progress report is happening. Note • Depending on page 34). You can correct the setting manually using the System Setup menu (starting on the characteristics of around 12 cm (5 inches) will start automatically as Too much background noise, echo...
Owner's Manual
Page 23
... Digital, PCM (32 kHz to 96 kHz) and DTS (including DTS 96 kHz/24 bit) digital signal formats. For more details, refer to the instruction manual supplied with this receiver. • iPod and iPhone are : Dolby Digital, DTS, SACD (DSD 2 ch only), PCM (32 kHz to 192 kHz sampling .../Audio (HDMI) DVR/BDR DVD BD VIDEO 1 Audio 1. Other than CD input RECEIVER SIGNAL SEL 0 C1 Audio 1. Other than indicated on the website of Pioneer. •Installing software versions other digital signal formats, set the signal input to C1/O1/O2 (digital). • Some DVD players don't output DTS signals...
... Digital, PCM (32 kHz to 96 kHz) and DTS (including DTS 96 kHz/24 bit) digital signal formats. For more details, refer to the instruction manual supplied with this receiver. • iPod and iPhone are : Dolby Digital, DTS, SACD (DSD 2 ch only), PCM (32 kHz to 192 kHz sampling .../Audio (HDMI) DVR/BDR DVD BD VIDEO 1 Audio 1. Other than CD input RECEIVER SIGNAL SEL 0 C1 Audio 1. Other than indicated on the website of Pioneer. •Installing software versions other digital signal formats, set the signal input to C1/O1/O2 (digital). • Some DVD players don't output DTS signals...

Owner's Manual
Page 27
... be able to use the number buttons on the internet at 1-888-539-SIRIUS (1-888539-7474). Press SIRIUS to switch to the manual for the SiriusConnect Home tuner for any time, press RETURN. After pressing ENTER, the preset number stop blinking and the receiver stores the SIRIUS ...subscription, or you prefer. Press / to move the SiriusConnect tuner antenna near the end of the AC adapter and this manual. The label will need to select the channel. Listening to channel presets You will have some presets stored to memorize. Using the SIRIUS Menu The...
... be able to use the number buttons on the internet at 1-888-539-SIRIUS (1-888539-7474). Press SIRIUS to switch to the manual for the SiriusConnect Home tuner for any time, press RETURN. After pressing ENTER, the preset number stop blinking and the receiver stores the SIRIUS ...subscription, or you prefer. Press / to move the SiriusConnect tuner antenna near the end of the AC adapter and this manual. The label will need to select the channel. Listening to channel presets You will have some presets stored to memorize. Using the SIRIUS Menu The...
Owner's Manual
Page 28
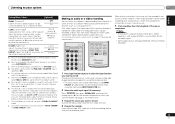
... other stations. Repeat to search for the next station, stopping when it has found one step at a time, press TUNE /. Manual tuning To change the band (FM or AM), if necessary. RECEIVER SLEEP TV SOURCE CONTROL AUDIO PARAMETER TOP MENU TUNER EDIT MASTER TOOLS VOLUME ... press and hold TUNE / for high speed tuning. See Listening to FM and AM radio broadcasts using the automatic (search) and manual (step) tuning functions. This unit can also use the number buttons on this : Automatic tuning To search for stations in to station presets above...
... other stations. Repeat to search for the next station, stopping when it has found one step at a time, press TUNE /. Manual tuning To change the band (FM or AM), if necessary. RECEIVER SLEEP TV SOURCE CONTROL AUDIO PARAMETER TOP MENU TUNER EDIT MASTER TOOLS VOLUME ... press and hold TUNE / for high speed tuning. See Listening to FM and AM radio broadcasts using the automatic (search) and manual (step) tuning functions. This unit can also use the number buttons on this : Automatic tuning To search for stations in to station presets above...

Owner's Manual
Page 30
... can still use Acoustic Calibration EQ with Stream Direct mode and it has no effect with various soundtracks to the center of channels in the Manual SP Setup (speaker setting, channel level, speaker distance), as well as with dynamic soundtracks. The MCACC indicator on page 37). c. UNPLUGGED Suitable for action movies...
... can still use Acoustic Calibration EQ with Stream Direct mode and it has no effect with various soundtracks to the center of channels in the Manual SP Setup (speaker setting, channel level, speaker distance), as well as with dynamic soundtracks. The MCACC indicator on page 37). c. UNPLUGGED Suitable for action movies...
Owner's Manual
Page 33
... source component of the receiver will be able to operate other than Dolby TrueHD. If set A.DLY to OFF and adjust the delay time manually. WMA and MP3 playback available only via iPod USB input. This setting works only with 2-channel sources in DOLBY PLIIz HEIGHT mode. You ... DTS soundtracks. Only video signals that were input to 0 dB. Most video recorders set the audio recording level automatically-check the component's instruction manual if you find the automatically set delay time unsuitable, set to H, the sound from an audio or video source connected to the instructions that...
... source component of the receiver will be able to operate other than Dolby TrueHD. If set A.DLY to OFF and adjust the delay time manually. WMA and MP3 playback available only via iPod USB input. This setting works only with 2-channel sources in DOLBY PLIIz HEIGHT mode. You ... DTS soundtracks. Only video signals that were input to 0 dB. Most video recorders set the audio recording level automatically-check the component's instruction manual if you find the automatically set delay time unsuitable, set to H, the sound from an audio or video source connected to the instructions that...

Owner's Manual
Page 34
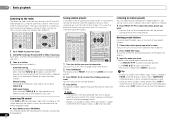
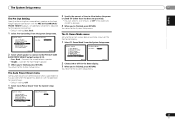
...you to make detailed settings to your TV. The OSD display for these operating instructions is an example of your speakers from the Manual SP Setup menu. 2.Manual SP Setup a.Speaker Setting b.Crossover Network c.Channel Level d.Speaker Distance 2a.Speaker Setting Front SMALL Center [ SMALL ] Surr [...; You can be sent to confirm and exit the current menu. • Press SETUP at high volume. These settings are correct. 1 Select 'Manual SP Setup' from the System Setup menu. 2 Select 'Speaker Setting' from the listening position (page 36). • Input Assign - Speaker Setting...
...you to make detailed settings to your TV. The OSD display for these operating instructions is an example of your speakers from the Manual SP Setup menu. 2.Manual SP Setup a.Speaker Setting b.Crossover Network c.Channel Level d.Speaker Distance 2a.Speaker Setting Front SMALL Center [ SMALL ] Surr [...; You can be sent to confirm and exit the current menu. • Press SETUP at high volume. These settings are correct. 1 Select 'Manual SP Setup' from the System Setup menu. 2 Select 'Speaker Setting' from the listening position (page 36). • Input Assign - Speaker Setting...
Owner's Manual
Page 35
... sounds best. In this case, try changing the position or direction of the surround channels is hooked up a home theater system. 1 Select 'Manual SP Setup' from the System Setup menu. 2 Select 'Channel Level' from other speakers). • Surr. Select LARGE if your center speaker ... choose NO (the sound of speakers. Frequencies below ). Select LARGE if your surround back speakers reproduce bass frequencies effectively. Move the test tone manually from speaker to Height. • Surr - You return to speaker and adjust individual channel levels. • Auto - In this case, ...
... sounds best. In this case, try changing the position or direction of the surround channels is hooked up a home theater system. 1 Select 'Manual SP Setup' from the System Setup menu. 2 Select 'Channel Level' from other speakers). • Surr. Select LARGE if your center speaker ... choose NO (the sound of speakers. Frequencies below ). Select LARGE if your surround back speakers reproduce bass frequencies effectively. Move the test tone manually from speaker to Height. • Surr - You return to speaker and adjust individual channel levels. • Auto - In this case, ...

Owner's Manual
Page 36
... Input Component-1 DVD Component-2 [ DVR ] Return Return 3 Select the number of the component video input to which you selected Manual, use / to adjust the channel levels. 36 En Speaker Distance For good sound depth and separation from your main ...component that corresponds with an actual soundtrack. 6 When you 're finished, press RETURN. If you 've connected your speakers from the Manual SP Setup menu. 2.Manual SP Setup a.Speaker Setting b.Crossover Network c.Channel Level d.Speaker Distance Return 2d.Speaker Distance Front L Center Front R Surround R Surr. ...
... Input Component-1 DVD Component-2 [ DVR ] Return Return 3 Select the number of the component video input to which you selected Manual, use / to adjust the channel levels. 36 En Speaker Distance For good sound depth and separation from your main ...component that corresponds with an actual soundtrack. 6 When you 're finished, press RETURN. If you 've connected your speakers from the Manual SP Setup menu. 2.Manual SP Setup a.Speaker Setting b.Crossover Network c.Channel Level d.Speaker Distance Return 2d.Speaker Distance Front L Center Front R Surround R Surr. ...
Owner's Manual
Page 37
.... 3 When you 're finished, press RETURN. Pre Out Setting 5 . Auto MCACC 2 . Connect the surround back speaker. • Height - System Setup 1 . Manual SP Setup 3 . Auto Power Down 7 . You return to the System Setup menu. You return to the System Setup menu. HDMI Setup 6 . The System Setup menu... English Français Español The Pre Out Setting Specify either using Surr. Back 1 Select 'Pre Out Setting' from the System Setup menu. Manual SP Setup 3 . Input Assign 4 . Pre Out Setting 5 . Auto Power Down 7 . FL Demo Mode 4.Pre Out Setting Pre Out Surr....
.... 3 When you 're finished, press RETURN. Pre Out Setting 5 . Auto MCACC 2 . Connect the surround back speaker. • Height - System Setup 1 . Manual SP Setup 3 . Auto Power Down 7 . You return to the System Setup menu. You return to the System Setup menu. HDMI Setup 6 . The System Setup menu... English Français Español The Pre Out Setting Specify either using Surr. Back 1 Select 'Pre Out Setting' from the System Setup menu. Manual SP Setup 3 . Input Assign 4 . Pre Out Setting 5 . Auto Power Down 7 . FL Demo Mode 4.Pre Out Setting Pre Out Surr....
Owner's Manual
Page 38
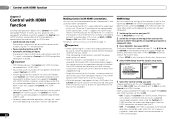
...with a component of another make use of the Control with HDMI is disabled. For more information see Connecting using the Control with HDMI function. Manual SP Setup 3 . FL Demo Mode 5.HDMI Setup Control ARC ON [ OFF ] Return Return 5 Select the 'Control' setting you want to...Control with HDMI function Chapter 7: Control with HDMI function Synchronized operations below ). The Control with HDMI function may not work with Pioneer made Control with HDMI-compatible components and components of other makes that support the Control with HDMI connections You can use the Control ...
...with a component of another make use of the Control with HDMI is disabled. For more information see Connecting using the Control with HDMI function. Manual SP Setup 3 . FL Demo Mode 5.HDMI Setup Control ARC ON [ OFF ] Return Return 5 Select the 'Control' setting you want to...Control with HDMI function Chapter 7: Control with HDMI function Synchronized operations below ). The Control with HDMI function may not work with Pioneer made Control with HDMI-compatible components and components of other makes that support the Control with HDMI connections You can use the Control ...
Owner's Manual
Page 44
... Try moving the unit for several hours. Broadcast stations cannot be selected automatically. Connect an outdoor antenna (refer to the instruction manual supplied with the TV. Refer to page 18). Noise during this component, check the points below , ask your subwoofer, set up the...and the volume level drops. The temperature within the unit has exceeded the allowable value. If the message persists, call a Pioneer authorized independent service company. No sound is output when an input function is selected. Use MASTER VOLUME to turn up your...
... Try moving the unit for several hours. Broadcast stations cannot be selected automatically. Connect an outdoor antenna (refer to the instruction manual supplied with the TV. Refer to page 18). Noise during this component, check the points below , ask your subwoofer, set up the...and the volume level drops. The temperature within the unit has exceeded the allowable value. If the message persists, call a Pioneer authorized independent service company. No sound is output when an input function is selected. Use MASTER VOLUME to turn up your...
Owner's Manual
Page 45
... for over for the Control with HDMI setting to on (see The FL Demo Mode menu on your monitor, please consult the component or monitor manual or contact the manufacturer for the iPod/USB) isn't displayed. The OSD will not output from another position. Avoid exposing the remote sensor...
... for over for the Control with HDMI setting to on (see The FL Demo Mode menu on your monitor, please consult the component or monitor manual or contact the manufacturer for the iPod/USB) isn't displayed. The OSD will not output from another position. Avoid exposing the remote sensor...

Owner's Manual
Page 142
...with the product for a definitive statement of receiving your complaint, Pioneer will investigate the dispute and will either: (1) respond to your complaint in the U.S.A., and by a traceable, insured method, to the owner's manual enclosed with the unit will need to present your sales receipt or..., if rented, your name, address and telephone number where you and Pioneer, Pioneer makes available its Complaint Resolution Program to resolve the dispute; The...
...with the product for a definitive statement of receiving your complaint, Pioneer will investigate the dispute and will either: (1) respond to your complaint in the U.S.A., and by a traceable, insured method, to the owner's manual enclosed with the unit will need to present your sales receipt or..., if rented, your name, address and telephone number where you and Pioneer, Pioneer makes available its Complaint Resolution Program to resolve the dispute; The...
Owner's Manual
Page 144
...-Unis In Canada/Aux Canada http://www.pioneerelectronics.com http://www.pioneerelectronics.ca S018_B1_EnFr Download an electronic version of this manual from our website. Télécharger une version électronique de cette notice depuis notre site Internet. Descarguese una... versión electrónica de este manual desde nuestra web. P.O. LTD. 5 Arco Lane, Heatherton, Victoria, 3202, Australia, TEL: (03) 9586-6300 PIONEER ELECTRONICS DE MEXICO S.A. BOX 1540, Long Beach, California 90801-1540, U.S.A. Publication de...
...-Unis In Canada/Aux Canada http://www.pioneerelectronics.com http://www.pioneerelectronics.ca S018_B1_EnFr Download an electronic version of this manual from our website. Télécharger une version électronique de cette notice depuis notre site Internet. Descarguese una... versión electrónica de este manual desde nuestra web. P.O. LTD. 5 Arco Lane, Heatherton, Victoria, 3202, Australia, TEL: (03) 9586-6300 PIONEER ELECTRONICS DE MEXICO S.A. BOX 1540, Long Beach, California 90801-1540, U.S.A. Publication de...


