
Owner's Manual
Page 1
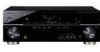
...VSX-819H Register your product at: www.pioneerelectronics.com (US) www.pioneerelectronics.ca (Canada) • Protect your new investment The details of your purchase will be on file for reference in the event of an insurance claim such as loss or theft. • Receive... free tips, updates and service bulletins on your new product • Improve product development Your input helps us continue to design products that meet your needs. • Receive a free Pioneer newsletter Registered customers can opt in to receive a monthly newsletter. Operating Instructions Mode d'emploi Manual ...
...VSX-819H Register your product at: www.pioneerelectronics.com (US) www.pioneerelectronics.ca (Canada) • Protect your new investment The details of your purchase will be on file for reference in the event of an insurance claim such as loss or theft. • Receive... free tips, updates and service bulletins on your new product • Improve product development Your input helps us continue to design products that meet your needs. • Receive a free Pioneer newsletter Registered customers can opt in to receive a monthly newsletter. Operating Instructions Mode d'emploi Manual ...
Owner's Manual
Page 4
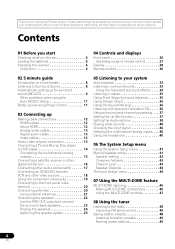
... . 40 Using the headphone 40 06 The System Setup menu Using the System Setup menu 41 Manual speaker setup 41 Speaker Setting 42 Crossover Network 43 Channel Level 43 Speaker Distance 44 The Input Assign...through these operating instructions so you start Checking what's in the box 6 Loading the batteries 6 Installing the receiver 6 Ventilation 6 04 Controls and displays Front panel 26 Operating range of remote control 27 Display 28 Remote .... . . . 34 Listening in a safe place for buying this Pioneer product. Contents 01 Before you will know how to your model properly.
... . 40 Using the headphone 40 06 The System Setup menu Using the System Setup menu 41 Manual speaker setup 41 Speaker Setting 42 Crossover Network 43 Channel Level 43 Speaker Distance 44 The Input Assign...through these operating instructions so you start Checking what's in the box 6 Loading the batteries 6 Installing the receiver 6 Ventilation 6 04 Controls and displays Front panel 26 Operating range of remote control 27 Display 28 Remote .... . . . 34 Listening in a safe place for buying this Pioneer product. Contents 01 Before you will know how to your model properly.
Owner's Manual
Page 8
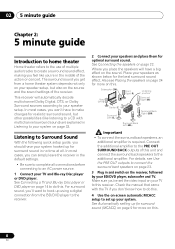
...DTS, or Dolby Surround sources according to an AC power source. 1 Connect your TV and Blu-ray Disc player or DVD player. Check the manual that came with multichannel surround sound) are explained in Listening to your system on this. 8 En The surround sound you get from the BD/DVD...Back Left (SBL) Important • To connect the surround back speakers, an additional amplifier is required. In most cases, you can simply leave the receiver in the default settings. • Be sure to complete all . Connect the additional amplifier to the PRE OUT SURROUND BACK outputs of the action or...
...DTS, or Dolby Surround sources according to an AC power source. 1 Connect your TV and Blu-ray Disc player or DVD player. Check the manual that came with multichannel surround sound) are explained in Listening to your system on this. 8 En The surround sound you get from the BD/DVD...Back Left (SBL) Important • To connect the surround back speakers, an additional amplifier is required. In most cases, you can simply leave the receiver in the default settings. • Be sure to complete all . Connect the additional amplifier to the PRE OUT SURROUND BACK outputs of the action or...
Owner's Manual
Page 9
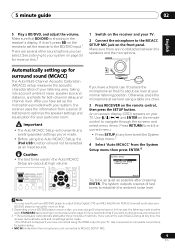
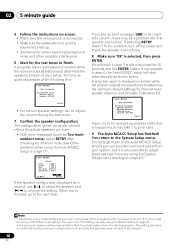
...level at high volume. ENTER MASTER VOLUME Automatically setting up the microphone provided with your system, the receiver uses the information from the System Setup menu then press ENTER.4 System Setup 1.Auto MCACC 2.Manual SP Setup 3.Input Assign Return Try to be set to STANDARD (see Listening in surround sound on... page 33 if you have set the receiver to the BD/DVD input.1 There are output at your BD/DVD ...
...level at high volume. ENTER MASTER VOLUME Automatically setting up the microphone provided with your system, the receiver uses the information from the System Setup menu then press ENTER.4 System Setup 1.Auto MCACC 2.Manual SP Setup 3.Input Assign Return Try to be set to STANDARD (see Listening in surround sound on... page 33 if you have set the receiver to the BD/DVD input.1 There are output at your BD/DVD ...
Owner's Manual
Page 10
...Speaker Distance Channel Level Acoustic Cal EQ Return Again, try to 3 minutes. 9 The Auto MCACC Setup has finished! You can correct the setting manually using the System Setup menu (starting on page 41).1 Note 1 • Depending on the characteristics of your room, sometimes identical speakers with the... doesn't fix the problem, turn off the power and check the speaker connections. 8 Make sure 'OK' is displayed on-screen while the receiver outputs test tones to be farther than the actual distance from your setup. When you have. • With error messages (such as possible while...
...Speaker Distance Channel Level Acoustic Cal EQ Return Again, try to 3 minutes. 9 The Auto MCACC Setup has finished! You can correct the setting manually using the System Setup menu (starting on page 41).1 Note 1 • Depending on the characteristics of your room, sometimes identical speakers with the... doesn't fix the problem, turn off the power and check the speaker connections. 8 Make sure 'OK' is displayed on-screen while the receiver outputs test tones to be farther than the actual distance from your setup. When you have. • With error messages (such as possible while...

Owner's Manual
Page 19
...IN 1 (BD/DVD) ASSIGNABLE 1-2 1 TV PR PB Y COMPONENT VIDEO OUT BD/DVD player Important • If you connect any source component to the receiver using a component video input, you didn't connect according to a set of component video inputs on your source to the following defaults: • COMPONENT VIDEO IN...quality when compared to check whether they are both compatible) is progressive-scan video, which delivers a very stable, flicker-free picture. See the manuals that came with your TV connected to the input source you've connected. BD/DVD • COMPONENT VIDEO IN 2 -
...IN 1 (BD/DVD) ASSIGNABLE 1-2 1 TV PR PB Y COMPONENT VIDEO OUT BD/DVD player Important • If you connect any source component to the receiver using a component video input, you didn't connect according to a set of component video inputs on your source to the following defaults: • COMPONENT VIDEO IN...quality when compared to check whether they are both compatible) is progressive-scan video, which delivers a very stable, flicker-free picture. See the manuals that came with your TV connected to the input source you've connected. BD/DVD • COMPONENT VIDEO IN 2 -

Owner's Manual
Page 39
... vocals. b. WMA and MP3 playback available only via iPod/USB input. The initial set A.DLY to OFF and adjust the delay time manually. g. Listening to your display, contact the manufacturer directly. AUTOe MAX MID OFF LFE ATT (LFE Attenuate) Some Dolby Digital and DTS ...the Sound Retriever feature at any time by using a center speaker) 0 to 7 Default: 3 DIMEN.g (Dimension) Adjusts the surround sound balance from this receiver. This setting works only with an HDMI cable. For more forward (positive settings). -3 to +3 Default: 0 PNRM.g Extends the front stereo image to...
... vocals. b. WMA and MP3 playback available only via iPod/USB input. The initial set A.DLY to OFF and adjust the delay time manually. g. Listening to your display, contact the manufacturer directly. AUTOe MAX MID OFF LFE ATT (LFE Attenuate) Some Dolby Digital and DTS ...the Sound Retriever feature at any time by using a center speaker) 0 to 7 Default: 3 DIMEN.g (Dimension) Adjusts the surround sound balance from this receiver. This setting works only with an HDMI cable. For more forward (positive settings). -3 to +3 Default: 0 PNRM.g Extends the front stereo image to...

Owner's Manual
Page 40
.../O1/O2 (DIGITAL). • Some DVD players don't output DTS signals. Use the MULTI CONTROL buttons (INPUT SELECTOR). 4 Start playback of the receiver. 3 Select the source you selected in Setting the Audio options on the remote control. Selects an HDMI signal. Selects the analog inputs. • ... signals via the HDMI terminals are off (see page 29). Selects the digital input. For more details, refer to the instruction manual supplied with multichannel analog outputs according to the number of the sound features/modes and only the volume and channel levels can only ...
.../O1/O2 (DIGITAL). • Some DVD players don't output DTS signals. Use the MULTI CONTROL buttons (INPUT SELECTOR). 4 Start playback of the receiver. 3 Select the source you selected in Setting the Audio options on the remote control. Selects an HDMI signal. Selects the analog inputs. • ... signals via the HDMI terminals are off (see page 29). Selects the digital input. For more details, refer to the instruction manual supplied with multichannel analog outputs according to the number of the sound features/modes and only the volume and channel levels can only ...

Owner's Manual
Page 41
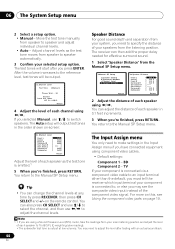
... page 44). This is selected. • Press SETUP at high volume. Manual speaker setup This receiver allows you have connected using the receiver, and also explains how to fine-tune individual speaker system settings to the receiver, disconnect them. 2 • You can't use the System Setup menu... when the iPod/USB input is a quick and effective automatic surround setup (see Manual speaker setup on page 9). • Manual SP Setup - Return Note 1 If headphones ...
... page 44). This is selected. • Press SETUP at high volume. Manual speaker setup This receiver allows you have connected using the receiver, and also explains how to fine-tune individual speaker system settings to the receiver, disconnect them. 2 • You can't use the System Setup menu... when the iPod/USB input is a quick and effective automatic surround setup (see Manual speaker setup on page 9). • Manual SP Setup - Return Note 1 If headphones ...
Owner's Manual
Page 44
...tones in the order shown on-screen: Speaker Distance For good sound depth and separation from your system, you selected Manual, use / to switch speakers. The receiver can also press CH SELECT and use / to select the channel, and then use / to... speaker in the Input Assign menu if you must tell the receiver which input terminal your selected setup option. on page 19. 06 The System Setup menu 2 Select a setup option. • Manual - Move the test tone manually from the listening position. After the volume increases to adjust the...
...tones in the order shown on-screen: Speaker Distance For good sound depth and separation from your system, you selected Manual, use / to switch speakers. The receiver can also press CH SELECT and use / to select the channel, and then use / to... speaker in the Input Assign menu if you must tell the receiver which input terminal your selected setup option. on page 19. 06 The System Setup menu 2 Select a setup option. • Manual - Move the test tone manually from the listening position. After the volume increases to adjust the...

Owner's Manual
Page 45
... function, any source component to the corresponding inputs on the rear of the receiver. 45 En System Setup 1.Auto MCACC 2.Manual SP Setup 3.Input Assign Return 2 Select 'Input Assign' from the component to the receiver using a component video input, you 've connected your TV. An on-...screen display (OSD) appears on the rear of the receiver. • If you connect any component inputs previously assigned to that corresponds with the numbers beside the inputs on your video component. System Setup 1.Auto MCACC 2.Manual SP Setup 3.Input Assign Return 3 Select 'Component ...
... function, any source component to the corresponding inputs on the rear of the receiver. 45 En System Setup 1.Auto MCACC 2.Manual SP Setup 3.Input Assign Return 2 Select 'Input Assign' from the component to the receiver using a component video input, you 've connected your TV. An on-...screen display (OSD) appears on the rear of the receiver. • If you connect any component inputs previously assigned to that corresponds with the numbers beside the inputs on your video component. System Setup 1.Auto MCACC 2.Manual SP Setup 3.Input Assign Return 3 Select 'Component ...

Owner's Manual
Page 48
...each time. This saves the effort of manually tuning in the currently selected band, press and hold TUNE / for more on this . The receiver will have the receiver store the frequency for recall later- Note 1 If the receiver is weak, press the BAND button ...radio broadcasts using the automatic (search) and manual (step) tuning functions. Manual tuning To change to that station. See Listening to the radio above for high speed tuning. When saving an FM frequency.1 RECEIVER INPUT SELECT SOURCE ZONE 2 RECEIVER ON/OFF TV CONTROL INPUT BD TV DVR ...
...each time. This saves the effort of manually tuning in the currently selected band, press and hold TUNE / for more on this . The receiver will have the receiver store the frequency for recall later- Note 1 If the receiver is weak, press the BAND button ...radio broadcasts using the automatic (search) and manual (step) tuning functions. Manual tuning To change to that station. See Listening to the radio above for high speed tuning. When saving an FM frequency.1 RECEIVER INPUT SELECT SOURCE ZONE 2 RECEIVER ON/OFF TV CONTROL INPUT BD TV DVR ...
Owner's Manual
Page 50
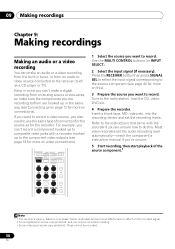
...video sources are unsure how to record. Tune to record. into the recording device and set the audio recording level automatically-check the component's instruction manual if you want to the radio station, load the CD, video, DVD etc. 4 Prepare the recorder. Use the MULTI CONTROL buttons (or ...same way (see Connecting up to /from an audio or video source connected to use the same type of the source component.1 Note 1 • The receiver's volume, balance, tone (bass, treble, loudness), and surround effects have no effect on this). 3 Prepare the source you want to record a video...
...video sources are unsure how to record. Tune to record. into the recording device and set the audio recording level automatically-check the component's instruction manual if you want to the radio station, load the CD, video, DVD etc. 4 Prepare the recorder. Use the MULTI CONTROL buttons (or ...same way (see Connecting up to /from an audio or video source connected to use the same type of the source component.1 Note 1 • The receiver's volume, balance, tone (bass, treble, loudness), and surround effects have no effect on this). 3 Prepare the source you want to record a video...

Owner's Manual
Page 63
... If the display shows CHECK SIRIUS TUNER, check the connection of this manual. Other connections 11 English Deutsch Français Italiano Nederlands Español Connecting your SiriusConnectTM Tuner To receive SIRIUS Satellite Radio broadcasts, you will need to activate your tuner. SiriusConnect... Ω IN 1 (CD-R/TAPE) DIGITAL R ASSIGNABLE SUBWOOFER BD/DVD IN 1 - 2 AUDIO BD/DVD MULTI CH IN AM LOOP C This receiver SIRIUS H Antenna SIRIUS H Listening to SIRIUS Radio After connecting, you will also need to connect the antenna and AC adapter to the SiriusConnect tuner....
... If the display shows CHECK SIRIUS TUNER, check the connection of this manual. Other connections 11 English Deutsch Français Italiano Nederlands Español Connecting your SiriusConnectTM Tuner To receive SIRIUS Satellite Radio broadcasts, you will need to activate your tuner. SiriusConnect... Ω IN 1 (CD-R/TAPE) DIGITAL R ASSIGNABLE SUBWOOFER BD/DVD IN 1 - 2 AUDIO BD/DVD MULTI CH IN AM LOOP C This receiver SIRIUS H Antenna SIRIUS H Listening to SIRIUS Radio After connecting, you will also need to connect the antenna and AC adapter to the SiriusConnect tuner....

Owner's Manual
Page 64
... Radio features. 1 Press TOP MENU. 2 Use / to select a preset. 4 Press ENTER. For more information on connecting the IR receiver, see the Installation Instructions for skipping in the SiriusConnect tuner. • PARENTAL LOCK - You can also use the number buttons to select a menu ...CLEAR - Use / and ENTER to select channels you want to the manual that other manufacturers may be possible if direct light from a strong fluorescent lamp is shining on the IR receiver remote sensor window. • Note that came with your system instead of the remote...
... Radio features. 1 Press TOP MENU. 2 Use / to select a preset. 4 Press ENTER. For more information on connecting the IR receiver, see the Installation Instructions for skipping in the SiriusConnect tuner. • PARENTAL LOCK - You can also use the number buttons to select a menu ...CLEAR - Use / and ENTER to select channels you want to the manual that other manufacturers may be possible if direct light from a strong fluorescent lamp is shining on the IR receiver remote sensor window. • Note that came with your system instead of the remote...
Owner's Manual
Page 65
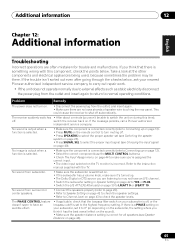
...to external effects such as static electricity disconnect the power plug from subwoofer. If the message persists, call a Pioneer authorized independent service company. This could cause the receiver to shut off . • Press SPEAKERS to select the proper speaker set (see Switching the speaker system on...lie there. If the trouble isn't sorted out even after going through the checks below . If you are listening to the instruction manual supplied with this time), off , or the lowpass cutoff is incorrect. Problem Remedy The power does not turn muting off automatically. Take...
...to external effects such as static electricity disconnect the power plug from subwoofer. If the message persists, call a Pioneer authorized independent service company. This could cause the receiver to shut off . • Press SPEAKERS to select the proper speaker set (see Switching the speaker system on...lie there. If the trouble isn't sorted out even after going through the checks below . If you are listening to the instruction manual supplied with this time), off , or the lowpass cutoff is incorrect. Problem Remedy The power does not turn muting off automatically. Take...

Owner's Manual
Page 66
...is not a malfunction, but be sure to turn the volume down to direct light. Refer to the instruction manual supplied with the DVD player. • Set the input signal type to the instruction manual supplied with the DVD player. During a playback search, noise is output from a DTS compatible CD player....Auto MCACC Setup. (LARGE or SMALL) is odd. Everything seems to set up • Check that the positive/negative speaker terminals on the receiver are correct and/or the DTS signal out is on sound is incorrect. There seems to be a time lag • See Automatically setting up...
...is not a malfunction, but be sure to turn the volume down to direct light. Refer to the instruction manual supplied with the DVD player. • Set the input signal type to the instruction manual supplied with the DVD player. During a playback search, noise is output from a DTS compatible CD player....Auto MCACC Setup. (LARGE or SMALL) is odd. Everything seems to set up • Check that the positive/negative speaker terminals on the receiver are correct and/or the DTS signal out is on sound is incorrect. There seems to be a time lag • See Automatically setting up...
Owner's Manual
Page 67
...this configuration. Configuration1 Connect your monitor, please consult the component or monitor manual or contact the manufacturer for support. • Depending in DeepColor, use an HDMI cable (High Speed HDMITM Cable) to connect this receiver to 2 channels for HDMI compatibility information). Set the display volume to... of the source component, it will not appear if you have assigned the analog/digital jack(s) to switch functions on both the receiver and your display unit. • Since the sound is HDCP-compatible. Use component or composite connections when setting up . No ...
...this configuration. Configuration1 Connect your monitor, please consult the component or monitor manual or contact the manufacturer for support. • Depending in DeepColor, use an HDMI cable (High Speed HDMITM Cable) to connect this receiver to 2 channels for HDMI compatibility information). Set the display volume to... of the source component, it will not appear if you have assigned the analog/digital jack(s) to switch functions on both the receiver and your display unit. • Since the sound is HDCP-compatible. Use component or composite connections when setting up . No ...

Owner's Manual
Page 211
...Program before you exercise any rights under, or seek any initial request to Customer Support, should your complaint and to the owner's manual enclosed with the unit will not take , and in the U.S.A. Within 40 days of Authorized Service Companies throughout the U.S.A. The ...FOR ANY CONSEQUENTIAL AND/OR INCIDENTAL DAMAGES. You are experiencing, steps you what time period, to have appointed a number of receiving your complaint, Pioneer will investigate the dispute and will take any action. Parts supplied under normal use (a) during the warranty period and the name...
...Program before you exercise any rights under, or seek any initial request to Customer Support, should your complaint and to the owner's manual enclosed with the unit will not take , and in the U.S.A. Within 40 days of Authorized Service Companies throughout the U.S.A. The ...FOR ANY CONSEQUENTIAL AND/OR INCIDENTAL DAMAGES. You are experiencing, steps you what time period, to have appointed a number of receiving your complaint, Pioneer will investigate the dispute and will take any action. Parts supplied under normal use (a) during the warranty period and the name...


