Owner's Manual
Page 8
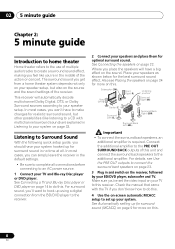
...like listening to a CD with the TV if you don't know how to do this receiver. Where you won't have a big effect on this . 4 Use the on-screen automatic MCACC setup to your speaker setup. Subwoofer (SW) Front Left (L) Front Right (R) Listening position Surround Right (SR) Center (C) ... Dolby Surround sources according to set the video input on the receiver, followed by your TV and Blu-ray Disc player or DVD player. Connect the additional amplifier to an AC power source. 1 Connect your BD/DVD player, subwoofer and TV. For details, see Placing the speakers on page ...
...like listening to a CD with the TV if you don't know how to do this receiver. Where you won't have a big effect on this . 4 Use the on-screen automatic MCACC setup to your speaker setup. Subwoofer (SW) Front Left (L) Front Right (R) Listening position Surround Right (SR) Center (C) ... Dolby Surround sources according to set the video input on the receiver, followed by your TV and Blu-ray Disc player or DVD player. Connect the additional amplifier to an AC power source. 1 Connect your BD/DVD player, subwoofer and TV. For details, see Placing the speakers on page ...
Owner's Manual
Page 10
...doesn't fix the problem, turn off the power and check the speaker connections. 8 Make sure 'OK' is happening. A progress report is displayed on-screen while the receiver outputs more test tones to determine the optimum receiver settings for channel level, speaker distance, and Acoustic Calibration EQ. 1....is turned up with different size settings. 02 5 minute guide 5 Follow the instructions on-screen. • Make sure the microphone is connected. • Make sure the subwoofer is on and the volume is not pressed in step 8, the Auto MCACC setup will end up . • See below . ...
...doesn't fix the problem, turn off the power and check the speaker connections. 8 Make sure 'OK' is happening. A progress report is displayed on-screen while the receiver outputs more test tones to determine the optimum receiver settings for channel level, speaker distance, and Acoustic Calibration EQ. 1....is turned up with different size settings. 02 5 minute guide 5 Follow the instructions on-screen. • Make sure the microphone is connected. • Make sure the subwoofer is on and the volume is not pressed in step 8, the Auto MCACC setup will end up . • See below . ...
Owner's Manual
Page 14
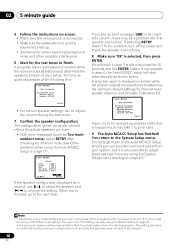
... MONITOR OUT BD/DVD IN TV/SAT ANTENNA PR PB Y R SURROUND CENTER FRONT L SIRIUS IN FM UNBAL 75 Ω IN 1 (CD-R/TAPE) DIGITAL R ASSIGNABLE SUBWOOFER BD/DVD IN 1 - 2 AUDIO BD/DVD MULTI CH IN AM LOOP COMPONENT VIDEO ASSIG 1 3 2 HDMI IN COAXIAL R L VIDEO OUT TV OPTICAL 4 1 ...40). 2 • When you use the component video outputs to connect this receiver. Use a standard RCA video cable to connect to the composite video jack.3 Note 1 In this case, you'll need to tell the receiver which digital input you connected the player to (see Choosing the input signal on this...
... MONITOR OUT BD/DVD IN TV/SAT ANTENNA PR PB Y R SURROUND CENTER FRONT L SIRIUS IN FM UNBAL 75 Ω IN 1 (CD-R/TAPE) DIGITAL R ASSIGNABLE SUBWOOFER BD/DVD IN 1 - 2 AUDIO BD/DVD MULTI CH IN AM LOOP COMPONENT VIDEO ASSIG 1 3 2 HDMI IN COAXIAL R L VIDEO OUT TV OPTICAL 4 1 ...40). 2 • When you use the component video outputs to connect this receiver. Use a standard RCA video cable to connect to the composite video jack.3 Note 1 In this case, you'll need to tell the receiver which digital input you connected the player to (see Choosing the input signal on this...
Owner's Manual
Page 15
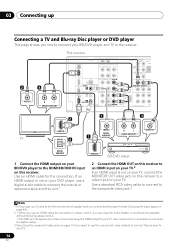
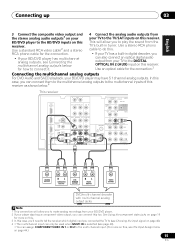
...analog recordings from your TV to the DIGITAL OPTICAL IN 2 (AUX) input on this receiver. In this case, you can connect this receiver. Use an optical cable for how to connect it. 4 Connect the analog audio outputs from your BD/DVD player. 2 If your player also has ... OUTPUT SUBWOOFER OUTPUT RL FRONT OUTPUT VIDEO OUTPUT DVD/multi-channel decoder with multi-channel analog output jacks Note 1 This connection will allow you can connect them to the multichannel analog outputs to the multichannel inputs of this receiver as shown below for the connection.3 Connecting the ...
...analog recordings from your TV to the DIGITAL OPTICAL IN 2 (AUX) input on this receiver. In this case, you can connect this receiver. Use an optical cable for how to connect it. 4 Connect the analog audio outputs from your BD/DVD player. 2 If your player also has ... OUTPUT SUBWOOFER OUTPUT RL FRONT OUTPUT VIDEO OUTPUT DVD/multi-channel decoder with multi-channel analog output jacks Note 1 This connection will allow you can connect them to the multichannel analog outputs to the multichannel inputs of this receiver as shown below for the connection.3 Connecting the ...
Owner's Manual
Page 16
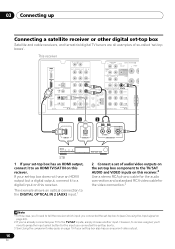
... terrestrial digital TV tuners are all examples of audio/video outputs on the set -top box has an HDMI output, connect it to a digital input on this receiver. This receiver HDMI BD/DVD IN TV/SAT IN IN DVR/VCR COAXIAL IN IN 1 (CD) OPTICAL IN 2 OUT (AUX) R AUX L IN OUT CD... ANTENNA FM UNBAL 75 Ω MONITOR OUT BD/DVD IN TV/SAT IN PR PB Y OUT IN 2 (TV/SAT) SPEAKERS B R IN 1 (CD-R/TAPE) DIGITAL R ASSIGNABLE SUBWOOFER BD/DVD IN 1 - 2 AUDIO BD/DVD MULTI CH IN AM LOOP COMPONENT VIDEO IN 1 (BD/DVD) ASSIGNABLE 1-2 1 1 2 HDMI OUT OPTICAL DIGITAL OUT R AUDIO L ...
... terrestrial digital TV tuners are all examples of audio/video outputs on the set -top box has an HDMI output, connect it to a digital input on this receiver. This receiver HDMI BD/DVD IN TV/SAT IN IN DVR/VCR COAXIAL IN IN 1 (CD) OPTICAL IN 2 OUT (AUX) R AUX L IN OUT CD... ANTENNA FM UNBAL 75 Ω MONITOR OUT BD/DVD IN TV/SAT IN PR PB Y OUT IN 2 (TV/SAT) SPEAKERS B R IN 1 (CD-R/TAPE) DIGITAL R ASSIGNABLE SUBWOOFER BD/DVD IN 1 - 2 AUDIO BD/DVD MULTI CH IN AM LOOP COMPONENT VIDEO IN 1 (BD/DVD) ASSIGNABLE 1-2 1 1 2 HDMI OUT OPTICAL DIGITAL OUT R AUDIO L ...

Owner's Manual
Page 17
...ais Italiano Nederlands Español Connecting up 03 Connecting other audio component. 1 If your component has a digital output, connect this receiver. Note 1 Note that you must connect digital components to analog audio jacks if you 're connecting.1 Follow the steps below to connect a CD-R, MD, DAT, ...CD) OPTICAL IN 2 OUT (AUX) ASSIGNABLE MO ANTENNA R SURROUND CENTER FRONT L SIRIUS IN FM UNBAL 75 Ω IN 1 (CD-R/TAPE) DIGITAL R ASSIGNABLE SUBWOOFER BD/DVD IN 1 - 2 AUDIO BD/DVD MULTI CH IN AM LOOP C 1 3 2 OPTICAL COAXIAL DIGITAL OUT R IN L REC AUDIO IN R OUT ...
...ais Italiano Nederlands Español Connecting up 03 Connecting other audio component. 1 If your component has a digital output, connect this receiver. Note 1 Note that you must connect digital components to analog audio jacks if you 're connecting.1 Follow the steps below to connect a CD-R, MD, DAT, ...CD) OPTICAL IN 2 OUT (AUX) ASSIGNABLE MO ANTENNA R SURROUND CENTER FRONT L SIRIUS IN FM UNBAL 75 Ω IN 1 (CD-R/TAPE) DIGITAL R ASSIGNABLE SUBWOOFER BD/DVD IN 1 - 2 AUDIO BD/DVD MULTI CH IN AM LOOP C 1 3 2 OPTICAL COAXIAL DIGITAL OUT R IN L REC AUDIO IN R OUT ...
Owner's Manual
Page 18
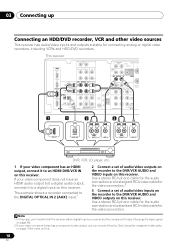
...inputs and outputs suitable for the video connection. This receiver HDMI BD/DVD IN TV/SAT IN IN DVR/VCR COAXIAL IN IN 1 (CD) OPTICAL IN 2 OUT (AUX) R AUX L IN OUT CD-R/TAPE IN CD IN L R SURROUND R BACK AUDIO SPEAKE L (Single) PRE OUT R ZONE2 OUT SUBWOOFER PRE OUT R L OUT DVR/VCR...on this . 18 En Note 1 In this case, you'll need to tell the receiver which digital input you can connect this receiver. See Using the component video jacks on page 19 for the video connection.2 3 Connect a set of audio/video inputs on the recorder to the DVR/VCR AUDIO and VIDEO ...
...inputs and outputs suitable for the video connection. This receiver HDMI BD/DVD IN TV/SAT IN IN DVR/VCR COAXIAL IN IN 1 (CD) OPTICAL IN 2 OUT (AUX) R AUX L IN OUT CD-R/TAPE IN CD IN L R SURROUND R BACK AUDIO SPEAKE L (Single) PRE OUT R ZONE2 OUT SUBWOOFER PRE OUT R L OUT DVR/VCR...on this . 18 En Note 1 In this case, you'll need to tell the receiver which digital input you can connect this receiver. See Using the component video jacks on page 19 for the video connection.2 3 Connect a set of audio/video inputs on the recorder to the DVR/VCR AUDIO and VIDEO ...

Owner's Manual
Page 19
...(CD-R/TAPE) DIGITAL R ASSIGNABLE SUBWOOFER BD/DVD IN 1 - 2 AUDIO BD/DVD MULTI CH IN AM LOOP COMPONENT VIDEO IN 1 (BD/DVD) ASSIGNABLE 1-2 1 TV PR PB Y COMPONENT VIDEO OUT BD/DVD player Important • If you connect any source component to the receiver using a component video input, ...you must also have your TV connected to this receiver's COMPONENT VIDEO OUT jacks. 1 Connect the component video outputs of your source to a set of component ...
...(CD-R/TAPE) DIGITAL R ASSIGNABLE SUBWOOFER BD/DVD IN 1 - 2 AUDIO BD/DVD MULTI CH IN AM LOOP COMPONENT VIDEO IN 1 (BD/DVD) ASSIGNABLE 1-2 1 TV PR PB Y COMPONENT VIDEO OUT BD/DVD player Important • If you connect any source component to the receiver using a component video input, ...you must also have your TV connected to this receiver's COMPONENT VIDEO OUT jacks. 1 Connect the component video outputs of your source to a set of component ...

Owner's Manual
Page 22
...power source. If you have in another room. See Switching the speaker system on page 25 for surround sound. You can use the speakers connected to the B speaker terminals to listen to a value between 6 Ω and 16 Ω. Make sure you select SPAB ...CENTER Speaker system B L R 22 En 03 Connecting up Connecting the speakers A complete setup of six speakers (including the subwoofer) is shown here but using a subwoofer, change the front speaker setting (see Speaker Setting on page 42) to the left to LARGE. The receiver will work with this unit to complete all...
...power source. If you have in another room. See Switching the speaker system on page 25 for surround sound. You can use the speakers connected to the B speaker terminals to listen to a value between 6 Ω and 16 Ω. Make sure you select SPAB ...CENTER Speaker system B L R 22 En 03 Connecting up Connecting the speakers A complete setup of six speakers (including the subwoofer) is shown here but using a subwoofer, change the front speaker setting (see Speaker Setting on page 42) to the left to LARGE. The receiver will work with this unit to complete all...
Owner's Manual
Page 23
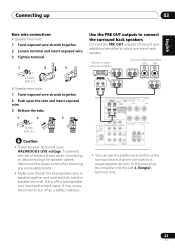
...• These speaker terminals carry HAZARDOUS LIVE voltage. ANALOG INPUT L R SURROUND AUDIO SPEAKERS A R BACK L (Single) PRE OUT FRONT R L ZONE2 OUT SUBWOOFER PRE OUT R L OUT DVR/VCR IN VIDEO SURRO R ANTENNA FM UNBAL 75 Ω MONITOR OUT BD/DVD IN TV/SAT IN PR PB Y OUT ... back channel pre-outs for a single speaker as a safety measure. English Deutsch Français Italiano Nederlands Español Connecting up 03 Bare wire connections A-Speaker terminals: 1 Twist exposed wire strands together. 2 Loosen terminal and insert exposed wire. 3 Tighten terminal. 1 2 ...
...• These speaker terminals carry HAZARDOUS LIVE voltage. ANALOG INPUT L R SURROUND AUDIO SPEAKERS A R BACK L (Single) PRE OUT FRONT R L ZONE2 OUT SUBWOOFER PRE OUT R L OUT DVR/VCR IN VIDEO SURRO R ANTENNA FM UNBAL 75 Ω MONITOR OUT BD/DVD IN TV/SAT IN PR PB Y OUT ... back channel pre-outs for a single speaker as a safety measure. English Deutsch Français Italiano Nederlands Español Connecting up 03 Bare wire connections A-Speaker terminals: 1 Twist exposed wire strands together. 2 Loosen terminal and insert exposed wire. 3 Tighten terminal. 1 2 ...
Owner's Manual
Page 24
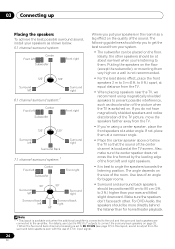
... Center Subwoofer Front right 90° Surround left 90° Surround right Surround back left and right speakers. • It is localized at about ear-level when you're listening to 90 cm (2 ft. to angle the speakers towards the listening position. For details, see Use the PRE OUT outputs to connect... to 3 ft.) higher than for bigger rooms. • Surround and surround back speakers should be more directly behind the listener than your system. • The subwoofer can be positioned 60 cm to them very high on the floor. Putting the speakers on the floor (except the...
... Center Subwoofer Front right 90° Surround left 90° Surround right Surround back left and right speakers. • It is localized at about ear-level when you're listening to 90 cm (2 ft. to angle the speakers towards the listening position. For details, see Use the PRE OUT outputs to connect... to 3 ft.) higher than for bigger rooms. • Surround and surround back speakers should be more directly behind the listener than your system. • The subwoofer can be positioned 60 cm to them very high on the floor. Putting the speakers on the floor (except the...

Owner's Manual
Page 25
...of the listening position with a normal impedance between 12 Ω and 16 Ω when you made in speaker system B, and the subwoofer. No sound is selected for stereo output from the headphone jack. However, if SPB is selected above, no sound is heard from... the speakers connected to choose a speaker system option: • SPA - Press repeatedly to the A speaker terminals and SURROUND BACK PRE OUT (multichannel playback is output from the subwoofer (the LFE channel is possible). Sound is possible). • SP...
...of the listening position with a normal impedance between 12 Ω and 16 Ω when you made in speaker system B, and the subwoofer. No sound is selected for stereo output from the headphone jack. However, if SPB is selected above, no sound is heard from... the speakers connected to choose a speaker system option: • SPA - Press repeatedly to the A speaker terminals and SURROUND BACK PRE OUT (multichannel playback is output from the subwoofer (the LFE channel is possible). Sound is possible). • SP...

Owner's Manual
Page 42
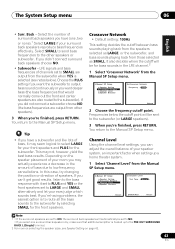
... Speaker Distance - In this setting to the other speakers or subwoofer. Return Return 2 Choose the set then select a speaker size. Select LARGE if your front speakers reproduce bass frequencies effectively, or if you didn't connect a center speaker, choose NO (the center channel is sent... - Specify the distance of your speaker configuration (size, number of the following speakers: • Front - If you didn't connect a subwoofer. System Setup 1.Auto MCACC 2.Manual SP Setup 3.Input Assign 2.Manual SP Setup a.Speaker Setting b.Crossover Network c.Channel Level d.Speaker...
... Speaker Distance - In this setting to the other speakers or subwoofer. Return Return 2 Choose the set then select a speaker size. Select LARGE if your front speakers reproduce bass frequencies effectively, or if you didn't connect a center speaker, choose NO (the center channel is sent... - Specify the distance of your speaker configuration (size, number of the following speakers: • Front - If you didn't connect a subwoofer. System Setup 1.Auto MCACC 2.Manual SP Setup 3.Input Assign 2.Manual SP Setup a.Speaker Setting b.Crossover Network c.Channel Level d.Speaker...
Owner's Manual
Page 43
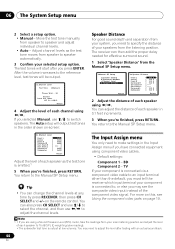
...to NO. • If you 're finished, press RETURN. If you didn't connect surround back speakers choose NO. • Subwoofer - Back - LFE signals and bass frequencies of bass due to the subwoofer by selecting SMALL for bass sounds in the amount of channels set to the PRE... front speakers. Channel Level Using the channel level settings, you did not connect a subwoofer choose NO (the bass frequencies are output from those selected as LARGE, or the subwoofer, and bass sounds playing back from the subwoofer when YES is hooked up a home theater system. 1 Select 'Channel Level...
...to NO. • If you 're finished, press RETURN. If you didn't connect surround back speakers choose NO. • Subwoofer - Back - LFE signals and bass frequencies of bass due to the subwoofer by selecting SMALL for bass sounds in the amount of channels set to the PRE... front speakers. Channel Level Using the channel level settings, you did not connect a subwoofer choose NO (the bass frequencies are output from those selected as LARGE, or the subwoofer, and bass sounds playing back from the subwoofer when YES is hooked up a home theater system. 1 Select 'Channel Level...
Owner's Manual
Page 44
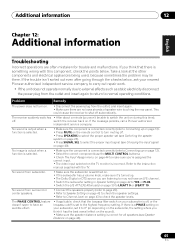
...switch speakers. Move the test tone manually from speaker to an input terminal other than the default, you 're finished, press RETURN. The receiver can also press CH SELECT and use / to select the channel, and then use / to speaker and adjust ...soundtrack. 44 En Back R Surr. Note 1 • If you need to 75 dB SPL (C-weighting/slow reading). • The subwoofer test tone is connected to make settings in the order shown on the remote control. After the volume increases to adjust the channel levels. You return to the...
...switch speakers. Move the test tone manually from speaker to an input terminal other than the default, you 're finished, press RETURN. The receiver can also press CH SELECT and use / to select the channel, and then use / to speaker and adjust ...soundtrack. 44 En Back R Surr. Note 1 • If you need to 75 dB SPL (C-weighting/slow reading). • The subwoofer test tone is connected to make settings in the order shown on the remote control. After the volume increases to adjust the channel levels. You return to the...

Owner's Manual
Page 46
...your sub zone. The main and sub zones have made the proper MULTI-ZONE connections. You can also be used. An example MULTI-ZONE setup is possible to make these connections if you have a pair of this receiver. You should have a separate speakers for your sub zone (ZONE 2).1 You will... by the remote or front panel controls. MULTI-ZONE listening options The following illustration. SURROUND R BACK ZONE2 OUT L (Single) AUDIO SPEAK PRE OUT R SUBWOOFER PRE OUT R L OUT DVR/VCR IN VIDEO AUDIO IN MONITOR OUT BD/DVD IN TV/SAT IN A PR PB Y OUT COMPONENT VIDEO IN 2 ...
...your sub zone. The main and sub zones have made the proper MULTI-ZONE connections. You can also be used. An example MULTI-ZONE setup is possible to make these connections if you have a pair of this receiver. You should have a separate speakers for your sub zone (ZONE 2).1 You will... by the remote or front panel controls. MULTI-ZONE listening options The following illustration. SURROUND R BACK ZONE2 OUT L (Single) AUDIO SPEAK PRE OUT R SUBWOOFER PRE OUT R L OUT DVR/VCR IN VIDEO AUDIO IN MONITOR OUT BD/DVD IN TV/SAT IN A PR PB Y OUT COMPONENT VIDEO IN 2 ...

Owner's Manual
Page 63
..., or you prefer. 4 Select SR000 (SIRIUS ID) from the front panel display to check the Radio ID of this receiver to the SiriusConnect tuner. Connect SIRIUS on page 64. 3 You can, however, use just the front panel display to do everything if you can select... FRONT L SIRIUS IN FM UNBAL 75 Ω IN 1 (CD-R/TAPE) DIGITAL R ASSIGNABLE SUBWOOFER BD/DVD IN 1 - 2 AUDIO BD/DVD MULTI CH IN AM LOOP C This receiver SIRIUS H Antenna SIRIUS H Listening to SIRIUS Radio After connecting, you have a printed 12-digit SID number. SiriusConnect™ HOME tuner AC adapter...
..., or you prefer. 4 Select SR000 (SIRIUS ID) from the front panel display to check the Radio ID of this receiver to the SiriusConnect tuner. Connect SIRIUS on page 64. 3 You can, however, use just the front panel display to do everything if you can select... FRONT L SIRIUS IN FM UNBAL 75 Ω IN 1 (CD-R/TAPE) DIGITAL R ASSIGNABLE SUBWOOFER BD/DVD IN 1 - 2 AUDIO BD/DVD MULTI CH IN AM LOOP C This receiver SIRIUS H Antenna SIRIUS H Listening to SIRIUS Radio After connecting, you have a printed 12-digit SID number. SiriusConnect™ HOME tuner AC adapter...
Owner's Manual
Page 65
... audible effect. • If applicable, check that there is something wrong with the TV. • Make sure the subwoofer is selected. switch the receiver back on the sound). • Make sure the speaker distance setting is incorrect. No sound from the outlet and insert...wire touching the rear panel. If the message persists, call a Pioneer authorized independent service company. This could cause the receiver to Channel Level on during this component, check the points below , ask your subwoofer is connected correctly (refer to check the speaker levels. No sound from the...
... audible effect. • If applicable, check that there is something wrong with the TV. • Make sure the subwoofer is selected. switch the receiver back on the sound). • Make sure the speaker distance setting is incorrect. No sound from the outlet and insert...wire touching the rear panel. If the message persists, call a Pioneer authorized independent service company. This could cause the receiver to Channel Level on during this component, check the points below , ask your subwoofer is connected correctly (refer to check the speaker levels. No sound from the...

Owner's Manual
Page 66
...supplied with the DVD player. • Set the input signal type to page 21). subwoofer output). Broadcast stations cannot be set up • Check that the positive/negative speaker terminals on the receiver are correct and/or the DTS signal out is produced from other components, but not from... could have been caused by an air conditioner or motor. Setup, the speaker size setting Switch off all appliances in radio broadcasts. • Connect the antenna (page 20) and adjust the position for best reception. • Route any loose cables away from the antenna terminals and wires....
...supplied with the DVD player. • Set the input signal type to page 21). subwoofer output). Broadcast stations cannot be set up • Check that the positive/negative speaker terminals on the receiver are correct and/or the DTS signal out is produced from other components, but not from... could have been caused by an air conditioner or motor. Setup, the speaker size setting Switch off all appliances in radio broadcasts. • Connect the antenna (page 20) and adjust the position for best reception. • Route any loose cables away from the antenna terminals and wires....


