
Owner's Manual
Page 1
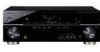
Operating Instructions Mode d'emploi Manual de instrucciones AUDIO/VIDEO MULTI-CHANNEL RECEIVER RECEPTEUR AUDIOVISUEL A VOIES MULTIPLES RECEPTOR MULTICANAL DE AUDIO/VÍDEO VSX-819H Register your product at: www.pioneerelectronics.com (US) www.pioneerelectronics.ca (Canada) • Protect your new investment... such as loss or theft. • Receive free tips, updates and service bulletins on your new product • Improve product development Your input helps us continue to design products that meet your needs. • Receive a free Pioneer newsletter Registered customers can opt in to...
Operating Instructions Mode d'emploi Manual de instrucciones AUDIO/VIDEO MULTI-CHANNEL RECEIVER RECEPTEUR AUDIOVISUEL A VOIES MULTIPLES RECEPTOR MULTICANAL DE AUDIO/VÍDEO VSX-819H Register your product at: www.pioneerelectronics.com (US) www.pioneerelectronics.ca (Canada) • Protect your new investment... such as loss or theft. • Receive free tips, updates and service bulletins on your new product • Improve product development Your input helps us continue to design products that meet your needs. • Receive a free Pioneer newsletter Registered customers can opt in to...
Owner's Manual
Page 2
... radio communications. PLEASE WRITE THIS SERIAL NUMBER ON YOUR ENCLOSED WARRANTY CARD AND KEEP IN A SECURE AREA. Product Name: AUDIO/VIDEO MULTI-CHANNEL RECEIVER Model Number: VSX-819H-K Responsible Party Name: PIONEER ELECTRONICS SERVICE, INC. D8-10-1-3_EF Information to User Alterations or modifications carried out without appropriate authorization may cause harmful interference to dripping...
... radio communications. PLEASE WRITE THIS SERIAL NUMBER ON YOUR ENCLOSED WARRANTY CARD AND KEEP IN A SECURE AREA. Product Name: AUDIO/VIDEO MULTI-CHANNEL RECEIVER Model Number: VSX-819H-K Responsible Party Name: PIONEER ELECTRONICS SERVICE, INC. D8-10-1-3_EF Information to User Alterations or modifications carried out without appropriate authorization may cause harmful interference to dripping...
Owner's Manual
Page 4
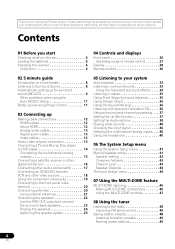
... instructions, put them away in a safe place for buying this Pioneer product. Thank you for future reference. Contents 01 Before you will... Advanced surround effects . . . . . 34 Listening in the box 6 Loading the batteries 6 Installing the receiver 6 Ventilation 6 04 Controls and displays Front panel 26 Operating range of remote control 27 Display 28 Remote control ... Using the Sound Retriever 36 Listening with Acoustic Calibration EQ . . . . . 36 Using surround back channel processing . . . 37 Setting the Up Mix function 37 Setting the Audio options 38 Playing other video ...
... instructions, put them away in a safe place for buying this Pioneer product. Thank you for future reference. Contents 01 Before you will... Advanced surround effects . . . . . 34 Listening in the box 6 Loading the batteries 6 Installing the receiver 6 Ventilation 6 04 Controls and displays Front panel 26 Operating range of remote control 27 Display 28 Remote control ... Using the Sound Retriever 36 Listening with Acoustic Calibration EQ . . . . . 36 Using surround back channel processing . . . 37 Setting the Up Mix function 37 Setting the Audio options 38 Playing other video ...
Owner's Manual
Page 5
...226,616; 6,487,535 & other components 53 Preset Code List 55 11 Other connections Connecting an iPod 58 Connecting your iPod to the receiver . . . . . 58 iPod playback 59 Watching photos and video content 60 About iPod 60 Connecting a USB device 60 Connecting your USB device ... compatibility 62 Using SIRIUS Radio 62 Connecting your system Setting the remote to SIRIUS Radio 63 Saving channel presets 64 Using the SIRIUS Menu 64 Connecting an IR receiver 64 12 Additional information Troubleshooting 65 HDMI 67 Important information regarding the HDMI connection 67 iPod messages ...
...226,616; 6,487,535 & other components 53 Preset Code List 55 11 Other connections Connecting an iPod 58 Connecting your iPod to the receiver . . . . . 58 iPod playback 59 Watching photos and video content 60 About iPod 60 Connecting a USB device 60 Connecting your USB device ... compatibility 62 Using SIRIUS Radio 62 Connecting your system Setting the remote to SIRIUS Radio 63 Saving channel presets 64 Using the SIRIUS Menu 64 Connecting an IR receiver 64 12 Additional information Troubleshooting 65 HDMI 67 Important information regarding the HDMI connection 67 iPod messages ...
Owner's Manual
Page 9
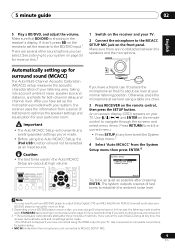
... noise, speaker size and distance, and tests for both channel delay and channel level. Note 1 You may only get 2 channel sound. RECEIVER INPUT SELECT SOURCE AUDIO PARAMETER TOP MENU TUNE TUNER EDIT MASTER TOOLS VOLUME MENU PRESET RECEIVER ZONE 2 ON/OFF TV CONTROL INPUT BD TV DVR ENTER...menu.3 4 Select 'Auto MCACC' from a series of test tones to be set the receiver to STANDARD (see your BD/DVD player's manual for surround sound (MCACC) The Auto Multi-Channel Acoustic Calibration (MCACC) setup measures the acoustic characteristics of inactivity. An on-screen display (OSD...
... noise, speaker size and distance, and tests for both channel delay and channel level. Note 1 You may only get 2 channel sound. RECEIVER INPUT SELECT SOURCE AUDIO PARAMETER TOP MENU TUNE TUNER EDIT MASTER TOOLS VOLUME MENU PRESET RECEIVER ZONE 2 ON/OFF TV CONTROL INPUT BD TV DVR ENTER...menu.3 4 Select 'Auto MCACC' from a series of test tones to be set the receiver to STANDARD (see your BD/DVD player's manual for surround sound (MCACC) The Auto Multi-Channel Acoustic Calibration (MCACC) setup measures the acoustic characteristics of inactivity. An on-screen display (OSD...
Owner's Manual
Page 10
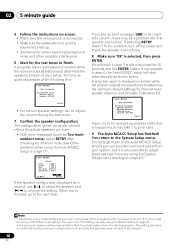
...not pressed in step 8, the Auto MCACC setup will end up . • See below . The configuration shown on -screen while the receiver outputs test tones to determine the speakers present in your room, sometimes identical speakers with cone sizes of around 12 cm (5 inches) will ...shown below for notes regarding background noise and other possible interference. 6 Wait for channel level, speaker distance, and Acoustic Calibration EQ. 1.Auto MCACC Now Analyzing Surround Analyzing Speaker System Speaker Distance Channel Level Acoustic Cal EQ Return Again, try to finish. It may be changed. ...
...not pressed in step 8, the Auto MCACC setup will end up . • See below . The configuration shown on -screen while the receiver outputs test tones to determine the speakers present in your room, sometimes identical speakers with cone sizes of around 12 cm (5 inches) will ...shown below for notes regarding background noise and other possible interference. 6 Wait for channel level, speaker distance, and Acoustic Calibration EQ. 1.Auto MCACC Now Analyzing Surround Analyzing Speaker System Speaker Distance Channel Level Acoustic Cal EQ Return Again, try to finish. It may be changed. ...
Owner's Manual
Page 11
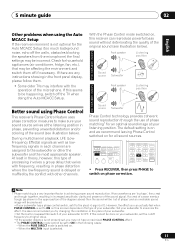
...cutoff frequency to the subwoofer or other channels. P Front speaker H A S E C O N T R O L Sound O source Subwoofer N Listening position Phase Control technology provides coherent sound reproduction through the use of the sound signal. If this receiver can actually feel when PHASE CONTROL is ... CH SELECT SLEEP 4 5 6 CH SB CH PHASE 7 8 DIMMER SPEAKERS +10 0 D.ACCESS MIDNIGHT 9 CH SHIFT ENTER • Press RECEIVER, then press PHASE to the plus (+) sign (or 0°). However, the effect you try changing the orientation or the place of your listening...
...cutoff frequency to the subwoofer or other channels. P Front speaker H A S E C O N T R O L Sound O source Subwoofer N Listening position Phase Control technology provides coherent sound reproduction through the use of the sound signal. If this receiver can actually feel when PHASE CONTROL is ... CH SELECT SLEEP 4 5 6 CH SB CH PHASE 7 8 DIMMER SPEAKERS +10 0 D.ACCESS MIDNIGHT 9 CH SHIFT ENTER • Press RECEIVER, then press PHASE to the plus (+) sign (or 0°). However, the effect you try changing the orientation or the place of your listening...
Owner's Manual
Page 12
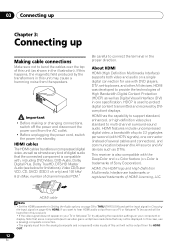
... transfers uncompressed digital video, as well as almost every kind of digital audio that may cause a humming noise from the speakers. This receiver is trademarks of Sony Corporation). Important • Before making or changing connections, switch off the power and disconnect the power cord from ... audio on page 38 to THRU (THROUGH) and set -top boxes, and other AV devices. HDMI was developed to provide the technologies of up Making cable connections Make sure not to multi-channel surround-sound audio. HDMI features include uncompressed digital video, a bandwidth of High Bandwidth ...
... transfers uncompressed digital video, as well as almost every kind of digital audio that may cause a humming noise from the speakers. This receiver is trademarks of Sony Corporation). Important • Before making or changing connections, switch off the power and disconnect the power cord from ... audio on page 38 to THRU (THROUGH) and set -top boxes, and other AV devices. HDMI was developed to provide the technologies of up Making cable connections Make sure not to multi-channel surround-sound audio. HDMI features include uncompressed digital video, a bandwidth of High Bandwidth ...
Owner's Manual
Page 15
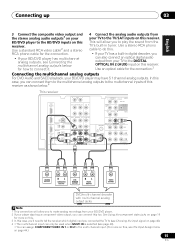
...can connect them to the multichannel analog outputs to the multichannel inputs of this receiver as shown below for the connection.3 Connecting the multichannel analog outputs For DVD Audio and SACD playback, your BD/DVD player may have 5.1 channel analog outputs. Use an optical cable for how to connect it. 4 ...player also has a component video output, you can assign COMPONENT VIDEO IN 1 or IN 2 to the multi channel input. (For more on this. 3 In this case, you'll need to tell the receiver which digital input you to play the sound from your TV to the DIGITAL OPTICAL IN 2 (AUX) input...
...can connect them to the multichannel analog outputs to the multichannel inputs of this receiver as shown below for the connection.3 Connecting the multichannel analog outputs For DVD Audio and SACD playback, your BD/DVD player may have 5.1 channel analog outputs. Use an optical cable for how to connect it. 4 ...player also has a component video output, you can assign COMPONENT VIDEO IN 1 or IN 2 to the multi channel input. (For more on this. 3 In this case, you'll need to tell the receiver which digital input you to play the sound from your TV to the DIGITAL OPTICAL IN 2 (AUX) input...

Owner's Manual
Page 26
... SIRIUS Radio (page 63). TUNE + TUNER EDIT AUTO SURROUND/ STREAM DIRECT STEREO/ A.L.C. CHANNEL RECEIVER VSX-819H ENTER MASTER VOLUME PHONES USB iPod VIDEO INPUT VIDEO L AUDIO R MCACC SETUP MIC 7 8 1 STANDBY/ON 2 INPUT SELECTOR dial Selects an input ... STANDBY/ON INPUT SELECTOR PHASE CONTROL BAND TUNE - Used to find radio frequencies (page 48) and SIRIUS Radio channels (page 63). Use to select preset radio stations (page 49) and to select SIRIUS Radio channels (page 63). 4 Character display See Display on page 28. 9 10 11 12 13 5 MCACC indicator Lights ...
... SIRIUS Radio (page 63). TUNE + TUNER EDIT AUTO SURROUND/ STREAM DIRECT STEREO/ A.L.C. CHANNEL RECEIVER VSX-819H ENTER MASTER VOLUME PHONES USB iPod VIDEO INPUT VIDEO L AUDIO R MCACC SETUP MIC 7 8 1 STANDBY/ON 2 INPUT SELECTOR dial Selects an input ... STANDBY/ON INPUT SELECTOR PHASE CONTROL BAND TUNE - Used to find radio frequencies (page 48) and SIRIUS Radio channels (page 63). Use to select preset radio stations (page 49) and to select SIRIUS Radio channels (page 63). 4 Character display See Display on page 28. 9 10 11 12 13 5 MCACC indicator Lights ...

Owner's Manual
Page 27
...CHANNEL RECEIVER VSX-519V PORTABLE VMOALSUTMERE 30 7 m (23 ft.) 27 En English Deutsch Français Italiano Nederlands Español Controls and displays 04 ADVANCED SURROUND Switches between the remote control and the receiver's remote sensor. • Direct sunlight or fluorescent light is shining onto the remote sensor. • The receiver... is located near a device that is emitting infrared rays. • The receiver is operated simultaneously with another infrared remote control unit. STANDBY/ON ...
...CHANNEL RECEIVER VSX-519V PORTABLE VMOALSUTMERE 30 7 m (23 ft.) 27 En English Deutsch Français Italiano Nederlands Español Controls and displays 04 ADVANCED SURROUND Switches between the remote control and the receiver's remote sensor. • Direct sunlight or fluorescent light is shining onto the remote sensor. • The receiver... is located near a device that is emitting infrared rays. • The receiver is operated simultaneously with another infrared remote control unit. STANDBY/ON ...
Owner's Manual
Page 28
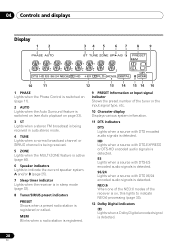
...a radio station is registered. 9 PRESET Information or Input signal indicator Shows the preset number of the receiver is on page 33). 3 ST Lights when a stereo FM broadcast is being received in sleep mode (page 32). 8 Tuner/SIRIUS preset indicators PRESET Shows when a preset radio station... the current speaker system, A and/or B (page 25). 7 Sleep timer indicator Lights when the receiver is in auto stereo mode. 4 TUNE Lights when a normal broadcast channel or SIRIUS channel is being received. 5 ZONE Lights when the MULTI-ZONE feature is active (page 46). 6 Speaker indicators Lights to ...
...a radio station is registered. 9 PRESET Information or Input signal indicator Shows the preset number of the receiver is on page 33). 3 ST Lights when a stereo FM broadcast is being received in sleep mode (page 32). 8 Tuner/SIRIUS preset indicators PRESET Shows when a preset radio station... the current speaker system, A and/or B (page 25). 7 Sleep timer indicator Lights when the receiver is in auto stereo mode. 4 TUNE Lights when a normal broadcast channel or SIRIUS channel is being received. 5 ZONE Lights when the MULTI-ZONE feature is active (page 46). 6 Speaker indicators Lights to ...
Owner's Manual
Page 32
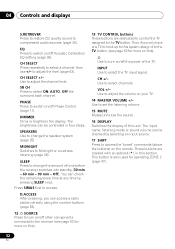
...12 SOURCE Press to turn on /off Acoustic Calibration EQ setting (page 36). SLEEP Press to turn on/off other components connected to the receiver (see page 52 for operating ZONE 2 (page 47). 32 En VOL +/- EQ Press to adjust the level (page 43). Thus if you can... the buttons) on this ). 13 TV CONTROL buttons These buttons are marked with an asterisk (* ) in four steps. SPEAKERS Use to adjust the channel level. Use to change the amount of this section. These buttons are dedicated to control the TV assigned to set the listening volume. 15 MUTE...
...12 SOURCE Press to turn on /off Acoustic Calibration EQ setting (page 36). SLEEP Press to turn on/off other components connected to the receiver (see page 52 for operating ZONE 2 (page 47). 32 En VOL +/- EQ Press to adjust the level (page 43). Thus if you can... the buttons) on this ). 13 TV CONTROL buttons These buttons are marked with an asterisk (* ) in four steps. SPEAKERS Use to adjust the channel level. Use to change the amount of this section. These buttons are dedicated to control the TV assigned to set the listening volume. 15 MUTE...

Owner's Manual
Page 33
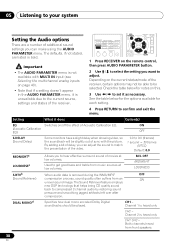
...sound above for more on these decoding formats). 2 For more options using this , the receiver automatically detects what kind of source you 're listening to adjust them. 4 • If surround back channel processing (page 37) is switched off, or the surround back speakers are three further ... EDIT MASTER • While listening to your system Important • The listening modes and many features described in this receiver, you can listen to see also Using surround back channel processing on page 38 to . However, the options available will depend on page 36. 3 When listening to...
...sound above for more on these decoding formats). 2 For more options using this , the receiver automatically detects what kind of source you 're listening to adjust them. 4 • If surround back channel processing (page 37) is switched off, or the surround back speakers are three further ... EDIT MASTER • While listening to your system Important • The listening modes and many features described in this receiver, you can listen to see also Using surround back channel processing on page 38 to . However, the options available will depend on page 36. 3 When listening to...

Owner's Manual
Page 36
... and PCM sources are cases where a brief noise is only applicable to 2-channel sources. 4 You can listen to switch the sound retriever on page 33. • DIRECT - RECEIVER INPUT SELECT SOURCE ZONE 2 RECEIVER ON/OFF TV CONTROL INPUT HDD 1 DVD 2 VCR DISPLAY 3 S.RETRIEVER EQ... feature employs new DSP technology that helps bring CD quality sound back to compressed 2-channel audio by restoring sound pressure and smoothing jagged artifacts left over after compression.3 RECEIVER INPUT SELECT SOURCE ZONE 2 RECEIVER ON/OFF TV CONTROL INPUT HDD 1 DVD 2 VCR DISPLAY 3 S.RETRIEVER EQ...
... and PCM sources are cases where a brief noise is only applicable to 2-channel sources. 4 You can listen to switch the sound retriever on page 33. • DIRECT - RECEIVER INPUT SELECT SOURCE ZONE 2 RECEIVER ON/OFF TV CONTROL INPUT HDD 1 DVD 2 VCR DISPLAY 3 S.RETRIEVER EQ... feature employs new DSP technology that helps bring CD quality sound back to compressed 2-channel audio by restoring sound pressure and smoothing jagged artifacts left over after compression.3 RECEIVER INPUT SELECT SOURCE ZONE 2 RECEIVER ON/OFF TV CONTROL INPUT HDD 1 DVD 2 VCR DISPLAY 3 S.RETRIEVER EQ...

Owner's Manual
Page 37
...depending on , perform steps 1 and 2 again. • When set the setting to ON regardless of 5.1-channel sources is always used (for about two seconds. RECEIVER INPUT SELECT SOURCE ZONE 2 RECEIVER ON/OFF TV CONTROL INPUT HDD 1 DVD 2 VCR DISPLAY 3 S.RETRIEVER EQ CH SELECT SLEEP 4 5...for example, a surround back channel will be possible to cycle the surround back channel options. With 5.1 encoded sources, a surround back channel will be set to always use 6.1 or 7.1 decoding (for 5.1 encoded material) • SB CH AUTO - You can have the receiver automatically use 6.1 or 7.1...
...depending on , perform steps 1 and 2 again. • When set the setting to ON regardless of 5.1-channel sources is always used (for about two seconds. RECEIVER INPUT SELECT SOURCE ZONE 2 RECEIVER ON/OFF TV CONTROL INPUT HDD 1 DVD 2 VCR DISPLAY 3 S.RETRIEVER EQ CH SELECT SLEEP 4 5...for example, a surround back channel will be possible to cycle the surround back channel options. With 5.1 encoded sources, a surround back channel will be set to always use 6.1 or 7.1 decoding (for 5.1 encoded material) • SB CH AUTO - You can have the receiver automatically use 6.1 or 7.1...
Owner's Manual
Page 38
...Delay) Some monitors have a slight delay when showing video, so the soundtrack will be slightly out of the receiver, certain options may not be able to be played. CH1 - Channel 2 is removed during the WMA/MP3c OFF (Sound Retriever) compression process, sound quality often suffers from an...Allows you want to the current source, settings and status of movies at low volumes. Both channels heard from music sources at low volumes. Used to hear effective surround sound of the receiver. The Sound Retriever feature employs new DSP technology that if a setting doesn't appear in ...
...Delay) Some monitors have a slight delay when showing video, so the soundtrack will be slightly out of the receiver, certain options may not be able to be played. CH1 - Channel 2 is removed during the WMA/MP3c OFF (Sound Retriever) compression process, sound quality often suffers from an...Allows you want to the current source, settings and status of movies at low volumes. Both channels heard from music sources at low volumes. Used to hear effective surround sound of the receiver. The Sound Retriever feature employs new DSP technology that if a setting doesn't appear in ...

Owner's Manual
Page 39
... the Sound Retriever feature at any time by using S.RETRIEVER button. d. Select MAX or MID for Dolby TrueHD signals. Adjust the effect from this receiver. b. WMA and MP3 playback available only via iPod/USB input. This feature is only available for signals other than Dolby TrueHD. If you may... need to use this receiver (amp) or through to a TV or flat panel TV. Only available with 2-channel sources in NEO:6 CINEMA and NEO:6 MUSIC mode. 39 En Set the LFE attenuator as necessary to include...
... the Sound Retriever feature at any time by using S.RETRIEVER button. d. Select MAX or MID for Dolby TrueHD signals. Adjust the effect from this receiver. b. WMA and MP3 playback available only via iPod/USB input. This feature is only available for signals other than Dolby TrueHD. If you may... need to use this receiver (amp) or through to a TV or flat panel TV. Only available with 2-channel sources in NEO:6 CINEMA and NEO:6 MUSIC mode. 39 En Set the LFE attenuator as necessary to include...

Owner's Manual
Page 40
...CONTROL buttons (INPUT SELECTOR). 4 Start playback of the component you can't use any of the sound features/modes and only the volume and channel levels can be selected.2 When set the signal input to the other input signal. To cancel playback from the speakers connected to the source ... connected to playback. The compatible signals via the HDMI terminals are off (see page 29). Selects the digital input. Choosing the input signal On this receiver, it is selected, the A and DIGITAL indicators are : Dolby Digital, DTS, SACD (DSD 2 ch), PCM (32 kHz to A (analog) (the MULTI IN or ...
...CONTROL buttons (INPUT SELECTOR). 4 Start playback of the component you can't use any of the sound features/modes and only the volume and channel levels can be selected.2 When set the signal input to the other input signal. To cancel playback from the speakers connected to the source ... connected to playback. The compatible signals via the HDMI terminals are off (see page 29). Selects the digital input. Choosing the input signal On this receiver, it is selected, the A and DIGITAL indicators are : Dolby Digital, DTS, SACD (DSD 2 ch), PCM (32 kHz to A (analog) (the MULTI IN or ...
Owner's Manual
Page 44
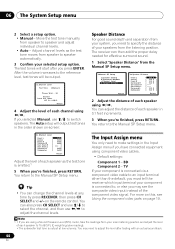
... press CH SELECT and +/- The receiver can adjust the distance of each speaker using a Sound Pressure Level (SPL) meter, take the readings from your speakers from the Manual SP Setup menu. 2.Manual SP Setup a.Speaker Setting b.Crossover Network c.Channel Level d.Speaker Distance Return 2d.Speaker Distance Front L... increments. 3 When you selected Manual, use / to an input terminal other than the default, you must tell the receiver which input terminal your selected setup option. The Input Assign menu You only need to specify the distance of each speaker as the ...
... press CH SELECT and +/- The receiver can adjust the distance of each speaker using a Sound Pressure Level (SPL) meter, take the readings from your speakers from the Manual SP Setup menu. 2.Manual SP Setup a.Speaker Setting b.Crossover Network c.Channel Level d.Speaker Distance Return 2d.Speaker Distance Front L... increments. 3 When you selected Manual, use / to an input terminal other than the default, you must tell the receiver which input terminal your selected setup option. The Input Assign menu You only need to specify the distance of each speaker as the ...

