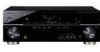
Owner's Manual
Page 4
... read through these operating instructions so you start Checking what's in the box 6 Loading the batteries 6 Installing the receiver 6 Ventilation 6 04 Controls and displays Front panel 26 Operating range of remote control 27 Display 28 Remote control 30...and Blu-ray Disc player or DVD player 14 Connecting the multichannel analog outputs 15 Connecting a satellite receiver or other digital set-top box 16 Connecting other audio components 17 Connecting an HDD/DVD recorder, VCR and other sources... Better sound using Phase Control 11 03 Connecting up for buying this Pioneer product.
... read through these operating instructions so you start Checking what's in the box 6 Loading the batteries 6 Installing the receiver 6 Ventilation 6 04 Controls and displays Front panel 26 Operating range of remote control 27 Display 28 Remote control 30...and Blu-ray Disc player or DVD player 14 Connecting the multichannel analog outputs 15 Connecting a satellite receiver or other digital set-top box 16 Connecting other audio components 17 Connecting an HDD/DVD recorder, VCR and other sources... Better sound using Phase Control 11 03 Connecting up for buying this Pioneer product.
Owner's Manual
Page 5
..., Pro Logic, Surround EX and the double-D symbol are trademarks of your system Setting the remote to SIRIUS Radio 63 Saving channel presets 64 Using the SIRIUS Menu 64 Connecting an IR receiver 64 12 Additional information Troubleshooting 65 HDMI 67 Important information regarding the HDMI connection 67...226,616; 6,487,535 & other components 53 Preset Code List 55 11 Other connections Connecting an iPod 58 Connecting your iPod to the receiver . . . . . 58 iPod playback 59 Watching photos and video content 60 About iPod 60 Connecting a USB device 60 Connecting your USB device to...
..., Pro Logic, Surround EX and the double-D symbol are trademarks of your system Setting the remote to SIRIUS Radio 63 Saving channel presets 64 Using the SIRIUS Menu 64 Connecting an IR receiver 64 12 Additional information Troubleshooting 65 HDMI 67 Important information regarding the HDMI connection 67...226,616; 6,487,535 & other components 53 Preset Code List 55 11 Other connections Connecting an iPod 58 Connecting your iPod to the receiver . . . . . 58 iPod playback 59 Watching photos and video content 60 About iPod 60 Connecting a USB device 60 Connecting your USB device to...
Owner's Manual
Page 8
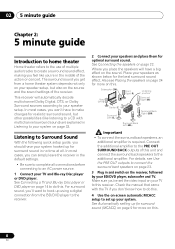
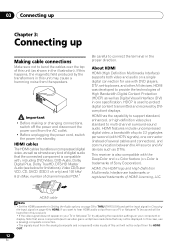
See Connecting a TV and Blu-ray Disc player or DVD player on the receiver, followed by your BD/DVD player, subwoofer and TV. Where you 've set up using a digital connection from a home theater system depends not only on your speaker setup, but other possibilities (like listening to a CD with... the TV if you can simply leave the receiver in no time at all connections before connecting to...
See Connecting a TV and Blu-ray Disc player or DVD player on the receiver, followed by your BD/DVD player, subwoofer and TV. Where you 've set up using a digital connection from a home theater system depends not only on your speaker setup, but other possibilities (like listening to a CD with... the TV if you can simply leave the receiver in no time at all connections before connecting to...
Owner's Manual
Page 9
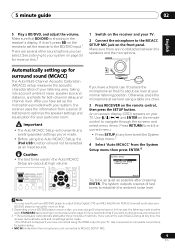
... Setup will overwrite any existing speaker settings you have connected using a table or a chair. 3 Press RECEIVER on the front panel. Caution • The test tones used in the receiver's display. An on-screen display (OSD) appears on the remote to set the receiver to MCACC SETUP MIC. 9 En...then press the SETUP button. ENTER MASTER VOLUME Automatically setting up the microphone provided with your TV. 2 Connect the microphone to establish the ambient noise level. Use and ENTER on the receiver and your system, the receiver uses the information from the System Setup menu then...
... Setup will overwrite any existing speaker settings you have connected using a table or a chair. 3 Press RECEIVER on the front panel. Caution • The test tones used in the receiver's display. An on-screen display (OSD) appears on the remote to set the receiver to MCACC SETUP MIC. 9 En...then press the SETUP button. ENTER MASTER VOLUME Automatically setting up the microphone provided with your TV. 2 Connect the microphone to establish the ambient noise level. Use and ENTER on the receiver and your system, the receiver uses the information from the System Setup menu then...
Owner's Manual
Page 10
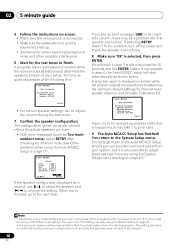
... using the System Setup menu (starting on page 41).1 Note 1 • Depending on -screen while the receiver outputs more test tones to determine the optimum receiver settings for channel level, speaker distance, and Acoustic Calibration EQ. 1.Auto MCACC Now Analyzing Surround Analyzing Speaker System Speaker Distance Channel Level Acoustic Cal EQ Return ...
... using the System Setup menu (starting on page 41).1 Note 1 • Depending on -screen while the receiver outputs more test tones to determine the optimum receiver settings for channel level, speaker distance, and Acoustic Calibration EQ. 1.Auto MCACC Now Analyzing Surround Analyzing Speaker System Speaker Distance Channel Level Acoustic Cal EQ Return ...
Owner's Manual
Page 11
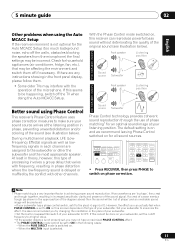
...be done on . - It is also recommended you may interfere with the operation of the sound (see illustration below ). If this receiver depends on the type of your subwoofer. • Set the built-in phase, preventing unwanted distortion and/or coloring of the microphone. P H Front speaker A S E C O N ... DIMMER SPEAKERS +10 0 D.ACCESS MIDNIGHT 9 CH SHIFT ENTER • Press RECEIVER, then press PHASE to make sure your sound source arrives at your subwoofer has a phase control switch, set it to ON in phase distortion where the low-frequency sound is delayed or ...
...be done on . - It is also recommended you may interfere with the operation of the sound (see illustration below ). If this receiver depends on the type of your subwoofer. • Set the built-in phase, preventing unwanted distortion and/or coloring of the microphone. P H Front speaker A S E C O N ... DIMMER SPEAKERS +10 0 D.ACCESS MIDNIGHT 9 CH SHIFT ENTER • Press RECEIVER, then press PHASE to make sure your sound source arrives at your subwoofer has a phase control switch, set it to ON in phase distortion where the low-frequency sound is delayed or ...
Owner's Manual
Page 12
.... • The signals input from the analog (composite and component) video inputs of several cables and connectors), and communication between the AV source and AV devices such as shown in the illustration). 03 Connecting up Chapter 3: Connecting up to 2.2 gigabytes per second (with the DeepColor and ...components (such as video game units) have resolutions that the connected component is used to protect digital content transmitted and received by the transformers in Setting the Audio options on page 38 to provide the technologies of HDMI Licensing, LLC. HDMI, the HDMI logo and...
.... • The signals input from the analog (composite and component) video inputs of several cables and connectors), and communication between the AV source and AV devices such as shown in the illustration). 03 Connecting up Chapter 3: Connecting up to 2.2 gigabytes per second (with the DeepColor and ...components (such as video game units) have resolutions that the connected component is used to protect digital content transmitted and received by the transformers in Setting the Audio options on page 38 to provide the technologies of HDMI Licensing, LLC. HDMI, the HDMI logo and...
Owner's Manual
Page 16
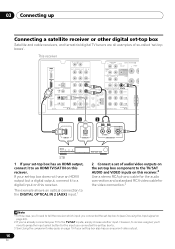
... The example shows an optical connection to the DIGITAL OPTICAL IN 2 (AUX) input.1 2 Connect a set of so-called 'set-top boxes'. However, to receive a signal, you'll need to tell the receiver which input you connected the set-top box to (see Choosing the input signal on this case, you'll need to press... RCA phono cable for the audio connection and a standard RCA video cable for the input you connected the set-top box to. 3 See Using the component video jacks on this receiver. If your set-top box does not have an HDMI output but a digital output, connect it to an HDMI TV/SAT...
... The example shows an optical connection to the DIGITAL OPTICAL IN 2 (AUX) input.1 2 Connect a set of so-called 'set-top boxes'. However, to receive a signal, you'll need to tell the receiver which input you connected the set-top box to (see Choosing the input signal on this case, you'll need to press... RCA phono cable for the audio connection and a standard RCA video cable for the input you connected the set-top box to. 3 See Using the component video jacks on this receiver. If your set-top box does not have an HDMI output but a digital output, connect it to an HDMI TV/SAT...

Owner's Manual
Page 17
... must connect digital components to analog audio jacks if you want to record to/from digital components (like an MD) to/from a digital component. This receiver R AUX L IN HDMI BD/DVD IN OUT CD-R/TAPE IN CD IN ZO OU L TV/SAT IN IR IN R OUT DVR/VCR IN TV/SAT... a digital output, or if you want to record from analog components. 17 En The example shows an analog connection to a set of spare audio inputs on this to a digital input on the receiver as shown. The example shows an optical connection to the DIGITAL OPTICAL IN 1 (CD-R/TAPE) input. 2 If necessary, connect...
... must connect digital components to analog audio jacks if you want to record to/from digital components (like an MD) to/from a digital component. This receiver R AUX L IN HDMI BD/DVD IN OUT CD-R/TAPE IN CD IN ZO OU L TV/SAT IN IR IN R OUT DVR/VCR IN TV/SAT... a digital output, or if you want to record from analog components. 17 En The example shows an analog connection to a set of spare audio inputs on this to a digital input on the receiver as shown. The example shows an optical connection to the DIGITAL OPTICAL IN 1 (CD-R/TAPE) input. 2 If necessary, connect...
Owner's Manual
Page 18
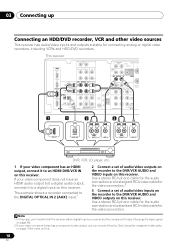
...Connecting an HDD/DVD recorder, VCR and other video sources This receiver has audio/video inputs and outputs suitable for the video connection. See Using the component video jacks on page 19 for the video connection.2 3 Connect a set of audio/video inputs on the recorder to (see Choosing the... to the DVR/VCR AUDIO and VIDEO outputs on this receiver. The example shows a recorder connected to the DIGITAL OPTICAL IN 2 (AUX) input.1 2 Connect a set of audio/video outputs on the recorder to a digital input on this receiver. This receiver HDMI BD/DVD IN TV/SAT IN IN DVR/VCR ...
...Connecting an HDD/DVD recorder, VCR and other video sources This receiver has audio/video inputs and outputs suitable for the video connection. See Using the component video jacks on page 19 for the video connection.2 3 Connect a set of audio/video inputs on the recorder to (see Choosing the... to the DVR/VCR AUDIO and VIDEO outputs on this receiver. The example shows a recorder connected to the DIGITAL OPTICAL IN 2 (AUX) input.1 2 Connect a set of audio/video outputs on the recorder to a digital input on this receiver. This receiver HDMI BD/DVD IN TV/SAT IN IN DVR/VCR ...

Owner's Manual
Page 19
See the manuals that came with your source to a set of component video inputs on this receiver to the component video inputs on page 44 for the connection. 2 If necessary, assign the component video inputs to check whether they are both compatible) ... COMPONENT VIDEO IN 1 (BD/DVD) ASSIGNABLE 1-2 1 TV PR PB Y COMPONENT VIDEO OUT BD/DVD player Important • If you connect any source component to the receiver using a component video input, you didn't connect according to composite video. Use a three-way component video cable. 19 En A further advantage (if your TV or...
See the manuals that came with your source to a set of component video inputs on this receiver to the component video inputs on page 44 for the connection. 2 If necessary, assign the component video inputs to check whether they are both compatible) ... COMPONENT VIDEO IN 1 (BD/DVD) ASSIGNABLE 1-2 1 TV PR PB Y COMPONENT VIDEO OUT BD/DVD player Important • If you connect any source component to the receiver using a component video input, you didn't connect according to composite video. Use a three-way component video cable. 19 En A further advantage (if your TV or...

Owner's Manual
Page 22
..., and a complete setup is shown here but using a subwoofer, change the front speaker setting (see Speaker Setting on page 25. However, note that only the front speakers are set to review Placing the speakers on page 24 when placing the speakers in the manner shown below.../DVD) D IN ASSIGNABLE COMPONENT VIDEO 1-2 CENTER Speaker system B L R 22 En Be sure to complete all connections before connecting this setup. The receiver will vary. You can use the speakers connected to the B speaker terminals to listen to LARGE. See Switching the speaker system on the left to...
..., and a complete setup is shown here but using a subwoofer, change the front speaker setting (see Speaker Setting on page 25. However, note that only the front speakers are set to review Placing the speakers on page 24 when placing the speakers in the manner shown below.../DVD) D IN ASSIGNABLE COMPONENT VIDEO 1-2 CENTER Speaker system B L R 22 En Be sure to complete all connections before connecting this setup. The receiver will vary. You can use the speakers connected to the B speaker terminals to listen to LARGE. See Switching the speaker system on the left to...

Owner's Manual
Page 26
... 28. 9 10 11 12 13 5 MCACC indicator Lights when Acoustic Calibration EQ (page 36) is on (Acoustic Calibration EQ is automatically set to on page 33) and Stream Direct playback. CHANNEL RECEIVER VSX-819H ENTER MASTER VOLUME PHONES USB iPod VIDEO INPUT VIDEO L AUDIO R MCACC SETUP MIC 7 8 1 STANDBY/ON 2 INPUT SELECTOR dial Selects...
... 28. 9 10 11 12 13 5 MCACC indicator Lights when Acoustic Calibration EQ (page 36) is on (Acoustic Calibration EQ is automatically set to on page 33) and Stream Direct playback. CHANNEL RECEIVER VSX-819H ENTER MASTER VOLUME PHONES USB iPod VIDEO INPUT VIDEO L AUDIO R MCACC SETUP MIC 7 8 1 STANDBY/ON 2 INPUT SELECTOR dial Selects...

Owner's Manual
Page 30
... page 51). 6 SIGNAL SEL Use to set up surround sound (page 41) or Audio parameters (page 38). 4 ZONE 2 ON/OFF Switches zone 2 of the multi-zone function between the various surround modes (page 34). STANDARD Press for the most accurate reproduction of your system on . 3 RECEIVER Switches the remote to control the...
... page 51). 6 SIGNAL SEL Use to set up surround sound (page 41) or Audio parameters (page 38). 4 ZONE 2 ON/OFF Switches zone 2 of the multi-zone function between the various surround modes (page 34). STANDARD Press for the most accurate reproduction of your system on . 3 RECEIVER Switches the remote to control the...

Owner's Manual
Page 31
...the corresponding MULTI CONTROL button (BD, TV, etc.). BAND Switches between the iPod controls and the receiver controls (page 60). 9 TUNE /, PRESET /), ENTER Use the arrow buttons when setting up your surround sound system (page 41). Use the TUNE / buttons can be ...other buttons that can be used to find radio frequencies (page 48) and the PRESET / buttons can be accessed after the RECEIVER button is set to access: iPod CTRL Switches between AM, FM ST (stereo) and FM MONO radio bands (page 48). RETURN Confirm and exit ...
...the corresponding MULTI CONTROL button (BD, TV, etc.). BAND Switches between the iPod controls and the receiver controls (page 60). 9 TUNE /, PRESET /), ENTER Use the arrow buttons when setting up your surround sound system (page 41). Use the TUNE / buttons can be ...other buttons that can be used to find radio frequencies (page 48) and the PRESET / buttons can be accessed after the RECEIVER button is set to access: iPod CTRL Switches between AM, FM ST (stereo) and FM MONO radio bands (page 48). RETURN Confirm and exit ...
Owner's Manual
Page 32
... source. 17 SHIFT Press to switch on /off Phase Control (page 11). The brightness can be controlled in this ). Use to the receiver (see page 52 for more on your TV. 14 MASTER VOLUME +/- This button is also used for more on this section. Use to Midnight or...are marked with an asterisk (* ) in four steps. Use to adjust the channel level. Use to set the listening volume. 15 MUTE Mutes/unmutes the sound. 16 DISPLAY Switches the display of time before the receiver switches into standby (30 min - 60 min - 90 min - 04 Controls and displays S.RETRIEVER ...
... source. 17 SHIFT Press to switch on /off Phase Control (page 11). The brightness can be controlled in this ). Use to the receiver (see page 52 for more on your TV. 14 MASTER VOLUME +/- This button is also used for more on this section. Use to Midnight or...are marked with an asterisk (* ) in four steps. Use to adjust the channel level. Use to set the listening volume. 15 MUTE Mutes/unmutes the sound. 16 DISPLAY Switches the display of time before the receiver switches into standby (30 min - 60 min - 90 min - 04 Controls and displays S.RETRIEVER ...

Owner's Manual
Page 33
Press repeatedly until AUTO SURROUND shows briefly in the display (it will automatically be available depending on the current source, setting and status of the receiver. If the source is Dolby Digital, DTS, or Dolby Surround encoded, the proper decoding format will then show the ...: • DOLBY PLII MOVIE - When the surround back speaker is switched off, or the surround back speakers are set to 2-channel sources in surround sound. With this, the receiver automatically detects what kind of a source. AUTO/ STEREO/ DIRECT A.L.C. Up to 5.1 channel sound, especially suited to ...
Press repeatedly until AUTO SURROUND shows briefly in the display (it will automatically be available depending on the current source, setting and status of the receiver. If the source is Dolby Digital, DTS, or Dolby Surround encoded, the proper decoding format will then show the ...: • DOLBY PLII MOVIE - When the surround back speaker is switched off, or the surround back speakers are set to 2-channel sources in surround sound. With this, the receiver automatically detects what kind of a source. AUTO/ STEREO/ DIRECT A.L.C. Up to 5.1 channel sound, especially suited to ...

Owner's Manual
Page 36
...4 5 6 CH SB CH PHASE 7 8 MIDNIGHT 9 CH • While listening to a source, press RECEIVER, then press EQ to the settings made in the Surround Setup (speaker setting, channel level, speaker distance), as well as with headphones. 36 En Sources are heard according to switch the ... S.RETRIEVER EQ CH SELECT SLEEP 4 5 6 CH SB CH PHASE 7 8 MIDNIGHT 9 CH • Press RECEIVER, then press S.RETRIEVER to sources using the Acoustic Calibration Equalization set in the signal. • PURE DIRECT - The MCACC indicator on the front panel lights when Acoustic Calibration EQ ...
...4 5 6 CH SB CH PHASE 7 8 MIDNIGHT 9 CH • While listening to a source, press RECEIVER, then press EQ to the settings made in the Surround Setup (speaker setting, channel level, speaker distance), as well as with headphones. 36 En Sources are heard according to switch the ... S.RETRIEVER EQ CH SELECT SLEEP 4 5 6 CH SB CH PHASE 7 8 MIDNIGHT 9 CH • Press RECEIVER, then press S.RETRIEVER to sources using the Acoustic Calibration Equalization set in the signal. • PURE DIRECT - The MCACC indicator on the front panel lights when Acoustic Calibration EQ ...

Owner's Manual
Page 37
... indicator on , perform steps 1 and 2 again. • When set up as follows: • SB CH ON - 6.1 or 7.1 decoding is output from the surround back speakers SL SR ? RECEIVER INPUT SELECT SOURCE ZONE 2 RECEIVER ON/OFF TV CONTROL INPUT HDD 1 DVD 2 VCR DISPLAY 3 S.RETRIEVER... EQ CH SELECT SLEEP 4 5 6 CH SB CH PHASE 7 8 MIDNIGHT 9 CH Setting the Up Mix function In a 7.1-channel surround system with 5.1...
... indicator on , perform steps 1 and 2 again. • When set up as follows: • SB CH ON - 6.1 or 7.1 decoding is output from the surround back speakers SL SR ? RECEIVER INPUT SELECT SOURCE ZONE 2 RECEIVER ON/OFF TV CONTROL INPUT HDD 1 DVD 2 VCR DISPLAY 3 S.RETRIEVER... EQ CH SELECT SLEEP 4 5 6 CH SB CH PHASE 7 8 MIDNIGHT 9 CH Setting the Up Mix function In a 7.1-channel surround system with 5.1...
Owner's Manual
Page 38
...the video. 0.0 to 9.0 (frames) 1 second = 30 frames (NTSC) Default: 0.0 MIDNIGHTa LOUDNESSa Allows you want to the current source, settings and status of the receiver, certain options may not be played. Used to get good bass and treble from an ON uneven sound image. M/L OFF MIDNIGHT LOUDNESS S.RTVb.../OFF TV CONTROL INPUT BD TV DVR ENTER HOME MENU SETUP iPod CTRL CATEGORY TUNE BAND RETURN 1 Press RECEIVER on the current status/mode of the receiver. Setting What it is not available with the picture. By adding a bit of delay, you can make using the AUDIO PARAMETER menu...
...the video. 0.0 to 9.0 (frames) 1 second = 30 frames (NTSC) Default: 0.0 MIDNIGHTa LOUDNESSa Allows you want to the current source, settings and status of the receiver, certain options may not be played. Used to get good bass and treble from an ON uneven sound image. M/L OFF MIDNIGHT LOUDNESS S.RTVb.../OFF TV CONTROL INPUT BD TV DVR ENTER HOME MENU SETUP iPod CTRL CATEGORY TUNE BAND RETURN 1 Press RECEIVER on the current status/mode of the receiver. Setting What it is not available with the picture. By adding a bit of delay, you can make using the AUDIO PARAMETER menu...


