
Operating Instructions
Page 1
AUDIO/VIDEO MULTI-CHANNEL RECEIVER VSX-816-S/-K Operating Instructions
AUDIO/VIDEO MULTI-CHANNEL RECEIVER VSX-816-S/-K Operating Instructions

Operating Instructions
Page 2
...uses, and can radiate radio frequency energy and, if not installed and used until a replacement cover is obtained. Reorient or relocate the receiving antenna. - Connect the equipment into any doubt, please consult a qualified electrician. D8-10-1-2_En Information to User Alteration or modifications ...plug, proceed as radios and televisions, use shielded cables and connectors for your local dealer. Increase the separation between the equipment and receiver. - A 10 amp fuse is fitted in this appliance may be of sufficient magnitude to constitute a risk of electric shock ...
...uses, and can radiate radio frequency energy and, if not installed and used until a replacement cover is obtained. Reorient or relocate the receiving antenna. - Connect the equipment into any doubt, please consult a qualified electrician. D8-10-1-2_En Information to User Alteration or modifications ...plug, proceed as radios and televisions, use shielded cables and connectors for your local dealer. Increase the separation between the equipment and receiver. - A 10 amp fuse is fitted in this appliance may be of sufficient magnitude to constitute a risk of electric shock ...
Operating Instructions
Page 4
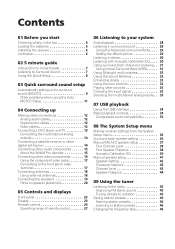
...12 Digital audio cables 12 Video cables 12 Connecting a DVD player and TV 13 Connecting the multichannel analog outputs 14 Connecting a satellite receiver or other digital set-top box 14 Connecting other audio components 15 About the WMA9 Pro decoder 15 Connecting other video components 16 ... 33 07 USB playback Using the USB interface 34 Basic playback controls 34 Compressed audio compatibility 35 08 The System Setup menu Making receiver settings from the System Setup menu 36 Surround back speaker setting 36 Manual MCACC speaker setup 37 Fine Channel Level 38 Fine Speaker Distance...
...12 Digital audio cables 12 Video cables 12 Connecting a DVD player and TV 13 Connecting the multichannel analog outputs 14 Connecting a satellite receiver or other digital set-top box 14 Connecting other audio components 15 About the WMA9 Pro decoder 15 Connecting other video components 16 ... 33 07 USB playback Using the USB interface 34 Basic playback controls 34 Compressed audio compatibility 35 08 The System Setup menu Making receiver settings from the System Setup menu 36 Surround back speaker setting 36 Manual MCACC speaker setup 37 Fine Channel Level 38 Fine Speaker Distance...
Operating Instructions
Page 5
... Theater Systems, Inc. 10 Making recordings Making an audio or a video recording . . . . . 47 11 Controlling the rest of your system Operating other Pioneer components . . . . . 48 Setting the remote to control other components 48 Selecting preset codes directly 49 Erasing all of the remote control presets . . ...54 Bi-amping your front speakers 55 Bi-wiring your speakers 55 Connecting additional amplifiers 56 Using this receiver with a Pioneer plasma display 56 Using the SR+ mode with a Pioneer plasma display 57 13 Other Settings The Input Assign menu 58 The Other Setup menu 59 Dynamic ...
... Theater Systems, Inc. 10 Making recordings Making an audio or a video recording . . . . . 47 11 Controlling the rest of your system Operating other Pioneer components . . . . . 48 Setting the remote to control other components 48 Selecting preset codes directly 49 Erasing all of the remote control presets . . ...54 Bi-amping your front speakers 55 Bi-wiring your speakers 55 Connecting additional amplifiers 56 Using this receiver with a Pioneer plasma display 56 Using the SR+ mode with a Pioneer plasma display 57 13 Other Settings The Input Assign menu 58 The Other Setup menu 59 Dynamic ...
Operating Instructions
Page 6
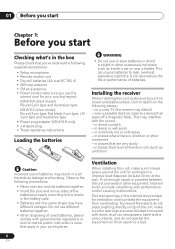
...with the same shape may interfere with governmental regulations or environmental public instruction's rules that apply in your country/region): VSX-816-K (black model) Round 2-pin type and Australian type VSX-816-S (silver model) Round 2-pin type, flat blade 2-pin type, UK 3-pin type and Australian type •...places that have different voltages. 01 Before you start Chapter 1: Before you start Checking what's in the box Please check that you've received the following supplied accessories: • Setup microphone • Remote control unit • Dry cell batteries (AA size IEC R6) x2 ...
...with the same shape may interfere with governmental regulations or environmental public instruction's rules that apply in your country/region): VSX-816-K (black model) Round 2-pin type and Australian type VSX-816-S (silver model) Round 2-pin type, flat blade 2-pin type, UK 3-pin type and Australian type •...places that have different voltages. 01 Before you start Chapter 1: Before you start Checking what's in the box Please check that you've received the following supplied accessories: • Setup microphone • Remote control unit • Dry cell batteries (AA size IEC R6) x2 ...
Operating Instructions
Page 7
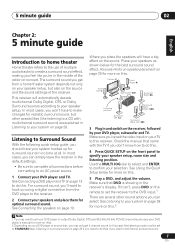
... select. In most cases, you won't have to make changes for realistic surround sound, but also on the source and the sound settings of the receiver. See Connecting the speakers on your TV to specify your speaker setup, room size and listening position. Also see Hints on speaker placement on page... 19. If it isn't, press DVD on the remote to set to STANDARD (see your DVD player's manual for the best surround sound effect. This receiver will have your selection. See Listening to your system on page 28 for more on this . 5 minute guide 02 English Deutsch Français Italiano...
... select. In most cases, you won't have to make changes for realistic surround sound, but also on the source and the sound settings of the receiver. See Connecting the speakers on your TV to specify your speaker setup, room size and listening position. Also see Hints on speaker placement on page... 19. If it isn't, press DVD on the remote to set to STANDARD (see your DVD player's manual for the best surround sound effect. This receiver will have your selection. See Listening to your system on page 28 for more on this . 5 minute guide 02 English Deutsch Français Italiano...
Operating Instructions
Page 8
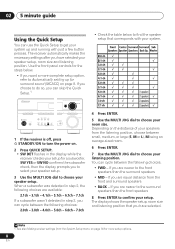
...ANALOG MIDNIGHT/ ATT LOUDNESS SPEAKERS TUNING / STATION TUNER EDIT TONE QUICK SETUP SETUP MULTI JOG AUDIO/VIDEO MULTI-CHANNEL RECEIVER VSX-816 ENTER MULTI JOG DIGITAL PRECISION PROCESSING AUX SIGNAL SB ch ACOUSTIC SELECT PROCESSING EQ MCACC SETUP MIC MASTER VOLUME DOWN UP 1 If ...room size. Depending on the distance of your speakers from the listening position, choose between the following choices: • FWD - The receiver automatically makes the necessary settings after you are nearer to Automatically setting up and running with your system. 4 Press ENTER. 5 Use ...
...ANALOG MIDNIGHT/ ATT LOUDNESS SPEAKERS TUNING / STATION TUNER EDIT TONE QUICK SETUP SETUP MULTI JOG AUDIO/VIDEO MULTI-CHANNEL RECEIVER VSX-816 ENTER MULTI JOG DIGITAL PRECISION PROCESSING AUX SIGNAL SB ch ACOUSTIC SELECT PROCESSING EQ MCACC SETUP MIC MASTER VOLUME DOWN UP 1 If ...room size. Depending on the distance of your speakers from the listening position, choose between the following choices: • FWD - The receiver automatically makes the necessary settings after you are nearer to Automatically setting up and running with your system. 4 Press ENTER. 5 Use ...
Operating Instructions
Page 9
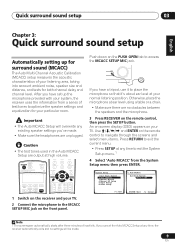
... will overwrite any existing speaker settings you cancel the Auto MCACC Setup at any time, the receiver automatically exits and no obstacles between the speakers and the microphone. 3 Press RECEIVER on the receiver and your TV. Use / / / and ENTER on the remote control to navigate through ...çais Italiano Nederlands Español Chapter 3: Quick surround sound setup Automatically setting up the microphone provided with your system, the receiver uses the information from the System Setup menu then press ENTER. System Setup 1.Surr Back System 2.Auto MCACC 3.Manual MCACC 4.Manual SP...
... will overwrite any existing speaker settings you cancel the Auto MCACC Setup at any time, the receiver automatically exits and no obstacles between the speakers and the microphone. 3 Press RECEIVER on the receiver and your TV. Use / / / and ENTER on the remote control to navigate through ...çais Italiano Nederlands Español Chapter 3: Quick surround sound setup Automatically setting up the microphone provided with your system, the receiver uses the information from the System Setup menu then press ENTER. System Setup 1.Surr Back System 2.Auto MCACC 3.Manual MCACC 4.Manual SP...
Operating Instructions
Page 10
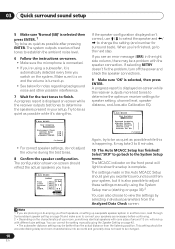
...is complete. 03 Quick surround sound setup 5 Make sure 'Normal (SB)' is selected then press ENTER. 1 Try to determine the optimum receiver settings for speaker setting, channel level, speaker distance, and Acoustic Calibration EQ. 2.Auto MCACC Now Analyzing 2.Auto MCACC Now Analyzing Environment Check ...subwoofer distance setting may take 3 to be as quiet as possible after pressing ENTER. A progress report is displayed on-screen while the receiver outputs test tones to establish the ambient noise level. 6 Follow the instructions on page 36 and make sure to the next step. Front...
...is complete. 03 Quick surround sound setup 5 Make sure 'Normal (SB)' is selected then press ENTER. 1 Try to determine the optimum receiver settings for speaker setting, channel level, speaker distance, and Acoustic Calibration EQ. 2.Auto MCACC Now Analyzing 2.Auto MCACC Now Analyzing Environment Check ...subwoofer distance setting may take 3 to be as quiet as possible after pressing ENTER. A progress report is displayed on-screen while the receiver outputs test tones to establish the ambient noise level. 6 Follow the instructions on page 36 and make sure to the next step. Front...
Operating Instructions
Page 12
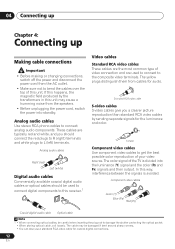
... connect the red plugs to R (right) terminals and white plugs to L (left) terminals. The cable may cause a humming noise from cables for audio. In this receiver.1 Video cables Standard RCA video cables These cables are the most common type of video connection and are typically red and white, and you a clearer...
... connect the red plugs to R (right) terminals and white plugs to L (left) terminals. The cable may cause a humming noise from cables for audio. In this receiver.1 Video cables Standard RCA video cables These cables are the most common type of video connection and are typically red and white, and you a clearer...
Operating Instructions
Page 13
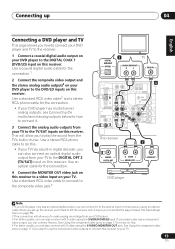
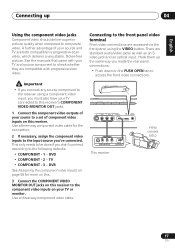
... 2 Connect the composite video output and the stereo analog audio outputs2 on your TV. Use a stereo RCA phono cable to the optical input on this receiver. Use a standard RCA video cable to connect to the composite video jack.4 DIGITAL AUDIO OUT OPTICAL 3 TV ANALOG AUDIO OUT R L VIDEO IN 4.../ MD VIDEO OUT CONTROL IN OUT OUT MONITOR OUT DVR / VCR IN TV / SAT IN SUB WOOFER DVD / LD PREOUT IN S-VIDEO REC L This receiver 2 1 COAXIAL DIGITAL OUT R AUDIO L ANALOG OUT VIDEO OUT DVD player Note 1 If your DVD player only has an optical digital output, you can connect ...
... 2 Connect the composite video output and the stereo analog audio outputs2 on your TV. Use a stereo RCA phono cable to the optical input on this receiver. Use a standard RCA video cable to connect to the composite video jack.4 DIGITAL AUDIO OUT OPTICAL 3 TV ANALOG AUDIO OUT R L VIDEO IN 4.../ MD VIDEO OUT CONTROL IN OUT OUT MONITOR OUT DVR / VCR IN TV / SAT IN SUB WOOFER DVD / LD PREOUT IN S-VIDEO REC L This receiver 2 1 COAXIAL DIGITAL OUT R AUDIO L ANALOG OUT VIDEO OUT DVD player Note 1 If your DVD player only has an optical digital output, you can connect ...
Operating Instructions
Page 14
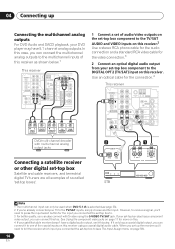
... has a component video output, you 've already connected your TV to the TV/SAT AUDIO and VIDEO inputs on this too. 04 Connecting up the receiver you'll need to press the input select button for more on this. 4 If your set-top box component to the DIGITAL OPT 2 (TV/SAT...) input on this receiver. OPTICAL COAXIAL R AUDIO L AV OUT VIDEO STB Note 1 The multichannel input can only be used when DVD 5.1 ch is selected (see The Input Assign menu...
... has a component video output, you 've already connected your TV to the TV/SAT AUDIO and VIDEO inputs on this too. 04 Connecting up the receiver you'll need to press the input select button for more on this. 4 If your set-top box component to the DIGITAL OPT 2 (TV/SAT...) input on this receiver. OPTICAL COAXIAL R AUDIO L AV OUT VIDEO STB Note 1 The multichannel input can only be used when DVD 5.1 ch is selected (see The Input Assign menu...

Operating Instructions
Page 15
...to analog audio jacks if you 're connecting a recorder, connect the analog audio outputs (REC) to the analog audio inputs on the receiver as shown. This receiver DIGITAL OUT IN OPT IN OPT 2 (TV/ SAT) IN OPT 1 (CD) OUT ASSIGNABLE DIGITAL IN IN ASSIGNABLE DIGITAL IN IN ... R IN L REC AUDIO IN R OUT L PLAY AUDIO OUT 4 OPTICAL DIGITAL IN CD-R, MD, DAT, Tape recorder, etc. You'll need to make this receiver. Use a stereo RCA phono cable as shown. English Deutsch Français Italiano Nederlands Español Connecting up 04 Connecting other audio component. 1 If...
...to analog audio jacks if you 're connecting a recorder, connect the analog audio outputs (REC) to the analog audio inputs on the receiver as shown. This receiver DIGITAL OUT IN OPT IN OPT 2 (TV/ SAT) IN OPT 1 (CD) OUT ASSIGNABLE DIGITAL IN IN ASSIGNABLE DIGITAL IN IN ... R IN L REC AUDIO IN R OUT L PLAY AUDIO OUT 4 OPTICAL DIGITAL IN CD-R, MD, DAT, Tape recorder, etc. You'll need to make this receiver. Use a stereo RCA phono cable as shown. English Deutsch Français Italiano Nederlands Español Connecting up 04 Connecting other audio component. 1 If...
Operating Instructions
Page 16
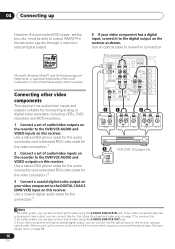
... using the S-VIDEO DVR/VCR OUT jack. 3 If your video component only has an optical digital output, you can connect this receiver. This receiver Microsoft, Windows Media®, and the Windows logo are trademarks, or registered trademarks of audio/video outputs on the recorder to the ...jacks on page 17 for the video connection.1 2 Connect a set of Microsoft Corporation in the United States and/or other video components This receiver has audio/video inputs and outputs suitable for the video connection.2 3 Connect a coaxial digital audio output on your video component has a digital...
... using the S-VIDEO DVR/VCR OUT jack. 3 If your video component only has an optical digital output, you can connect this receiver. This receiver Microsoft, Windows Media®, and the Windows logo are trademarks, or registered trademarks of audio/video outputs on the recorder to the ...jacks on page 17 for the video connection.1 2 Connect a set of Microsoft Corporation in the United States and/or other video components This receiver has audio/video inputs and outputs suitable for the video connection.2 3 Connect a coaxial digital audio output on your video component has a digital...
Operating Instructions
Page 17
... / MD FM AM USB AUX S -VIDEO VIDEO INPUT VIDEO L AUDIO R DIGITAL IN USB MCACC SETUP MIC V L R VIDEO OUTPUT DIGITAL OUT This receiver Video camera (etc.) 17 En See the manuals that came with your TV and source component to the front panel video terminal Front video connections..., flicker-free picture. Use a three-way component video cable for more on this. 3 Connect the COMPONENT VIDEO MONITOR OUT jacks on this receiver to the input source you didn't connect according to composite video. DVR See Assigning the component video inputs on page 58 for the connection. ...
... / MD FM AM USB AUX S -VIDEO VIDEO INPUT VIDEO L AUDIO R DIGITAL IN USB MCACC SETUP MIC V L R VIDEO OUTPUT DIGITAL OUT This receiver Video camera (etc.) 17 En See the manuals that came with your TV and source component to the front panel video terminal Front video connections..., flicker-free picture. Use a three-way component video cable for more on this. 3 Connect the COMPONENT VIDEO MONITOR OUT jacks on this receiver to the input source you didn't connect according to composite video. DVR See Assigning the component video inputs on page 58 for the connection. ...
Operating Instructions
Page 19
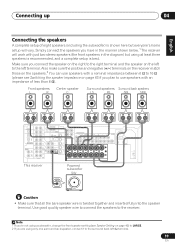
... 110V 240V 120 -127V MONITOR OUT LR SURROUND (TV/SAT)IN 2 R R L CENTER R SURROUND BACK L R CENTER B AC IN 110V 120 - 127V 220V 240V This receiver Powered subwoofer SW INPUT Caution • Make sure that all the bare speaker wire is best. Also make sure the positive and negative (+/-) terminals on... on the speakers.2 You can use speakers with just two stereo speakers (the front speakers in the manner shown below.1 The receiver will work with an impedance of eight speakers (including the subwoofer) is shown here but using only one surround back speaker, connect...
... 110V 240V 120 -127V MONITOR OUT LR SURROUND (TV/SAT)IN 2 R R L CENTER R SURROUND BACK L R CENTER B AC IN 110V 120 - 127V 220V 240V This receiver Powered subwoofer SW INPUT Caution • Make sure that all the bare speaker wire is best. Also make sure the positive and negative (+/-) terminals on... on the speakers.2 You can use speakers with just two stereo speakers (the front speakers in the manner shown below.1 The receiver will work with an impedance of eight speakers (including the subwoofer) is shown here but using only one surround back speaker, connect...
Operating Instructions
Page 20
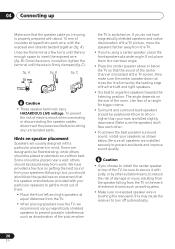
... shielded speakers to prevent possible interference, such as earthquakes. • Make sure no exposed speaker wire is touching the rear panel, this may cause the receiver to secure it with putty, or by the leading edge of the room.
... shielded speakers to prevent possible interference, such as earthquakes. • Make sure no exposed speaker wire is touching the rear panel, this may cause the receiver to secure it with putty, or by the leading edge of the room.
Operating Instructions
Page 22
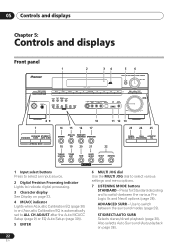
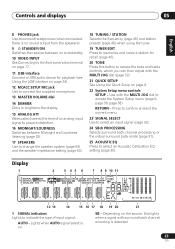
... displays Chapter 5: Controls and displays Front panel ADVANCED ST/DIRECT/ STANDARD SURR AUTO SURR LISTENING MODE STANDBY/ON PHONES 1 2 34 56 AUDIO/VIDEO MULTI-CHANNEL RECEIVER VSX-816 ENTER MULTI JOG DVD / LD TV / SAT DVR / VCR VIDEO DIGITAL PRECISION PROCESSING CD CD-R / TAPE / MD FM AM USB AUX SIGNAL SB ch ACOUSTIC...
... displays Chapter 5: Controls and displays Front panel ADVANCED ST/DIRECT/ STANDARD SURR AUTO SURR LISTENING MODE STANDBY/ON PHONES 1 2 34 56 AUDIO/VIDEO MULTI-CHANNEL RECEIVER VSX-816 ENTER MULTI JOG DVD / LD TV / SAT DVR / VCR VIDEO DIGITAL PRECISION PROCESSING CD CD-R / TAPE / MD FM AM USB AUX SIGNAL SB ch ACOUSTIC...
Operating Instructions
Page 23
... Italiano Nederlands Español 8 PHONES jack Use to connect headphones (when connected, there is no sound output from the speakers). 9 STANDBY/ON Switches the receiver between on and standby. 10 VIDEO INPUT See Connecting to the front panel video terminal on page 17. 11 USB interface Connect a USB audio device...
... Italiano Nederlands Español 8 PHONES jack Use to connect headphones (when connected, there is no sound output from the speakers). 9 STANDBY/ON Switches the receiver between on and standby. 10 VIDEO INPUT See Connecting to the front panel video terminal on page 17. 11 USB interface Connect a USB audio device...
Operating Instructions
Page 24
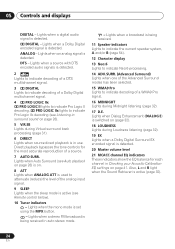
... signal is set using the MPX button. - Lights when Auto Surround (see Remote control below). 10 Tuner indicators - Lights when a stereo FM broadcast is being received. 11 Speaker indicators Lights to indicate the current speaker system, A and/or B (page 54). 12 Character display 13 Neo:6 Lights to indicate Neo:6 processing. 14... Enhancement (DIALOG E) is in auto stereo mode. - Lights when a broadcast is detected. 2 DIGITAL - 05 Controls and displays DIGITAL - Lights when a digital audio signal is being received in use.
... signal is set using the MPX button. - Lights when Auto Surround (see Remote control below). 10 Tuner indicators - Lights when a stereo FM broadcast is being received. 11 Speaker indicators Lights to indicate the current speaker system, A and/or B (page 54). 12 Character display 13 Neo:6 Lights to indicate Neo:6 processing. 14... Enhancement (DIALOG E) is in auto stereo mode. - Lights when a broadcast is detected. 2 DIGITAL - 05 Controls and displays DIGITAL - Lights when a digital audio signal is being received in use.


