
Operating Instructions
Page 4
...6 Installing the receiver 6 Ventilation 6 02 5 minute guide Introduction to home theater 7 Listening to Surround Sound 7 Using the Quick Setup 8 03 Quick surround sound setup Automatically setting up for surround sound (MCACC 9 Other problems when using the Auto MCACC Setup 11 04 Connecting up Making cable connections 12 Analog audio cables 12 Digital audio cables 12 Video cables 12 Connecting a DVD player and TV 13 Connecting the multichannel analog outputs 14 Connecting a satellite receiver or other digital set-top box 14 Connecting other audio components 15 About the WMA9 Pro...
...6 Installing the receiver 6 Ventilation 6 02 5 minute guide Introduction to home theater 7 Listening to Surround Sound 7 Using the Quick Setup 8 03 Quick surround sound setup Automatically setting up for surround sound (MCACC 9 Other problems when using the Auto MCACC Setup 11 04 Connecting up Making cable connections 12 Analog audio cables 12 Digital audio cables 12 Video cables 12 Connecting a DVD player and TV 13 Connecting the multichannel analog outputs 14 Connecting a satellite receiver or other digital set-top box 14 Connecting other audio components 15 About the WMA9 Pro...
Operating Instructions
Page 5
... Switching the speaker system 54 Bi-amping your front speakers 55 Bi-wiring your system Operating other Pioneer components . . . . . 48 Setting the remote to control other components 48 Selecting preset codes directly 49 Erasing all of Digital Theater Systems, Inc. 10 Making recordings Making an audio or a video recording . . . . . 47 11 Controlling the rest of your speakers 55 Connecting additional amplifiers 56 Using this receiver with a Pioneer plasma display 56 Using the SR+ mode with a Pioneer plasma display 57 13 Other Settings The Input Assign menu...
... Switching the speaker system 54 Bi-amping your front speakers 55 Bi-wiring your system Operating other Pioneer components . . . . . 48 Setting the remote to control other components 48 Selecting preset codes directly 49 Erasing all of Digital Theater Systems, Inc. 10 Making recordings Making an audio or a video recording . . . . . 47 11 Controlling the rest of your speakers 55 Connecting additional amplifiers 56 Using this receiver with a Pioneer plasma display 56 Using the SR+ mode with a Pioneer plasma display 57 13 Other Settings The Input Assign menu...
Operating Instructions
Page 9
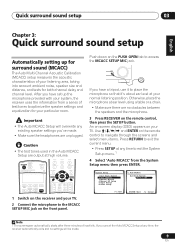
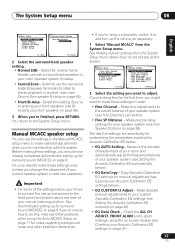
... 4.Manual SP Setup 5.Input Assign 6.Other Setup 2. An on-screen display (OSD) appears on the remote control to navigate through the screens and select menu items. Press RETURN to exit the current menu. • Press SETUP at any time to exit the System Setup menu.1 4 Select 'Auto MCACC' from a series of test tones to the MCACC SETUP MIC jack on the remote control, then press the SETUP button. If you 've made . 9 En After you have set up for surround sound...
... 4.Manual SP Setup 5.Input Assign 6.Other Setup 2. An on-screen display (OSD) appears on the remote control to navigate through the screens and select menu items. Press RETURN to exit the current menu. • Press SETUP at any time to exit the System Setup menu.1 4 Select 'Auto MCACC' from a series of test tones to the MCACC SETUP MIC jack on the remote control, then press the SETUP button. If you 've made . 9 En After you have set up for surround sound...
Operating Instructions
Page 10
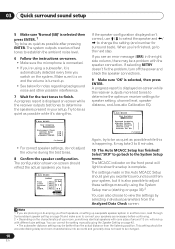
... to change the setting (and number for speaker setting, channel level, speaker distance, and Acoustic Calibration EQ. 2.Auto MCACC Now Analyzing 2.Auto MCACC Now Analyzing Environment Check Ambient Noise Microphone Speaker YES/NO [ OK ] [ OK ] [ OK ] :Cancel • For correct speaker settings, do not adjust the volume during the test tones. 8 Confirm the speaker configuration. If selecting RETRY doesn't fix the problem, turn off the power and check the speaker connections. 9 Make sure 'OK' is selected then...
... to change the setting (and number for speaker setting, channel level, speaker distance, and Acoustic Calibration EQ. 2.Auto MCACC Now Analyzing 2.Auto MCACC Now Analyzing Environment Check Ambient Noise Microphone Speaker YES/NO [ OK ] [ OK ] [ OK ] :Cancel • For correct speaker settings, do not adjust the volume during the test tones. 8 Confirm the speaker configuration. If selecting RETRY doesn't fix the problem, turn off the power and check the speaker connections. 9 Make sure 'OK' is selected then...
Operating Instructions
Page 14
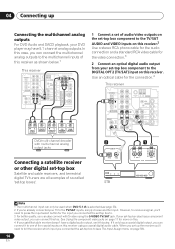
... connect with multi-channel analog output jacks 2 1 DIGITAL OUT Connecting a satellite receiver or other digital set-top box Satellite and cable receivers, and terrestrial digital TV tuners are all examples of so-called 'set-top boxes'. 04 Connecting up the receiver you'll need to the multichannel inputs of the coaxial inputs on page 58). 14 En SUB TER WOOFER AUX FM UNBAL 75 Ω CD DVR / VCR AM LOOP ANTENNA MONITOR OUT OUT CONTROL IN OUT R L SURROUND DVD...
... connect with multi-channel analog output jacks 2 1 DIGITAL OUT Connecting a satellite receiver or other digital set-top box Satellite and cable receivers, and terrestrial digital TV tuners are all examples of so-called 'set-top boxes'. 04 Connecting up the receiver you'll need to the multichannel inputs of the coaxial inputs on page 58). 14 En SUB TER WOOFER AUX FM UNBAL 75 Ω CD DVR / VCR AM LOOP ANTENNA MONITOR OUT OUT CONTROL IN OUT R L SURROUND DVD...
Operating Instructions
Page 16
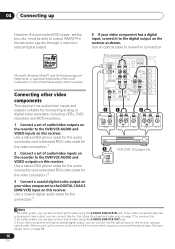
.... 1 Connect a set of audio/video outputs on the recorder to (see The Input Assign menu on page 58). 16 En Use an optical cable to the digital output on this receiver using an optical cable. must be able to output WMA9 Pro format audio signals through a coaxial or optical digital output. 4 If your video component has a digital input, connect it to the DVR/VCR AUDIO and VIDEO outputs on this. 2 For better quality, you can also connect with S-video using the S-VIDEO DVR/VCR OUT jack. 3 If your video component...
.... 1 Connect a set of audio/video outputs on the recorder to (see The Input Assign menu on page 58). 16 En Use an optical cable to the digital output on this receiver using an optical cable. must be able to output WMA9 Pro format audio signals through a coaxial or optical digital output. 4 If your video component has a digital input, connect it to the DVR/VCR AUDIO and VIDEO outputs on this. 2 For better quality, you can also connect with S-video using the S-VIDEO DVR/VCR OUT jack. 3 If your video component...
Operating Instructions
Page 19
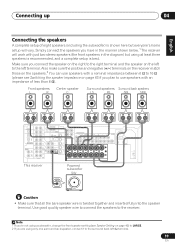
... P E SUB WOOFER A DVD / LD A PREOUT IN S-VIDEO K E R S FRONT COMPONENT VIDEO (DVR/VCR)IN 3 ASSIGNABLE Y PB PR Y (DVD/LD) IN 1 PB PR TWO VOLTAGE SELECTORS FRONT L SURROUND SURROUND BACK L L PREOUT 220V 110V 240V 120 -127V MONITOR OUT LR SURROUND (TV/SAT)IN 2 R R L CENTER R SURROUND BACK L R CENTER B AC IN 110V 120 - 127V 220V 240V This receiver Powered subwoofer SW INPUT Caution • Make sure that all the bare speaker wire is best. Use good quality speaker wire...
... P E SUB WOOFER A DVD / LD A PREOUT IN S-VIDEO K E R S FRONT COMPONENT VIDEO (DVR/VCR)IN 3 ASSIGNABLE Y PB PR Y (DVD/LD) IN 1 PB PR TWO VOLTAGE SELECTORS FRONT L SURROUND SURROUND BACK L L PREOUT 220V 110V 240V 120 -127V MONITOR OUT LR SURROUND (TV/SAT)IN 2 R R L CENTER R SURROUND BACK L R CENTER B AC IN 110V 120 - 127V 220V 240V This receiver Powered subwoofer SW INPUT Caution • Make sure that all the bare speaker wire is best. Use good quality speaker wire...
Operating Instructions
Page 26
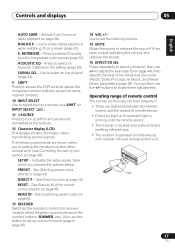
DTV MENU - GUIDE - RETURN - Use to turn on DVD discs. INPUT SELECT - The controls above these buttons can be accessed after you have selected the corresponding MULTI CONTROL button (DVD, AM, FM, TV, etc.) TOP MENU - Changes the audio language or channel on /off . SUBTITLE - The following button controls (except SETUP) can be accessed after you have selected the corresponding MULTI CONTROL button (for example DVD, DVR or TV (when connected to a DTV)). REC STOP - HDD/DVD - 05 Controls and displays 4 Tuner/component control buttons/SETUP The...
DTV MENU - GUIDE - RETURN - Use to turn on DVD discs. INPUT SELECT - The controls above these buttons can be accessed after you have selected the corresponding MULTI CONTROL button (DVD, AM, FM, TV, etc.) TOP MENU - Changes the audio language or channel on /off . SUBTITLE - The following button controls (except SETUP) can be accessed after you have selected the corresponding MULTI CONTROL button (for example DVD, DVR or TV (when connected to a DTV)). REC STOP - HDD/DVD - 05 Controls and displays 4 Tuner/component control buttons/SETUP The...
Operating Instructions
Page 27
... then use this button to control other components connected to select the green commands above the component control buttons) as well as some receiver controls. 10 INPUT SELECT Use to select the input source (use +/- Use to select a channel, then use SHIFT for INPUT SELECT ). 11 SOURCE Press to turn on page 48): SETUP - Selects Auto Surround (Auto playback on page 49. PRESET - See Erasing all of the Advanced Surround effects, Dolby Pro Logic IIx Music, and Neo:6 Music parameters (page 29). Also adjusts the level of the remote control presets on...
... then use this button to control other components connected to select the green commands above the component control buttons) as well as some receiver controls. 10 INPUT SELECT Use to select the input source (use +/- Use to select a channel, then use SHIFT for INPUT SELECT ). 11 SOURCE Press to turn on page 48): SETUP - Selects Auto Surround (Auto playback on page 49. PRESET - See Erasing all of the Advanced Surround effects, Dolby Pro Logic IIx Music, and Neo:6 Music parameters (page 29). Also adjusts the level of the remote control presets on...
Operating Instructions
Page 29
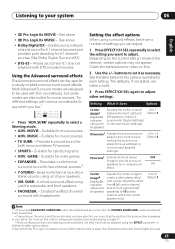
...; Dolby Digital EX - Creates surround back channel sound for 5.1 channel sources and provides pure decoding for a stereo surround effect (stereo field is selected, the effect level can adjust. 1 Press EFFECT/CH SEL repeatedly to select the setting you press ADVANCED SURROUND when the headphones are designed to 7 Default: 3 Dimensiona Adjusts the surround sound balance from 0 (all of overall surround with Dolby Digital sources). 29 En Gives multichannel sound to a stereo source, using all center channel sent to front right and left speakers...
...; Dolby Digital EX - Creates surround back channel sound for 5.1 channel sources and provides pure decoding for a stereo surround effect (stereo field is selected, the effect level can adjust. 1 Press EFFECT/CH SEL repeatedly to select the setting you press ADVANCED SURROUND when the headphones are designed to 7 Default: 3 Dimensiona Adjusts the surround sound balance from 0 (all of overall surround with Dolby Digital sources). 29 En Gives multichannel sound to a stereo source, using all center channel sent to front right and left speakers...
Operating Instructions
Page 33
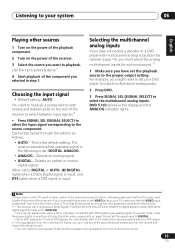
... audio components on the rear of the sound features/modes and only the volume and channel levels can be set your TV, make sure that all the sound is the default setting. For more details, refer to the instruction manual supplied with multichannel analog outputs to this receiver. 2 • This receiver can 't listen to 96 kHz), DTS and WMA9 Pro digital signal formats. Choosing the input signal • Default setting: AUTO You need to DIGITAL. • Some DVD players don't output DTS signals. Selects...
... audio components on the rear of the sound features/modes and only the volume and channel levels can be set your TV, make sure that all the sound is the default setting. For more details, refer to the instruction manual supplied with multichannel analog outputs to this receiver. 2 • This receiver can 't listen to 96 kHz), DTS and WMA9 Pro digital signal formats. Choosing the input signal • Default setting: AUTO You need to DIGITAL. • Some DVD players don't output DTS signals. Selects...
Operating Instructions
Page 36
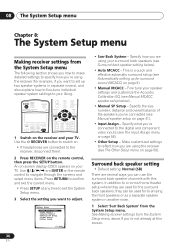
... time to exit the System Setup menu. 3 Select the setting you want to set up for surround sound (MCACC) on page 41). • Input Assign - Fine tune your surround back speakers (see The Input Assign menu on your TV. Specify how you are used for the surround back speakers, they can use the surround back speaker channels with this screen. 36 En Specify what you've connected to the digital and component video inputs (see Surround back speaker setting below ). • Manual SP Setup...
... time to exit the System Setup menu. 3 Select the setting you want to set up for surround sound (MCACC) on page 41). • Input Assign - Fine tune your surround back speakers (see The Input Assign menu on your TV. Specify how you are used for the surround back speakers, they can use the surround back speaker channels with this screen. 36 En Specify what you've connected to the digital and component video inputs (see Surround back speaker setting below ). • Manual SP Setup...
Operating Instructions
Page 37
... Ch Level - System Setup 1.Surr Back System 2.Auto MCACC 3.Manual MCACC 4.Manual SP Setup 5.Input Assign 6.Other Setup : Exit 3.Manual MCACC a.Fine Ch Level b.Fine SP Distance c.EQ AUTO Setting d.EQ Data Copy e.EQ CUSTOM1 Adjust f .EQ CUSTOM2 Adjust g.EQ Data Check :Return 2 Select the setting you want to make these settings in the Manual MCACC setup menu to stereo playback in your speaker system (see Second Zone speaker B setup on and turn up the volume as necessary. 1 Select 'Manual...
... Ch Level - System Setup 1.Surr Back System 2.Auto MCACC 3.Manual MCACC 4.Manual SP Setup 5.Input Assign 6.Other Setup : Exit 3.Manual MCACC a.Fine Ch Level b.Fine SP Distance c.EQ AUTO Setting d.EQ Data Copy e.EQ CUSTOM1 Adjust f .EQ CUSTOM2 Adjust g.EQ Data Check :Return 2 Select the setting you want to make these settings in the Manual MCACC setup menu to stereo playback in your speaker system (see Second Zone speaker B setup on and turn up the volume as necessary. 1 Select 'Manual...
Operating Instructions
Page 57
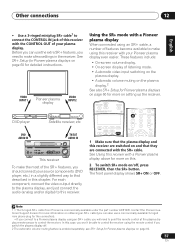
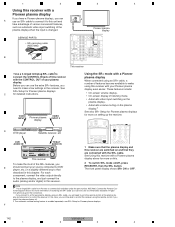
... with a Pioneer plasma display When connected using an SR+ cable, a number of your plasma display. These features include: • On-screen volume display. • On-screen display of the SR+ features, you switch the plasma display off , press RECEIVER, then the SR+ button. VIDEO INPUT 1 Pioneer plasma display VIDEO INPUT 2 DVD player Satellite receiver, etc DVD AUDIO IN TV/SAT AUDIO IN ADVANCED ST/DIRECT/ STANDARD SURR AUTO SURR LISTENING MODE STANDBY/ON PHONES AUDIO/VIDEO MULTI-CHANNEL RECEIVER VSX-816 ENTER MULTI JOG DVD / LD TV /SAT DVR / VCR VIDEO DIMMER ANALOG...
... with a Pioneer plasma display When connected using an SR+ cable, a number of your plasma display. These features include: • On-screen volume display. • On-screen display of the SR+ features, you switch the plasma display off , press RECEIVER, then the SR+ button. VIDEO INPUT 1 Pioneer plasma display VIDEO INPUT 2 DVD player Satellite receiver, etc DVD AUDIO IN TV/SAT AUDIO IN ADVANCED ST/DIRECT/ STANDARD SURR AUTO SURR LISTENING MODE STANDBY/ON PHONES AUDIO/VIDEO MULTI-CHANNEL RECEIVER VSX-816 ENTER MULTI JOG DVD / LD TV /SAT DVR / VCR VIDEO DIMMER ANALOG...
Operating Instructions
Page 58
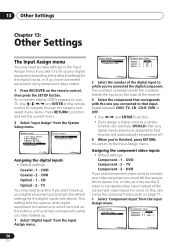
...An on-screen display (OSD) appears on your digital equipment according to the default settings for the digital inputs, or if you have hooked up. 1 Select 'Digital Input' from the System Setup menu. System Setup 1.Surr Back System 2.Auto MCACC 3.Manual MCACC 4.Manual SP Setup 5.Input Assign 6.Other Setup 5.Input Assign a.Digital Input b.Component Input : Exit :Return Assigning the digital inputs • Default settings: Coaxial - 1 - TV Component - 3 - This setting tells the receiver what you have connected equipment using component video cables. 1 Press RECEIVER on page...
...An on-screen display (OSD) appears on your digital equipment according to the default settings for the digital inputs, or if you have hooked up. 1 Select 'Digital Input' from the System Setup menu. System Setup 1.Surr Back System 2.Auto MCACC 3.Manual MCACC 4.Manual SP Setup 5.Input Assign 6.Other Setup 5.Input Assign a.Digital Input b.Component Input : Exit :Return Assigning the digital inputs • Default settings: Coaxial - 1 - TV Component - 3 - This setting tells the receiver what you have connected equipment using component video cables. 1 Press RECEIVER on page...
Operating Instructions
Page 62
... front panel to direct light. • Unplug anything connected to the CONTROL IN jack and use remote normally (see Operating other components, but not from LD or DVD player. • Set the SIGNAL SELECT to AUTO, DIGITAL or ANALOG according to the type of loud noise from your speakers. 14 Additional information Problem Remedy No sound from surround back speakers. • Refer to Speaker Setting on page 42 to check the surround back speaker settings. • Refer to Channel Level...
... front panel to direct light. • Unplug anything connected to the CONTROL IN jack and use remote normally (see Operating other components, but not from LD or DVD player. • Set the SIGNAL SELECT to AUTO, DIGITAL or ANALOG according to the type of loud noise from your speakers. 14 Additional information Problem Remedy No sound from surround back speakers. • Refer to Speaker Setting on page 42 to check the surround back speaker settings. • Refer to Channel Level...
Service Manual
Page 138
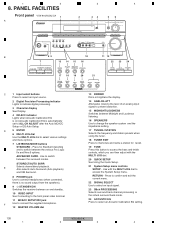
RETURN - PANEL FACILITIES Front panel VSX-816/KUXJ/CA 1 A 2 34 5 6 AUDIO/VIDEO MULTI-CHANNEL RECEIVER VSX-816 ENTER MULTI JOG ADVANCED ST/DIRECT/ STANDARD SURR AUTO SURR LISTENING MODE STANDBY/ON PHONES DIGITAL PRECISION PROCESSING DVD/LD TV/SAT DVR/VCR VIDEO CD CD-R/TAPE/MD FM AM XM AUX SIGNAL SB ch ACOUSTIC SELECT PROCESSING EQ DIMMER ANALOG MIDNIGHT/ ATT LOUDNESS SPEAKERS TUNING/ STATION TUNER EDIT TONE QUICK SETUP SETUP RETURN MULTI JOG S-VIDEO VIDEO INPUT VIDEO L AUDIO R DIGITAL IN MCACC SETUP MIC DOWN MASTER VOLUME UP B 89 10 11...
RETURN - PANEL FACILITIES Front panel VSX-816/KUXJ/CA 1 A 2 34 5 6 AUDIO/VIDEO MULTI-CHANNEL RECEIVER VSX-816 ENTER MULTI JOG ADVANCED ST/DIRECT/ STANDARD SURR AUTO SURR LISTENING MODE STANDBY/ON PHONES DIGITAL PRECISION PROCESSING DVD/LD TV/SAT DVR/VCR VIDEO CD CD-R/TAPE/MD FM AM XM AUX SIGNAL SB ch ACOUSTIC SELECT PROCESSING EQ DIMMER ANALOG MIDNIGHT/ ATT LOUDNESS SPEAKERS TUNING/ STATION TUNER EDIT TONE QUICK SETUP SETUP RETURN MULTI JOG S-VIDEO VIDEO INPUT VIDEO L AUDIO R DIGITAL IN MCACC SETUP MIC DOWN MASTER VOLUME UP B 89 10 11...
Service Manual
Page 140
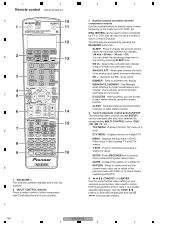
...preset stations. 140 VSX-816-K 1 2 3 4 Attenuates (lowers) the level of a DVD. T.EDIT - SETUP (Press RECEIVER first to access) Use to movie soundtracks at low volume. F 3 4 3 Number buttons and other components (see Controlling the rest of your surround sound system. SB ch - Use Midnight when listening to access the System Setup menu. Off). SR + - It also displays TV and DTV menus. Displays the guides on a digital TV. CLASS - GUIDE - DTV MENU - 1 2 Remote control VSX-816/KUXJ/CA A 10 RECEIVERSIENLPEUCTT SOURCE 1 11 AUDIO/VIDEO PRE-PROGRAMMED REMOTE CONTROL...
...preset stations. 140 VSX-816-K 1 2 3 4 Attenuates (lowers) the level of a DVD. T.EDIT - SETUP (Press RECEIVER first to access) Use to movie soundtracks at low volume. F 3 4 3 Number buttons and other components (see Controlling the rest of your surround sound system. SB ch - Use Midnight when listening to access the System Setup menu. Off). SR + - It also displays TV and DTV menus. Displays the guides on a digital TV. CLASS - GUIDE - DTV MENU - 1 2 Remote control VSX-816/KUXJ/CA A 10 RECEIVERSIENLPEUCTT SOURCE 1 11 AUDIO/VIDEO PRE-PROGRAMMED REMOTE CONTROL...
Service Manual
Page 141
... switching to select channels when using the MULTI CONTROL buttons. If the signal is operated simultaneously with another infrared remote control unit. 30 30 DOWN DOWN 23 ft (7m) F VSX-816-K 141 5 6 7 8 Use to mono will improve the sound quality. JUKEBOX - S. Switches between direct and stereo playback. DIALOG E - Press to restore CD quality sound to select an Acoustic Calibration EQ setting. See Selecting preset codes directly. TV CH +/- - Displays/changes the subtitles included in multilingual DVD-Video discs. See Direct function...
... switching to select channels when using the MULTI CONTROL buttons. If the signal is operated simultaneously with another infrared remote control unit. 30 30 DOWN DOWN 23 ft (7m) F VSX-816-K 141 5 6 7 8 Use to mono will improve the sound quality. JUKEBOX - S. Switches between direct and stereo playback. DIALOG E - Press to restore CD quality sound to select an Acoustic Calibration EQ setting. See Selecting preset codes directly. TV CH +/- - Displays/changes the subtitles included in multilingual DVD-Video discs. See Direct function...
Service Manual
Page 142
... /DIRECT / STANDARD SURR AUTO SURR LISTENING MODE STANDBY/ON PHONES AUDIO/VIDEO MULTI-CHANNEL RECEIVER VSX-816 ENTER MULTI JOG DIGITAL PRECISION PROCESSING DVD / LD TV / SAT DVR/ VCR VIDEO CD CD-R/T APE /M D FM AM XM AUX SIGNAL SB ch ACOUSTIC SELECT PROCESSING EQ DIMMER ANALOG MIDNIGHT/ ATT LOUDNESS SPEAKERS TUNING / STATION TUNER EDIT TONE QUICK SETUP SETUP RETURN MULTI JOG S- These features include: • On-screen volume display. • On-screen display of the SR+ features, you need to point the remote control...
... /DIRECT / STANDARD SURR AUTO SURR LISTENING MODE STANDBY/ON PHONES AUDIO/VIDEO MULTI-CHANNEL RECEIVER VSX-816 ENTER MULTI JOG DIGITAL PRECISION PROCESSING DVD / LD TV / SAT DVR/ VCR VIDEO CD CD-R/T APE /M D FM AM XM AUX SIGNAL SB ch ACOUSTIC SELECT PROCESSING EQ DIMMER ANALOG MIDNIGHT/ ATT LOUDNESS SPEAKERS TUNING / STATION TUNER EDIT TONE QUICK SETUP SETUP RETURN MULTI JOG S- These features include: • On-screen volume display. • On-screen display of the SR+ features, you need to point the remote control...


