

Owner's Manual
Page 1
...MULTI-CHANNEL RECEIVER VSX-816 Register your product at www.pioneerelectronics.com (US) www.pioneerelectronics.ca (Canada) • Protect your new investment The details of your purchase will be on file for reference in the event of an insurance claim such as loss or theft. • Receive free tips..., updates and service bulletins on your new product • Improve product development Your input helps us continue to design products that meet your needs. • Receive a free Pioneer newsletter Registered customers can opt in to...
...MULTI-CHANNEL RECEIVER VSX-816 Register your product at www.pioneerelectronics.com (US) www.pioneerelectronics.ca (Canada) • Protect your new investment The details of your purchase will be on file for reference in the event of an insurance claim such as loss or theft. • Receive free tips..., updates and service bulletins on your new product • Improve product development Your input helps us continue to design products that meet your needs. • Receive a free Pioneer newsletter Registered customers can opt in to...

Owner's Manual
Page 2
... or more of Dolby Laboratories. D8-10-3a_En Manufactured under license from the wall socket when left unused for a long period of this Pioneer product. For U.S. If the AC plug of after handling D36-P4_A_En IMPORTANT NOTICE - D2-4-4-1_EF WARNING: Handling the cord on , the.... Replacement and mounting of an AC plug on proposition 65 known to the State of Digital Theater Systems, Inc. Reorient or relocate the receiving antenna. - "Dolby", "Pro Logic", "Surround EX", and the double-D symbol are trademarks of California and other governmental entities to use...
... or more of Dolby Laboratories. D8-10-3a_En Manufactured under license from the wall socket when left unused for a long period of this Pioneer product. For U.S. If the AC plug of after handling D36-P4_A_En IMPORTANT NOTICE - D2-4-4-1_EF WARNING: Handling the cord on , the.... Replacement and mounting of an AC plug on proposition 65 known to the State of Digital Theater Systems, Inc. Reorient or relocate the receiving antenna. - "Dolby", "Pro Logic", "Surround EX", and the double-D symbol are trademarks of California and other governmental entities to use...
Owner's Manual
Page 4
...12 Digital audio cables 12 Video cables 12 Connecting a DVD player and TV 13 Connecting the multichannel analog outputs 14 Connecting a satellite receiver or other digital set-top box 14 Connecting other audio components 15 About the WMA9 Pro decoder 15 Connecting other video components 16 ... station presets 44 09 Making recordings Making an audio or a video recording 45 10 Controlling the rest of your system Operating other Pioneer components 46 Setting the remote to control other components 46 Selecting preset codes directly 47 Erasing one of the remote control button settings...
...12 Digital audio cables 12 Video cables 12 Connecting a DVD player and TV 13 Connecting the multichannel analog outputs 14 Connecting a satellite receiver or other digital set-top box 14 Connecting other audio components 15 About the WMA9 Pro decoder 15 Connecting other video components 16 ... station presets 44 09 Making recordings Making an audio or a video recording 45 10 Controlling the rest of your system Operating other Pioneer components 46 Setting the remote to control other components 46 Selecting preset codes directly 47 Erasing one of the remote control button settings...

Owner's Manual
Page 5
...system 54 Bi-amping your front speakers 55 Bi-wiring your speakers 55 Connecting additional amplifiers 56 Using this receiver with a Pioneer plasma display 56 Using the SR+ mode with a Pioneer plasma display 57 12 Other Settings The Input Assign menu 58 The Other Setup menu 59 Dynamic Range ...Control Setup 59 Dual Mono Setup 60 LFE Attenuator Setup 60 SR+ Setup for Pioneer plasma displays . . . 60 13 Additional information Troubleshooting 61 XM radio messages 63 Resetting the main unit 63 Switching the speaker impedance 63...
...system 54 Bi-amping your front speakers 55 Bi-wiring your speakers 55 Connecting additional amplifiers 56 Using this receiver with a Pioneer plasma display 56 Using the SR+ mode with a Pioneer plasma display 57 12 Other Settings The Input Assign menu 58 The Other Setup menu 59 Dynamic Range ...Control Setup 59 Dual Mono Setup 60 LFE Attenuator Setup 60 SR+ Setup for Pioneer plasma displays . . . 60 13 Additional information Troubleshooting 61 XM radio messages 63 Resetting the main unit 63 Switching the speaker impedance 63...

Owner's Manual
Page 6
... heat dispersal (at least 8 in damp or wet areas - in direct sunlight - in places that you start Chapter 1: Before you 've received the following supplied accessories: • Setup microphone • Remote control unit • Dry cell batteries (AA size IEC R6) x2 •... AM loop antenna • FM wire antenna • These operating instructions Loading the batteries Installing the receiver When installing this unit, make sure the openings are never blocked or covered with governmental regulations or environmental public instruction's rules that gives ...
... heat dispersal (at least 8 in damp or wet areas - in direct sunlight - in places that you start Chapter 1: Before you 've received the following supplied accessories: • Setup microphone • Remote control unit • Dry cell batteries (AA size IEC R6) x2 •... AM loop antenna • FM wire antenna • These operating instructions Loading the batteries Installing the receiver When installing this unit, make sure the openings are never blocked or covered with governmental regulations or environmental public instruction's rules that gives ...

Owner's Manual
Page 7
... a big effect on page 19. In most cases, you 've set the video input on the remote to set your DVD player to the receiver. 2 Connect your DVD player and TV. Make sure you won't have to make changes for optimal surround sound. See Connecting the speakers on the..., or Dolby Surround sources according to the DVD input.1 There are explained in surround sound on this . 5 Play a DVD, and adjust the volume. This receiver will have your system hooked up using a digital connection from a home theater system depends not only on your DVD player, subwoofer and TV. Also see...
... a big effect on page 19. In most cases, you 've set the video input on the remote to set your DVD player to the receiver. 2 Connect your DVD player and TV. Make sure you won't have to make changes for optimal surround sound. See Connecting the speakers on the..., or Dolby Surround sources according to the DVD input.1 There are explained in surround sound on this . 5 Play a DVD, and adjust the volume. This receiver will have your system hooked up using a digital connection from a home theater system depends not only on your DVD player, subwoofer and TV. Also see...

Owner's Manual
Page 8
...DIMMER ANALOG MIDNIGHT/ ATT LOUDNESS SPEAKERS TUNING / STATION TUNER EDIT TONE QUICK SETUP SETUP MULTI JOG AUDIO/VIDEO MULTI-CHANNEL RECEIVER VSX-816 ENTER MULTI JOG DIGITAL PRECISION PROCESSING AUX SIGNAL SB ch ACOUSTIC SELECT PROCESSING EQ MCACC SETUP MIC MASTER VOLUME DOWN UP 1 If the...subwoofer. If you are nearer to the front speakers than the front speakers 8 Press ENTER to confirm your setup. Note 1 See also Making receiver settings from the System Setup menu on the distance of your speakers from the front and surround speakers • BACK - When a subwoofer ...
...DIMMER ANALOG MIDNIGHT/ ATT LOUDNESS SPEAKERS TUNING / STATION TUNER EDIT TONE QUICK SETUP SETUP MULTI JOG AUDIO/VIDEO MULTI-CHANNEL RECEIVER VSX-816 ENTER MULTI JOG DIGITAL PRECISION PROCESSING AUX SIGNAL SB ch ACOUSTIC SELECT PROCESSING EQ MCACC SETUP MIC MASTER VOLUME DOWN UP 1 If the...subwoofer. If you are nearer to the front speakers than the front speakers 8 Press ENTER to confirm your setup. Note 1 See also Making receiver settings from the System Setup menu on the distance of your speakers from the front and surround speakers • BACK - When a subwoofer ...
Owner's Manual
Page 9
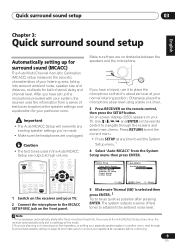
... on the remote control to place the microphone so that it's about ear level at ear level using a table or a chair. 3 Press RECEIVER on the remote control, then press the SETUP button. Quick surround sound setup 03 English Deutsch Français Italiano Nederlands Español Chapter... to connect your front speakers, or setting up a separate speaker system in the Auto MCACC Setup are no settings will overwrite any time, the receiver automatically exits and no obstacles between the speakers and the microphone. Auto MCACC Surr Back System Normal (SB) ] : Exit ENTER : Start :...
... on the remote control to place the microphone so that it's about ear level at ear level using a table or a chair. 3 Press RECEIVER on the remote control, then press the SETUP button. Quick surround sound setup 03 English Deutsch Français Italiano Nederlands Español Chapter... to connect your front speakers, or setting up a separate speaker system in the Auto MCACC Setup are no settings will overwrite any time, the receiver automatically exits and no obstacles between the speakers and the microphone. Auto MCACC Surr Back System Normal (SB) ] : Exit ENTER : Start :...
Owner's Manual
Page 10
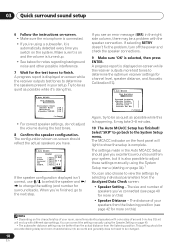
...the power and check the speaker connections. 9 Make sure 'OK' is happening. A progress report is displayed on-screen while the receiver outputs more test tones to determine the optimum receiver settings for more on this . 2.Auto MCACC Now Analyzing Environment Check Ambient Noise Microphone Speaker YES/NO [ OK ] [ OK...setup. The size and number of around 5 inches (12cm) will light to show the setup is displayed on-screen while the receiver outputs test tones to determine the speakers present in the Auto MCACC Setup should be accurate (taking delay and room characteristics into account...
...the power and check the speaker connections. 9 Make sure 'OK' is happening. A progress report is displayed on-screen while the receiver outputs more test tones to determine the optimum receiver settings for more on this . 2.Auto MCACC Now Analyzing Environment Check Ambient Noise Microphone Speaker YES/NO [ OK ] [ OK...setup. The size and number of around 5 inches (12cm) will light to show the setup is displayed on-screen while the receiver outputs test tones to determine the speakers present in the Auto MCACC Setup should be accurate (taking delay and room characteristics into account...
Owner's Manual
Page 12
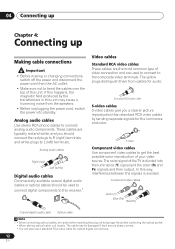
... AC outlet. • Make sure not to bend the cables over the top of video connection and are used to connect digital components to this receiver.1 Video cables Standard RCA video cables These cables are typically red and white, and you a clearer picture reproduction than standard RCA video cables by the...
... AC outlet. • Make sure not to bend the cables over the top of video connection and are used to connect digital components to this receiver.1 Video cables Standard RCA video cables These cables are typically red and white, and you a clearer picture reproduction than standard RCA video cables by the...

Owner's Manual
Page 13
...the multichannel analog outputs below for the connection. 4 Connect the MONITOR OUT video jack on this . 4 For better quality, you can connect this receiver. When you set up 04 English Deutsch Français Italiano Nederlands Español Connecting a DVD player and TV This page shows you how... TAPE / MD REC L VIDEO OUT CONTROL IN OUT OUT MONITOR OUT DVR / VCR IN TV / SAT IN SUB WOOFER DVD / LD PREOUT IN S-VIDEO This receiver 2 1 COAXIAL DIGITAL OUT R AUDIO L ANALOG OUT VIDEO OUT DVD player Note 1 If your DVD player. 3 For better quality, you can also connect with ...
...the multichannel analog outputs below for the connection. 4 Connect the MONITOR OUT video jack on this . 4 For better quality, you can connect this receiver. When you set up 04 English Deutsch Français Italiano Nederlands Español Connecting a DVD player and TV This page shows you how... TAPE / MD REC L VIDEO OUT CONTROL IN OUT OUT MONITOR OUT DVR / VCR IN TV / SAT IN SUB WOOFER DVD / LD PREOUT IN S-VIDEO This receiver 2 1 COAXIAL DIGITAL OUT R AUDIO L ANALOG OUT VIDEO OUT DVD player Note 1 If your DVD player. 3 For better quality, you can also connect with ...

Owner's Manual
Page 14
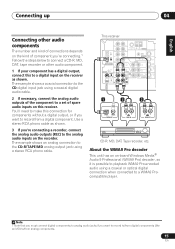
... IN IN COAX 2 (DVR/VCR) IN COAX 1 (DVD/LD) OUT R AUDIO CEN- See Using the component video jacks on page 17 for more on this receiver.2 Use a stereo RCA phono cable for the audio connection and a standard RCA video cable for the video connection.3 2 Connect an optical digital audio output from...-called `set -top box component to the DIGITAL OPT 2 (TV/SAT) input on page 58). 14 En Use an optical cable for the connection.4 This receiver IN IN OPT 2 (TV/ SAT) IN OPT 1 (CD) OUT ASSIGNABLE DIGITAL IN IN ASSIGNABLE DIGITAL IN XM IN IN COAX 2 (DVR/VCR) IN COAX 1 (...
... IN IN COAX 2 (DVR/VCR) IN COAX 1 (DVD/LD) OUT R AUDIO CEN- See Using the component video jacks on page 17 for more on this receiver.2 Use a stereo RCA phono cable for the audio connection and a standard RCA video cable for the video connection.3 2 Connect an optical digital audio output from...-called `set -top box component to the DIGITAL OPT 2 (TV/SAT) input on page 58). 14 En Use an optical cable for the connection.4 This receiver IN IN OPT 2 (TV/ SAT) IN OPT 1 (CD) OUT ASSIGNABLE DIGITAL IN IN ASSIGNABLE DIGITAL IN XM IN IN COAX 2 (DVR/VCR) IN COAX 1 (...
Owner's Manual
Page 15
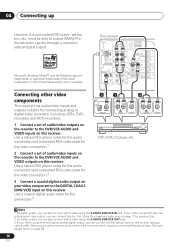
...a CD-R, MD, DAT, tape recorder or other audio component. 1 If your component has a digital output, connect this to a digital input on the receiver as shown. 3 If you're connecting a recorder, connect the analog audio outputs (REC) to the analog audio inputs on the recorder. The example shows... OPTICAL COAXIAL DIGITAL OUT R IN L REC AUDIO IN R OUT L PLAY AUDIO OUT CD-R, MD, DAT, Tape recorder, etc. You'll need to make this receiver. Note 1 Note that you must connect digital components to analog audio jacks if you want to record from analog components. 15 En English Deutsch Fran...
...a CD-R, MD, DAT, tape recorder or other audio component. 1 If your component has a digital output, connect this to a digital input on the receiver as shown. 3 If you're connecting a recorder, connect the analog audio outputs (REC) to the analog audio inputs on the recorder. The example shows... OPTICAL COAXIAL DIGITAL OUT R IN L REC AUDIO IN R OUT L PLAY AUDIO OUT CD-R, MD, DAT, Tape recorder, etc. You'll need to make this receiver. Note 1 Note that you must connect digital components to analog audio jacks if you want to record from analog components. 15 En English Deutsch Fran...
Owner's Manual
Page 16
...®, and the Windows logo are trademarks, or registered trademarks of Microsoft Corporation in the United States and/or other video components This receiver has audio/video inputs and outputs suitable for connecting analog or digital video recorders, including VCRs, DVDrecorders and HDD recorders. 1 Connect a... DVD player, set of audio/video inputs on the recorder to output WMA9 Pro format audio signals through a coaxial or optical digital output. This receiver IN IN OPT 2 (TV/ SAT) IN OPT 1 (CD) OUT ASSIGNABLE DIGITAL IN IN ASSIGNABLE DIGITAL IN XM IN IN COAX 2 (...
...®, and the Windows logo are trademarks, or registered trademarks of Microsoft Corporation in the United States and/or other video components This receiver has audio/video inputs and outputs suitable for connecting analog or digital video recorders, including VCRs, DVDrecorders and HDD recorders. 1 Connect a... DVD player, set of audio/video inputs on the recorder to output WMA9 Pro format audio signals through a coaxial or optical digital output. This receiver IN IN OPT 2 (TV/ SAT) IN OPT 1 (CD) OUT ASSIGNABLE DIGITAL IN IN ASSIGNABLE DIGITAL IN XM IN IN COAX 2 (...

Owner's Manual
Page 17
...) is progressive-scan video, which delivers a very stable, flicker-free picture. DVR See Assigning the component video inputs on this receiver's COMPONENT VIDEO MONITOR OUT jacks. 1 Connect the component video outputs of your TV or monitor. DVD • COMP 2 - This... OUTPUT DIGITAL OUT Video camera (etc.) 17 En A further advantage (if your source and TV are compatible with your TV connected to this receiver. Hook them up 04 Using the component video jacks Component video should deliver superior picture quality when compared to the input source you've connected...
...) is progressive-scan video, which delivers a very stable, flicker-free picture. DVR See Assigning the component video inputs on this receiver's COMPONENT VIDEO MONITOR OUT jacks. 1 Connect the component video outputs of your TV or monitor. DVD • COMP 2 - This... OUTPUT DIGITAL OUT Video camera (etc.) 17 En A further advantage (if your source and TV are compatible with your TV connected to this receiver. Hook them up 04 Using the component video jacks Component video should deliver superior picture quality when compared to the input source you've connected...

Owner's Manual
Page 19
... PB PR FRONT L SURROUND SURROUND BACK L L PREOUT MONITOR OUT LR SURROUND (TV/SAT)IN 2 R R L CENTER R SURROUND BACK L R CENTER B This receiver Powered subwoofer SW INPUT AC OUTLET Caution • Make sure that all the bare speaker wire is best. Use good quality speaker wire to connect...with an impedance of eight speakers (including the subwoofer) is shown here but using only one surround back speaker, connect it to the receiver. Front speakers Center speaker L R C Surround speakers Surround back speakers LS RS SBL SBR IN IN OPT 2 (TV/ SAT)...
... PB PR FRONT L SURROUND SURROUND BACK L L PREOUT MONITOR OUT LR SURROUND (TV/SAT)IN 2 R R L CENTER R SURROUND BACK L R CENTER B This receiver Powered subwoofer SW INPUT AC OUTLET Caution • Make sure that all the bare speaker wire is best. Use good quality speaker wire to connect...with an impedance of eight speakers (including the subwoofer) is shown here but using only one surround back speaker, connect it to the receiver. Front speakers Center speaker L R C Surround speakers Surround back speakers LS RS SBL SBR IN IN OPT 2 (TV/ SAT)...

Owner's Manual
Page 20
... in the event of external shocks such as earthquakes. • Make sure no exposed speaker wire is touching the rear panel, this may cause the receiver to turn off automatically.
... in the event of external shocks such as earthquakes. • Make sure no exposed speaker wire is touching the rear panel, this may cause the receiver to turn off automatically.

Owner's Manual
Page 21
...outlet. • Do not connect appliances with high power consumption to the AC outlet in regular use (ex. This can also cause the receiver to malfunction. • Since a subwoofer or power amplifier can also refer to the AC outlet. 21 En B 3-D view of connected ...equipment should not exceed 100 W (0.8 A). • This unit should not be disconnected by the receiver's power switch. Total electrical power consumption of 7.1 channel speaker setup Caution • Do not connect a TV set, monitor, heater, or similar appliance...
...outlet. • Do not connect appliances with high power consumption to the AC outlet in regular use (ex. This can also cause the receiver to malfunction. • Since a subwoofer or power amplifier can also refer to the AC outlet. 21 En B 3-D view of connected ...equipment should not exceed 100 W (0.8 A). • This unit should not be disconnected by the receiver's power switch. Total electrical power consumption of 7.1 channel speaker setup Caution • Do not connect a TV set, monitor, heater, or similar appliance...

Owner's Manual
Page 22
... displays Chapter 5: Controls and displays Front panel ADVANCED ST/DIRECT/ STANDARD SURR AUTO SURR LISTENING MODE STANDBY/ON PHONES 1 2 34 56 AUDIO/VIDEO MULTI-CHANNEL RECEIVER VSX-816 ENTER MULTI JOG DIGITAL PRECISION PROCESSING DVD / LD TV/ SAT DVR/ VCR VIDEO CD CD-R / TAPE / MD FM AM XM AUX SIGNAL SB ch ACOUSTIC...
... displays Chapter 5: Controls and displays Front panel ADVANCED ST/DIRECT/ STANDARD SURR AUTO SURR LISTENING MODE STANDBY/ON PHONES 1 2 34 56 AUDIO/VIDEO MULTI-CHANNEL RECEIVER VSX-816 ENTER MULTI JOG DIGITAL PRECISION PROCESSING DVD / LD TV/ SAT DVR/ VCR VIDEO CD CD-R / TAPE / MD FM AM XM AUX SIGNAL SB ch ACOUSTIC...
Owner's Manual
Page 23
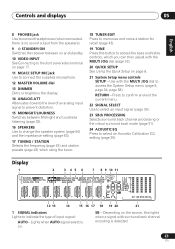
... (page 43). 19 TONE Press this lights when a signal with surround back channel encoding is no sound output from the speakers). 9 STANDBY/ON Switches the receiver between on and standby. 10 VIDEO INPUT See Connecting to the front panel video terminal on page 17. 11 MCACC SETUP MIC jack Use to...
... (page 43). 19 TONE Press this lights when a signal with surround back channel encoding is no sound output from the speakers). 9 STANDBY/ON Switches the receiver between on and standby. 10 VIDEO INPUT See Connecting to the front panel video terminal on page 17. 11 MCACC SETUP MIC jack Use to...


