

Owner's Manual
Page 1
...MULTI-CHANNEL RECEIVER VSX-816 Register your product at www.pioneerelectronics.com (US) www.pioneerelectronics.ca (Canada) • Protect your new investment The details of your purchase will be on file for reference in the event of an insurance claim such as loss or theft. • Receive free tips..., updates and service bulletins on your new product • Improve product development Your input helps us continue to design products that meet your needs. • Receive a free Pioneer newsletter Registered customers can opt in to...
...MULTI-CHANNEL RECEIVER VSX-816 Register your product at www.pioneerelectronics.com (US) www.pioneerelectronics.ca (Canada) • Protect your new investment The details of your purchase will be on file for reference in the event of an insurance claim such as loss or theft. • Receive free tips..., updates and service bulletins on your new product • Improve product development Your input helps us continue to design products that meet your needs. • Receive a free Pioneer newsletter Registered customers can opt in to...

Owner's Manual
Page 2
...CORD. Wash hands after removal. These limits are trademarks of Digital Theater Systems, Inc. Increase the separation between the equipment and receiver. - D8-10-2_En CAUTION: This product satisfies FCC regulations when shielded cables and connectors are trademarks of Dolby Laboratories. and Australia...user's right to provide reasonable protection against harmful interference in accordance with Canadian ICES-003. If the AC plug of this Pioneer product. THIS IS FOR YOUR SECURITY. For U.S. D2-4-4-1_EF WARNING: Handling the cord on this product or cords associated...
...CORD. Wash hands after removal. These limits are trademarks of Digital Theater Systems, Inc. Increase the separation between the equipment and receiver. - D8-10-2_En CAUTION: This product satisfies FCC regulations when shielded cables and connectors are trademarks of Dolby Laboratories. and Australia...user's right to provide reasonable protection against harmful interference in accordance with Canadian ICES-003. If the AC plug of this Pioneer product. THIS IS FOR YOUR SECURITY. For U.S. D2-4-4-1_EF WARNING: Handling the cord on this product or cords associated...
Owner's Manual
Page 4
...12 Digital audio cables 12 Video cables 12 Connecting a DVD player and TV 13 Connecting the multichannel analog outputs 14 Connecting a satellite receiver or other digital set-top box 14 Connecting other audio components 15 About the WMA9 Pro decoder 15 Connecting other video components 16 ... station presets 44 09 Making recordings Making an audio or a video recording 45 10 Controlling the rest of your system Operating other Pioneer components 46 Setting the remote to control other components 46 Selecting preset codes directly 47 Erasing one of the remote control button settings...
...12 Digital audio cables 12 Video cables 12 Connecting a DVD player and TV 13 Connecting the multichannel analog outputs 14 Connecting a satellite receiver or other digital set-top box 14 Connecting other audio components 15 About the WMA9 Pro decoder 15 Connecting other video components 16 ... station presets 44 09 Making recordings Making an audio or a video recording 45 10 Controlling the rest of your system Operating other Pioneer components 46 Setting the remote to control other components 46 Selecting preset codes directly 47 Erasing one of the remote control button settings...

Owner's Manual
Page 5
...system 54 Bi-amping your front speakers 55 Bi-wiring your speakers 55 Connecting additional amplifiers 56 Using this receiver with a Pioneer plasma display 56 Using the SR+ mode with a Pioneer plasma display 57 12 Other Settings The Input Assign menu 58 The Other Setup menu 59 Dynamic Range ...Control Setup 59 Dual Mono Setup 60 LFE Attenuator Setup 60 SR+ Setup for Pioneer plasma displays . . . 60 13 Additional information Troubleshooting 61 XM radio messages 63 Resetting the main unit 63 Switching the speaker impedance 63...
...system 54 Bi-amping your front speakers 55 Bi-wiring your speakers 55 Connecting additional amplifiers 56 Using this receiver with a Pioneer plasma display 56 Using the SR+ mode with a Pioneer plasma display 57 12 Other Settings The Input Assign menu 58 The Other Setup menu 59 Dynamic Range ...Control Setup 59 Dual Mono Setup 60 LFE Attenuator Setup 60 SR+ Setup for Pioneer plasma displays . . . 60 13 Additional information Troubleshooting 61 XM radio messages 63 Resetting the main unit 63 Switching the speaker impedance 63...

Owner's Manual
Page 6
...Dry cell batteries (AA size IEC R6) x2 • AM loop antenna • FM wire antenna • These operating instructions Loading the batteries Installing the receiver When installing this unit, make sure the openings are very dusty - This may distort) - in the battery case. • Batteries with the same shape ... - Ventilation When installing this unit, make sure to put it on a level and stable surface. 01 Before you start Chapter 1: Before you 've received the following places: - near a cassette deck (or close to a device that are never blocked or covered with the sound...
...Dry cell batteries (AA size IEC R6) x2 • AM loop antenna • FM wire antenna • These operating instructions Loading the batteries Installing the receiver When installing this unit, make sure the openings are very dusty - This may distort) - in the battery case. • Batteries with the same shape ... - Ventilation When installing this unit, make sure to put it on a level and stable surface. 01 Before you start Chapter 1: Before you 've received the following places: - near a cassette deck (or close to a device that are never blocked or covered with the sound...

Owner's Manual
Page 7
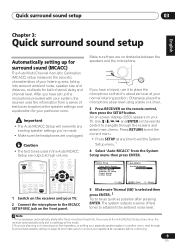
...page 28 if you 've set to confirm your system hooked up using a digital connection from a home theater system depends not only on the receiver, followed by your speakers and place them for optimal surround sound. Make sure that came with multichannel surround sound) are several other possibilities (like... of the action or concert. See Using the Quick Setup below for more on this . 4 Press QUICK SETUP on the remote to set the receiver to the DVD input.1 There are explained in the default settings. • Be sure to an AC power source. 1 Connect your speaker setup,...
...page 28 if you 've set to confirm your system hooked up using a digital connection from a home theater system depends not only on the receiver, followed by your speakers and place them for optimal surround sound. Make sure that came with multichannel surround sound) are several other possibilities (like... of the action or concert. See Using the Quick Setup below for more on this . 4 Press QUICK SETUP on the remote to set the receiver to the DVD input.1 There are explained in the default settings. • Be sure to an AC power source. 1 Connect your speaker setup,...

Owner's Manual
Page 8
...PHONES DIMMER ANALOG MIDNIGHT/ ATT LOUDNESS SPEAKERS TUNING / STATION TUNER EDIT TONE QUICK SETUP SETUP MULTI JOG AUDIO/VIDEO MULTI-CHANNEL RECEIVER VSX-816 ENTER MULTI JOG DIGITAL PRECISION PROCESSING AUX SIGNAL SB ch ACOUSTIC SELECT PROCESSING EQ MCACC SETUP MIC MASTER VOLUME DOWN UP 1 If the...and surround speakers • BACK - SW YES or SW NO confirms the subwoofer check, then the display prompts you have selected. The receiver automatically makes the necessary settings after you to select your speaker setup. 3 Use the MULTI JOG dial to choose your setup for more...
...PHONES DIMMER ANALOG MIDNIGHT/ ATT LOUDNESS SPEAKERS TUNING / STATION TUNER EDIT TONE QUICK SETUP SETUP MULTI JOG AUDIO/VIDEO MULTI-CHANNEL RECEIVER VSX-816 ENTER MULTI JOG DIGITAL PRECISION PROCESSING AUX SIGNAL SB ch ACOUSTIC SELECT PROCESSING EQ MCACC SETUP MIC MASTER VOLUME DOWN UP 1 If the...and surround speakers • BACK - SW YES or SW NO confirms the subwoofer check, then the display prompts you have selected. The receiver automatically makes the necessary settings after you to select your speaker setup. 3 Use the MULTI JOG dial to choose your setup for more...
Owner's Manual
Page 9
...SETUP ENTER MENU ST T.EDIT RETURN GUIDE CATEGORY TUNE TV CONTROL TV VOL INPUT SELECT TV CH VOL O /O REC O 1 Switch on the receiver and your TV. 2 Connect the microphone to the MCACC SETUP MIC jack on your normal listening position. System Setup 1.Surr Back System 2.Auto ... • Make sure the headphones are planning on bi-amping your front speakers, or setting up the microphone provided with your system, the receiver uses the information from the System Setup menu then press ENTER. Note 1 The screensaver automatically starts after pressing ENTER. Auto MCACC Surr Back...
...SETUP ENTER MENU ST T.EDIT RETURN GUIDE CATEGORY TUNE TV CONTROL TV VOL INPUT SELECT TV CH VOL O /O REC O 1 Switch on the receiver and your TV. 2 Connect the microphone to the MCACC SETUP MIC jack on your normal listening position. System Setup 1.Surr Back System 2.Auto ... • Make sure the headphones are planning on bi-amping your front speakers, or setting up the microphone provided with your system, the receiver uses the information from the System Setup menu then press ENTER. Note 1 The screensaver automatically starts after pressing ENTER. Auto MCACC Surr Back...
Owner's Manual
Page 10
...as possible while it's doing this ) • Speaker Distance - If you see page 42 for more test tones to determine the optimum receiver settings for more on and the volume is turned up with different size settings. The distance of your room, sometimes identical speakers with cone sizes.... 7 Wait for surround back). It may take 3-8 minutes. 10 The Auto MCACC Setup has finished! The MCACC indicator on -screen while the receiver outputs more on this is happening. This setting should give you excellent surround sound from your system, but it is also possible to adjust these...
...as possible while it's doing this ) • Speaker Distance - If you see page 42 for more test tones to determine the optimum receiver settings for more on and the volume is turned up with different size settings. The distance of your room, sometimes identical speakers with cone sizes.... 7 Wait for surround back). It may take 3-8 minutes. 10 The Auto MCACC Setup has finished! The MCACC indicator on -screen while the receiver outputs more on this is happening. This setting should give you excellent surround sound from your system, but it is also possible to adjust these...
Owner's Manual
Page 12
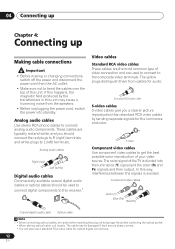
... off the power and disconnect the power cord from the AC outlet. • Make sure not to bend the cables over the top of this receiver.1 Video cables Standard RCA video cables These cables are the most common type of video connection and are used to connect to the composite video...
... off the power and disconnect the power cord from the AC outlet. • Make sure not to bend the cables over the top of this receiver.1 Video cables Standard RCA video cables These cables are the most common type of video connection and are used to connect to the composite video...

Owner's Manual
Page 13
...4 For better quality, you can also connect with S-video using the S-VIDEO DVD/LD jack. Use a coaxial digital audio cable for more on this receiver. When you set up 04 English Deutsch Français Italiano Nederlands Español Connecting a DVD player and TV This page shows you how... also connect with S-video using the S-VIDEO MONITOR OUT jack. Use an optical cable for how to connect it to the optical input on this receiver. Use a standard RCA video cable3 and a stereo RCA phono cable for the connection. • If your DVD player has multichannel analog outputs, ...
...4 For better quality, you can also connect with S-video using the S-VIDEO DVD/LD jack. Use a coaxial digital audio cable for more on this receiver. When you set up 04 English Deutsch Français Italiano Nederlands Español Connecting a DVD player and TV This page shows you how... also connect with S-video using the S-VIDEO MONITOR OUT jack. Use an optical cable for how to connect it to the optical input on this receiver. Use a standard RCA video cable3 and a stereo RCA phono cable for the connection. • If your DVD player has multichannel analog outputs, ...

Owner's Manual
Page 14
... AV OUT VIDEO STB Note 1 The multichannel input can only be used when DVD 5.1 ch is selected (see The Input Assign menu on this receiver.2 Use a stereo RCA phono cable for the audio connection and a standard RCA video cable for the video connection.3 2 Connect an optical digital audio ...output from your satellite/cable receiver doesn't have 5.1 channel analog outputs.In this case, you can connect the multichannel analog outputs to the multichannel inputs of this step. If...
... AV OUT VIDEO STB Note 1 The multichannel input can only be used when DVD 5.1 ch is selected (see The Input Assign menu on this receiver.2 Use a stereo RCA phono cable for the audio connection and a standard RCA video cable for the video connection.3 2 Connect an optical digital audio ...output from your satellite/cable receiver doesn't have 5.1 channel analog outputs.In this case, you can connect the multichannel analog outputs to the multichannel inputs of this step. If...
Owner's Manual
Page 15
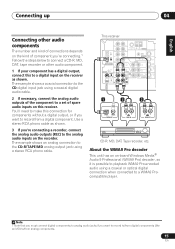
... below to connect a CD-R, MD, DAT, tape recorder or other audio component. 1 If your component has a digital output, connect this receiver. The example shows an analog connection to the CD-R/TAPE/MD analog output jack using a coaxial or optical digital connection when connected to a WMA9... connect digital components to analog audio jacks if you 're connecting a recorder, connect the analog audio outputs (REC) to /from a digital component. This receiver IN IN OPT 2 (TV/ SAT) IN OPT 1 (CD) OUT ASSIGNABLE DIGITAL IN IN ASSIGNABLE DIGITAL IN XM IN IN COAX 2 (DVR/VCR)...
... below to connect a CD-R, MD, DAT, tape recorder or other audio component. 1 If your component has a digital output, connect this receiver. The example shows an analog connection to the CD-R/TAPE/MD analog output jack using a coaxial or optical digital connection when connected to a WMA9... connect digital components to analog audio jacks if you 're connecting a recorder, connect the analog audio outputs (REC) to /from a digital component. This receiver IN IN OPT 2 (TV/ SAT) IN OPT 1 (CD) OUT ASSIGNABLE DIGITAL IN IN ASSIGNABLE DIGITAL IN XM IN IN COAX 2 (DVR/VCR)...
Owner's Manual
Page 16
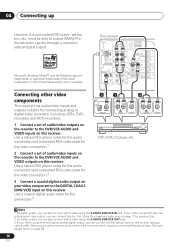
...standard RCA video cable for the video connection.2 3 Connect a coaxial digital audio output on your video component to the optical input on this receiver using the S-VIDEO DVR/VCR IN jack. See Using the component video jacks on page 17 for connecting analog or digital video recorders, ... OUT jack. 3 If your video component also has a component video output, you can connect it to the DIGITAL COAX 2 (DVR/VCR) input on this receiver. Use a stereo RCA phono cable for the audio connection and a standard RCA video cable for the connection.3 3 1 2 OPTICAL COAXIAL DIGITAL OUT R IN...
...standard RCA video cable for the video connection.2 3 Connect a coaxial digital audio output on your video component to the optical input on this receiver using the S-VIDEO DVR/VCR IN jack. See Using the component video jacks on page 17 for connecting analog or digital video recorders, ... OUT jack. 3 If your video component also has a component video output, you can connect it to the DIGITAL COAX 2 (DVR/VCR) input on this receiver. Use a stereo RCA phono cable for the audio connection and a standard RCA video cable for the connection.3 3 1 2 OPTICAL COAXIAL DIGITAL OUT R IN...

Owner's Manual
Page 17
... video terminal Front video connections are compatible with your TV and source component to the component video inputs on your source to composite video. This receiver DIGITAL PRECISION PROCESSING CD CD-R / TAPE / MD FM AM XM AUX S -VIDEO VIDEO INPUT VIDEO L AUDIO R DIGITAL IN MCACC SETUP MIC V L R ...same way you didn't connect according to the following defaults: • COMP 1 - Important • If you connect any source component to the receiver using the VIDEO button. DVD • COMP 2 - This only needs to be done if you made the rear panel connections.
... video terminal Front video connections are compatible with your TV and source component to the component video inputs on your source to composite video. This receiver DIGITAL PRECISION PROCESSING CD CD-R / TAPE / MD FM AM XM AUX S -VIDEO VIDEO INPUT VIDEO L AUDIO R DIGITAL IN MCACC SETUP MIC V L R ...same way you didn't connect according to the following defaults: • COMP 1 - Important • If you connect any source component to the receiver using the VIDEO button. DVD • COMP 2 - This only needs to be done if you made the rear panel connections.

Owner's Manual
Page 19
...connect the speakers you plan to use speakers with just two stereo speakers (the front speakers in the manner shown below.1 The receiver will vary. English Deutsch Français Italiano Nederlands Español Connecting up 04 Connecting the speakers A complete setup of less.../LD) IN 1 PB PR FRONT L SURROUND SURROUND BACK L L PREOUT MONITOR OUT LR SURROUND (TV/SAT)IN 2 R R L CENTER R SURROUND BACK L R CENTER B This receiver Powered subwoofer SW INPUT AC OUTLET Caution • Make sure that all the bare speaker wire is best. Make sure you are using at least...
...connect the speakers you plan to use speakers with just two stereo speakers (the front speakers in the manner shown below.1 The receiver will vary. English Deutsch Français Italiano Nederlands Español Connecting up 04 Connecting the speakers A complete setup of less.../LD) IN 1 PB PR FRONT L SURROUND SURROUND BACK L L PREOUT MONITOR OUT LR SURROUND (TV/SAT)IN 2 R R L CENTER R SURROUND BACK L R CENTER B This receiver Powered subwoofer SW INPUT AC OUTLET Caution • Make sure that all the bare speaker wire is best. Make sure you are using at least...

Owner's Manual
Page 20
... speakers don't face each wire, with about 3/8 in. (10 mm) of the picture when the TV is touching the rear panel, this may cause the receiver to reduce the risk of damage or injury resulting from the speaker falling from walls. C 10mm • The speaker terminals also accept single banana plugs...
... speakers don't face each wire, with about 3/8 in. (10 mm) of the picture when the TV is touching the rear panel, this may cause the receiver to reduce the risk of damage or injury resulting from the speaker falling from walls. C 10mm • The speaker terminals also accept single banana plugs...

Owner's Manual
Page 21
...SBR fig. Total electrical power consumption of connected equipment should not exceed 100 W (0.8 A). • This unit should not be disconnected by the receiver's power switch. The second (fig. Front left Center Front right Surround left Surround back right Single surround back speaker . The diagrams below show... suggested surround and surround back speaker orientation. The first diagram (fig. This can also cause the receiver to malfunction. • Since a subwoofer or power amplifier can also refer to the 3-D speaker setup illustration on vacation).
...SBR fig. Total electrical power consumption of connected equipment should not exceed 100 W (0.8 A). • This unit should not be disconnected by the receiver's power switch. The second (fig. Front left Center Front right Surround left Surround back right Single surround back speaker . The diagrams below show... suggested surround and surround back speaker orientation. The first diagram (fig. This can also cause the receiver to malfunction. • Since a subwoofer or power amplifier can also refer to the 3-D speaker setup illustration on vacation).

Owner's Manual
Page 22
... displays Chapter 5: Controls and displays Front panel ADVANCED ST/DIRECT/ STANDARD SURR AUTO SURR LISTENING MODE STANDBY/ON PHONES 1 2 34 56 AUDIO/VIDEO MULTI-CHANNEL RECEIVER VSX-816 ENTER MULTI JOG DIGITAL PRECISION PROCESSING DVD / LD TV/ SAT DVR/ VCR VIDEO CD CD-R / TAPE / MD FM AM XM AUX SIGNAL SB ch ACOUSTIC...
... displays Chapter 5: Controls and displays Front panel ADVANCED ST/DIRECT/ STANDARD SURR AUTO SURR LISTENING MODE STANDBY/ON PHONES 1 2 34 56 AUDIO/VIDEO MULTI-CHANNEL RECEIVER VSX-816 ENTER MULTI JOG DIGITAL PRECISION PROCESSING DVD / LD TV/ SAT DVR/ VCR VIDEO CD CD-R / TAPE / MD FM AM XM AUX SIGNAL SB ch ACOUSTIC...
Owner's Manual
Page 23
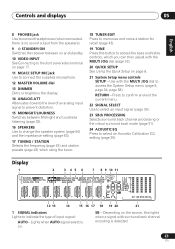
... Italiano Nederlands Español 8 PHONES jack Use to connect headphones (when connected, there is no sound output from the speakers). 9 STANDBY/ON Switches the receiver between on and standby. 10 VIDEO INPUT See Connecting to the front panel video terminal on page 17. 11 MCACC SETUP MIC jack Use to...
... Italiano Nederlands Español 8 PHONES jack Use to connect headphones (when connected, there is no sound output from the speakers). 9 STANDBY/ON Switches the receiver between on and standby. 10 VIDEO INPUT See Connecting to the front panel video terminal on page 17. 11 MCACC SETUP MIC jack Use to...


