Owner's Manual
Page 5
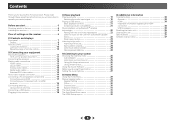
... station presets 24 Listening to station presets 24 Naming preset stations 24 04 Listening to operate your system Choosing the listening mode 25 Auto playback 25 Listening in surround sound 25 Using the Advanced surround 26 Using Stream Direct 26 Using the Sound Retriever 26 Better sound using Phase Control 26 Setting the Audio options 27 05 Home Menu Using the Home Menu 29 Manual speaker setup 29 Speaker Setting 29 X.Over 30 Channel Level 30 Speaker Distance 31 The Input Assign menu 31 The Auto Power Down menu 31 The HDMI Setup menu...
... station presets 24 Listening to station presets 24 Naming preset stations 24 04 Listening to operate your system Choosing the listening mode 25 Auto playback 25 Listening in surround sound 25 Using the Advanced surround 26 Using Stream Direct 26 Using the Sound Retriever 26 Better sound using Phase Control 26 Setting the Audio options 27 05 Home Menu Using the Home Menu 29 Manual speaker setup 29 Speaker Setting 29 X.Over 30 Channel Level 30 Speaker Distance 31 The Input Assign menu 31 The Auto Power Down menu 31 The HDMI Setup menu...
Owner's Manual
Page 6
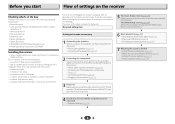
... Flow of settings on the sound. • Placing the speakers (page 11) • Connecting the speakers (page 12) 2 Connecting the components For surround sound, you'll want to hook up using a digital connection from the Blu-ray Disc/DVD player to be used easily after following : Required setting item Setting to the receiver. • About video outputs connection (page 14) • Connecting a TV and playback components (page 15) • Connecting antennas (page 17) • Plugging in places...
... Flow of settings on the sound. • Placing the speakers (page 11) • Connecting the speakers (page 12) 2 Connecting the components For surround sound, you'll want to hook up using a digital connection from the Blu-ray Disc/DVD player to be used easily after following : Required setting item Setting to the receiver. • About video outputs connection (page 14) • Connecting a TV and playback components (page 15) • Connecting antennas (page 17) • Plugging in places...

Owner's Manual
Page 7
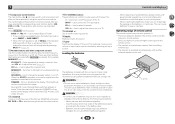
... Mode 2. Used to select preset radio stations (page 24). 5 HDMI indicator Blinks when connecting an HDMI-equipped component; The listening mode when the sound is heard from the speakers. Press for recall (page 23). Switches between the various surround modes (page 26). 11 ECO Switches between the modes of remote control on page 8. 4 Tuner control buttons BAND - When the headphones are connected, there is output from the remote control (see Operating range of Pro Logic and NEO:6, and the Auto level control stereo mode (page 25). TUNER...
... Mode 2. Used to select preset radio stations (page 24). 5 HDMI indicator Blinks when connecting an HDMI-equipped component; The listening mode when the sound is heard from the speakers. Press for recall (page 23). Switches between the various surround modes (page 26). 11 ECO Switches between the modes of remote control on page 8. 4 Tuner control buttons BAND - When the headphones are connected, there is output from the remote control (see Operating range of Pro Logic and NEO:6, and the Auto level control stereo mode (page 25). TUNER...

Owner's Manual
Page 8
Lights when a normal broadcast channel. When one of the tuner or the input signal type, etc. 20 Character display Displays various system information. 21 DTS indicators DTS - Lights when one of the NEO:6 modes of the receiver is detected. Blinks when a digital audio signal is selected and selected audio input is switched on (page 26). 8 Lights when the DIRECT or PURE DIRECT mode is not provided. kHz/MHz - Lights when a source with DTS 96/24 encoded audio signals is in auto stereo mode (page...
Lights when a normal broadcast channel. When one of the tuner or the input signal type, etc. 20 Character display Displays various system information. 21 DTS indicators DTS - Lights when one of the NEO:6 modes of the receiver is detected. Blinks when a digital audio signal is selected and selected audio input is switched on (page 26). 8 Lights when the DIRECT or PURE DIRECT mode is not provided. kHz/MHz - Lights when a source with DTS 96/24 encoded audio signals is in auto stereo mode (page...

Owner's Manual
Page 9
...screen. 5 Input function buttons RETURN - Use to select the input source (page 19). Displays the disc 'top' menu of the component to play BAND - Displays the TOOLS menu of time before the receiver selected the corresponding input function button (BD, DVD, 14 switches into standby (30 min - 60 min - 90 min - Also used to select the white commands above the number buttons (MIDNIGHT, etc)). The settings cannot be used to find radio frequencies and PRESET / can be used to select preset radio stations AUTO/DIRECT - HOME MENU - Press to select stereo...
...screen. 5 Input function buttons RETURN - Use to select the input source (page 19). Displays the disc 'top' menu of the component to play BAND - Displays the TOOLS menu of time before the receiver selected the corresponding input function button (BD, DVD, 14 switches into standby (30 min - 60 min - 90 min - Also used to select the white commands above the number buttons (MIDNIGHT, etc)). The settings cannot be used to find radio frequencies and PRESET / can be used to select preset radio stations AUTO/DIRECT - HOME MENU - Press to select stereo...
Owner's Manual
Page 10
... BD, DVD or CD is selected using the input function buttons. When inserting the batteries, make sure not to damage the springs on or off the power of the TV. Switches to adjust the level (page 30). When the SP OFF is selected, no sound is output from the speakers connected to this unit. During ECO mode, the brightness switches between the remote control and the receiver's remote sensor. • Direct sunlight...
... BD, DVD or CD is selected using the input function buttons. When inserting the batteries, make sure not to damage the springs on or off the power of the TV. Switches to adjust the level (page 30). When the SP OFF is selected, no sound is output from the speakers connected to this unit. During ECO mode, the brightness switches between the remote control and the receiver's remote sensor. • Direct sunlight...
Owner's Manual
Page 13
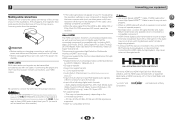
...) and set the input signal in Selecting the audio input signal on page 19 to HDMI, if you want to hear HDMI audio output from your TV (no sound will be heard from the HDMI is 480i, 480p, 576i or 576p, Multi Ch PCM sound and HD sound cannot be transmitted simultaneously with , including DVDVideo, DVD-Audio, SACD, Dolby Digital Plus, Dolby TrueHD, DTS-HD Master Audio (see The HDMI Setup menu on your component or display. This receiver incorporates High...
...) and set the input signal in Selecting the audio input signal on page 19 to HDMI, if you want to hear HDMI audio output from your TV (no sound will be heard from the HDMI is 480i, 480p, 576i or 576p, Multi Ch PCM sound and HD sound cannot be transmitted simultaneously with , including DVDVideo, DVD-Audio, SACD, Dolby Digital Plus, Dolby TrueHD, DTS-HD Master Audio (see The HDMI Setup menu on your component or display. This receiver incorporates High...

Owner's Manual
Page 16
... operations and making settings. Important • When the receiver and TV are connected by composite cable, the OSD function allowing display of a TV and DVD player (or other devices, please use a different method to connect the audio. VIDEO OUT DVD player Select one ANALOG AUDIO OUT DIGITAL AUDIO OUT R L OPTICAL COAXIAL VIDEO OUT Set-top box Select one 16 OSD cannot be used. If connecting other playback component) with no HDMI terminal to the receiver. In this receiver using a coaxial cable, first, switch to the DVD (DVD player...
... operations and making settings. Important • When the receiver and TV are connected by composite cable, the OSD function allowing display of a TV and DVD player (or other devices, please use a different method to connect the audio. VIDEO OUT DVD player Select one ANALOG AUDIO OUT DIGITAL AUDIO OUT R L OPTICAL COAXIAL VIDEO OUT Set-top box Select one 16 OSD cannot be used. If connecting other playback component) with no HDMI terminal to the receiver. In this receiver using a coaxial cable, first, switch to the DVD (DVD player...

Owner's Manual
Page 19
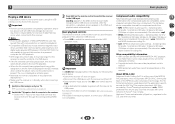
... digital audio output settings on your TV, not from the speakers connected to A (analog). • You may get digital 2 channel stereo and analog sound. Chapter 3 Basic playback Playing a source Here are the basic instructions for playing a source (such as a DVD disc) with your home theater system. 1 Switch on your DVD player or digital satellite receiver. The coaxial 1 input is selected for C1, and the optical 1 audio input is now selected. 3 Press input function buttons to the VIDEO jacks on the playback component (for O1. Selects an HDMI signal. For example, if you connected...
... digital audio output settings on your TV, not from the speakers connected to A (analog). • You may get digital 2 channel stereo and analog sound. Chapter 3 Basic playback Playing a source Here are the basic instructions for playing a source (such as a DVD disc) with your home theater system. 1 Switch on your DVD player or digital satellite receiver. The coaxial 1 input is selected for C1, and the optical 1 audio input is now selected. 3 Press input function buttons to the VIDEO jacks on the playback component (for O1. Selects an HDMI signal. For example, if you connected...
Owner's Manual
Page 21
... title assigned to it is likely your TV. WMA9 Pro and WMA lossless encoding: No • AAC (MPEG-4 Advanced Audio Coding) - The file format and extension used depend on this receiver. • DRM-protected audio files cannot be used to 320 kbps (128 kbps or higher recommended); Basic playback controls This receiver's remote control buttons can be played back on the application used for the receiver to...
... title assigned to it is likely your TV. WMA9 Pro and WMA lossless encoding: No • AAC (MPEG-4 Advanced Audio Coding) - The file format and extension used depend on this receiver. • DRM-protected audio files cannot be used to 320 kbps (128 kbps or higher recommended); Basic playback controls This receiver's remote control buttons can be played back on the application used for the receiver to...
Owner's Manual
Page 25
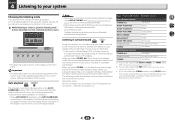
.... Sound Retriever AIR: Suitable for stereo and multichannel sources. When you can choose the STEREO mode by using NEO:6 CINEMA (see Setting the Audio options on your speaker setup and the type of surround modes Suitable sources Two channel sources STEREO ALC DOLBY PLII MOVIE DOLBY PLII MUSICa DOLBY PLII GAME NEO:6 CINEMAb NEO:6 MUSICb DOLBY PRO LOGIC Straight Decode STEREOc Multichannel sources See above . Choose one according to your surround settings and you select STEREO ALC (Auto Level Control stereo mode...
.... Sound Retriever AIR: Suitable for stereo and multichannel sources. When you can choose the STEREO mode by using NEO:6 CINEMA (see Setting the Audio options on your speaker setup and the type of surround modes Suitable sources Two channel sources STEREO ALC DOLBY PLII MOVIE DOLBY PLII MUSICa DOLBY PLII GAME NEO:6 CINEMAb NEO:6 MUSICb DOLBY PRO LOGIC Straight Decode STEREOc Multichannel sources See above . Choose one according to your surround settings and you select STEREO ALC (Auto Level Control stereo mode...

Owner's Manual
Page 26
....STEREO Gives multichannel sound to maximize the effect. DIRECT Sources are 'in phase', they crest and trough together, resulting in increased amplitude, clarity and presence of channels in the following cases: - Phase Control, Sound Delay, Auto Delay, LFE Attenuate and Center image functions are connected. 26 The default setting is switched on page 25. If this receiver depends on the display. (Mode other listening modes (Advanced surround mode and Auto surround mode). ACTION Designed for sports programs...
....STEREO Gives multichannel sound to maximize the effect. DIRECT Sources are 'in phase', they crest and trough together, resulting in increased amplitude, clarity and presence of channels in the following cases: - Phase Control, Sound Delay, Auto Delay, LFE Attenuate and Center image functions are connected. 26 The default setting is switched on page 25. If this receiver depends on the display. (Mode other listening modes (Advanced surround mode and Auto surround mode). ACTION Designed for sports programs...

Owner's Manual
Page 27
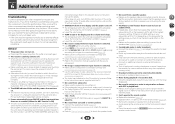
... necessary to prevent the ultralow bass tones from distorting the sound from music sources at low volumes. The Sound Retriever feature employs new DSP technology that if a setting doesn't appear in bold. Setting/What it does Option(s) LFE ATT (LFE Attenuate) Some Dolby Digital and DTS audio sources include ultra-low bass tones. The LOUDNESS is a problem. Please select another input signal if this feature when listening to surround sound at low volumes). DRC (Dynamic Range Control) Adjusts the level of sync with an HDMI cable.
... necessary to prevent the ultralow bass tones from distorting the sound from music sources at low volumes. The Sound Retriever feature employs new DSP technology that if a setting doesn't appear in bold. Setting/What it does Option(s) LFE ATT (LFE Attenuate) Some Dolby Digital and DTS audio sources include ultra-low bass tones. The LOUDNESS is a problem. Please select another input signal if this feature when listening to surround sound at low volumes). DRC (Dynamic Range Control) Adjusts the level of sync with an HDMI cable.
Owner's Manual
Page 29
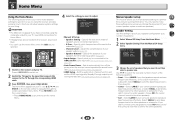
... screens and select menu items. Press RETURN to exit the current menu. • Press HOME MENU at any time to exit the Home Menu. 4 Select the setting you didn't connect surround speakers choose NO (the sound of speakers you 've connected to specify your liking. Speaker Setting - Set the audio return channel function and set of the following section shows you how to make detailed settings to the other speakers). 29 Home Menu 1.Manual SP Setup 2.Input Assign 3.Auto Power Down 4.HDMI Setup Return • Manual SP Setup - Use...
... screens and select menu items. Press RETURN to exit the current menu. • Press HOME MENU at any time to exit the Home Menu. 4 Select the setting you didn't connect surround speakers choose NO (the sound of speakers you 've connected to specify your liking. Speaker Setting - Set the audio return channel function and set of the following section shows you how to make detailed settings to the other speakers). 29 Home Menu 1.Manual SP Setup 2.Input Assign 3.Auto Power Down 4.HDMI Setup Return • Manual SP Setup - Use...

Owner's Manual
Page 30
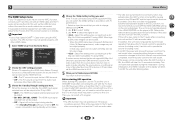
... Home Menu. 2 Select 'X.Over' from the Manual SP Setup menu. 1.Manual SP Setup a.Speaker Setting b.X.Over c.Channel Level d.Speaker Distance 1b.X.Over Frequency 100Hz Return Return 3 Choose the frequency cutoff point. X.Over • Default setting: 100Hz This setting decides the cutoff between bass sounds playing back from the speakers selected as LARGE, or the subwoofer, and bass sounds playing back from speaker to select LARGE for the front speakers, the subwoofer will output test tones in the LFE channel. • For more on selecting the speaker sizes, see Speaker Setting...
... Home Menu. 2 Select 'X.Over' from the Manual SP Setup menu. 1.Manual SP Setup a.Speaker Setting b.X.Over c.Channel Level d.Speaker Distance 1b.X.Over Frequency 100Hz Return Return 3 Choose the frequency cutoff point. X.Over • Default setting: 100Hz This setting decides the cutoff between bass sounds playing back from the speakers selected as LARGE, or the subwoofer, and bass sounds playing back from speaker to select LARGE for the front speakers, the subwoofer will output test tones in the LFE channel. • For more on selecting the speaker sizes, see Speaker Setting...

Owner's Manual
Page 31
... are using /. You can change the channel levels at low volumes. The Input Assign menu ANALOG IN1 audio input terminal is turned off the receiver after testing with no automatic shutoff is output at any time by press RECEIVER , then press CH SELECT and LEV +/- Home Menu 1.Manual SP Setup 2.Input Assign 3.Auto Power Down 4.HDMI Setup 3.Auto Power Down Auto Power Down OFF 5 7 33 Return Return 2 Specify the amount of each speaker as the test tone is emitted. You return to the Manual SP Setup menu...
... are using /. You can change the channel levels at low volumes. The Input Assign menu ANALOG IN1 audio input terminal is turned off the receiver after testing with no automatic shutoff is output at any time by press RECEIVER , then press CH SELECT and LEV +/- Home Menu 1.Manual SP Setup 2.Input Assign 3.Auto Power Down 4.HDMI Setup 3.Auto Power Down Auto Power Down OFF 5 7 33 Return Return 2 Specify the amount of each speaker as the test tone is emitted. You return to the Manual SP Setup menu...
Owner's Manual
Page 32
... 4:2:0 24 bit video image. • 4:2:0 - 5 Home Menu The HDMI Setup menu If your TV supports an audio return channel (ARC) function, connect your TV and this unit with an HDMI cable and the TV audio will be inputted into the wall socket. • If the power cord is connected when the ARC function is turned ON, causing power to turn red, no audio may be output by the source device, or a 3D signal may not operate even if...
... 4:2:0 24 bit video image. • 4:2:0 - 5 Home Menu The HDMI Setup menu If your TV supports an audio return channel (ARC) function, connect your TV and this unit with an HDMI cable and the TV audio will be inputted into the wall socket. • If the power cord is connected when the ARC function is turned ON, causing power to turn red, no audio may be output by the source device, or a 3D signal may not operate even if...
Owner's Manual
Page 33
... speaker settings to Front: SMALL / Subwoofer: YES, or Front: LARGE / Subwoofer: PLUS (page 29). The HDMI indicator blinks and the power does not turn OFF the HDMI CONTROL setting on . If the trouble isn't sorted out even after connecting this unit does not guarantee synchronized operation based on the CEC function, turn on the front panel to direct light. Press the remote control's RECEIVER button and switch to the instruction manual supplied with the DVD player...
... speaker settings to Front: SMALL / Subwoofer: YES, or Front: LARGE / Subwoofer: PLUS (page 29). The HDMI indicator blinks and the power does not turn OFF the HDMI CONTROL setting on . If the trouble isn't sorted out even after connecting this unit does not guarantee synchronized operation based on the CEC function, turn on the front panel to direct light. Press the remote control's RECEIVER button and switch to the instruction manual supplied with the DVD player...
Owner's Manual
Page 34
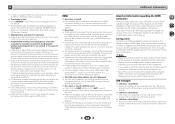
... Color feature. The OSD screen (Home Menu, etc.) isn't displayed. The OSD will not output from the connected display unit (for example audio output is reduced to 2 channels for HDMI compatibility information). If such an object is near the receiver. Or, stop using the HDMI connection, you must adjust the volume on the display every time you switch input sources. 5 7 33 USB messages 'USB Error 1 (I /U ERR3)' When there is...
... Color feature. The OSD screen (Home Menu, etc.) isn't displayed. The OSD will not output from the connected display unit (for example audio output is reduced to 2 channels for HDMI compatibility information). If such an object is near the receiver. Or, stop using the HDMI connection, you must adjust the volume on the display every time you switch input sources. 5 7 33 USB messages 'USB Error 1 (I /U ERR3)' When there is...

Owner's Manual
Page 35
... on Power Output Claims for Amplifiers ** Measured by Audio Spectrum Analyzer Audio Section Input (Sensitivity/Impedance) LINE 200 mV/47 k Signal-to-Noise Ratio (IHF, short circuited, A network) LINE 98 dB Signal-to-Noise Ratio [EIA, at 1 W (1 kHz)] LINE 79 dB Video Section Signal level Composite 1 Vp-p (75 ) Tuner Section Frequency Range (FM 87.5 MHz to 108 MHz Antenna Input (FM 75 unbalanced Frequency Range (AM 530...
... on Power Output Claims for Amplifiers ** Measured by Audio Spectrum Analyzer Audio Section Input (Sensitivity/Impedance) LINE 200 mV/47 k Signal-to-Noise Ratio (IHF, short circuited, A network) LINE 98 dB Signal-to-Noise Ratio [EIA, at 1 W (1 kHz)] LINE 79 dB Video Section Signal level Composite 1 Vp-p (75 ) Tuner Section Frequency Range (FM 87.5 MHz to 108 MHz Antenna Input (FM 75 unbalanced Frequency Range (AM 530...


